I was installing 5-1/2-in.-tall baseboard in an older house. I did everything by the book: I made sample pieces to test the coped joints in the inside corners, I knocked down high spots in the wall, and I built up low spots with shims.
In one corner, the test pieces seemed to fit perfectly, so I nailed off the first piece. When I installed the second piece, I was surprised that the joint was open at the bottom. I looked around and saw that the floor had a large dip in it. That dip had made my test piece slope upward, while the actual piece bridged the dip. I had unknowingly built out my wall at an angle perpendicular to the slope of the floor.
The first lesson I learned is not to trust a short test block. But how was I going to adjust the piece that I had already nailed off?
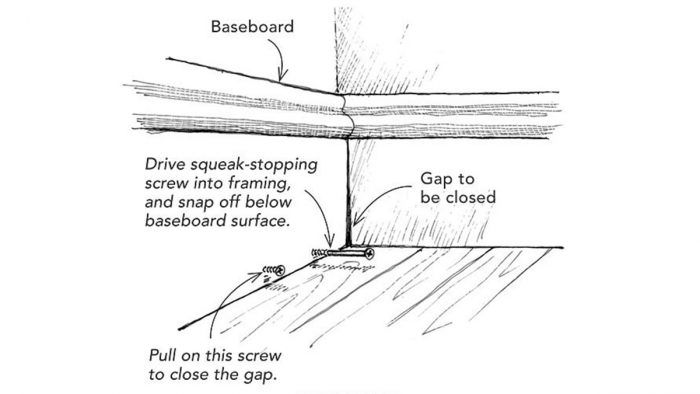
I chose to drill two pilot holes in the base where they would be covered by the shoe molding. I drove a drywall screw into one of the holes, being careful not to run it into the wall framing, and left its head sticking out. I hooked a hammer onto the screw head and used it to pry out the bottom of the base until it closed the gap. Maintaining pressure on the screw, I drove a Squeeeeek No More flooring screw (123itsdone.com) through the second pilot hole and into the wall framing. I drove it far enough so that the scored section of the screw was just under the face of the wood, then I broke off the head. Gap closed.
David Hornemann, Mount Horeb, Wis.
Edited and Illustrated by Charles Miller
From Fine Homebuilding #220
