FHB Logo Facebook LinkedIn Email Pinterest Twitter X Instagram Tiktok YouTube Plus Icon Close Icon Navigation Search Icon Navigation Search Icon Arrow Down Icon Video Guide Icon Article Guide Icon Modal Close Icon Guide Search Icon Skip to content
Subscribe
Log In
  • How-To
  • Design
  • Tools & Materials
  • Restoration
  • Videos
  • Blogs
  • Forum
  • Magazine
  • Members
  • FHB House
  • Podcast
Log In

Fine Homebuilding Project Guides

Decks

Guide Home
  • Design & Planning
  • Tools & Materials
  • Footings & Foundations
  • Framing a Deck
  • Installing Decking
  • Installing Railings
  • Deck Stairs
  • Custom Details
  • Finishes, Repairs, and Maintenance
  • Complete Deck Builds
How-To

Site-Built Deck Drainage

Mike Guertin demonstrates his methods for draping EPDM roofing membrane over joists before installing decking to create an affordable system for keeping the space under a deck dry.

By Mike Guertin Issue 220
  • X
  • facebook
  • linkedin
  • pinterest
  • email
  • add to favorites Log in or Sign up to save your favorite articles

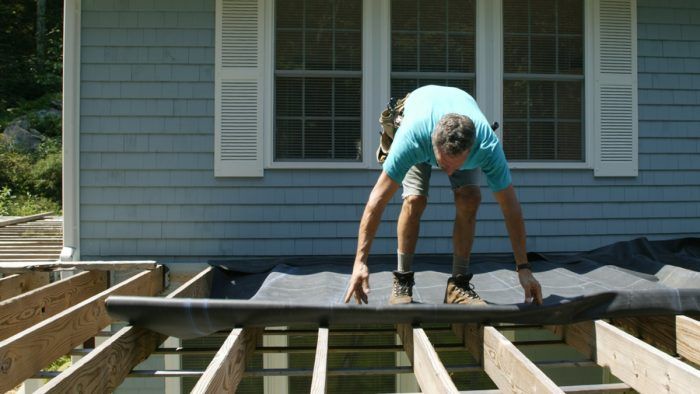
When I build a deck with more than 4 ft. of space between the framing and the grade, I install an underdeck-drainage system. Consisting of a membrane installed under the decking, the system collects and channels water into a perimeter gutter system and away from the building. The area beneath the deck is kept dry and can be used for storage or, with enough headroom, a covered patio.

Several commercial underdeck-drainage systems are available for installation during deck construction or as a retrofit. I prefer to fabricate my own system from EPDM rubber-roof material and an aluminum gutter. It’s relatively fast and easy to install before the decking is laid, and this method costs less than commercial systems.

EPDM (ethylene propylene diene monomer) rubber is a roofing material used on flat and low-slope roofs. It’s available from roofing-supply houses in two standard thicknesses, 0.045 in. and 0.060 in., and in 10-ft.- or 20-ft.-wide rolls 50 ft. to 100 ft. in length. I usually use the thicker material, thinner grade works fine for this application. When working alone, I find 10-ft.-wide rolls easier to handle.

I figure that it costs about $1 per sq. ft. in material for 0.060-in. EPDM, gutter, and accessories. The slightly thinner 0.045-in. EPDM costs 90¢ per sq. ft. For a finished ceiling under the deck with vinyl soffit material and accessories, add $1 per sq. ft.

estimate the amount of membrane needed for the deck drainage system
Photo: Mike Guertin

Before the layout, gauge the droop. The easiest way to estimate the amount of membrane needed is to make a gauge from a piece of rope or a strip of EPDM. Hold the piece across a joist bay, and slide one end inward until you reach the target droop in the middle. Mark the gauge at the center of the joists and measure. To estimate the material at the shallow end, repeat the process at the opposite end of the joist bay.

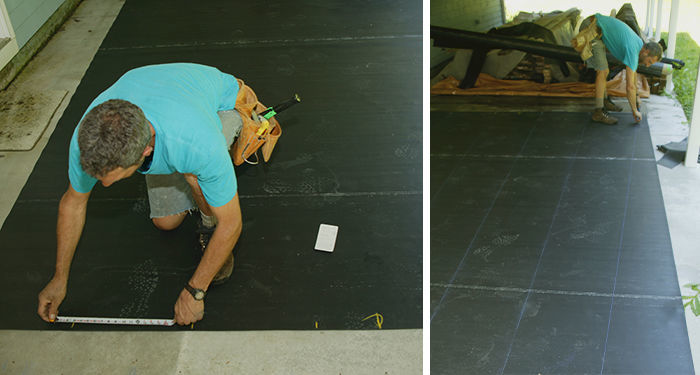
Chalklines make layout easy. Because of the graduated swale of the membrane between the joists, each piece of membrane must be fan-shaped. Start by finding the center of the sheet at each end; this locates the center joist in the series. Step off the head measurement along one end of the sheet on each side of the center mark and again along the gutter end. (If you’re marking out more than two or three pieces of membrane with the same joist spacing and membrane droop, make story poles for each end of the sheets.) Snap chalklines between the marks at the head and foot of the sheet. Trim off the excess membrane along the edges, leaving about 3 in. beyond the last joist line. The EPDM strips can be saved and used as sleeper cushions for decks over flat roofs.

measure and mark chalklines on the EPDM

Start with a plan to drain the water

Working backward, it’s best to figure out where the water will go before engineering the membrane. A standard aluminum gutter is a cost-effective, simple solution. On this project, I located the gutter along the outer perimeter, beneath the joists. I design decks with an integral rim beam made of double 2x12s with the floor joists (typically 2×8) flush with the beam top. This leaves enough of the beam hanging below the joists to hide all or part of the gutter. Alternatively, an extra-wide trim board that conceals the bottom edge of the rim board will also hide the gutter on decks that have a flush rim beam or cantilever over a beam.

Before launching into a project, it’s a good idea to identify the type of decking that will be used. Some plastic and composite decking brands require a minimum ventilation area beneath the boards. Check with the manufacturer’s requirements when selecting decking to see if underdeck-drainage systems are permitted.

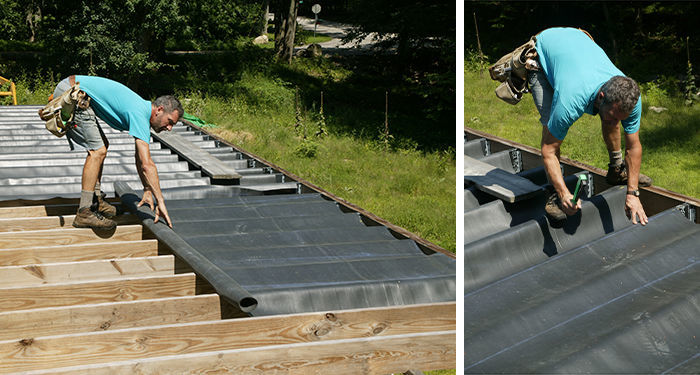
Roll out and staple. Align the centerline of the sheet with the center joist of the area it covers. Let about an inch of the sheet run up the wall. Staple the sheet every 12 in. along the joist with hammer-tacker staples. The staples need to hold the sheet only temporarily until the decking goes down. Leave the last foot of the sheet at the gutter end loose for trimming later. Shift the sheet sideways to align the next chalkline with the center of the adjacent joist, and staple it down. Continue until you reach the last joist on both sides.

roll out and staple the EPDM for the deck drainge system

Determine the slope of the membrane

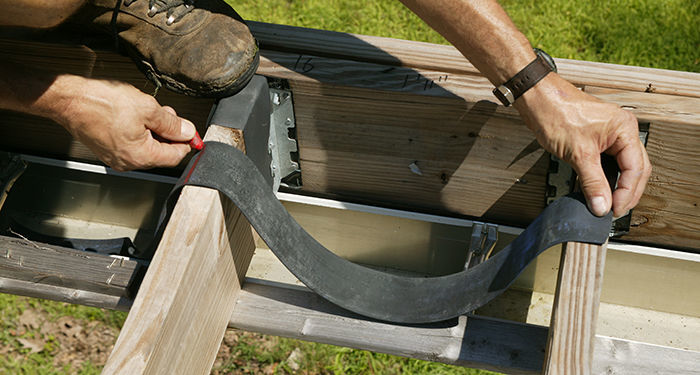
To drain the water toward the gutter, I create a graduated swale in the membrane between the joists that drains the water into the gutter. The swale is tighter at the house, about 1 in. to 11⁄2 in. of droop at the head of the joist bays and a droop 1⁄2 in. shy of the full joist depth at the gutter end.

The trick here is an accurate layout of the membrane. Because of the graduated swale between joists, each piece of membrane must be cut into a fan shape. To account for the distortion created by the swale, I add an extra 8 in. to the length of the membrane for decks built of 2×6 and 2×8 joists and 12 in. for decks framed with 2×10 and 2×12 joists. Each 10-ft.-wide sheet will span four 16-in.-oncenter bays and cross five joists.

Clean it up. Trim off the excess membrane along the last joist, the gutter, and the house.

Trim off the excess membrane along the last joist, the gutter, and the house.

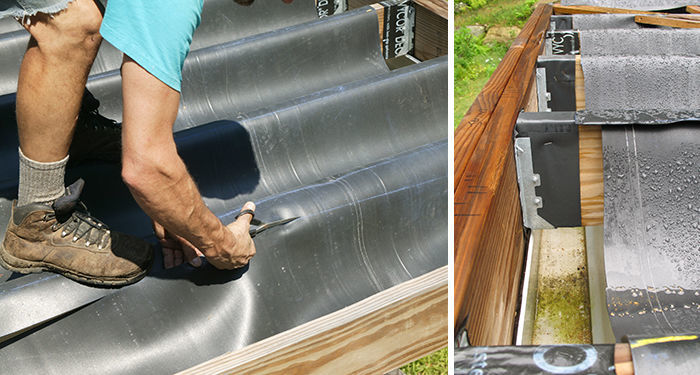
Leave about 1 in. of overlap into the gutter and over the siding, respectively.

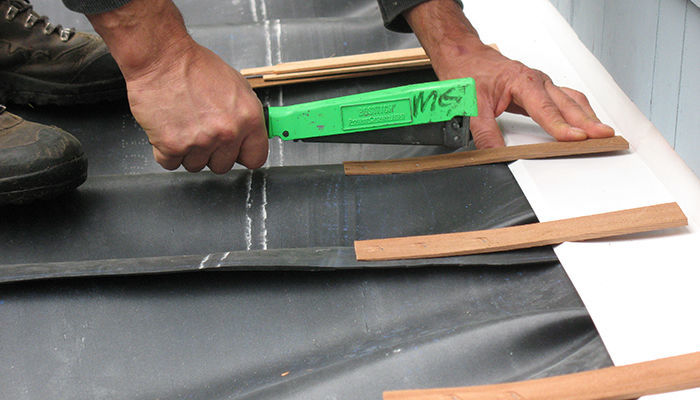
Flash at the house. Lap siding makes flashing the underdeck-drainage system easy. Bend a piece of metal or vinyl flashing to slip under a butt joint and over the membrane by several inches. When it’s time to install the decking, first lay strips of cedar shingles on top of each joist to create a drainage space over the flashing. Any water collected by the flashing can then drain onto the membrane instead of being trapped between the decking and the flashing.

When it’s time to install the decking, first lay strips of cedar shingles on top of each joist to create a drainage space over the flashing.
Photo: Mike Guertin

A long life span still requires maintenance

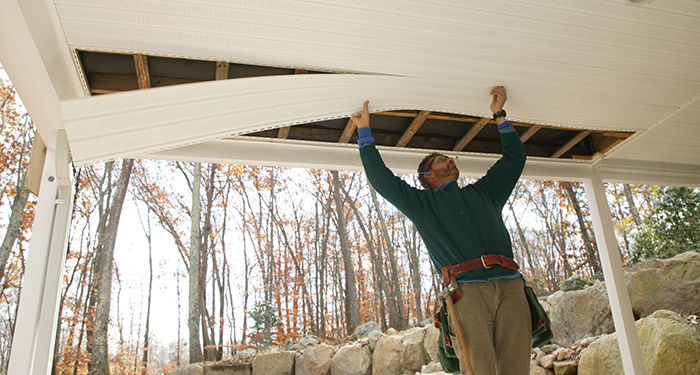
A ceiling is better than bare joists. Finish the underside of the deck when the area will be used as outdoor-living space. The beam and gutter get wrapped first with aluminum or vinyl coil stock for a clean look. The joists are covered with vinyl soffit stapled into place. Tongue-and- groove boards or plywood also can be used.

Finish the underside of the deck when the area will be used as outdoor-living space.
Photo: Mike Guertin

EPDM roofing has a 20- to 30-year or longer life span when exposed on a flat roof.Given that the decking shades the EPDM, I’m hoping for a 75-year-plus life. Don’t expect to get away without any maintenance, though. Leaves and debris will inevitably get between the deck boards. Chances are that regular rain will flush everything clean. However, plan access points for periodic washing. If you nail down deck boards or use a hidden-fastener system, consider screwing one course of decking near the house side and another course close to the outside edge of the deck. The screwed boards can be removed so that the drainage system can be hosed out and the gutter cleaned.

Photos by Charles Bickford, except where noted

Fine Homebuilding Recommended Products

Fine Homebuilding receives a commission for items purchased through links on this site, including Amazon Associates and other affiliate advertising programs.

Drill Driver/Impact Driver

Whether you're pre-drilling holes or driving screws, this Milwaukee® compact cordless driver is the way to go when it comes to building decks.
Buy at Amazon

MicroFoam Nitrile Coated Work Gloves

These gloves are comfortable and have a good grip, making for splinter-free work.
Buy at Amazon

Standard Marking Chalk

We like white chalk because it’s non-permanent and wears off easily — this is especially helpful when marks are exposed and need to disappear.
Buy at Amazon
Previous: How to Install Deck Rim Joists Next: Project: Site-Built Under-Deck Drainage System

Guide

Decks

Chapter

Framing a Deck

Sign up for eletters today and get the latest how-to from Fine Homebuilding, plus special offers.

Signing you up...

This site is protected by reCAPTCHA and the Google Privacy Policy and Terms of Service apply.
See all newsletters
See all newsletters

View Comments

  1. Robertf | Nov 04, 2018 06:42am | #1

    Great idea. I bought the EPDM, then Code Enforcement said I needed blocking between the joists. So I guess this won't work with the new codes? Also, how would this work if I was doing a deck with a decking pattern that required extra blocking?

    1. Mike_Guertin | Feb 05, 2020 08:40pm | #2

      The IRC only requires solid blocking between joists over a beam if the joists cantilever past the beam. And in that case the code only calls for the blocks to be 60% of the height of the joists. The short height block will allow the drainage membrane to pass over. It could be the case that your local code inspectors are enforcing a local amendment to the IRC. In that case there isn't much you can do unless you can demonstrate that their blocking requirement is unnecessary (which it is unless there are exceptional loads on the deck joists)

  2. user-5840206 | Apr 08, 2020 11:30am | #3

    I actually installed this same type of system on my new build deck about 4 years ago. This year i am finally finishing the under side of the deck. But one thing i realized i needed this year was to lay screen material across the joists on top of the epdm. basically to stop leaves from making their way through the cracks in the deck and clogging the troughs and gutter. Also going to need to make sure everything is sealed up properly on the underside to keep the birds and critters from making nests in the troughs. But this system does work great and very glad i did it.

  3. user-7066777 | Apr 29, 2021 11:29am | #4

    Mike! How do you straighten deck boards when installing---think 5/4 Garapa---without putting tears in the membrane? Does a bowrench cause problems? Thanks!

Log in or create an account to post a comment.

Sign up Log in

Become a member and get full access to FineHomebuilding.com

Decks

Decks

Hundreds of articles and videos by top deck-building pros on how to design and build a beautiful, sturdy, and safe deck

View Project Guide

View All Project Guides »

Become a member and get unlimited site access, including the Decks Project Guide.

Start Free Trial

Design & Planning
  • Basic Design Options
  • Generating Plans
  • Calculating Deck Loads
  • Code Compliance
Tools & Materials
  • Deck Building Tools
  • Foundation and Framing Materials
  • Decking Materials
  • Fasteners and Hardware
Footings & Foundations
  • Choosing a Foundation
  • Sizing and Laying Out Footings
  • Excavation
  • Pouring the Foundation
Framing a Deck
  • Framing Overview
  • Installing the Ledger
  • Setting Posts and Beams
  • Installing Joists
Installing Decking
  • Decking Basics
  • Installation Process
  • Adding Fascia and Other Decorative Elements
Installing Railings
  • Installing Deck Railing Posts
  • Building Wood Rails and Balustrades
  • Non-Wood Railing Options
  • Installing Nonwood Balustrades
Deck Stairs
  • Deck Stairs Overview
  • Laying Out, Cutting, and Installing the Stringers
  • Installing Treads, Risers, and Stair Railings
Custom Details
  • Benches, Planters, and Privacy Features
  • Pergolas
  • Lighting
Finishes, Repairs, and Maintenance
  • Deck Finishes
  • Cleaning and Refinishing
  • Inspection and Repair
Complete Deck Builds
  • Grade-Level Decks
  • Raised Decks

Fine Home Building

Newsletter Sign-up

  • Fine Homebuilding

    Home building tips, offers, and expert advice in your inbox.

  • Green Building Advisor

    Building science and energy efficiency advice, plus special offers, in your inbox.

  • Old House Journal

    Repair, renovation, and restoration tips, plus special offers, in your inbox.

Signing you up...

This site is protected by reCAPTCHA and the Google Privacy Policy and Terms of Service apply.
See all newsletters

Follow

  • Fine Homebuilding

    Dig into cutting-edge approaches and decades of proven solutions with total access to our experts and tradespeople.

    Start Free Trial Now
    • Facebook
    • Instagram
    • X
    • LinkedIn
  • GBA Prime

    Get instant access to the latest developments in green building, research, and reports from the field.

    Start Free Trial Now
    • Facebook
    • YouTube
  • Old House Journal

    Learn how to restore, repair, update, and decorate your home.

    Subscribe Now
    • Facebook
    • Instagram
    • X

Membership & Magazine

  • Online Archive
  • Start Free Trial
  • Magazine Subscription
  • Magazine Renewal
  • Gift a Subscription
  • Customer Support
  • Privacy Preferences
  • About
  • Contact
  • Advertise
  • Careers
  • Terms of Use
  • Site Map
  • Do not sell or share my information
  • Privacy Policy
  • Accessibility
  • California Privacy Rights

© 2025 Active Interest Media. All rights reserved.

Fine Homebuilding receives a commission for items purchased through links on this site, including Amazon Associates and other affiliate advertising programs.

  • Home Group
  • Antique Trader
  • Arts & Crafts Homes
  • Bank Note Reporter
  • Cabin Life
  • Cuisine at Home
  • Fine Gardening
  • Fine Woodworking
  • Green Building Advisor
  • Garden Gate
  • Horticulture
  • Keep Craft Alive
  • Log Home Living
  • Military Trader/Vehicles
  • Numismatic News
  • Numismaster
  • Old Cars Weekly
  • Old House Journal
  • Period Homes
  • Popular Woodworking
  • Script
  • ShopNotes
  • Sports Collectors Digest
  • Threads
  • Timber Home Living
  • Traditional Building
  • Woodsmith
  • World Coin News
  • Writer's Digest
Active Interest Media logo
X
X
This is a dialog window which overlays the main content of the page. The modal window is a 'site map' of the most critical areas of the site. Pressing the Escape (ESC) button will close the modal and bring you back to where you were on the page.

Main Menu

  • How-To
  • Design
  • Tools & Materials
  • Video
  • Blogs
  • Forum
  • Project Guides
  • Reader Projects
  • Magazine
  • Members
  • FHB House

Podcasts

  • FHB Podcast
  • ProTalk

Webinars

  • Upcoming and On-Demand

Podcasts

  • FHB Podcast
  • ProTalk

Webinars

  • Upcoming and On-Demand

Popular Topics

  • Kitchens
  • Business
  • Bedrooms
  • Roofs
  • Architecture and Design
  • Green Building
  • Decks
  • Framing
  • Safety
  • Remodeling
  • Bathrooms
  • Windows
  • Tilework
  • Ceilings
  • HVAC

Magazine

  • Current Issue
  • Past Issues
  • Magazine Index
  • Subscribe
  • Online Archive
  • Author Guidelines

All Access

  • Member Home
  • Start Free Trial
  • Gift Membership

Online Learning

  • Courses
  • Project Guides
  • Reader Projects
  • Podcast

More

  • FHB Ambassadors
  • FHB House
  • Customer Support

Account

  • Log In
  • Join

Newsletter

Get home building tips, offers, and expert advice in your inbox

Signing you up...

This site is protected by reCAPTCHA and the Google Privacy Policy and Terms of Service apply.
See all newsletters
See all newsletters

Follow

  • X
  • YouTube
  • instagram
  • facebook
  • pinterest
  • Tiktok

Join All Access

Become a member and get instant access to thousands of videos, how-tos, tool reviews, and design features.

Start Your Free Trial

Subscribe

FHB Magazine

Start your subscription today and save up to 81%

Subscribe

We hope you’ve enjoyed your free articles. To keep reading, become a member today.

Get complete site access to expert advice, how-to videos, Code Check, and more, plus the print magazine.

Start your FREE trial

Already a member? Log in

Privacy Policy Update

We use cookies, pixels, script and other tracking technologies to analyze and improve our service, to improve and personalize content, and for advertising to you. We also share information about your use of our site with third-party social media, advertising and analytics partners. You can view our Privacy Policy here and our Terms of Use here.

Cookies

Analytics

These cookies help us track site metrics to improve our sites and provide a better user experience.

Advertising/Social Media

These cookies are used to serve advertisements aligned with your interests.

Essential

These cookies are required to provide basic functions like page navigation and access to secure areas of the website.

Delete My Data

Delete all cookies and associated data