You Can Install a Central Vac
Running PVC and low-voltage wiring brings cleaner rooms and clearer air.
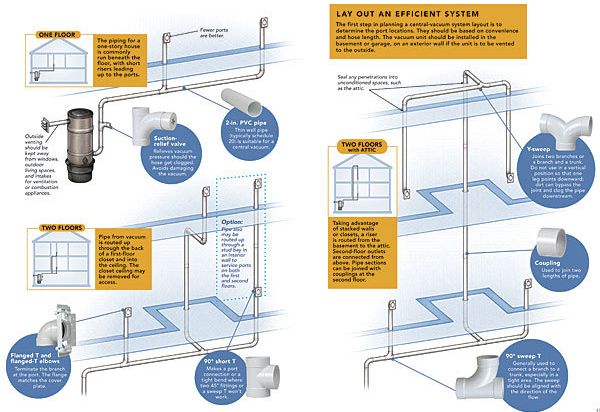
Synopsis: Although your house might have been built without a central vac, you can still have one. By figuring out the best way to run piping and minimize damage while installing the ports, FHB editorial adviser Mike Guertin says, you can retrofit a central vac. The process starts by laying out an efficient system, then using the right types of pipes to create efficient airflow. Finally, make the wiring connections. This article includes sidebars on determining the amount of air watts you need in a central vacuum, the best way to assemble pipe, and the types of central-vacuum canisters available.
Allergies and asthma are on the rise in the United States, especially among children, and one direct cause is the indoor-air quality in our homes. According to a study by the University of California at Davis School of Medicine, using a central-vacuum system can reduce allergy sufferers’ symptoms by as much as 61%. When I started focusing on building airtight, energy-efficient houses, my concerns about indoor air quality led me to begin installing central-vacuum systems.
Lately, I’ve been asked to retrofit a few central-vacuum systems. Most of the work is straightforward — running PVC pipe and low-voltage wiring. The difficulty is determining the best way to run the piping without collateral damage while still getting the ports in the most convenient locations.
How central vacs beat the portables
Central vacuums don’t necessarily have better filters than conventional vacuums, but they discharge exhaust outside the living space. Fine particles that make it past the filters of regular vacuums are delivered back inside the house. Today, living in a house with a central vacuum, I recognize a marked difference in the dust levels compared to previous homes that were cleaned with a portable vacuum.
A central-vacuum system offers other benefits beyond improved air quality. It is more powerful than a conventional vacuum, and because the motor and canister are in a garage, a basement, or a utility room, the house is quieter, and the canister doesn’t require emptying as often. I empty ours maybe twice a year. In as little as five minutes, I dump out the dirt, brush off the foam filter, and snap the canister back together.
While most general contractors and homeowners hire specialists, installing central-vacuum systems isn’t hard work. I can usually rough in a new house in a couple of hours or retrofit an existing house in half a day with minimal tools or mess. It’s easy, and the parts are inexpensive. The vacuums themselves can get pricey, but they tend to last longer and perform better than portable vacuums. The key to an easy installation and a system that performs well is thoughtful planning.
Planning starts with port locations
Good central-vacuum layout takes into account the location of the vacuum canister, the hose-port locations, and the piping routes between the ports and the vacuum. Vacuums can be noisy, so it’s a good idea to locate the canister away from living areas. A utility room, laundry room, garage, or basement is a natural candidate. The location must be easy to access for filter cleaning and bag replacement. Ideally, the vacuum will be exhausted outside, so there should be an easy route to the exterior. The exhaust should be kept away from windows, outdoor living spaces, and air intakes for ventilation and combustion appliances.
Vacuum ports need to be spaced so that the vacuum hose can reach the far corners of every room of the house. While you could install a port in every room for convenience, fewer ports mean less air leakage and more efficient cleaning, not to mention labor savings.
For more photos, illustrations, and details, click the View PDF button below:


