The number one enemy of your house is water, and I’m a constant crusader on the topic of water management. My guess is that 90+% of all windows installed in American homes have no sill pan under them. We as a building community are placing huge faith in these flanged windows that they will never develop a leak when we install them into a hole and tape the flanges then move on with cladding.
Windows can & will leak, so this install method you’ll see here I feel is the best practice method for installing a flanged window in new construction. I like that this method utilizes off the shelf products and is easily trainable. I actually use this video as I’m training new carpenters who join our crew.
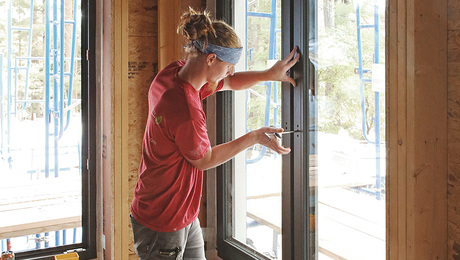
Here’s an overview of the steps covered in the video for how to install a new construction window:
- Put down the sill pan (FlexWrap is recommended if you can spare the extra cash).
- Put down three horseshoe shims on the sill.
- Caulk the window on three sides (not the sill!).
- Place the window and nail off the flanges at the top.
- Before nailing on the bottom flange, pop a shim under every other nail hole and nail through the shim, giving the water an escape path for whenever the inevitable leak does occur.
- Finish nailing down the flanges on all sides.
- Wrap the sides, then the head of the window, leaving the sill open.
- Tack down the wrap that was flipped up, cut it flush to the window head, and then finally put a piece of Tyvek tape over the corners. This should be your last step in installing a new construction window.
– Matt Risinger


View Comments
I have a couple things to say about this installation. First of all when leaving the sill open for drainage how do you insure an airtight installation. I would assume that you spray foam the inside of the window before any trim goes in. How does the spray foam affect the drainage if the window leaks? Second I have found in my experience that the best system for sealing windows is to cut the house wrap out of the opening completely and go even one step further and cut it back about a half inch away from the rough opening. In this half inch is where the caulk line would go. The reasoning behind this is that when the house wrap is wrapped inside the opening if air gets behind the house wrap, which it will, it has a nice protected path into the house not even the spray foam will stop.
I agree with the above post - I recently installed some Andersen 400 windows and I couldn't get my head around the instruction to tuck the house wrap into the opening - it seems that air & moisture could easily move behind it - I ended up using Blueskin Flashing around the entire inside of the rough opening (sides and top), tucking it under the building wrap on the outside at the caulk line, similar to what Walla describes - I think this is a much more airtight and moisture proof detail when using a sill pan.
quoting Matt Risinger: "...windows can and will leak"
While I agree that a leak could occur due to a poorly designed window, a poorly installed window, a poorly installed trim/siding job, or just a poorly designed home in general I must firmly disagree that a window WILL leak.
I see this article as defining a 'belt and suspenders' style of window installation method. Here's the deal about belts and suspenders; neither are required if your pants just fit properly. But if you're building spec homes then that is just the problem... the home is never designed to fit it's location. On top of that, the product chosen are chosen based on price and sellability rather than function and even worse, the installation contractors are chosen based on low bid to ensure maximum profit. The whole system leads to leaky windows and a general fear amongst contractors and homeowners alike that their "windows can and will leak."
But if you simply choose the right home design, spec a good window, and install the window and surrounding components properly then why would it leak? Heck, I have tore into windows & siding that is over 150 years old yet showed no sign of leakage..... on the flip, I have tore into windows & siding that was less than a decade old and full of rot.
While I am not telling you not to install your windows with extra protection I am saying that it isn't entirely necessary and I believe that the building science community would agree. Unfortunately if you aren't the one designing the house or you aren't also the trim installer and siding installer then you might want to CYA by being a little overly cautious.
DC
Great video, Matt. There are a few slight variations on this approach, but it is the most widely accepted best practice in the industry.
I may have missed this at the beginning, but did you do something to slope the sill?
Also, I assume that you spray a bead of foam around the perimeter at the inside of the opening where it prevents infiltration but doesn't stop drainage. But perhaps you can comment on the air sealing questions.
Let me see if I can address some of the comments/questions above.
@Dreamcatcher: I misspoke, not every window will leak. Some windows may leak would be more accurate. But, that doesn't change my assertion that windows need to be installed with a sill pan so that the 1 out of every X windows that leaks over the next 50+ years of that windows life won't cause a building failure. When I remodeled my 1920's house a few years ago in Portland, OR I found that nearly every window had signs of leakage. But, with no insulation in the walls the house dried out. That house had lots of moisture holding capacity with "real" lumber and plaster (and shiplap sheathing and cedar shingles). Houses we build today have much less moisture holding capacity and way less chance to dry if they do get wet in the walls.
@WallaWallaBuilder: The sills on these windows have a small slope in the framing, then we use backer rod and caulk at the sill and 6" up the jambs. We finish with low expansion spray foam to ensure a tight air barrier.
Thanks for the comments, I appreciate that we all care about the final durability of our houses and we can have a good discussion about "Best Practice". -Matt Risinger
I think that Ricky and Edwardo deserve cudos for a fine installation. I learned the trade in the late 50s and 60s and basically all of the techniques of counter flashing that they use are similar to the best practices I learned. The difference is or course the material technology, ie; Tyvek substitutes for 32" courses of 15 or 30# felt. Although Matt talked about sill pans made out of sheet metal they were often constructed of the same felts used to flash the jambs. It takes a little knowledge of folding paper but a seamless two way corner can be achieved. I don't know how long felt will actually last but I can attest to seeing intact felt in houses built in the early 20 and 30s, that I have remodeled. So we can stop water with transnational materials and good craftsman ship but it certainly takes a longer than 10 minutes to install a window using traditional materials. Over the course of time I have determined it's prudent not to mix old and modern material technologies. So if you happen to find yourself putting in a couple of windows or doors and the "papers" are traditional felts stick with them, use the same counter-flashing techniques, and get a book on Origami. It's actually very satisfying to fold a seamless two way corner, just don't plan on accomplishing a window installation in 10 minutes.
This is a follow-on to the comments from WallaWallabuilder: I would appreciate an article on how to improve the sealing around windows after construction. I own a 12 year old home that leaks air horrendously when the wind blows. I'm hesitant to rip apart either the inside or the outside of the home when I don't know how to fix whatever I find. I am expecting to find that the builder did not stuff the gap between the window and the framing but WallaWallaBuilder has brought up another possibility.
This is about the window install using the Anderson and the Dow products. There are 3 concerns on the way that was done.
1 - the head was nailed in place, precluding any allowance for shrinkage and the heah of the opening coming down and putting a load on the window. C clip at the head , possibly as part of a head flashing, will hold the nail fin in place an allow building movement and not verticall put a load on the window frame.
2 - The sill flange was furred out and the jambs and head were not, this can lead to a distortion of the frame as the surface the window is pulled up against is no longer flat. with an opening window this will distort the surfaces where the gaskets must seal leading to leaks. Why not just put a few 3/8" holes in the top of the nailing fin, drains water and keeps the window fram truw.
3 - Air seal, your air seal is compromised at the sill. A better install would have had you run your tyvek membranes back into the window opening on all 4 sides( would require a patch in the top corners as well as the sill pan). I like to have an interior angle that fits snug to the back of the window to give an elevated dam for the sill pan. once the window is in a caulk seal at the sill between the angle covered in tyvek flexwrap followed by a rod and caulk seal on the jambs and head.
This will give a sill pan that drains to the exterior, and an air seal at the back of the window where the chances of water getting close to it are minimal. The air barrier component of a building envelope is critical, any air leaks can and will pull water into the wall assembly.
Hey Matt,
Nice video on what is the industry standard on window and also door installs. For those who don't follow this enhanced method, it is the method that almost all window/door manufactures require for warranty validation of their product when installation is on frame housing.
For your average track/spec home, yes, you will likely never see this method but that is a short term gain that will bite you on the backside at some point in callbacks---do the math, a potenial four to six callbacks if you do good volume within the next year will evaporate any perceived gain you thought you had.
As far as the sill is concened, a bead of silicon applied only on the inside of the window seals things up nicely---minimaly expanding foam after install is anougher method commonly used.
Again, a good video on a text book install---nice job.
Good video but installation lacks attention to detail. According to step 4 of of the DuPont flashing systems installation guidelines you have reverse flashed the flexwrap at the bottom corners. The jamb flashing should have extended 1" above window head flange. The head flashing should extend beyond the outer edge of the jamb flashing. Conclusion: Your installation does not meet DuPont's specifications.
I'm curious about the nail gun you used. It looks like just a coil roofing nailer. Is it? How low do you set pressure to avoid damaging the flange? My biggest concern would be missing the hole and shattering the vinyl nail strip as you can't see exactly where the nail will land. That's why I have stuck with hand nailing with 2" roofing nails so far, but it wears on the arm...
I don't think that putting shims on the out-side of the bottom nail flange is a good idea. Not only will it stress the window seal, I would hate to be the one trimming out the interior jambs. The sides would taper as they get to the bottom!
(http://top4biz.com )
Online Store,Get Name Brand Fashion From 12USD Now!
Lv,Gucci,Prada,Coach,Chanel Women sandal is $30
I have not heard about this way to do residential window installations before. I have always done them another way. Your way looks much easier and efficient though. Unfortunately, one of my bigger garage widows got damaged during a fierce wind storm that hit my area. I will have to try this method out. Thanks!