FHB Logo Facebook LinkedIn Email Pinterest Twitter X Instagram Tiktok YouTube Plus Icon Close Icon Navigation Search Icon Navigation Search Icon Arrow Down Icon Video Guide Icon Article Guide Icon Modal Close Icon Guide Search Icon Skip to content
Subscribe
Log In
  • How-To
  • Design
  • Tools & Materials
  • Restoration
  • Videos
  • Blogs
  • Forum
  • Magazine
  • Members
  • FHB House
  • Podcast
Log In
How-To

10 Steps to Better Washer and Dryer Installation

The long life and dutiful service you expect from these machines depends on the quality of the installation.

By Ryan Anderson Issue 223
  • X
  • facebook
  • linkedin
  • pinterest
  • email
  • add to favorites Log in or Sign up to save your favorite articles


I make my living installing and repairing appliances, including washers and dryers. A good percentage of my laundry service calls easily could have been avoided if the machines had been installed properly.

Over the past 12 years, I’ve developed some guidelines for installing washers and dryers to ensure that everything fits like it should and functions the way it’s supposed to. If you follow this advice, you’ll reduce the chances that the washer-drain hose will pump water all over the second-floor laundry room on Christmas Eve, that the dryer will take hours to dry a single load because of kinked or clogged ducting, or that you’ll ever have to call a guy like me.

Before you buy

1. Take the time to measure

I can’t stress this enough: Measure the space where you want to install the new washer and dryer, and take note of plumbing, electrical, and vent locations. Be especially accurate with measurements for a laundry area surrounded by built-in cabinetry and for machines stacked in a closet. These two installation scenarios have the smallest margins for error. Keep in mind that there aren’t many standard dimensions for washers and dryers, so you need to compare the measurements of your space carefully with the detailed technical specs for each model. Look for potential problems, and be sure that the space can accommodate any accessories you’re considering, such as pedestals and stacking kits.

2. Keep the appliances serviceable

Every laundry machine will break or malfunction at some point. Most service companies refuse to do the repair if one person can’t get an appliance out and back into its space without damaging floors, walls, or cabinets.

3. Know when to hire help

If the installation is especially complicated, consider buying your appliances from a local dealer that specializes in working with custom-home builders and remodelers. They usually have contact with specialized appliance-installation subcontractors who have the experience that comes from years of custom appliance installations.

The Washer

4. Spin cycles should spin

Remove the tub shipping supports before you install the washing machine. All front loaders have some type of bolt or other means of immobilizing the tub so that the suspension parts are not damaged during shipment. If you start a cycle without removing them, you’ll damage the tub and/or motor.

5. Level the washer in both directions

It’s especially important that front loaders are level, or they will walk or vibrate badly. On wood-framed floors, especially long-spanning I-joists, this can be severe enough to shake the whole house. It’s also critical that the washer be absolutely level if you’re going to stack a dryer on it; small washer vibrations will be magnified at the top of the dryer, possibly moving it enough to damage surrounding cabinets.

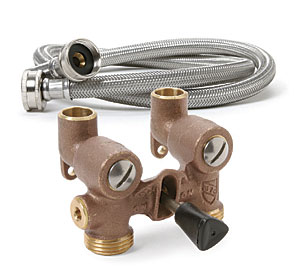
6. Don’t skimp on the hoses and valves

If the machine includes rubber supply hoses with lightweight stamped-metal ends, throw them away. At $40, durable stainless-steel hoses are cheap insurance against a leak. Also, ball valves are the pricier option, at around $30 for the single-handle model shown here, but they are far quicker and easier to shut off in an emergency, and more durable than gate valves over the long haul

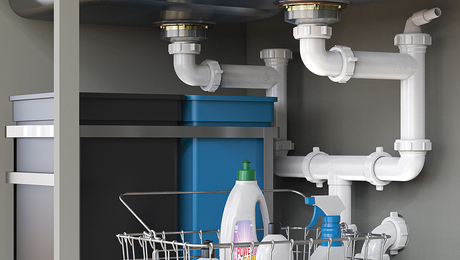
7. Secure the drain hose

After snapping the hose into the U-shaped carrier, secure it to something solid so that it can’t lift out of the standpipe when the drain pump kicks on. If you can fasten the carrier to the wall, great, but it’s often not possible. Zip ties come in handy for securing the hose, and bundling the supply and drain hoses makes for a tidy installation. For recessed boxes that house the supply valves and the standpipe, insert the drain hose at least 1 ft. into the standpipe. This way, the hose will hit the top of the box before it can lift out.

The Dryer

8. Duct length is crucial

When you check the technical specs of the dryers you’re considering, find the allowable duct length for each machine. (This information is typically buried somewhere in the installation manual, which you can find online if yours is missing.) The allowable duct length can vary by more than 60 ft., depending on the model. Also, be sure to count each elbow in the duct run at the equivalent straight-run length listed in the manual.

9. Flex duct is OK, to an extent

If I had my say, dryer ducting would always be rigid galvanized steel and never the thin aluminum duct that’s often sold as dryer ducting. Flexible ducting, though, is sometimes helpful. I use it between the dryer and the rigid duct to allow me to connect the two and to push the dryer in place. I typically use less than 24 in., often much less, but in some instances, as with a stacked dryer in a closet, the flexible duct must be slightly longer so that you can connect the dryer and push it in place.

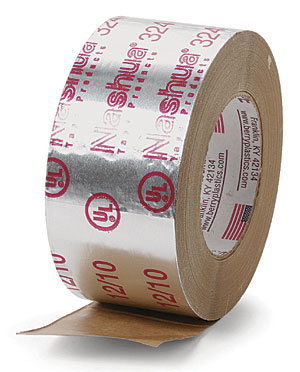
10. Use tape, not clamps

Metal worm-drive clamps won’t give you an airtight seal at joints in dryer ductwork, and the leaking air traps lint around the joints and causes an obstruction over time. Duct seams should be sealed with high-quality tape. Never use cloth duct tape; it will dry out and fail. Aluminum foil tape stands up over time, but the best option is mastic tape such as Nashua 324-A. This tape has foil on the outside, a thin layer of plastic in the middle, and then an aggressive adhesive. Before using any tape, clean the manufacturing-oil residue off the galvanized-steel duct with a degreasing household cleanser, or the adhesive could fail.

Photos: Rodney Diaz. Drawing: Jackie Rogers.

Sign up for eletters today and get the latest how-to from Fine Homebuilding, plus special offers.

Signing you up...

This site is protected by reCAPTCHA and the Google Privacy Policy and Terms of Service apply.
See all newsletters
See all newsletters
×

Get home building tips, offers, and expert advice in your inbox

Signing you up...

This site is protected by reCAPTCHA and the Google Privacy Policy and Terms of Service apply.
See all newsletters
See all newsletters
View PDF

New Feature

Fine Homebuilding Forums

Ask questions, offer advice, and share your work

  • X
  • facebook
  • linkedin
  • pinterest
  • email
  • add to favorites Log in or Sign up to save your favorite articles

View Comments

  1. user-6870177 | Nov 10, 2022 01:02pm | #1

    The best way to duct a clothes dryer is to buy a ductless one, and skip the hole in the wall entirely. They are usually a combination of heat-exchanger and compressor, are extremely efficient, and present no danger of fire due to build up in a duct. The water from the wet clothes drains into the washer drain.

    Also notice that instead of buying platforms, we made on, with enough space underneath to hold clothesbaskets -- pre-sorted laundry, and always easy to see when it's time to do a load.

  2. mcsawyer | Jan 23, 2023 01:59pm | #2

    Dear Fellow Washers Wiggles,

    Do you have a fix for high RPM vibration into surrounding walls & floor joists? I just installed an ASKO stackable into a space where a very small footprint Maytag (no longer made) had rested for 30 years. The vibration in the kitchen is unreal.(this is at 1/2 speed or minimum spin. high speed is 1600RPM)

    Thanks!

Log in or create an account to post a comment.

Sign up Log in

Become a member and get full access to FineHomebuilding.com

Up Next

Video Shorts

Featured Story

FHB Summit 2025 — Design, Build, Business

Join some of the most experienced and recognized building professionals for two days of presentations, panel discussions, networking, and more.

Featured Video

Micro-Adjust Deck-Baluster Spacing for an Eye-Deceiving Layout

No math, no measuring—just a simple jig made from an elastic band is all you need to lay out a good-looking deck railing.

Related Stories

  • A Drip-Free, Through-Window Heat Pump
  • An Impressive Air-to-Water Heat Pump
  • A Closer Look at Smart Water-Leak Detection Systems
  • One-System Wonder

Discussion Forum

Recent Posts and Replies

  • |
  • |
  • |
  • |
  • |
  • |
View More Create Post

Highlights

Fine Homebuilding All Access
Fine Homebuilding Podcast
Tool Tech
Plus, get an extra 20% off with code GIFT20

"I have learned so much thanks to the searchable articles on the FHB website. I can confidently say that I expect to be a life-long subscriber." - M.K.

Get home building tips, offers, and expert advice in your inbox

Signing you up...

This site is protected by reCAPTCHA and the Google Privacy Policy and Terms of Service apply.
See all newsletters
See all newsletters

Video

View All Videos
  • A Drip-Free, Through-Window Heat Pump
  • An Impressive Air-to-Water Heat Pump
  • A Closer Look at Smart Water-Leak Detection Systems
  • FHB Podcast Segment: Efficient HVAC for a New Build
View All

Appliances

View All Appliances Articles
  • One-System Wonder
  • Right-Sized Gas Furnace
  • Space-Saving Sink Drain
View All Appliances Articles

Fine Homebuilding Magazine

  • Issue 332 - July 2025
    • Custom Built-ins With Job-Site Tools
    • Fight House Fires Through Design
    • Making the Move to Multifamily
  • Issue 331 - June 2025
    • A More Resilient Roof
    • Tool Test: You Need a Drywall Sander
    • Ducted vs. Ductless Heat Pumps
  • Issue 330 - April/May 2025
    • Deck Details for Durability
    • FAQs on HPWHs
    • 10 Tips for a Long-Lasting Paint Job
  • Old House Journal – August 2025
    • Designing the Perfect Garden Gate
    • Old House Air-Sealing Basics
  • Issue 329 - Feb/Mar 2025
    • Smart Foundation for a Small Addition
    • A Kominka Comes West
    • Making Small Kitchens Work

Fine Home Building

Newsletter Sign-up

  • Fine Homebuilding

    Home building tips, offers, and expert advice in your inbox.

  • Green Building Advisor

    Building science and energy efficiency advice, plus special offers, in your inbox.

  • Old House Journal

    Repair, renovation, and restoration tips, plus special offers, in your inbox.

Signing you up...

This site is protected by reCAPTCHA and the Google Privacy Policy and Terms of Service apply.
See all newsletters

Follow

  • Fine Homebuilding

    Dig into cutting-edge approaches and decades of proven solutions with total access to our experts and tradespeople.

    Start Free Trial Now
    • Facebook
    • Instagram
    • X
    • LinkedIn
  • GBA Prime

    Get instant access to the latest developments in green building, research, and reports from the field.

    Start Free Trial Now
    • Facebook
    • YouTube
  • Old House Journal

    Learn how to restore, repair, update, and decorate your home.

    Subscribe Now
    • Facebook
    • Instagram
    • X

Membership & Magazine

  • Online Archive
  • Start Free Trial
  • Magazine Subscription
  • Magazine Renewal
  • Gift a Subscription
  • Customer Support
  • Privacy Preferences
  • About
  • Contact
  • Advertise
  • Careers
  • Terms of Use
  • Site Map
  • Do not sell or share my information
  • Privacy Policy
  • Accessibility
  • California Privacy Rights

© 2025 Active Interest Media. All rights reserved.

Fine Homebuilding receives a commission for items purchased through links on this site, including Amazon Associates and other affiliate advertising programs.

  • Home Group
  • Antique Trader
  • Arts & Crafts Homes
  • Bank Note Reporter
  • Cabin Life
  • Cuisine at Home
  • Fine Gardening
  • Fine Woodworking
  • Green Building Advisor
  • Garden Gate
  • Horticulture
  • Keep Craft Alive
  • Log Home Living
  • Military Trader/Vehicles
  • Numismatic News
  • Numismaster
  • Old Cars Weekly
  • Old House Journal
  • Period Homes
  • Popular Woodworking
  • Script
  • ShopNotes
  • Sports Collectors Digest
  • Threads
  • Timber Home Living
  • Traditional Building
  • Woodsmith
  • World Coin News
  • Writer's Digest
Active Interest Media logo
X
X
This is a dialog window which overlays the main content of the page. The modal window is a 'site map' of the most critical areas of the site. Pressing the Escape (ESC) button will close the modal and bring you back to where you were on the page.

Main Menu

  • How-To
  • Design
  • Tools & Materials
  • Video
  • Blogs
  • Forum
  • Project Guides
  • Reader Projects
  • Magazine
  • Members
  • FHB House

Podcasts

  • FHB Podcast
  • ProTalk

Webinars

  • Upcoming and On-Demand

Podcasts

  • FHB Podcast
  • ProTalk

Webinars

  • Upcoming and On-Demand

Popular Topics

  • Kitchens
  • Business
  • Bedrooms
  • Roofs
  • Architecture and Design
  • Green Building
  • Decks
  • Framing
  • Safety
  • Remodeling
  • Bathrooms
  • Windows
  • Tilework
  • Ceilings
  • HVAC

Magazine

  • Current Issue
  • Past Issues
  • Magazine Index
  • Subscribe
  • Online Archive
  • Author Guidelines

All Access

  • Member Home
  • Start Free Trial
  • Gift Membership

Online Learning

  • Courses
  • Project Guides
  • Reader Projects
  • Podcast

More

  • FHB Ambassadors
  • FHB House
  • Customer Support

Account

  • Log In
  • Join

Newsletter

Get home building tips, offers, and expert advice in your inbox

Signing you up...

This site is protected by reCAPTCHA and the Google Privacy Policy and Terms of Service apply.
See all newsletters
See all newsletters

Follow

  • X
  • YouTube
  • instagram
  • facebook
  • pinterest
  • Tiktok

Join All Access

Become a member and get instant access to thousands of videos, how-tos, tool reviews, and design features.

Start Your Free Trial

Subscribe

FHB Magazine

Start your subscription today and save up to 70%

Subscribe

You have 1 free article remaining.

Get complete site access, including thousands of videos, how-to tips, tool reviews, and design features.

Start your FREE trial

Already a member? Log in

We hope you’ve enjoyed your free articles. To keep reading, become a member today.

Get complete site access to expert advice, how-to videos, Code Check, and more, plus the print magazine.

Start your FREE trial

Already a member? Log in

Privacy Policy Update

We use cookies, pixels, script and other tracking technologies to analyze and improve our service, to improve and personalize content, and for advertising to you. We also share information about your use of our site with third-party social media, advertising and analytics partners. You can view our Privacy Policy here and our Terms of Use here.

Cookies

Analytics

These cookies help us track site metrics to improve our sites and provide a better user experience.

Advertising/Social Media

These cookies are used to serve advertisements aligned with your interests.

Essential

These cookies are required to provide basic functions like page navigation and access to secure areas of the website.

Delete My Data

Delete all cookies and associated data