A Built-In Corner Seating Nook
Plywood boxes assemble into an elegant, comfortable kitchen bench with storage.
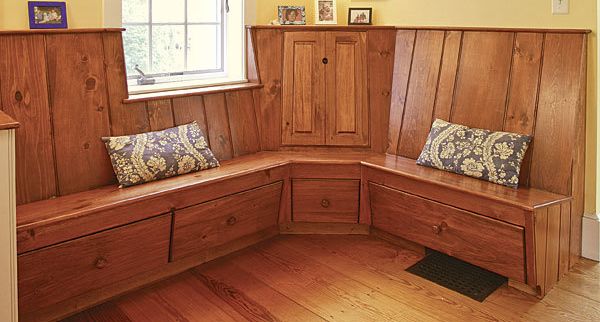
Synopsis: Builder Joseph Lanza faced a challenge: how to create a seating nook in an 18th-century house where plumb, level, and square no longer existed, and to do so without help. In this article, Lanza describes the design and construction of the nook. After designing the unit in SketchUp, he decided to break down the job into four parts: start with a level plinth, install the base as four separate boxes, install the seat and the corner-cabinet unit, and finish with the solid-wood parts (seat back, nosings, and moldings). He built the boxes from Baltic-birch plywood, the seats from pine plywood, and the beadboard panels and various trim pieces from solid pine. In addition to providing a place for dining, playing games, and doing homework, the nook includes storage in the corner cabinet and in drawers that run the full length of the seating area. Detailed drawings illustrate the construction of the base units; the installation of the corner cabinet, seat panels, and back frame; and the placement of the trim pieces.
My friends Debbie and Tom decided to make better use of a small room next to their kitchen. They wanted a built-in seat that could serve as an informal dining area and a place for board games or homework.
After measuring the space and designing the seat in cross section, I made a Sketch Up model of a seat with enough room for four people, storage drawers below, and a cabinet in the back of the corner seat. Tom and Debbie liked the design, but before I started building, I made a 24-in.-wide plywood mock-up to make sure they would be comfortable sitting in it. We agreed that the mock-up was more comfortable with a 3⁄4-in. plywood block under the front edge. I gave the seat an additional 5° tilt, then made a new Sketch Up model of the base of the seat.
Because I would be working alone, building the seat in the shop and installing it as a complete unit were out of the question. Even if I had the strength to do so, the house was built in the 18th century, so plumb, level, and square had long since vanished. Because there was sure to be lots of scribing and fitting before the seat was in place, it made sense to break down the job into manageable parts. I decided to start with a level plinth, then to install the base as four separate boxes. Next, I would install the seat and the corner-cabinet unit, and then finish up with all of the solid-wood parts (the seat back, nosings, and mouldings). I could make all the parts in the shop, then assemble everything together at the house.
Build boxes to form the seat
For the boxes below the seat, I used dimensions from the Sketch Up model to cut parts from 3⁄4-in. birch plywood. Because the seat has a 10° pitch, the joint between the cabinets at the top is a compound miter. To cut the joints, I used a circular saw with the blade set to a 3.81° bevel and a shooting board. The bevel angle came from a chart I found online (www.woodshoptips.com). I cut the corner cabinet to the dimensions on the Sketch Up model, but I made the two adjoining cabinets 1 in. longer so that I would have room to scribe and fit the joints in place.
Next, using a dado and rabbet joint that was glued and nailed, I made drawers from 1⁄2-in. Baltic-birch plywood. I delayed making the applied drawer fronts until the boxes and the face frames were in place and I could get an accurate measurement.
While in the shop, I ripped 3⁄4-in. pine plywood to 16 in. for the seats. The back just overlaps the back edge of the seat. I also milled other parts, such as the solid-pine round over nosing for the seat, the pine grooved panelling, the face frame, and the cap stock.
Playing by old-house rules
Once on-site, my first task was to install the plinth, which is essentially a plywood box 3 1⁄2 in. high that is analogous to a cabinet’s toe kick. Starting at the high point, I leveled each side across, shimming with blocks and screwing the base to the baseboard. I hid the plywood and the gaps with a 1x pine kick board that I scribed to the floor.
For more photos, drawings, and details, click the View PDF button below:






View Comments
In the diagram on the first page of this article (page 36) where it says "seat angled up 10 degrees" it should instead say "seat angled up 5 degrees." This is when measured from the horizontal - as is shown as part of the note.
This is a great diagram. I've referred to it a number of times when planning built-in seating for clients.
Additionally, still referring to the same diagram on the first page of the article, the note that says "Seat back is beveled 5° at the bottom and 15° at the top" makes no sense whatsoever. From what I can tell, the seat back is beveled 10° when measured from vertical.