FHB Logo Facebook LinkedIn Email Pinterest Twitter X Instagram Tiktok YouTube Plus Icon Close Icon Navigation Search Icon Navigation Search Icon Arrow Down Icon Video Guide Icon Article Guide Icon Modal Close Icon Guide Search Icon Skip to content
Subscribe
Log In
  • How-To
  • Design
  • Tools & Materials
  • Restoration
  • Videos
  • Blogs
  • Forum
  • Magazine
  • Members
  • FHB House
  • Podcast
Log In

Fine Homebuilding Project Guides

Drywall

Guide Home
  • Drywall Basics
  • Tools and Materials
  • Hanging Drywall
  • Taping and Sanding
  • Special Installations
  • Drywall Repairs
  • Plaster
How-To

How to Hang Airtight Drywall

Drywall can stop air leaks when it's installed with caulk, foam, and adhesive.

By Myron R. Ferguson Issue 229 – Aug/Sept 2012
  • X
  • facebook
  • linkedin
  • pinterest
  • email
  • add to favorites Log in or Sign up to save your favorite articles

Synopsis: If you want to make your house more energy efficient, the first thing to do is stop air leaks. Because drywall is great at stopping air, it can be part of a house’s air barrier when installed using the airtight-drywall approach. This approach, described in this article by contributor Myron R. Ferguson, makes use of caulks, sealants, canned foam, and gaskets to seal the seams between sheets and to stop airflow through holes cut in the drywall. Ferguson begins an airtight-drywall job by applying flexible caulk to all gaps in the framing and by sealing electrical boxes. He then hangs the ceiling, making sure to seal the holes he cuts out for junction boxes and light fixtures with caulk, and to seal the perimeter between the framing and the drywall with canned foam. Finally, he hangs the walls. Window openings are sealed with caulk and polyurethane construction adhesive, large gaps with canned foam, and small gaps with caulk. Ferguson demonstrated his technique at FHB‘s Project House, and this article includes a drawing that shows the exact locations where he applied caulk, foam, and construction adhesive.


Stopping air leaks is the single most important part of making a house more energy efficient. You can stop air on the outside with plywood, housewrap, and tape, but the best air barrier is a system that incorporates the whole wall or roof assembly.

As it turns out, drywall is excellent at stopping air. If you doubt that, try to blow through it. The weak spots are the seams between sheets and the holes that you have to cut for windows, doors, electrical boxes, and can lights. The process for installing drywall as an air barrier is called the airtight-drywall approach and it relies on caulks, sealants, canned foam, and gaskets to seal the weak spots.

The first step to airtight drywall is to identify what building scientists call the thermal boundary—insulation to us regular folks. The air barrier needs to be continuous along the thermal boundary. This is especially important where interior walls join exterior walls at rim joists or in places where chases are run for plumbing or electrical work.

We decided to hang drywall in the garage shop in FHB’s Project House using the airtight approach, partly to show you how to do it and partly so that the editors could make me do their dirty work. The outside of the house eventually will be covered with housewrap and rigid-foam sheathing. The drywall, therefore, is not the primary air barrier but is the interior part of an air-barrier system.

Materials you’ll need

Redundancy means that nothing slips through the cracks
To seal up this garage shop, I used flexible caulk, construction adhesive, and cans of expanding foam. Various types of gaskets are also often used in airtight-drywall jobs. The most basic material, of course, is drywall. To minimize the number of seams I need to fill, I buy the longest sheets I can get my hands on—12-ft. sheets in this case. When hanging big sheets overhead, it’s worth considering the new ultralight drywall available from most drywall manufacturers. I wish that the editors had thought to order some of that for this job.

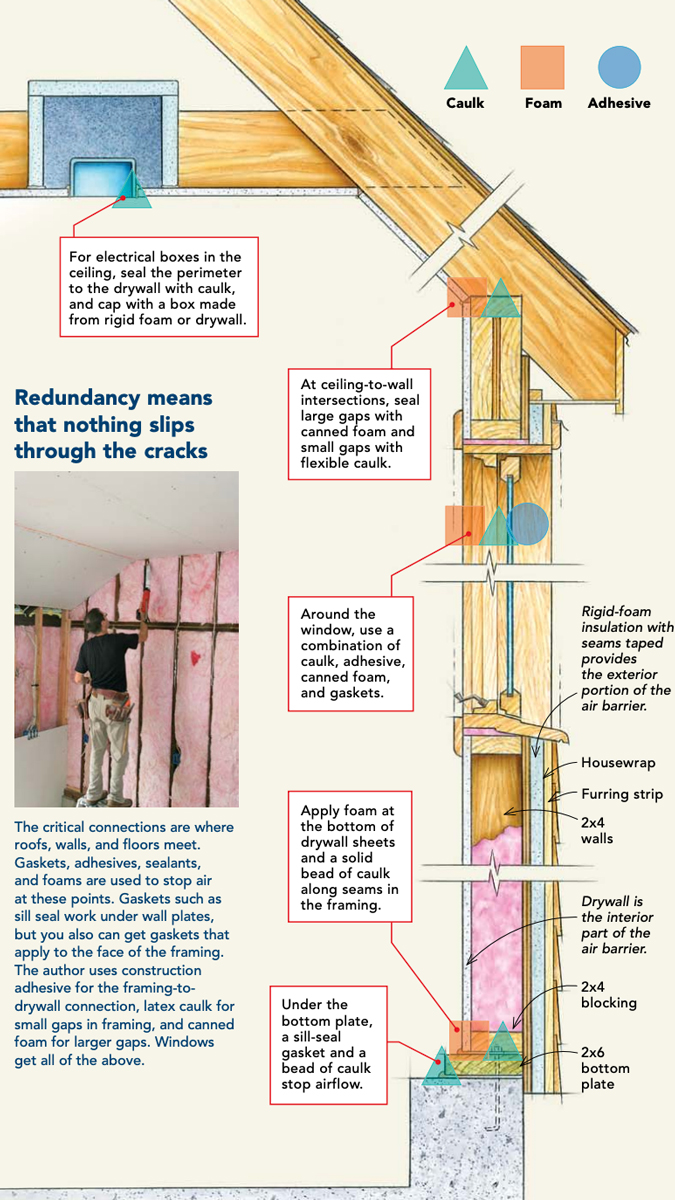
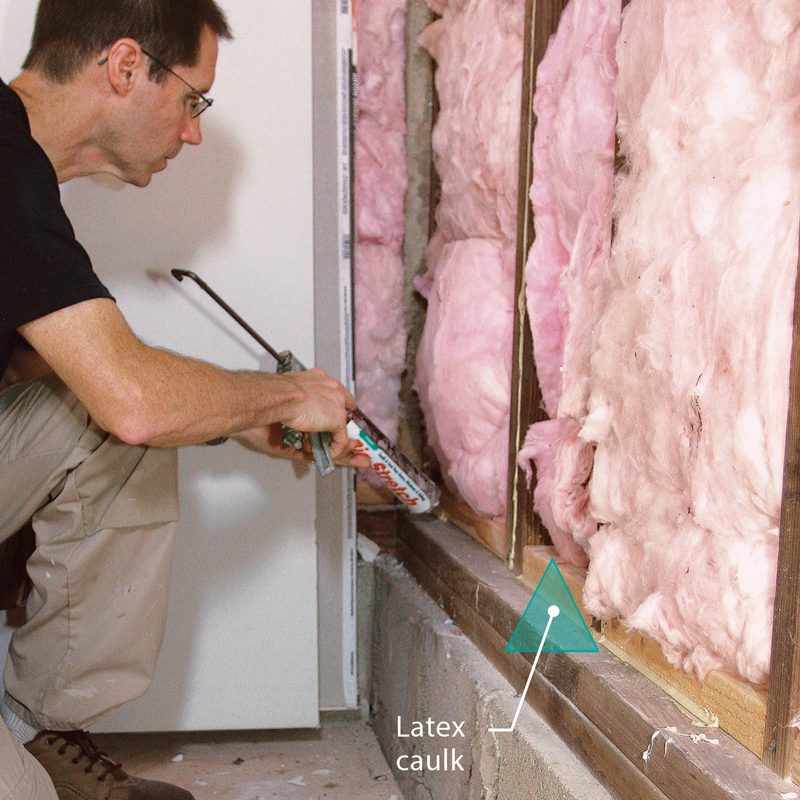
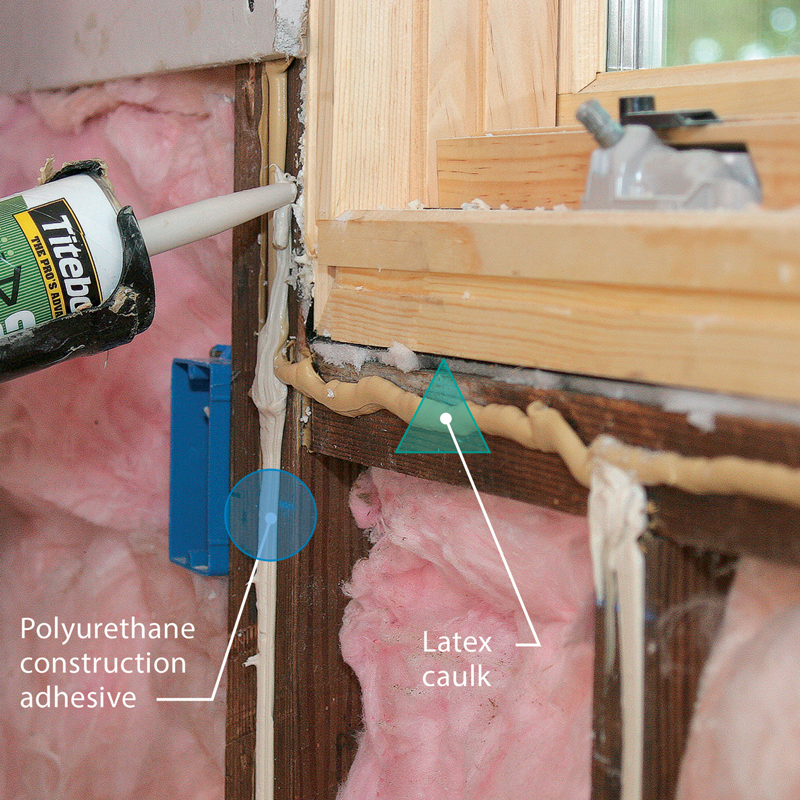
Flexible caulk is used around the perimeter of the walls and ceilings, around window and door openings, and around electrical boxes. It has to be flexible caulk; caulks that dry out over time can leave gaps. Likewise, if structural settling occurs, a caulk that stretches and flexes will help to prevent gaps from forming.

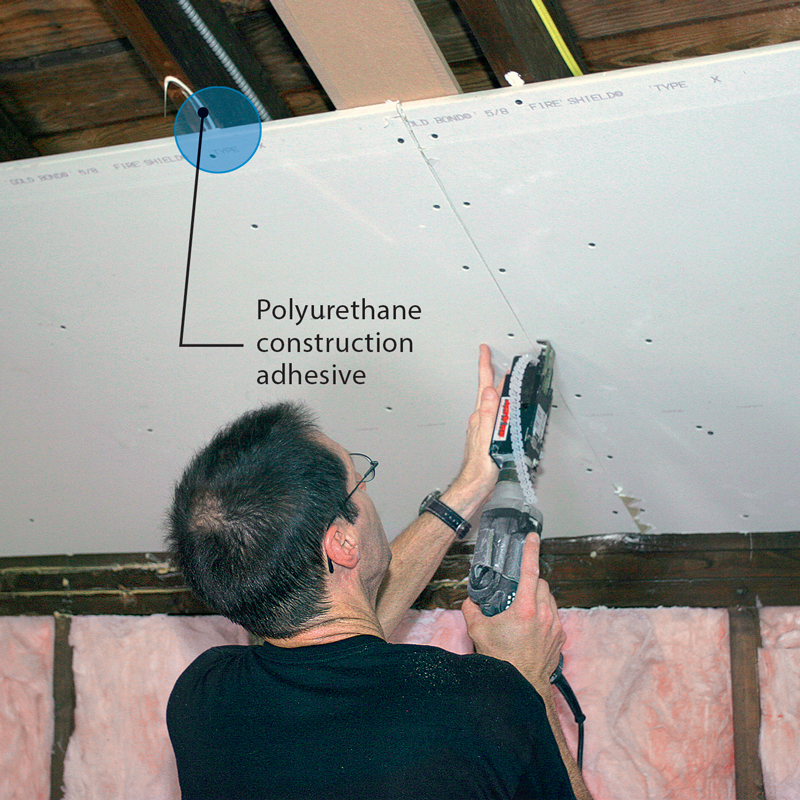
Construction adhesive runs along framing members. Bonding the drywall to the rafters, ceiling joists, and studs isolates each framing cavity, making a single leak much less of a problem down the road. One thing I really like about using a latex drywall adhesive is the amount of open time. You can apply the adhesive to the studs and have up to 30 minutes of open time to fasten sheets of drywall.

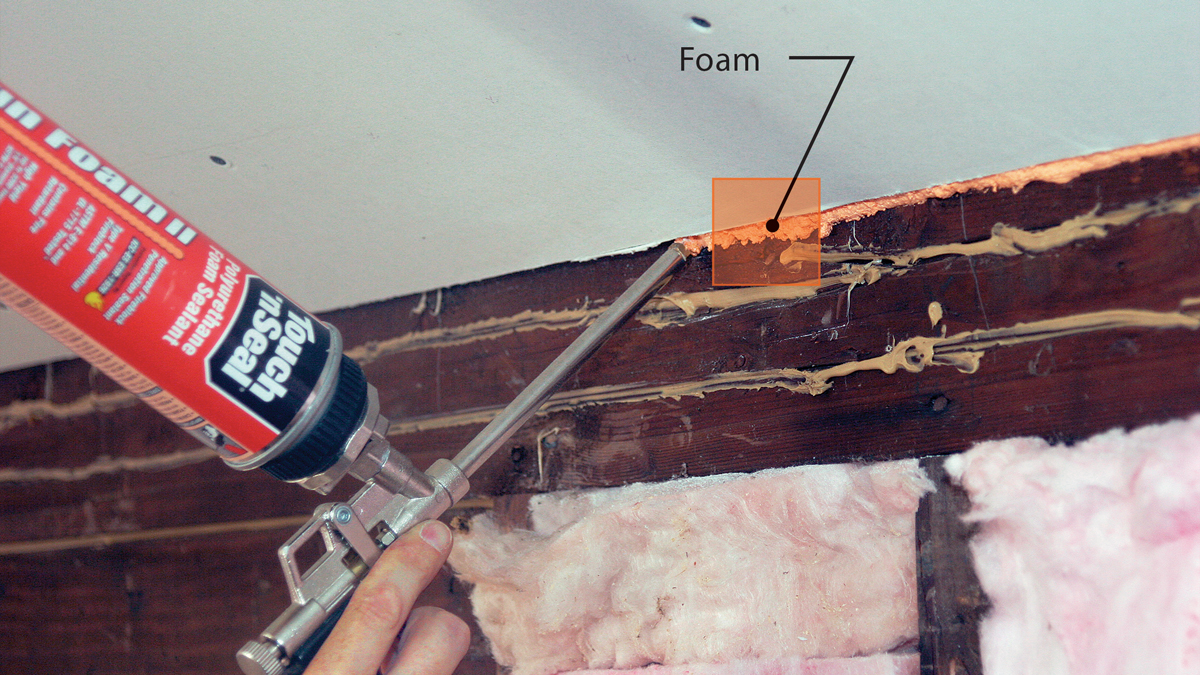
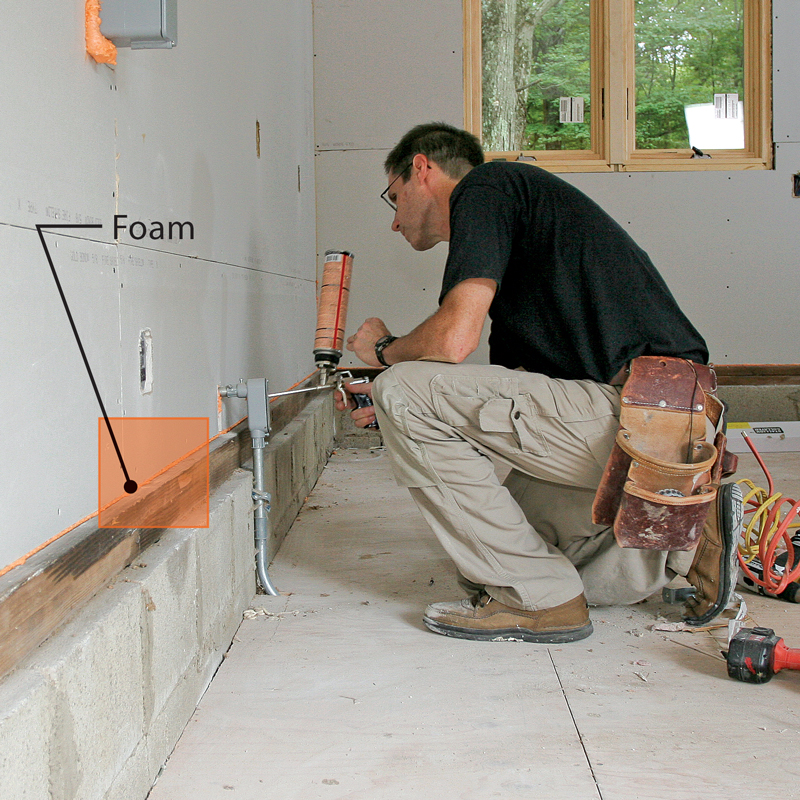
Expanding foam is useful for filling larger gaps such as where ceilings meet walls, where sloped ceilings meet flat ceilings, or where walls meet floors.

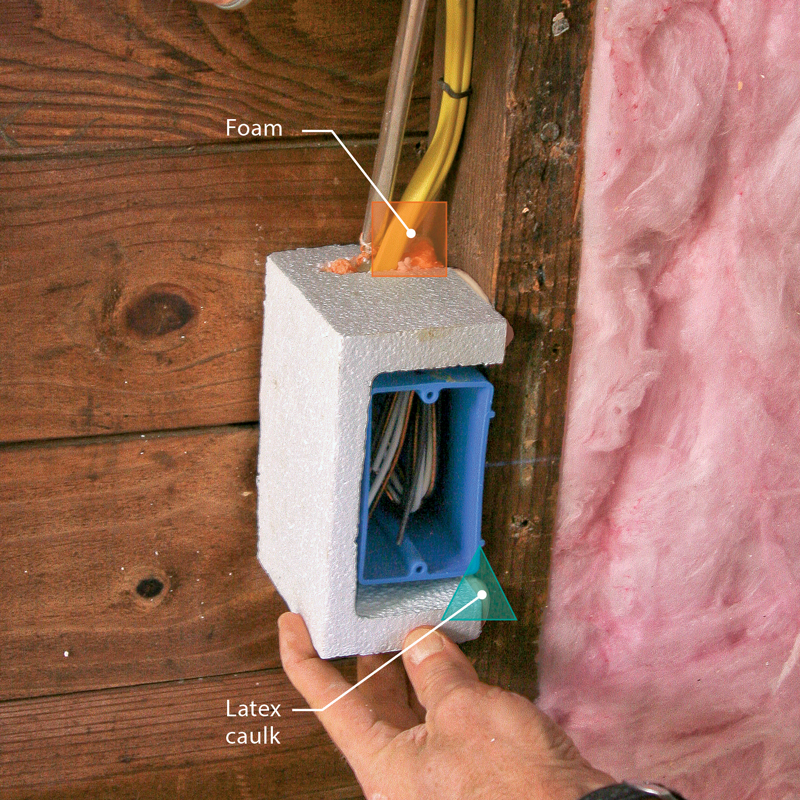
Another product that I use for airtight-drywall jobs is factoryshaped foam insulation that fits around electrical boxes in walls. I use Energy Blocks (www.energyblock.com), but other brands are available. For can lights and other ceiling-mounted fixtures, I make my own box with rigid foam or drywall.

Before hanging any sheets, I apply a bead of flexible, stretchable caulk to all gaps in the framing, including the gap between the double top plates, the gap between the jack studs and the king studs, the gap between the bottom plate and the subfloor, and any other gaps where air can leak through. The builder can complete this part of the job well before you show up to hang drywall.

Plan a strategy for tricky spots

This particular garage has 2×4 studs sitting on a 2×6 bottom plate atop a concrete-block stemwall about 10 in. tall. Before I came in, the editors placed 2×4 blocks in the bottom of each stud cavity. These blocks gave me a surface to glue the bottom of the drywall sheets to; without them, a considerable amount of air could flow through the gap. Another challenge on this job was that one of the walls had a big conduit running from the electrical service panel outside to the breaker panel inside. We removed the conduit’s fastening brackets so that we could slide a sheet of drywall behind it. After the drywall was sealed, the conduit itself could be boxed out. It’s unwise to box out a chase before drywall because this introduces long cracks to seal.

The garage ceiling is a broken cathedral ceiling, meaning that it slopes up to a flat expanse. The slope is about 51 in.; the drywall sheets are 48 in. Rather than hang a 3-in. strip, I cut a foot off the full sheets so that I could put up two larger pieces, which made taping the ceiling easier.

At the transition between the sloped ceiling and the flat ceiling, there was no solid backing for adhesive. There are a couple of ways to deal with this problem: Apply solid blocking, as we did at the bottom of the wall, or use canned foam to seal the gap after the ceiling has been hung. The best approach is to add backing, but because we added blocking at the bottom of the wall, we used canned foam on the ceiling to illustrate both approaches.

Some tricky spots may not become apparent until you are actually hanging the drywall. In old houses, framing may not be perfectly square, so you can end up with oddly shaped gaps at the butt joints. Fix such a gap by cutting a drywall scrap to fit, screwing it into position, and filling it with drywall compound.
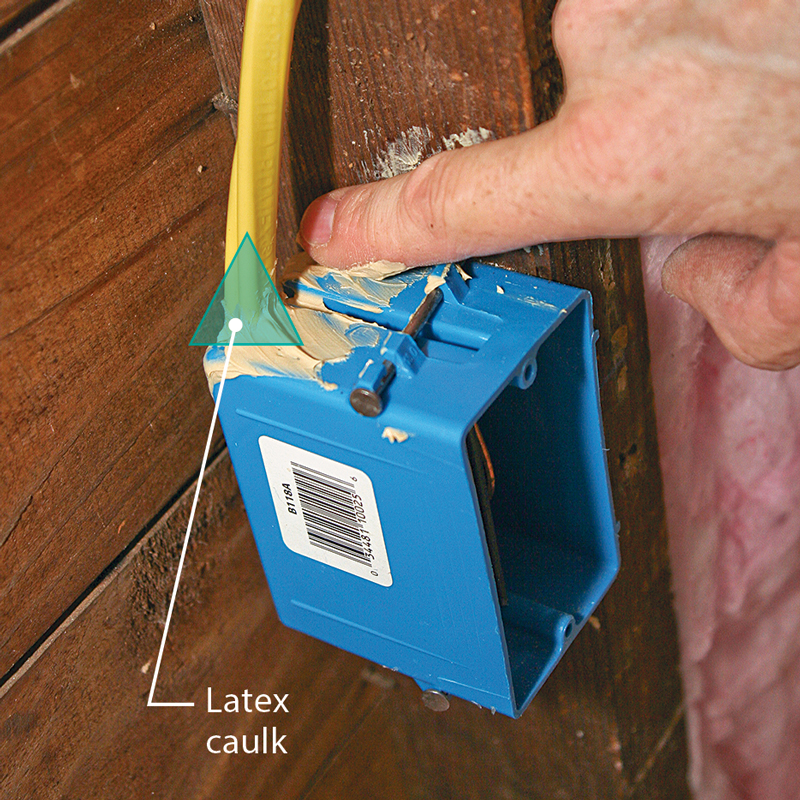
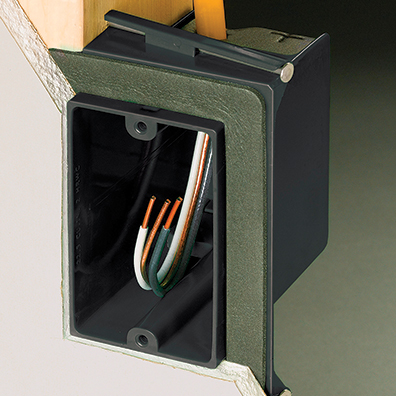
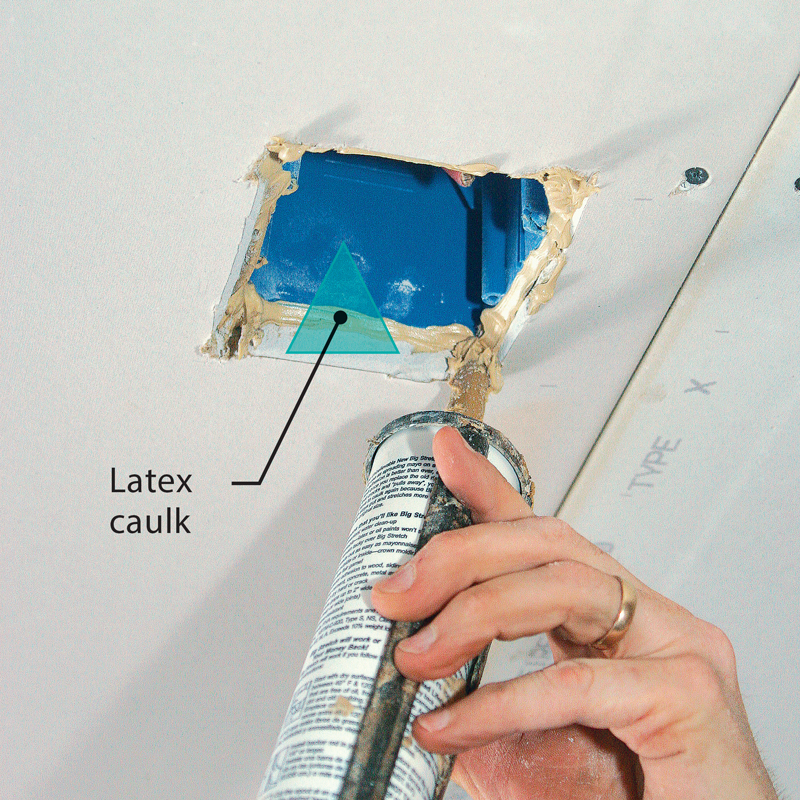
Seal boxes first

Three ways to make a box airtight. The cheapest way to seal an electrical box is to caulk or foam the holes in the back and to seal the perimeter to the drywall. This method is fine for a garage shop. A better way is to use a premade electrical box cover, usually made from EPS foam, that wraps around the box and is caulked and foamed in place. For new construction, airtight electrical boxes, such as the one pictured below (www.tnb-canada.com) are a good choice.

Latex caulk Foam and latex caulk Airtight electrical box

Installation is not all that different

As with typical drywall jobs, I hang the ceilings first, then the walls. When applying caulk and adhesive to the framing, do not skimp— goop it on. This is not the place to save money on a job. Run the bead beyond where the end of the sheet will land. This will keep the seal continuous from one panel to the next.

When placing the sheets, be careful not to smear the caulk and adhesive too much. The framing is only 1-1/2 in. wide, so smearing the sealant can compromise the integrity of the air barrier significantly. On ceilings, align the edge of the sheet you are hanging against the one you are butting it to. Snug the sheet into place, pushing it tight against the framing without sliding it back and forth. Cutting the sheets 1/4 in. short is a good way to ensure that they will fit. On walls, prevent smearing the sealant by tilting the panels into place top first, holding the bottom away from the framing. When the top is in place, push the sheet against the framing, bedding it into the adhesive. Seal the perimeter between ceiling and walls with caulk or canned foam after the hanging is complete.

Properly fastening the drywall holds it tight against the framing and sealant, making a tight air seal. The best way to fasten drywall is to begin along one edge, then move toward the center, fastening the other edge last. This ensures that the center of the panel is tight against the framing. For panels that cover electrical boxes, tack the sheet in place, cut out the box with a router, and finish fastening the panel. For large sheets, I screw off the top edge of the sheet before cutting out the boxes. For smaller pieces, I may fasten a top corner and the opposite bottom corner first.

When using a router to cut around electrical boxes, be patient and careful with your cutting. This may take an extra minute, but it will save a lot of repair work later. When cutting out boxes overhead, I turn off the router before removing the bit from the drywall so that the router will not blow drywall dust in my face. Brush out the dust left behind from the router before sealing the box opening with caulk.

Corners, intersecting walls, and other obstructions

The best corners are floated so that the drywall is not attached to wood that could form a drywall crack. To pull off an airtight-drywall job in this situation, install the first sheet into the corner without fastening the edge to a stud. Only caulk it. Next, apply a bead of caulk to the edge of the first sheet and bed the second sheet into it, fastening the edge into a corner stud. Use drywall clips if there is not a stud within 10 in. of the corner. For plumbing or conduit runs, such as the large electrical conduit in this shop, slide the drywall behind the pipe, and box it out later. Intersecting walls pose a similar problem: A poorly detailed intersection amounts to a huge hole in the air barrier. It is important to make sure that the drywall air barrier is continuous in these places.

After hanging the room, fill the gaps

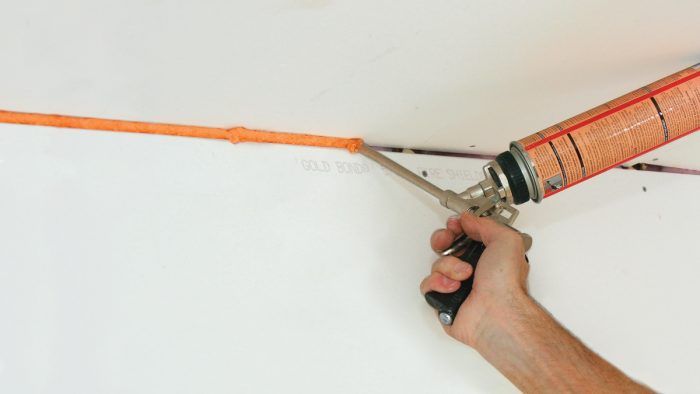
One of the great things about drywall is that the seams don’t have to be perfect. Gaps can be filled with foam and mud. After the ceiling and walls are hung, go along the perimeter and fill gaps with foam or caulk. For gaps larger than 1/4 in., use expanding foam; for smaller gaps, use caulk. Big globs of caulk will make the taping job a nightmare, so smooth the bead with your finger before it sets up. Likewise, cut off foam after it cures. To complete the air seal, tape the seams and the inside corners as you would for any other drywall job.


Hanging the ceilings next

Butt seams are best made between framing members.
Butt seams are best made between framing members. The author likes to use a backerboard that pulls the ends of the panels back, allowing a tapered seam. Adhesive on the face of the framing isolates each framing cavity, so if there is an air leak, it will be contained to one cavity. The adhesive also adds a bit of shear strength and reduces fastener pops.

Seal the holes.
Seal the holes. Cut out holes for junction boxes and light fixtures with a router, and then seal them with caulk. It is better to seal holes with caulk after the drywall is attached (as opposed to before hanging the sheet) because the drywall router or saw might damage the caulk joint. When sealing the edges of boxes like this, make sure to brush off the dust so that the caulk can stick to the drywall.

Seal the perimeter.
Seal the perimeter. After completing the ceiling, apply canned foam along the  perimeter gap between the framing and  the drywall. Let it expand, and cut it off  before hanging the walls. Notice here that gaps between framing members were sealed with caulk before hanging any sheets.

Hang the walls last

A tight seal at the bottom.
A tight seal at the bottom. If it was not done on the preconstruction walk-through, seal all the gaps between framing members with flexible caulk. Here, the author seals between the 2×4 blocks and 2×6 bottom plate. The blocks provide a solid surface for adhesive, which will isolate the framing cavities.

Windows get the royal treatment. Use both latex caulk and polyurethane construction adhesive to seal around window openings. Rather than just running a bead of adhesive around the window rough opening, the author uses flexible caulk on the jack studs, sill, and header. This serves as insurance against building movement at this potential hole in the envelope.

Foam the big cracks. After the walls and ceiling are hung, spray canned foam along the bottom of the wall and in any large gaps or cracks.
Foam the big cracks. After the walls and ceiling are hung, spray canned foam along the bottom of the wall and in any large gaps or cracks. Cut off the expanded foam with a drywall saw or utility knife. Seal smaller gaps with caulk. Smooth the bead with your finger to make taping a little easier.


Myron R. Ferguson (www.thatdrywallguy.com) is a certified building-performance analyst and NAHB Green Home verifier. Photos by Daniel Morrison, except where noted. Drawing: Don Mannes

For more photos, drawings, and details, click the View PDF button below:

From Fine Homebuilding #229

View PDF
Previous: Airtight Drywall Next: How to Hang Airtight Drywall on Ceilings

Guide

Drywall

Chapter

Hanging Drywall

Sign up for eletters today and get the latest how-to from Fine Homebuilding, plus special offers.

Signing you up...

This site is protected by reCAPTCHA and the Google Privacy Policy and Terms of Service apply.
See all newsletters
See all newsletters

Log in or create an account to post a comment.

Sign up Log in

Become a member and get full access to FineHomebuilding.com

Drywall

Drywall

Trusted, comprehensive guidance for choosing, hanging, taping, sanding, and repairing drywall—the right way

View Project Guide

View All Project Guides »

Become a member and get unlimited site access, including the Drywall Project Guide.

Start Free Trial

Drywall Basics
  • Types and Uses of Drywall
  • Planning the Job
Tools and Materials
  • Hanging Tools
  • Taping Tools and Materials
  • Sanding and Finishing Tools and Materials
Hanging Drywall
  • Prep for Hanging
  • Measuring and Cutting Drywall
  • Guidelines for Hanging and Fastening Drywall
  • Hanging Ceilings
  • Hanging Walls
  • Hanging Airtight Drywall
  • Trim Accessories/Corner Beads
Taping and Sanding
  • Taping Basics
  • Taping Seams
  • Taping Inside and Outside Corners
  • Sanding
Special Installations
  • Tricky Transitions
  • Curved Surfaces
  • Other Special Installations
  • Decorating with Drywall
Drywall Repairs
  • Patching Holes, Cracks, and More
Plaster
  • Working with Lime Plaster
  • Plaster Repair
  • Classic Plaster Techniques

Fine Home Building

Newsletter Sign-up

  • Fine Homebuilding

    Home building tips, offers, and expert advice in your inbox.

  • Green Building Advisor

    Building science and energy efficiency advice, plus special offers, in your inbox.

  • Old House Journal

    Repair, renovation, and restoration tips, plus special offers, in your inbox.

Signing you up...

This site is protected by reCAPTCHA and the Google Privacy Policy and Terms of Service apply.
See all newsletters

Follow

  • Fine Homebuilding

    Dig into cutting-edge approaches and decades of proven solutions with total access to our experts and tradespeople.

    Start Free Trial Now
    • Facebook
    • Instagram
    • X
    • LinkedIn
  • GBA Prime

    Get instant access to the latest developments in green building, research, and reports from the field.

    Start Free Trial Now
    • Facebook
    • YouTube
  • Old House Journal

    Learn how to restore, repair, update, and decorate your home.

    Subscribe Now
    • Facebook
    • Instagram
    • X

Membership & Magazine

  • Online Archive
  • Start Free Trial
  • Magazine Subscription
  • Magazine Renewal
  • Gift a Subscription
  • Customer Support
  • Privacy Preferences
  • About
  • Contact
  • Advertise
  • Careers
  • Terms of Use
  • Site Map
  • Do not sell or share my information
  • Privacy Policy
  • Accessibility
  • California Privacy Rights

© 2025 Active Interest Media. All rights reserved.

Fine Homebuilding receives a commission for items purchased through links on this site, including Amazon Associates and other affiliate advertising programs.

  • Home Group
  • Antique Trader
  • Arts & Crafts Homes
  • Bank Note Reporter
  • Cabin Life
  • Cuisine at Home
  • Fine Gardening
  • Fine Woodworking
  • Green Building Advisor
  • Garden Gate
  • Horticulture
  • Keep Craft Alive
  • Log Home Living
  • Military Trader/Vehicles
  • Numismatic News
  • Numismaster
  • Old Cars Weekly
  • Old House Journal
  • Period Homes
  • Popular Woodworking
  • Script
  • ShopNotes
  • Sports Collectors Digest
  • Threads
  • Timber Home Living
  • Traditional Building
  • Woodsmith
  • World Coin News
  • Writer's Digest
Active Interest Media logo
X
X
This is a dialog window which overlays the main content of the page. The modal window is a 'site map' of the most critical areas of the site. Pressing the Escape (ESC) button will close the modal and bring you back to where you were on the page.

Main Menu

  • How-To
  • Design
  • Tools & Materials
  • Video
  • Blogs
  • Forum
  • Project Guides
  • Reader Projects
  • Magazine
  • Members
  • FHB House

Podcasts

  • FHB Podcast
  • ProTalk

Webinars

  • Upcoming and On-Demand

Podcasts

  • FHB Podcast
  • ProTalk

Webinars

  • Upcoming and On-Demand

Popular Topics

  • Kitchens
  • Business
  • Bedrooms
  • Roofs
  • Architecture and Design
  • Green Building
  • Decks
  • Framing
  • Safety
  • Remodeling
  • Bathrooms
  • Windows
  • Tilework
  • Ceilings
  • HVAC

Magazine

  • Current Issue
  • Past Issues
  • Magazine Index
  • Subscribe
  • Online Archive
  • Author Guidelines

All Access

  • Member Home
  • Start Free Trial
  • Gift Membership

Online Learning

  • Courses
  • Project Guides
  • Reader Projects
  • Podcast

More

  • FHB Ambassadors
  • FHB House
  • Customer Support

Account

  • Log In
  • Join

Newsletter

Get home building tips, offers, and expert advice in your inbox

Signing you up...

This site is protected by reCAPTCHA and the Google Privacy Policy and Terms of Service apply.
See all newsletters
See all newsletters

Follow

  • X
  • YouTube
  • instagram
  • facebook
  • pinterest
  • Tiktok

Join All Access

Become a member and get instant access to thousands of videos, how-tos, tool reviews, and design features.

Start Your Free Trial

Subscribe

FHB Magazine

Start your subscription today and save up to 81%

Subscribe

This is your last free article.

Don't miss another expert tip or technique from building pros. Start your free trial today.

Start your FREE trial

Already a member? Log in

We hope you’ve enjoyed your free articles. To keep reading, become a member today.

Get complete site access to expert advice, how-to videos, Code Check, and more, plus the print magazine.

Start your FREE trial

Already a member? Log in

Privacy Policy Update

We use cookies, pixels, script and other tracking technologies to analyze and improve our service, to improve and personalize content, and for advertising to you. We also share information about your use of our site with third-party social media, advertising and analytics partners. You can view our Privacy Policy here and our Terms of Use here.

Cookies

Analytics

These cookies help us track site metrics to improve our sites and provide a better user experience.

Advertising/Social Media

These cookies are used to serve advertisements aligned with your interests.

Essential

These cookies are required to provide basic functions like page navigation and access to secure areas of the website.

Delete My Data

Delete all cookies and associated data