A Better Way to Clean Up Drywall Dust
Make a low-cost dust collector from recycled mud buckets
Other than the inherent danger of working on a jobsite, dust is the biggest nuisance for a remodeler. Actually, dust is one of the the biggest nuisances for a remodeler, and one of the inherent dangers of working on a jobsite. Either way, cutting and sanding wood and drywall, mixing mortar and grout, even just walking from the outside to the inside of a house, day-in and day-out, all make quite a mess. You can put up plastic sheeting to contain dust. You can build a dust collector. You can even cobble together a blower to capture dust and exhaust it out the window.
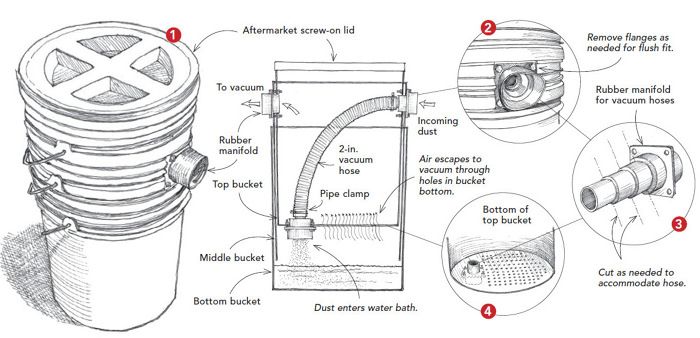
When it comes to drywall dust specifically, a vacuum is often the best tool for clean up. The dust, though, wants to get into the motor’s bearings and kill it, and the powdery mess clogs the filter in a hurry. As a remodeling contractor, I got tired of dealing with the dust, so I built what I call the “vac accumulator.” The idea is simple: Before the dust gets to the vacuum canister, I run it through a water-bath unit to separate the drywall dust from the air pulled into the vacuum. Here’s how it works.
As shown in the drawings, the unit consists of three 5-gal. buckets. I use buckets from the same manufacturer to ensure a tight fit between them. The bottom bucket is the collector and requires no modification. The middle bucket, with its bottom cut out, provides a little more volume for the dust-laden air from the vacuum to drop its particles into the 3-in.-deep layer of water in the bottom bucket. The top bucket has the most modifications. Its bottom has a port for a 2-in.-dia. vacuum hose to admit dust-laden air to the water bath, and it has rows of 3⁄16-in.-dia. holes for air passage out of the water chamber (drawing 4). The top bucket also is fitted with a two-piece screw-on top for easier access and a better air seal (drawing 1).
The trickiest part of making the accumulator is fitting the intake and exhaust ports to the sides. The ports are made of rubber manifolds designed to be modified to fit different hose diameters (drawing 3). I bought three at my local big-box store (they’re next to the shop-vacuum paraphernalia). I used an oscillating multi-tool to remove portions of the bucket flanges so that the intake and exhaust ports sit flat against the bucket sides to minimize air leaks (drawing 2). The two side ports sandwich the top and middle buckets together. They are held in place by 1/4-in. machine bolts with nuts and lock washers.
It took a fair amount of time and expense to build this rig—about $75 for the various parts—but the savings in cleanup time more than outweighs the cost. Plus, there’s reduced wear and tear on my vacuum.
Click here to view larger image
Bob Carli, Unionville, CT
Edited and Illustrated by Charles Miller
For a comprehensive look at protecting a house from dust during remodeling, check out “Dust Control” by Tom O’Brien from FHB #180.










View Comments
Have you tried a little dish soap in the water, to break its surface tension, to help the water collect even the finer dust?
Or perhaps have the dusty air bubble through the water bath as in a Hookah.
Just one bucket with the floor-piece intake hose immersed pulls the dust into the water.
There are ways to simplify this set up, but I think this is elegant.