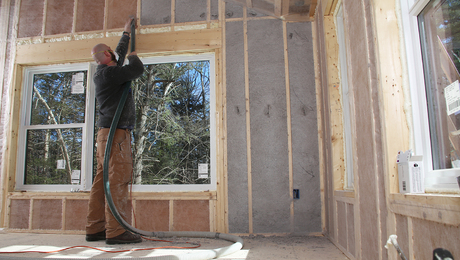
Kneewalls—short walls under sloped ceilings—are common in story-and-a-half homes and in bonus rooms above garages. Although kneewalls can help turn attics into living space, they often present insulation challenges. Most builders install fiberglass batts between the studs and some type of blown insulation between the floor joists. This quick-and-dirty approach doesn’t work well because air from the soffit vents flows freely through the unprotected batts. Because these kneewalls usually have no sheathing on the back side, the fiberglass batts eventually fall out of the stud bays and flop over onto the floor. Whether they flop over or not, though, cold air can enter the living space through unsealed electrical boxes or cracks around access doors.
Many builders also forget to add blocking between the floor joists under the kneewall, so cold air has an easy path into the uninsulated joist bays that separate the first floor from the second floor. A leaky kneewall also can provide a pathway for escaping warm air to heat up roof sheathing, which can contribute to ice dams.
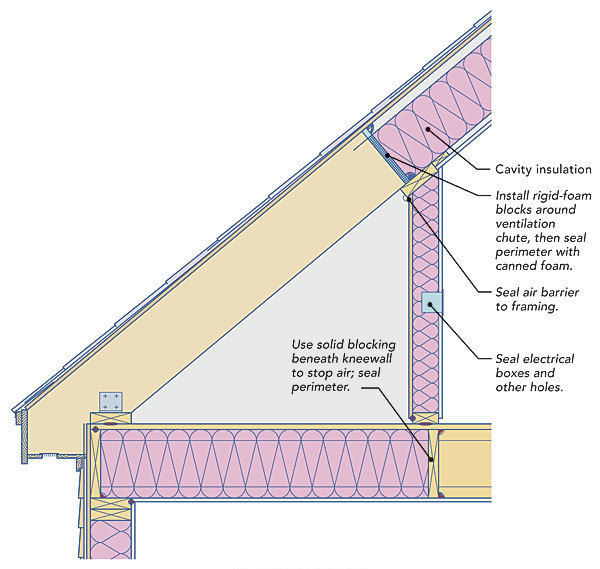
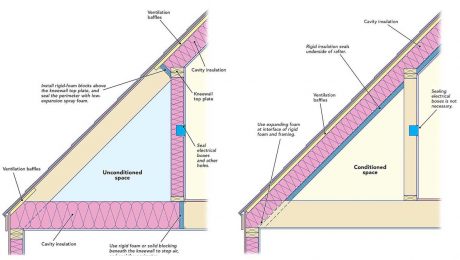
There are two ways to insulate triangular attics behind kneewalls. The traditional approach is to insulate the kneewall and the attic floor behind the kneewall. This method can be made to work, but the necessary air-sealing details are demanding and fussy. A better approach is to insulate the roof slope above the attic. This brings the triangular attic into the home’s conditioned space and is therefore the only method to use if the attic includes ducts or plumbing pipes.
Good: air-seal and insulate the kneewall
If you plan to insulate a kneewall and the attic floor behind the kneewall, protect the insulation with an adjacent air barrier. The air barrier should have no leaks, especially in the areas where the floor meets the wall and the wall meets the roof.
This approach requires a lot of blocking under the bottom plate of the kneewall and between the rafters above the top plate of the kneewall. If the roof is vented, the rafter blocking should extend to the ventilation baffles; if the roof is not vented, this blocking should extend all the way to the roof sheathing. Most builders use rigid foam as blocking, although it’s also possible to use solid lumber. In either case, seal the perimeter of the blocking with caulk or canned foam.After you install the blocking, the kneewall and the attic floor can be insulated. If you are using air-permeable insulation (fiberglass, cellulose cellulose, or mineral wool), it’s essential to include an air barrier on the back side of the kneewall. The best material for this purpose is rigid foam; acceptable alternatives include OSB, ThermoPly, or drywall. It’s also possible to use housewrap, but it’s less effective. Seal all panel seams with caulk or compatible tape. If you install rigid foam on the back side of the kneewalls, remember that thick foam is more likely to keep stud bays warm and free of condensation than thin foam.
An insulated kneewall should be air-sealed as if it were an exterior wall. This means that all penetrations (including electrical boxes and duct penetrations) should be made as airtight as possible.
Access doors need to be detailed like exterior doors. These doors need to include thick insulation (for example, several layers of rigid foam glued to the back of the door), a tight threshold, good weatherstripping, and a latch that pulls the door tightly shut.
Better: insulate the sloped ceiling
It’s usually easier and more effective to insulate the sloped ceiling rather than the kneewall. In a traditional story-and-a-half Cape, the insulation should extend from the rafter bird’s mouths to somewhere above the flat ceiling above the second floor.
Sloped roof assemblies can be insulated with a wide variety of insulation materials, including spray foam, fiberglass batts, or blown-in cellulose. If you choose an air-permeable insulation like fiberglass or cellulose, most building codes require the roof assembly to include a ventilated air gap directly above or directly below the roof sheathing. If you’re installing spray foam, the roof assembly can be unvented.
Air-permeable insulation should be protected by a durable air barrier on both sides of the insulation. The top-side air barrier is usually some type of panel forming the bottom of the ventilation chute, while the bottom-side air barrier can be drywall, OSB, ThermoPly, or rigid foam. To ensure a tight air barrier, the seams of these panels should be sealed. It’s also important to caulk the joint between these panels and the kneewall top plate.
Make sure that you install enough insulation to meet or exceed minimum code requirements. The 2012 IRC requires at least R-30 in climate zone 1, R-38 in zones 2 and 3, and R-49 in zones 4 and higher.
More details online
The details here will help you to meet the requirements of Energy Star’s Thermal Bypass Checklist. Members of Green Building Advisor get full access to the detail library, which includes a set of Energy Star details at GreenBuildingAdvisor.com/energystar.
1. Keep the attic outside Insulating a kneewall and the attic floor behind the kneewall is possible but tricky. This method of insulation won’t work if the triangular attic includes ducts or plumbing pipes. An insulated kneewall is effectively an exterior wall, so you’ll need a layer of rigid foam, drywall, OSB, or ThermoPly on the back side of the kneewall to prevent cold air from degrading the performance of the insulation. Remember to seal air leaks at any electrical boxes in the kneewall and ceiling below the insulated floor.
2. Bring the attic inside Insulating between the rafters simplifies the air-sealing details. Now that the kneewall is located within the home’s thermal enclosure, it’s no longer necessary to air-seal electrical boxes or access doors in the kneewall. Don’t forget to verify that the R-value of the roof insulation meets minimum code requirements.
 Keep the attic outside
 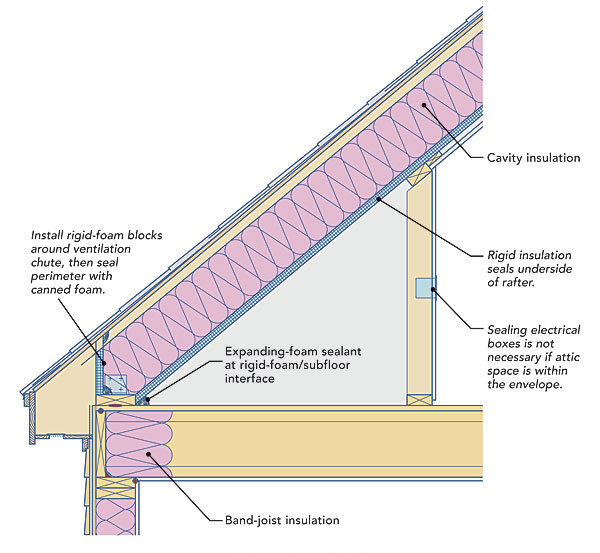 Bring the attic inside.
Remodeling: The devil’s triangle
A new construction project has many obvious advantages over a retrofit project. If you’re building a new home with a kneewall, it makes sense to insulate between the rafters before the kneewall is framed.
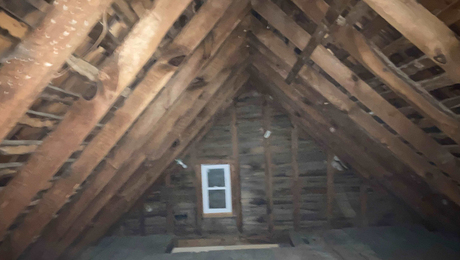
Weatherization workers who insulate older homes refer to an attic behind a kneewall as “the devil’s triangle.” These tight environments aren’t conducive to high-quality work. In some cases, these areas are so tight that it’s hard to crawl in there, much less swing a hammer. Even when a worker can enter with a tool belt, a staple gun, and a cordless drill, it probably will be hard to get full-size sheets of drywall or OSB into position.
If a spray-foam contractor is willing to take on the job, count your blessings, but check with your local building official to find out whether the foam needs to be protected by a layer of drywall.
If you have no choice but to crawl into a tight space to install sheet goods such as drywall or foil-faced foam, one trick is to score the facing on one side of each sheet so that it can be folded in half to fit through a tight opening.
If you have to insulate a triangular attic that is too small to crawl into, it may be necessary to fill the space with dense-packed cellulose. Because this technique doesn’t allow for roof ventilation, it is somewhat controversial. Nevertheless, this approach has been used successfully for years by weatherization contractors in New England. According to Bill Hulstrunk, technical manager at National Fiber, “We do it only if the area is so small that we can’t get a body in there. In other words, the kneewall has to be 18-in. high or less. The first time the tube is inserted, it sits on the bottom of the floor. Then after a while, you pull out the tube and reinsert it higher up to top everything off.”
Drawings: Steve Baczek, Architect


View Comments
can you place foam insulation board across the backside of the studs as mentioned as an air barrier, this also adds more R value?? Can the insulation in between the studs in the knee wall be paper faced or would that create issues with condensation? climate zone 2 in florida.
what is the best insulation to use inside knee wall paper faced or not? with foam board behind it? or is it better to use house wrap or double bubble foil?
trying to insulate a ventilated gambrel roof, few areas have header and inset area closer to roof sheathing, majority of areas are vertical walls 3 feet away from the side sloped roof. upper portion of roof has ridge vent & gable vent.
Hey Martin, thanks for the information. I am in a similar situation as Andrew mentioned above. I currently have Fiberglass batts with Kraft facing towards the interior of the home. I would also like to add foam board as well. I’m just not sure what type of foam board to use and if the foam board can also have a vapor barrier. I live in Los Angeles, Climate Zone 3.