Prep Doors for Knobs and Dead Bolts
Get the hole layout right, and the rest of the job is straightforward.
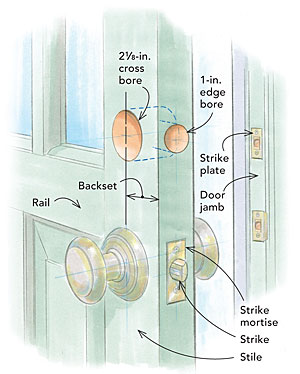
Boring and mortising a door for a knob or lock is not a hard job, but if you get the holes in the wrong spot, you’re in for a tough fix. You might even have to buy a new door. Fortunately, it’s easy to get the holes right if you pay attention to two critical dimensions and use the paper layout template that comes with the door.
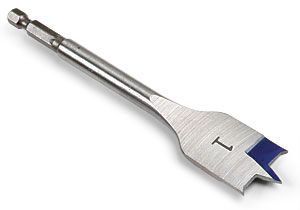
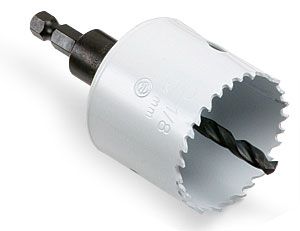
You need a 2-1⁄8-in. hole saw and a 1-in. spade bit for making the holes. A few dead bolts need a 1-1⁄2-in. hole saw instead of a 2-1⁄8-in. hole saw, though, so check the instructions to make sure you have the right one.
The first critical dimension you need to know is the door thickness. Exterior doors are generally 1-3⁄4-in. thick. Most interior doors are 1-3⁄8-in. thick. When it’s time to mark the door for boring, choose the mark on the template that corresponds to the door thickness. If the door is thinner than 1-3⁄8-in. or thicker than 1-3⁄4-in., you’ll likely need a special-order lock.
The second critical dimension is backset, which is the distance the center of the knob or dead bolt is from the edge of the door. Doors almost always have either a 2-3⁄8-in. or 2-3⁄4-in. backset, and most modern locksets and dead bolts accommodate both. If you’re adding a dead bolt, match the backset of the existing doorknob; if you’re starting with a new door, choose the backset based on the door. Generally, 2-3⁄4 in. is the preferred backset because it leaves more room for your knuckles when you’re closing the door. However, narrow doors (less than 32-in.) and doors with narrow stiles, such as many full-glass doors, often look better with a 2-3⁄8-in. backset because it brings the knob closer to the center of the stile.
Most doorknobs are installed between 32-in. and 36-in. above the floor; dead bolts are about 44-in. above the floor. However, you may have to adjust these dimensions slightly to match other doors or to avoid interfering with screen-door hardware.
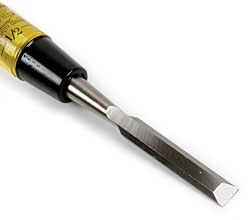
Once you’ve drilled the door, mark the mortises with a sharp utility knife. I like to screw the strike and strike plate in place temporarily and then scribe around them. The knife groove makes it easier to locate the chisel accurately. Make sure your chisel is sharp, and work from the top and bottom toward the hole in the center to prevent slipping past the outline of the mortise. Finally, be sure to use the 3-in.-long screws that come with the dead bolts, because they provide much greater resistance to forceable entry than do shorter screws.
Step by Step
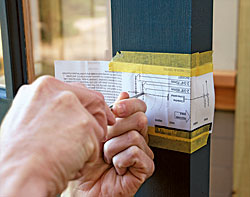
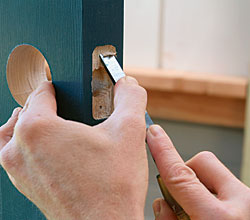
| 1. Tape on the template. With the template level and attached to the door with painter’s tape, mark the center of the cross bore with a nail or scratch awl, then mark the center of the edge-bore hole based on the door thickness. Make both marks deep enough to prevent the pilot bit on the hole saw from moving when you start the drill. | 2. Drill the cross bore. Using a 2-1⁄8-in. hole saw or a 1-1⁄2-in. hole saw (check the lock instructions), drill about 1-in. deep. Remove the hole saw, and use the pilot hole to register it for drilling from the other side. Keep the bit level, and maintain a firm grip on the drill. |
 |
 |
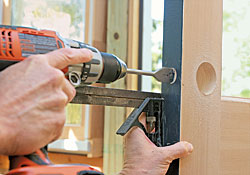
| 3. Drill the edge bore. Check the manufacturer’s instructions for the edge-bore diameter. Most strike assemblies require a 1-in. hole. Use a spade bit for wood edges and a hole saw for metal edges. Keep the bit level and straight so that the bolt will operate smoothly. | 4. Mark the mortise. Insert the bolt assembly into the door edge, and temporarily screw it in place. Mark the shape on the door’s edge with a utility knife. Do this in several light passes so that you don’t slip with the knife and mar the door. Remove the bolt assembly. |
 |
 |
| 5. Chisel the mortise. Use a sharp 1⁄2-in. chisel to cut the mortise for the bolt assembly. Work from the edges toward the hole to avoid slipping with the chisel and messing up the door’s edge. Work incrementally, taking shallow passes and keeping the bottom of the mortise level. Deepen the mortise until the bolt fits flush with the edge of the door. | 6. Fasten the bolt. Using the screw holes made earlier, drive in the screws that secure the dead bolt to the door’s edge. A conventional screwdriver is less likely to strip or damage the screw heads than a cordless drill or impact driver. |
 |
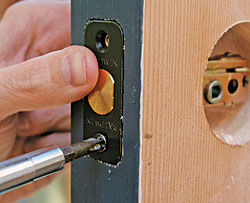 |
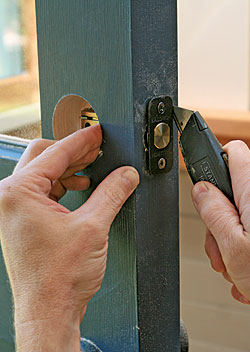
| 7. Install the lock assembly. With the lock oriented correctly and right side up, align the parts to correspond with the proper backset (2-3⁄8-in. or 2-3⁄4-in.), and drive in the long screws that attach the two halves of the assembly. | 8. Locate the strike. Cover the end of the bolt with chalk powder. While holding the door shut, operate the lock to transfer the bolt location to the jamb. With the mark centered in the strike plate, trace the hole in the center of the strike. |
 |
 |
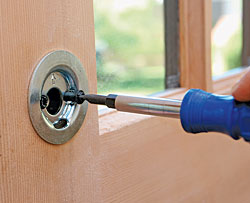
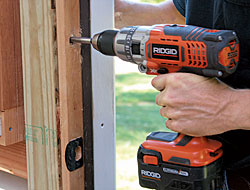
| 9. Drill the jamb. Use a 1-in. spade bit to drill through the jamb for the lock bolt. Close the door, and check the lock operation. If the lock is tough to turn or won’t engage fully, expand the hole with a small chisel or round file until the bolt engages easily. | 10. Install the strike. Screw the strike plate in place temporarily, and then use a utility knife to trace around the strike in several passes. Remove the strike, and mortise the recess with a 1⁄2-in. chisel. Use the provided 3-in. screws for the greatest resistance to break-in. |
 |
 |
Tools for preparing doors
You can find cheaper hole saws than the ones shown below, but it’s worth spending a few extra dollars for pro-quality saws with bi-metal construction, which stay sharp longer than standard saws.
Web Extra: How To Install an Exterior Doorknob in a New Door
Photos and Illustration: Dan Thornton
-
1-in. spade bit; $5
-
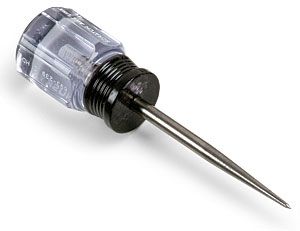
Scratch awl; $5
-
2-1⁄8-in. hole saw with pilot bit; $24
-
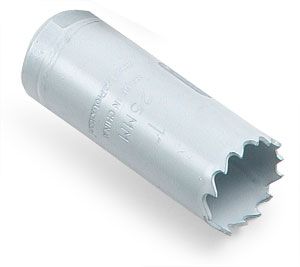
1-in. hole saw; $8