
A Tale of Two Pitches: Exploring Off-Angle Roof Framing
See what decisions need to be made about rafter angles and soffit depths, if you are building intersecting roofs on houses with wings of varying widths.
Overview
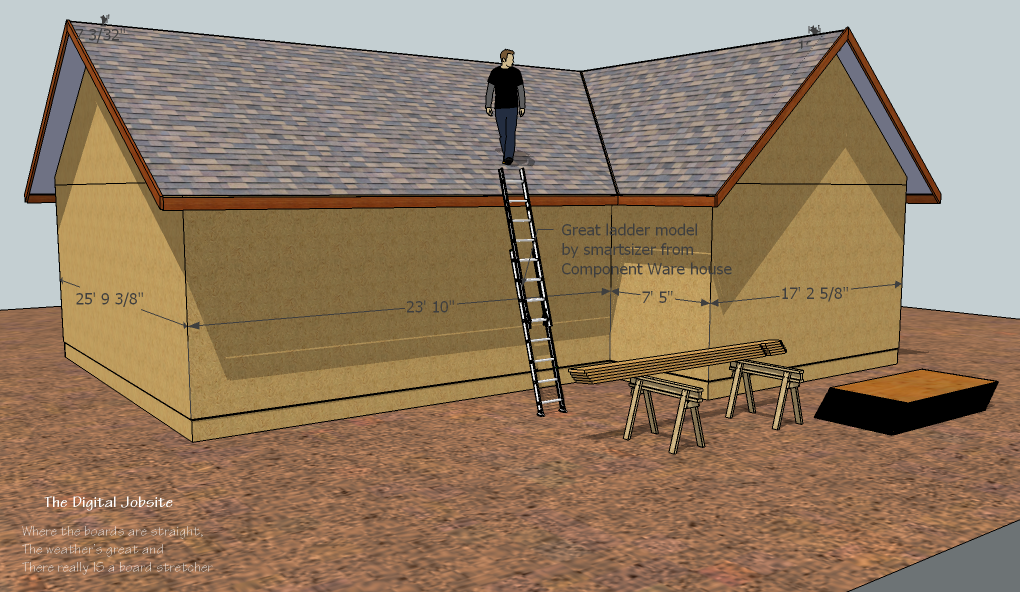
Although uncommon, there are situations where architectural parameters require “off angle” hip and valley roof construction. The most common parameter is to maintain an equal ridge height over building sections with differing spans. To maintain a consistent ridge height in these situations the roof pitch must be adjusted. Another by-product of this roof configuration is varying soffit heights and widths which require further design decisions.
This video above shows how the finished roof planes in off-angle roof construction will look when completed. With the Orbit capability of SketchUp we can check out some of the various roof features as well as get an overview of how dimension/angle factors influence the resulting configuration.
Peeling an Onion… in Reverse:
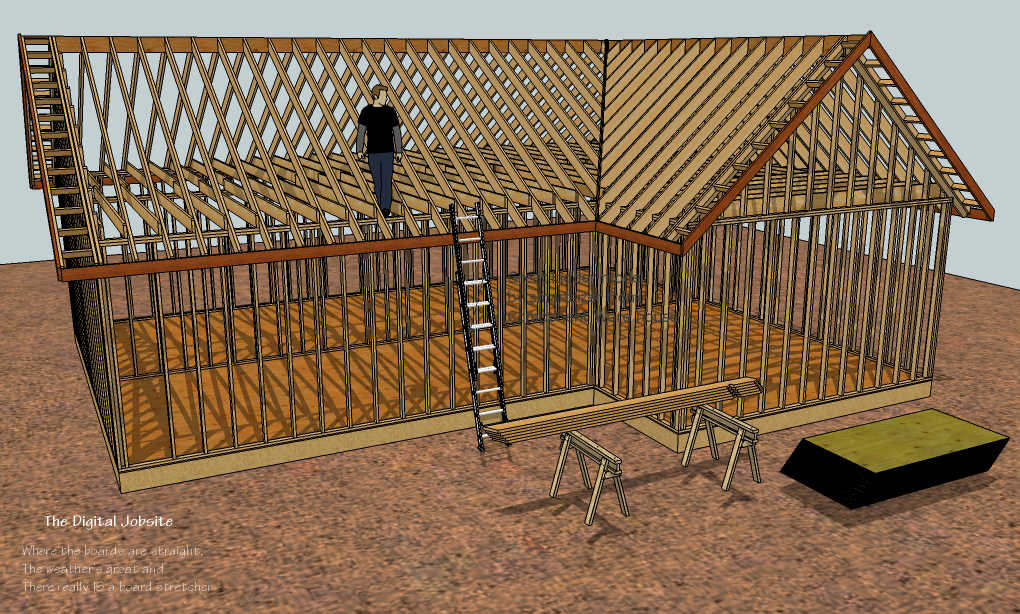
It was fun to “build” this roof framing model considering the Great Weather, Straight Lumber and a fully functional Board Stretcher available at The Digital Job Site. As I recall, the last time I worked on a real roof like this it was cold, VERY windy, and the lumber wasn’t straight.
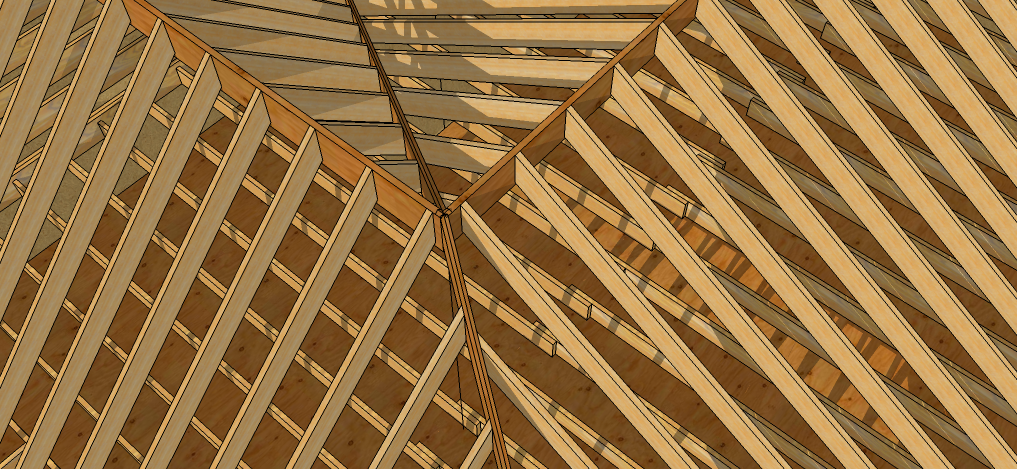
Checkout this next video clip to look into the what and why of soffit conditions generated with off-angle roof construction. We’ll also get a look at how actual rafter framing would look on such a roof. Using SketchUp’s Layers feature is not unlike peeling layers of an onion (except I hope shortcomings in my video production won’t bring you to tears) so we can get an up-close look at how various framing components fit together.
Thanks for stopping by The Digital Job Site…
-
Achieving even ridge height requires non-standard rafter cuts
-
-
Differing spans and matching ridge heights require off-angle roof framing

View Comments
Complex roof cutting is part of why I love Sketchup so much. Why stand around on the jobsite scratching your head when you can cut an entire virtual roof in the comfort of your own home.The true power of Sketchup is revealed when you can cut an entire complex roof system on the ground then hoist it all upstairs for a perfect fit (lumber inconsistencies aside).
For those with existing casual knowledge in using Sketchup, I think it is important to emphasize the point Mr. Jackson made about using the temporary top bevels on the ridge beams. Another approach (my approach) is to draw the rafters first without a ridge beam; as if they are simply mitered at the peak. Then, based on the structural ridge beam size you need draw a beam that passes through the rafters at the proper location. If you had the forethought to make the common rafters into components then you just cut one back and they all cut back.
Better yet... for anyone trying to decide whether or not they want to upgrade to Sketchup Pro version... Solids Tools make quick work of cutting complex angles on virtual jack, hip, and valley rafters.
DC
Dreamcatcher,
Thanks for "stopping by" the Digital Jobsite. Your in-depth and wide ranging experience from work and business along with extensive knowledge of SketchUp is always an asset to the discussion here.
As there are as many ways to model things as there are to build them I hope other viewers appreciate the methods and perspective shared in your comments,I know I do.
Matt
to achieve equal fascia height and projection on your unequal slope intersection roof you have to raise your minor roof walls the difference of fascia elevations
slstamand,
Thanks for your comments...
While raising wall heights can indeed make the fascia line up, all other things being equal, it would make the ridge heights differ by the same amount. Its a matter of choosing where to compromise in a selection of geometric constraints.
I hope you find The Digital Jobsite and SketchUp helpful in visualizing non-standard roof framing configurations.
Matt
That it does not, all math and scaling is done to the overhang instead of the walls like equal pitch roof thus your ridge heights will always be the same. building an unequal slope intersection is an essential part of becoming a journeyman carpenter.
sketchup is a great program. with a few changes on what you have made it would be a great resource to use to teach apprentices that have a hard time visualizing
slstamand,
I respect your persistence. It brings to light more of the geometric constraints of roof framing. It also helped me to understand the point you raise: Soffit width and fascia height can be made equal by adjusting the roof pitch and rafter bearing height.
If there is viewer interest I will draw and upload a roof framing model to clarify how wall and rafter framing would be configured to meet this design criteria. I agree it would be a great resource for the learning process.
Thanks for sharing at The Digital Jobsite.
Matt
Thanks for this post.you might be interested in checking out fine luxury homes by Brejnik Fine Homes (www.brejnik.ca). They build fine luxury houses. Brejnik team consists of qualified and trusted: Architects, Interior Designers, Appraisers / Lenders, Trades & Suppliers, Geo-technical engineers, Structural Engineers, Arborists, Landscape Architects, Pool & Water Feature.
I watched both parts of the FHB tutorials about this model (linked below) with great interest. At the end of the second one you began verbally stumbling with your explanation a bit. I believe you have made a couple of simple errors in your drawing that can, and should, be fixed. And fixing them will show you something's about unequal pitches that you have missed.
1) If the H/V rafters are not backed, the H/V rafters should not be equally split from the Hip/Valley line in plan-view.
2) Also, if you will "fly" around in your model and look up the valley you will notice that the valley line does not align to the outside of the inside corner of the fascia as it should. It appears that you have the meeting planes aligned to the inside of the fascia thickness instead of the outsides. (?)
3) The offset height of the flat topped ridges is correct. Showing the bevels on the Ridges and H/V rafters adds to the confusion. If the roof will be framed w/o backing the Ridges and H/V rafters (bevels), then they should be shown as you would frame them. That is what makes SU so cool, Real, and Live, 3-D models.
Your tutorials on using SketchUp are very good but your understanding of the Irregular Geometry is slightly off. Maybe you could do a follow up, "Part Three", showing the fixes that are needed and how to do them?
Mr Jalapeno,
Thanks for being so observant of details in this post and its model.
I'm not exactly sure what the point of your first comment is. The hip/valley members are 1 1/2" thick and my intent was to show the bottom surface of roof sheathing meeting at their centers. If you're saying they should be off-center please explain.
Your observation is correct about the H/V line meeting the inside corner of the fascia instead of the outside. You are correct. Measure the offset in SU and you'll see it is less than 1/2". From a modeling standpoint it should be corrected. Even with perfect math, in a framing situation an error of that size could be the result of nominal framing lumber variance, crowns in rafters, etc. The roof framer would need to use his quality conscience to decide what, if anything, should be done to correct it. I've long lived by the credo: "If it takes a little work to make something a lot better, it's worth it. If it takes a lot of work to make something a little better, it's probably not worth it." This seems to be an ideal application of the principal.
The idea of showing bevels on top of the ridges is to help visualize how the roof planes "plane out" with aid of the "Z flashing" effect in SkectchUp. If I do a "Part III" as you suggest I can address this to help eliminate confusion.
I appreciate your input on this topic. Your depth of knowledge and insight will benefit any who invest a little time to read our dialog.
Thanks,
Matt
Matt,
About point No. 1. When framing Irregular Hip/Valley Roofs, the H/V Rafter members are not equally split by the sheathing lines. (They are off-center.) To Illustrate this using SketchUp and your models dimensions, draw a right triangle with one leg at 25' 9-3/8" and the other leg length at 17'2-5/8", now scale the triangle down so the hypotenuse is reduced to 1-1/2" (or the thickness of the H/V Rafter) I will then use this scaled down triangle to properly place the H/V footprint, in SketchUp virtually as well as on the job reality too.
Also, when building an Irregular with Equal Ridge heights, the tangent of the plan angle is (Minor Span/Major Span). *(If the building has equal width overhangs then the spans should include the overhangs, including the fascia thickness.)
There should be no difference in a roof modeled in SU or framed in reality.
Mr Jalapeno,
I understand your explanation of the process for locating the offset hip/valley footprint. I can't see how or why the offset is necessary though. Can you explain further? It seems that, for a carpenter assembling the rafters, it's more straightforward to adjust the jack rafter lengths and geometry to center the H/V than to work in a very small offset dimension (1 1/32" and 15/32" in this example). Does centering the H/V warp the roof planes or some other subtle distortion?
Not including fascia thickness in the overhang dimension in the Tale of Two Pitches model was something I realized late in the modeling process. I should have adjusted things at the time as now you've nearly convinced me I should re-work the model. Do you happen to have a good recipe for humble pie? It's looking like I'm going to have to eat a slice or two :-)
Looking forward to your response...
Matt
Matt,
As Chuck Miller on FHB's site says . . .
"You could do it like this (centered), . . . but there's a better way." =)
Truth is, Irregular H/V Rafters can be put in either way, Centered of Shifted, but If you want the roof to be easier to construct, and fit together absolutely perfect, then it is my opinion that the shifted method is better. (The old German Carpenters did them both ways.) However! Centered Irregular Hips require backing (At least on the steeper side which would stand proud if not backed, Shifting them plans both square shoulders to the same Hap for each roof. Equally splitting the rafter that joins unequally split pitches? . . . . Doesn't make sense to me!). Also, I don't use the perpendicular shift dimensions for locating the "Footprint", I use the right angle leg dims, of the scaled triangle, (found along the plate lines from the corner). These dims are more useful for deriving the jack lengths and don't require extra math steps to find.
And, the same geometry found at the plane of the intersecting plates can also be found at the plane of the top of the ridge board. This information should be the secret "clue" for the placement and rotation of the Hip Rafter as you demonstrate the Hip roof construction in your tutorials. I hope this helps with your "Shift Vs. Centered" question.
About the overhangs/fascia issue; Your SU model has the Major Roof showing the Fascia planed to the outside shoulder and the Minor Roof is planed to the inside shoulder, so the model is inconsistent in that respect. (and it is even visible in the small video windows above, that is what made me look at it.)
Even with SketchUp, and drawing Irregular H/V Roofs, it helps to know the proportions of the roofs to construct everything perfect. To simplify your demo above, make the spans simpler with their proportions, for example, 30' and 20'. (And use "Face -to-Face" of stud walls for the rough frame dimensions. Do not include the sheathing thickness, that should be part of the overall overhang dimension, as that is how rafter lengths should be calculated from.)
"Smooth Framing" is what I like to call it.
=)
Mr Jalapeno,
Progress slow but sure...
Just wanted to let you know that I've re-worked the roof model for this blog post and uploaded it to the Component Warehouse. I fixed the fascia position by "re-cutting" rafters to make the roof planes line up. I left the H/V rafters in the "centered" orientation and show beveled tops so roof planes line up correctly.
Since the "offset" H/V method you've explained (very clearly) is new to me, I've got to spend a little time figuring out how best to model and then explain the process. Viewers who look closely at the (newly revised) Off-Angle Roof model will notice complex angle/bevel cuts necessary when the H/V rafters are centered. To clarify the offset H/V method I'll "build" and upload an additional off-angle roof model to compare the similarities and differences between the two methods discussed here.
Thanks Mr J. and who've participated in this discussion so far... something tells me its not over yet :-)
Matt
Matt,
Placing the fascia to plane to the outer edge is all that was needed to fix the "A Tale of Two Pitches" SketchUp demo assembly. With regular pitch H/V roofs the equality simplifies fascia alignments. With irregulars, the equal thickness of the fascia becomes a factor for proportionate slopes. Same with ridges, this is what determines which pitch is the Major and the other Minor. (Of course, your demo has both ridge heights equal, so either could be considered the Major Pitch, but I always default to the Lesser Pitch as the Major Pitch, for explanation sake. * The Major Pitch contains the Ridge and typically is the Lesser.)
The thing about asymmetrical offset H/V rafters that I really prefer is the ease with which they can be processed. For most typical conventional roof framing they would be processed almost as easily as a common, the length derived using the same "Effective Run" base dimension as used to calculate the Commons. And because the modern circular saws can be set to match cheek-cut bevels, this tool geometry is a big part of the ease with which these rafters can be accurately marked and cut (*processed). And backing bevels are not absolutely necessary to the process them as with the equally split (centered) Irregular H/V Rafters. (i.e.; as shown in your SU Demo.)
"You either shift it, or you back it"
In My Opinion, because of the difference in the way they are processed to fit, it is necessary to examine both methods when demonstrating Irregular Roof Framing. This forum discussion should start fulfilling that requirement. Thanks for sharing!
It would be really cool to see another SU Demo showing how to draw in SketchUp an Irregular H/V Roof with the proportionate offset and square shouldered H/V Rafters. There is more to these roofs than "meets the eye". Have "sum more" fun.
Mr. J
Hey Mr J,
Truer words are seldom spoken than the quote in your most recent comment: "There is more to these roofs than "meets the eye"." Ironically, in this case the teacher (me?), learns a lesson in the process of teaching. The subtle though important issues about hip/valley placement that you've highlighted in our ongoing dialog on the Tale of Two Pitches saga have inspired me to follow your suggestion to do a follow up post showing the "offset method" of framing an off-angle hip roof system.
Since I've personally not framed this type of roof using the offset method it may take awhile to put the Digital Jobsite Blog post together. I love a new challenge and learning experience so I'll be working on the SketchUp model first. Once completed I'll upload the model to the Component Warehouse for feedback. Hopefully by that time I'll have learned enough about the process to post a viable follow up. I see a problem on the horizon though: what to title the new post? "A Tale of Three Pitches" sounds too much like a baseball game... HHMMMM...
Thanks for your valuable input and feedback on a topic you're obviously invested in.
Regards,
Matt Jackson