Iamme is working on a house originally built in the 1960s that’s developed a saggy floor. Elsewhere in this well built house, the floors are fine. But in one room, the 16-ft. 3×10 joists have dipped 3/4 in. in the middle of the room. Joists have X-bridging at mid-span, and are capped with 4-in. plank subflooring. The ends of the joists rest on I-beams.
As Iamme weighs his options, there are a couple of caveats. First, he’s not in a position to take up the subfloor and attack the problem from above. There’s also potential cracking in a tiled bathroom to consider.
He’ll have steel beams on site, so he’s wondering about using them to cure this deflection.
“What I am thinking is to place one underneath across the middle of the joists, setting jacks on steel plates to not crack the slab, and jacking them over several weeks until the joists are level,” Iamme writes in a post at Fine Homebuilding’s discussion forum. “I’d then put in whatever my engineer calls for and sister the original joists, but I’ll assume the originals are not capable of carrying any load without deflecting again, since they have already been deformed, so I’ll design the new lumber for the full load.”
That’s the plan. But Iamme wonders whether the jacking will have unintended consequences.
“My biggest concern, other then eventually repairing the tile and plaster upstairs which will likely crack, is that the joist ends will rise off the I beams they rest upon instead of the joist returning to level, though I plan to do the operation over several weeks, 1/8 in. each day. The end rising does not seem likely on one end of the joist, since there is a load bearing wall above, but on the other end it is only carrying a partial floor load.”
Any advice? That’s the subject of this Breaktime Spotlight.
Reinforce the joists with steel strapping
Rather than jack up all the joists at once, Junkhound writes, go after them one at a time and reinforce them with steel strapping 2 1/2 in. to 3 in. wide and 1/8 in. thick.
He suggests using a drill press to bore a series of 3/8-in. holes the length of the strapping at spacing recommended by Iamme’s engineer to resist lateral shear. The pattern is likely to include more holes near the ends of the strapping and fewer near the center. Bolts should fit the holes snugly.
Jack up a single joist, bolt the strapping to the joist and remove the jack, Junkhound says. Then move on to the next joist, adjusting the amount of upward bow depending on how close to dead flat the first joist ends up.
Junkhound has followed this approach with 2x10s, 2x8s, 3x12s and even a 16-ft. 6×12, all with great success.
“[The first] one was on my brother’s house with 1-in. sag on 2x8s,” he says. “Thirty years later the floor is still dead flat.”
But will the ends of the joist lift?
Iamme’s lingering concern is that the ends of a joist will push upward as the middle is jacked up, causing problems with the walls above.
Whether it creates a problem will depend on what’s built on top, Junkhound replies.
He points out that it takes about 2 tons of pressure to bend a 3×10 3/4 in., meaning that a 3-ton jack at the center of the span should do the trick. But there should be enough weight on the joist end to keep in place. That would apply for a shear wall, but if the wall above is lath and plaster, it would be smart to watch carefully for signs of cracking.
“The single joist will try to raise that section of the wall, and there’s not much elasticity in old plaster,” Junkhound says, adding, “Found in one case (jacking each joist over the course of a day, not all at once) that 4-5 100-lb. bags of sand stacked on the floor above the ends of each joist being jacked alleviated the cracking.”
Joists that dry in place will be hard to straighten
Oldhand wonders whether the joists were installed green, and if that were the case they could have developed a sag as they dried in place. That would make it very difficult to straighten them now.
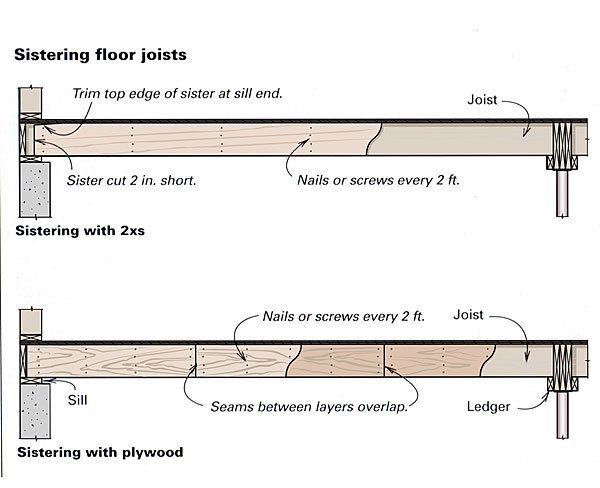
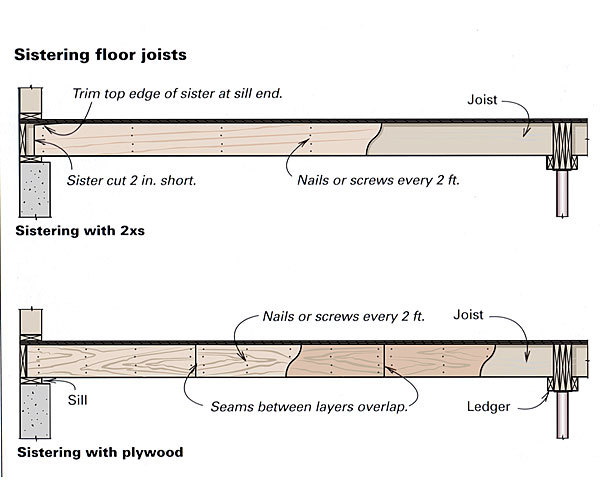
He’s not alone. Florida also doubts Iamme is going to get much deflection out of a 50-year-old 3×10 in a matter of weeks. He’s had better luck in taking the sag out of a roof by cutting the old rafter in two, sistering in a new 2x next to it and then jacking them both up and nailing them together.
Besides, Oldhand adds, a 3/4-in. dip over a 16-ft. span “isn’t the end of the world.”
Iamme, however, suspects the joists were dry when they went in. In other houses by the same builder, Iamme has found identical looking stock in “fine shape and level.” Plus, there’s no sign of twisting, which would have been a clue to green lumber drying in place.
His theory is that the design in this house was somewhat different than what the builder was used to, resulting in a point load he hadn’t properly accounted for.
“Not everything in old houses can be fixed and 3/4 in. isn’t huge,” Iamme writes, “but in this case it is an expensive house and the problems it caused are noticable even if you barely look – some doors don’t hang right with 1/2 in. gap at one jamb, and the floors clearly slope and creak extremely badly. Since the floor upstairs will get replaced eventually and I can fix the subfloor then, I want to try to make the joists right now while it is open below.”
Fine Homebuilding Recommended Products
Fine Homebuilding receives a commission for items purchased through links on this site, including Amazon Associates and other affiliate advertising programs.

Handy Heat Gun

8067 All-Weather Flashing Tape

Reliable Crimp Connectors



View Comments
I solved an almost identical problem in 1995. In my case, there was sag due to only some of the joists (20 ft long 2X12s dating from the 1970s). The sag was annoying, but the floor bounced so terribly that 5 year old walking through would make dished fall in a buffet. In this case, I need to deal with almost 50 linear feet of floor. No room for a steel beam, nor any way to get a long piece of anything into that basement. My solution required a pile of 12 ft 2X6 (the longest element that could make it into the basement) and some plywood. I fabricated a 5.5 inch beam with glue and 16d nails. That was lifted on jack-posts to the bottom of the lowest-hanging joists. I had a set of extra-beefy joist hangers made from inch and a half X 3/16" angle iron. Also, I made a set of tensioners from the same angle iron and 3/8" threaded rod. Using a combination of the tensioners installed on all of the high-sitting joists I lifted the new beam one turn of the bolt on the threaded rod. This was followed by snugging up the jack-posts from below. It took several weeks, but I finally had all the joists snug against the top of the new beam. The I installed the joist hangers and removed the posts. The floor was extremely solid (no more bouncing) and the sag was less than 1/8". The whole job cost under $200 and only 6" of headroom in the basement. I was smart enough to miter the corners of the joist hangers to reduce risk of a tall person needing sutures in his head. In all work I only had to repair on joist, and that required sistering with plywood.
Consider also converting your 3x10 to a flitch beam by adding a 3/16"x10" or 1/4" x 10" steel plate and a 2x10 on top of that and bolting through them all. The additional 2x10 keeps the steel plate from buckling. The stiffness would be improved enormously. A lot of trouble though.
The whole concept of maternity leave is an affront to gender equality
I study in General knowledge and this article very good for my knowledge.
I have a similar project on my son's home. We sistered on 1-5/8" x 6 18 gauge steel studs laid horizontally along every existing wood joist. We notched out the plate ends to allow vertical movement since we didn't need the plate bearing just the straightness of the stud. We picked out the existing ceiling joist with the worst sag and used that one as a starting point. 2 structural screws (or bolts) every 16" along the full length of the joists. Leveled out the ceiling perfectly. Steel, even the heavier 18 gauge is so much easier to work with than wood and every piece is dead straight. You loose a miniscule amount of ceiling height but it is flat! The steel attached to the wood joists minimizes further deflection issues and adds very little weight to the ceiling.