
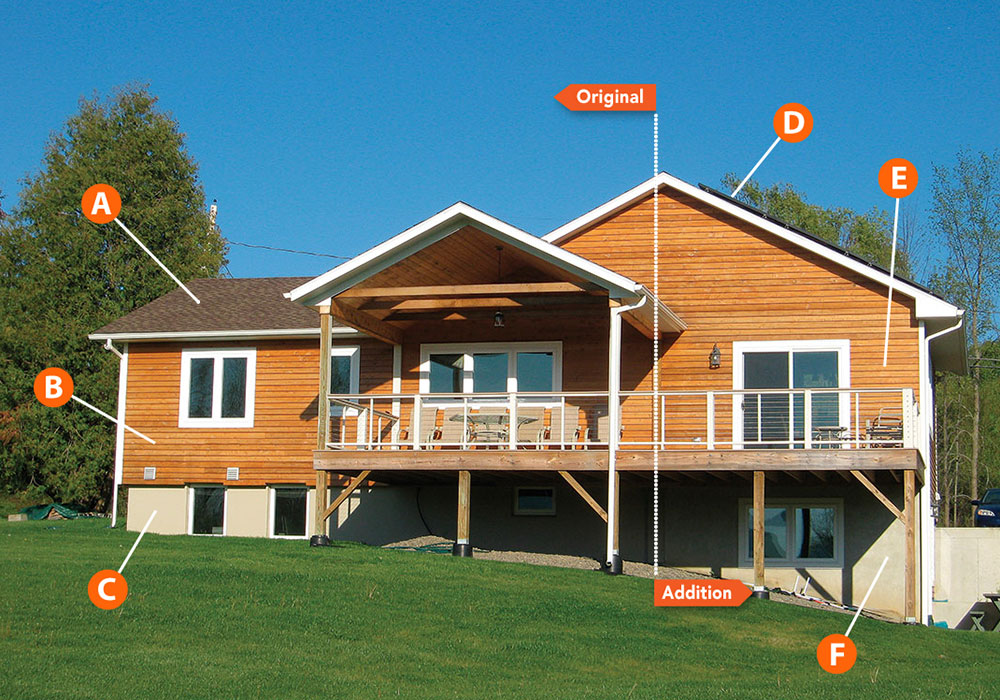
A Retrofit for the Future
An old ranch house gets an improved shell, solar panels, and an upgraded heating and cooling system to provide energy independence.
Synopsis: Painting contractor Bob Ritacco and his wife dreamed for years of living in an energy-efficient house, but it wasn’t until they had spent 24 years in two poorly performing houses that they finally got their chance. They bought a small ranch in poor condition, intending to tear it down and build a new home until architect David Toder convinced them to do a deep-energy retrofit (DER) instead. This aligned well with Ritacco’s interest in zero-net-energy (ZNE) design. The remodel included an addition made with insulated concrete forms (ICFs). Ritacco adopted the Building Science Corporation’s standard for insulation in a cold climate. To create an R-60 roof, he built 11-1/2-in.-deep rafter bays, filled them with dense-pack cellulose, and then added 4 in. of rigid foam on the roof. To create R-40 walls in the addition, he added 1-1/2 in. of closed-cell spray foam to the outside of the ICFs; to do so in the existing house, he filled the stud bays with dense-pack cellulose, then added 4 in. of closed-cell spray foam to the outside. Spray foam on the cinder-block walls in the basement brought the foundation walls to R-27. In the addition, underslab rigid foam created an R-20 floor. Because he did not want to lose ceiling height in the existing basement, he used only 1-1/2 in. of rigid foam on top of the slab. Heating and cooling are provided by a Mitsubishi Mr. Slim ducted air-source heat pump, and PV panels on the roof supply most of the home’s electricity. In a sidebar, Ritacco discusses the merits of being his own general contractor on the project.
Our desire to live in an energy-efficient, moderate-size house hearkens back to the early 1980s, when my wife, Wendy, and I wanted to purchase our first home. We considered building a well-constructed modular home, but finding property, and the time to build one, was secondary to finding an affordable home in a family-friendly neighborhood. After a long search, we eventually settled into a 1950s Cape Cod with 3-1 ⁄ 2-in.-thick fiberglass-insulated walls and a poorly performing roof and basement.
After 12 years of raising our family in the old Cape—and another 12 years of living in a similarly constructed and poorly insulated 1960s ranch-style house—the time finally came when Wendy and I could consider building the comfortable, durable, and energy-efficient home that we had been dreaming of for the past 24 years. We had no idea just how efficient that home would become.
Wendy and I both were interested in living a more sustainable lifestyle, and we didn’t want to worry about the rising cost of home heating fuel—which approached $4 per gal. in 2006. We felt that there had to be an alternative to burning fossil fuels to heat our water and our home.
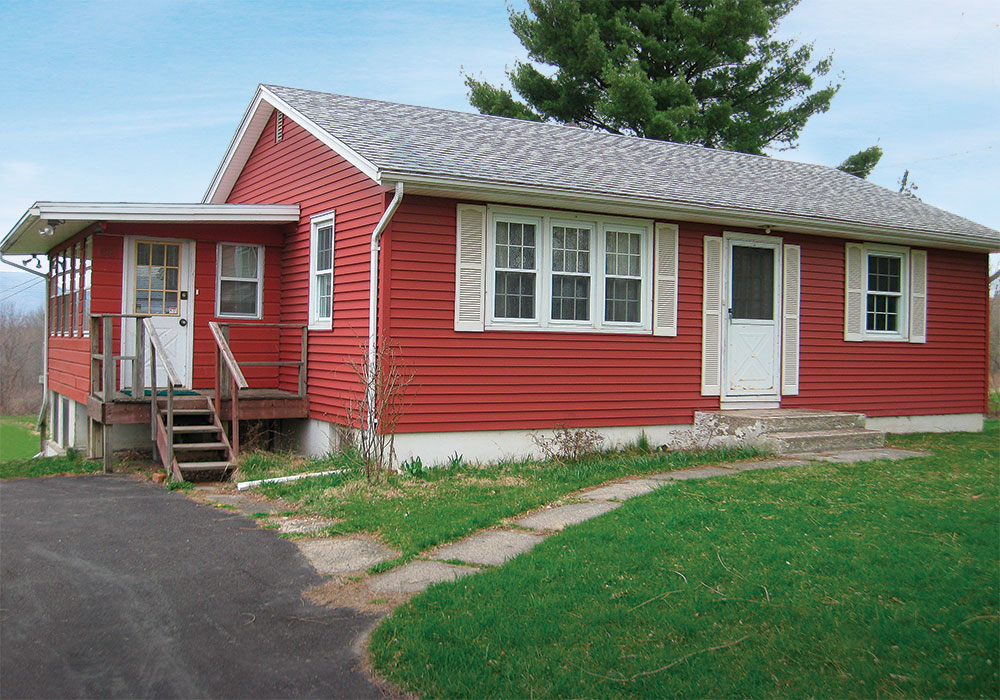
After perusing different lots on which to build, we found a rundown little ranch on one acre, with a beautiful view of the Shawangunk Ridge in New York state. The house was in poor shape, smelled terrible, and needed a new septic system; however, it was half a mile from a quaint town, and a 14-mile rail trail runs along the property line in the backyard. With thoughts of tearing the house down, we bought the property.
Our plans changed drastically when we met with David Toder, owner of Bolder Architecture. He affirmed what I had been reading: The greenest house is one you do not have to build. That’s when we decided to remodel.
How we arrived at net zero
Before we ever met David, I did a lot of reading about different energy-efficient building methods. The German Passivhaus concept intrigued me. This type of house utilizes extreme insulation levels and is warmed by passive solar gain through strategically placed windows, so the house must be sited to take advantage of the sun. There usually are few windows on the northern side of a Passive House, and it is extremely airtight, requiring a mechanical ventilation system to supply fresh air. Even in cold climates, a Passive House needs only a small heat source to supplement the heat given off by appliances, the inhabitants, and the sun’s rays.
Still, Passive House construction had some drawbacks in my view. In the Passive Houses I’ve seen, efficiency comes with a compromise in aesthetics. That, combined with the strict construction guidelines a Passive House necessitates, led me to decide against remodeling to the Passive House standard.
In that same vein, I was not interested in following the LEED standard— which I also had researched—simply to qualify for its rating and attendant bragging rights.
Ultimately, we decided that a zero-net-energy (ZNE) design was the way to go. I liked the idea of a home that produces, through solar or wind power, as much energy as it uses. I looked at a nearby ZNE development in New Paltz, N.Y., designed by Bolder Architecture. That’s where I met David, and I asked him to look at the property we’d bought. He suggested that rather than tearing the house down, we consider doing a complete deep-energy retrofit (DER) instead. He said that we could use the existing structure, add on to it, and superinsulate it. A DER made great sense to Wendy and me, so we agreed to the idea.
Details of a deep-energy retrofit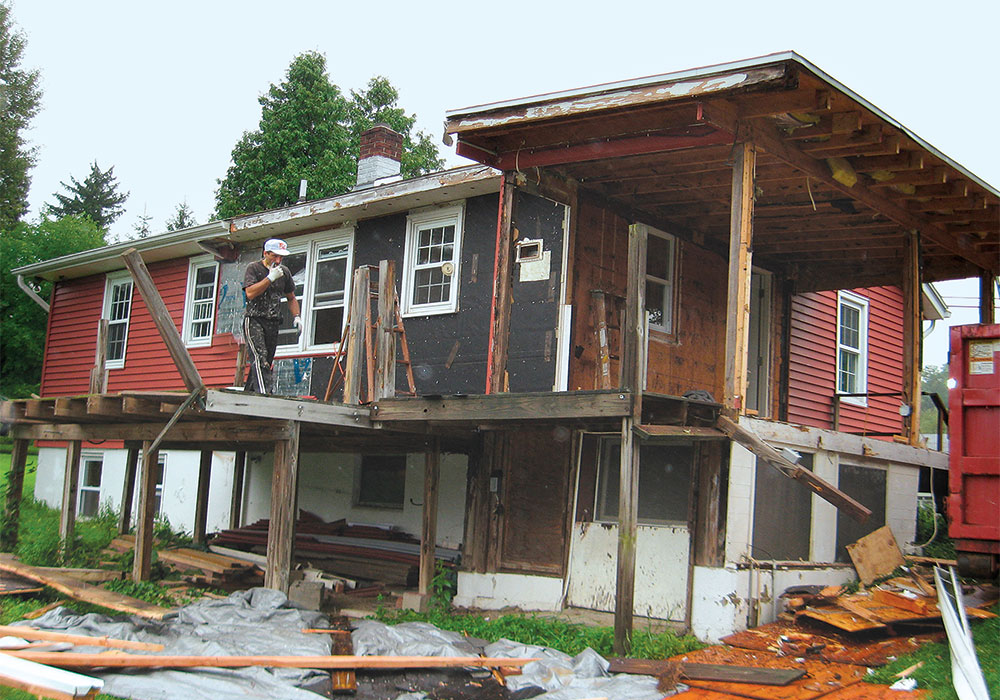
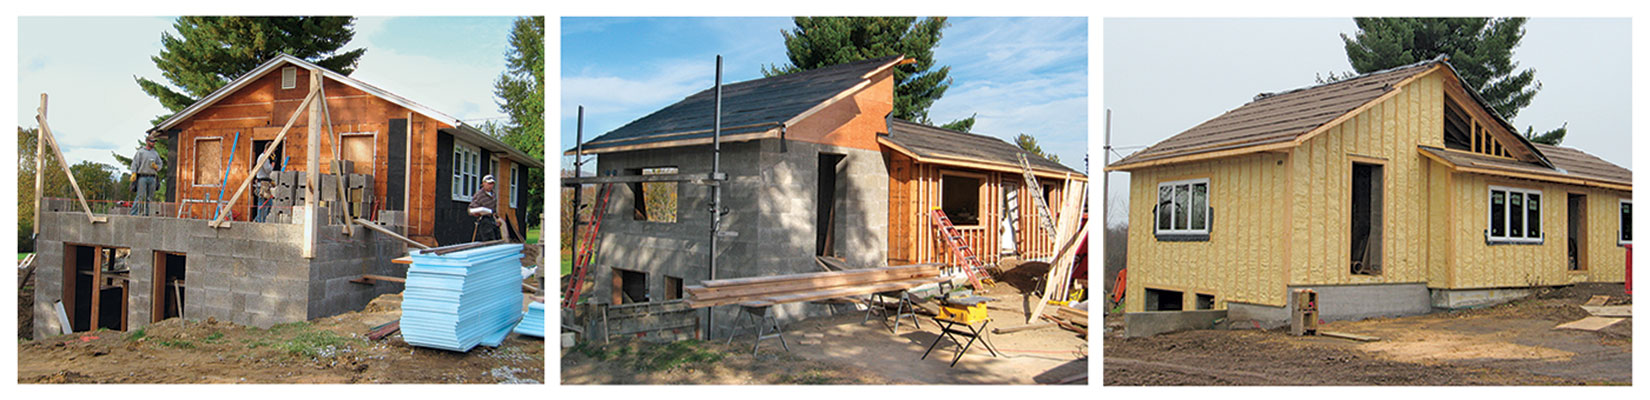
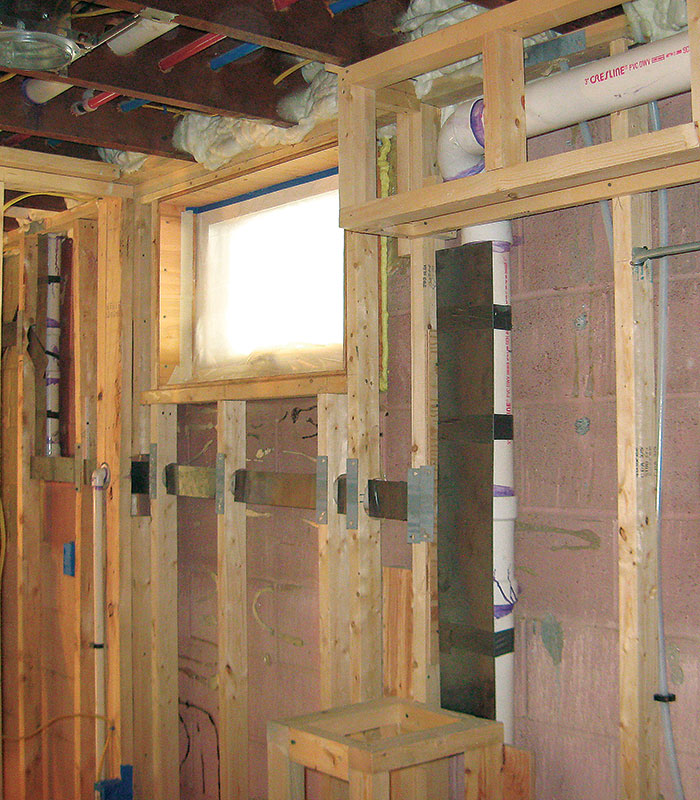
Following the prescriptive measures set by Building Science Corporation, the author aimed to upgrade the home’s existing foundation, walls, and roof to R-20, R-40, and R-60, respectively. In order to achieve those targeted assemblies, a skeletal framework was applied to the exterior of the house, and framing cavities in the roof and the foundation were increased from the interior to accommodate the additional insulation.
 |
 |
 |
 |
 |
 |
Architect: David Toder, Bolder Architecture (bolder-architecture.com)
General contractor: Bob Ritacco, homeowner
Carpenters: Tom Cucarro and Brent Hertzog
Energy consultant: Pasquale Strocchia, Integral Building and Design (integralbuilding.com)
A strong foundation for a new addition
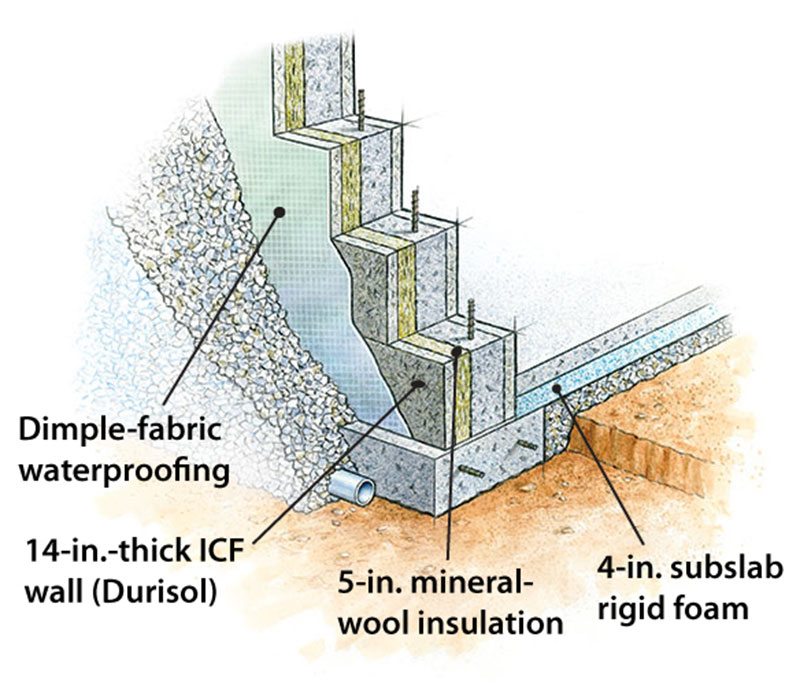
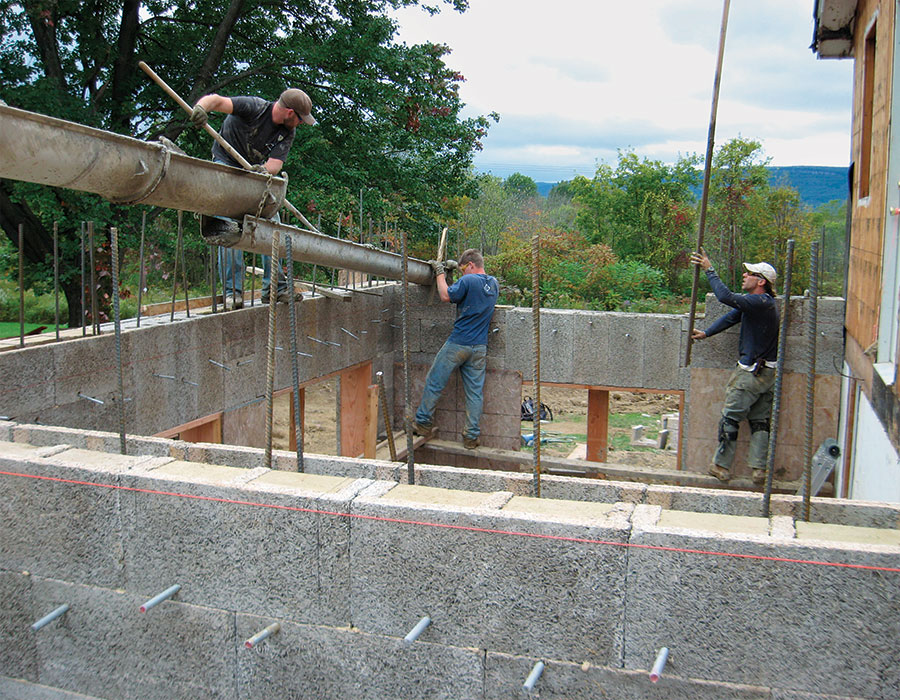
The new addition, which holds a dining room and a recreation room, is built of Durisol icFs. the blocks are assembled just like other icFs, and they offer insulating value and structural integrity in a single step. to increase the assembly’s insulating value to meet that of the retrofitted portion of the house, the exterior face of the block received a 11 ⁄ 2-in.-thick coat of closed-cell spray foam. Not only did this create a cohesive thermal envelope, but it helped bring the siding and trim elements into plane.
 |
 |
It comes down to teamwork
Although I knew a little bit about construction, I knew less about ZNE design. I quickly had to assemble a team of professionals and subs. I began by hiring local home-energy rater and former builder Dave Raponi of Global Dwelling as a carpenter and consultant. He was enthusiastic about the project and extremely helpful in referring other subcontractors.
I began the demolition of the interior, the ugly porch, and the deck in August 2009. At the same time, I hired Integral Building and Design to do the home-energy rating, to advise on the buildingenvelope features, and to ensure that the house was at least compliant with New York’s Energy Star standards. Along with David Toder and Dave Raponi, I had my core team of advisors.
To GC or not to GC?I decided to be the general contractor for this project, mainly because I could not find anyone else to do the job the way I wanted it done. I knew it was a huge commitment, but I thought I was up for the challenge. Because I’m a selfemployed painting contractor, I could make the time to oversee the project. My wife and I had to make dozens of decisions as we went along, and being the GC, homeowner, and builder made the decision making more fluid. My hands-on involvement meant that I did not have to discuss every little detail with another GC. On the other hand, it was a very challenging, time consuming job. From the time we bought the house until we nearly completed the project a year later, I was consumed with the process. I’d never remodeled a house before, let alone gutted one and then done a deep-energy retrofit.
Because we had sold our previous house, we needed a place to live during the construction. We did not want to rent, so we bought a 26-ft. travel trailer. We moved the trailer onto the property and stayed there from October through May, a period that included a very cold winter. That was only one of the challenges we faced, but in retrospect, it was a great idea as well as an adventure. At least we were close to the project. The major benefit of being the GC was that I could control all aspects of the project, including quality. The most challenging part was the stress of keeping the job moving along, and finding all the right people to complete the work. All told, I hired 47 different people to work on the house. A rough estimate tells me that my being the GC saved us about 10% to 15% of the total cost of the project, but the control I had over every detail outshined the cost savings. Wendy and I got exactly the house we always wanted. With the knowledge I gained, I started a business called Ritacco’s Retrofits. |
Building it tight
I wanted to construct the addition with insulated concrete forms (ICFs). But rather than the traditional foam ICFs, I chose to use Durisol ICFs. Durisol blocks are made from recycled-wood fibers bonded together with cement. The blocks can be ordered with mineral- wool insulation partially filling the open space. They are stacked like ordinary ICFs, and the remaining space is filled with concrete for strength and support.
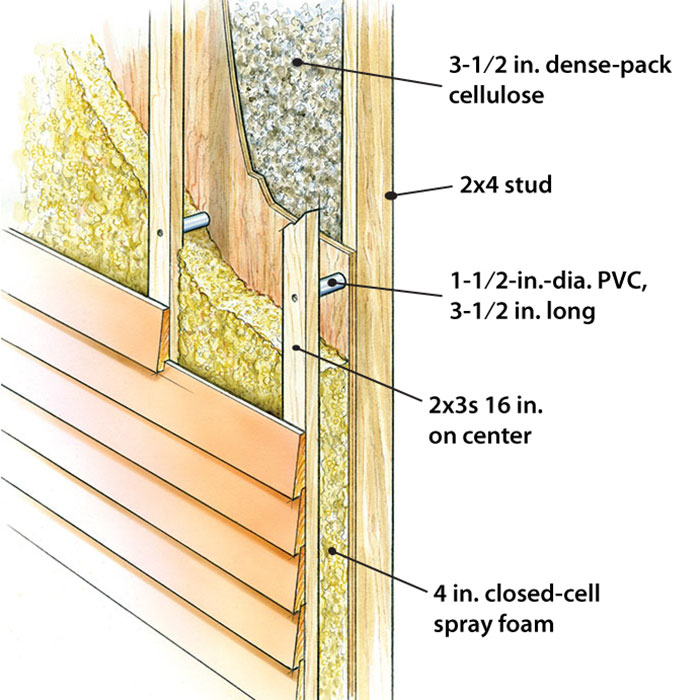
The most important step in a DER is to create a superinsulated airtight shell around the structure. The challenge was how to insulate our 2×4 framed walls and 2×6 roof rafters. I discovered the Building Science Corporation’s (buildingscience.com) standard for insulation levels in colder climates: R-60 roof, R-40 walls, R-20 foundation walls, R-10 under slab, and R-5 windows. This was my minimum goal for the envelope.
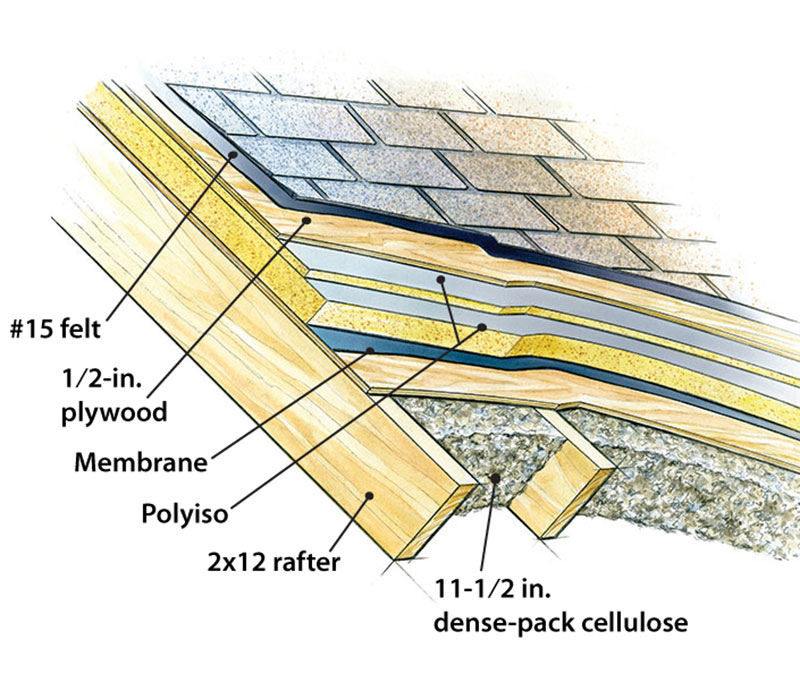
In order to pack 11 in. of cellulose insulation in the ceiling, we sistered a 2×6 to the bottom of each existing roof rafter with plywood gussets and installed collar ties, creating 11-1 ⁄ 2-in.-deep bays for the cellulose. We also dense-packed the walls with 3-1 ⁄ 2 in. of cellulose.
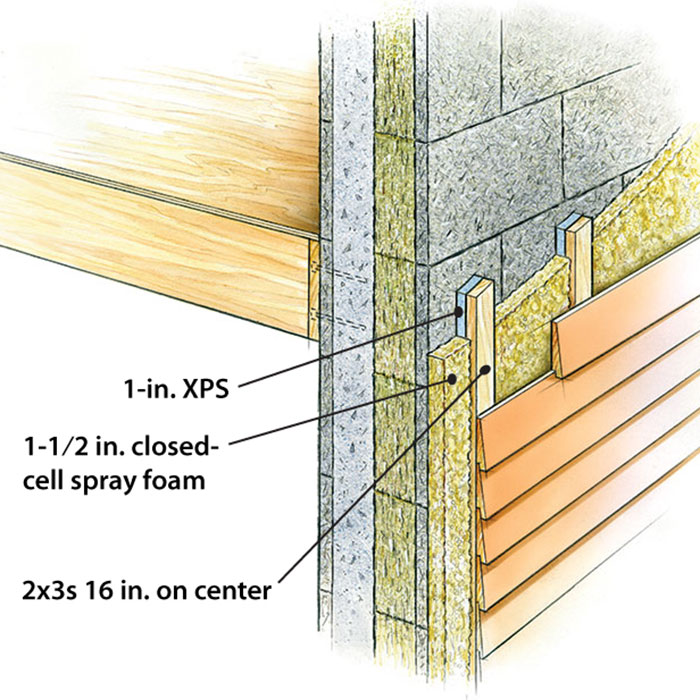
We still needed to beef up the insulation on the outside of the house. On the roof, we added 4 in. of polyisocyanurate rigid foam in two layers: a 3-in. layer, taped at the seams, followed by a staggered 1-in. layer, also taped at the seams. With the cellulose inside and the polyiso outside, the resulting R-value is more than R-60.
For the exterior walls, our choices were to add rigid foam or to spray closed-cell bio-based foam around the entire house. On Dave Raponi’s advice, we chose the spray foam. To make the walls thicker to accommodate the foam, we added vertically mounted 2x3s furred out from the wall with 11 ⁄ 2-in.-dia. PVC pipe. This created a 5-in.- deep cavity to spray approximately 4 in. of foam on the entire exterior. The remaining inch of airspace forms a drainage plane behind the cedar clapboards, which are nailed directly to the 2x3s.
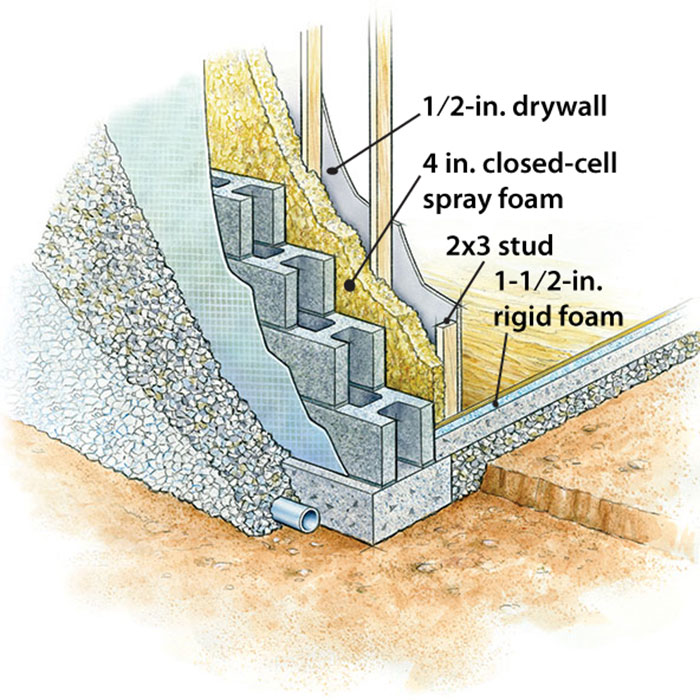
In the basement, we used a similar method of framing and spraying foam on the cinder-block walls to create an R-27 wall. Because we did not want to lose much ceiling height in the basement, we used only 11 ⁄ 2 in. of rigid foam on top of the existing concrete slab, totaling R-7, and covered it with plywood. However, in the addition, the new slab has 4 in. of rigid foam under it, giving it an R-value of 20.
Choosing the right systems
The windows are triple-glazed, krypton-gas-filled, cellular-composite casements made by Okna (oknawindows.com). They are solid, attractive, and have a great U-value of 0.16. Contrary to the typical industry rating, this U-value is for the whole window, not just the glazing.
To heat and cool the house, we chose a Mitsubishi Mr. Slim ducted air-source heat pump. I had looked into a geothermal heat pump but decided it was too expensive. The small, efficient Mr. Slim has two heads: one for upstairs and one for the finished basement. It works perfectly to cool evenly on hot, humid days, and it heats the house well, even when outdoor temperatures are in the low teens. Temperatures can approach single digits or below, but the house never gets cooler than 60°F. If need be, we throw a few logs in the woodstove, and soon it is a toasty 80°F or more throughout the house.
For ventilation in our nearly airtight home, we installed a Lifebreath heatrecovery ventilator (HRV), which supplies a constant flow of fresh air into the dwelling spaces. (For more on HRVs, see “Breathe Easy With Balanced Ventilation,” pp. 54-58.)
Because I did not want even a small gas-fired appliance in the house, we decided to go with a Stiebel-Eltron Accelera 300 heat-pump water heater. It was more expensive than others of its type, but it has an energy factor (EF)—a measure that accounts for heat losses while the hot water sits idle in the tank—of just 2.5. It works by extracting 80% of the energy it requires from the ambient heat in the utility room.
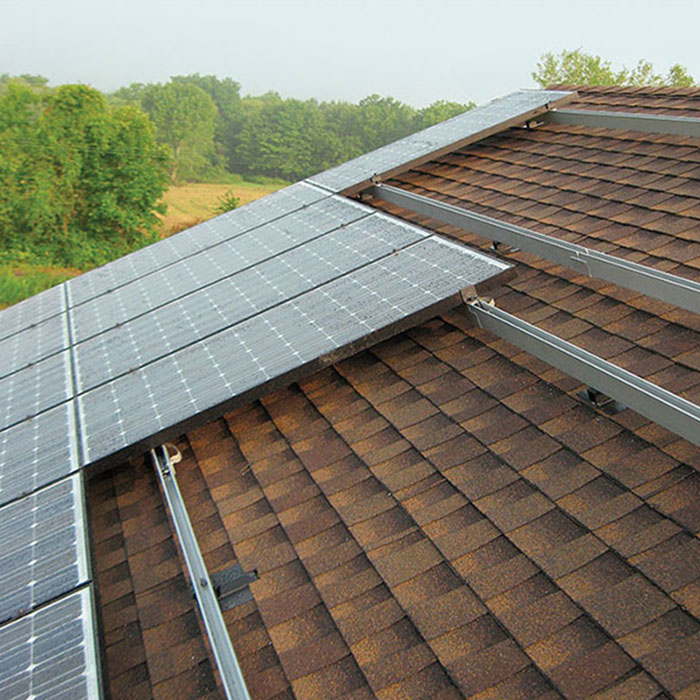
For most of the year, the Sanyo 5.16kw, 24-panel photovoltaic array on the roof of the addition provides more than enough electricity to power all small appliances, the heat pump, the HRV, the water heater, the lighting, the electric stove, and even the clothes dryer. From November to February, we have to purchase some of our electricity from the utility company. We are very close to achieving our goal of zero net energy. For six to seven months of the year, we have no electric bill (except for a small delivery charge). For the entire year of 2012, our electricity cost an average of $76 per month.
Energy profileReducing our energy load through air-sealing and increased insulation allowed us to satisfy most of our utility demand with a 5.16kw PV system.
Below is a cost breakdown of our array and the impact it has had on our annual electrical expenses.
|
Meeting goals
Our goal was to have an all-electric, ZNE house. Although I pulled ideas from several building concepts, the only guidelines I had to adhere to were those set forth by my home-energy rater and the state of New York to guarantee the cash incentives and tax credits associated with an Energy Star rating. By having an Energy Star certificate, we have added value to the home.
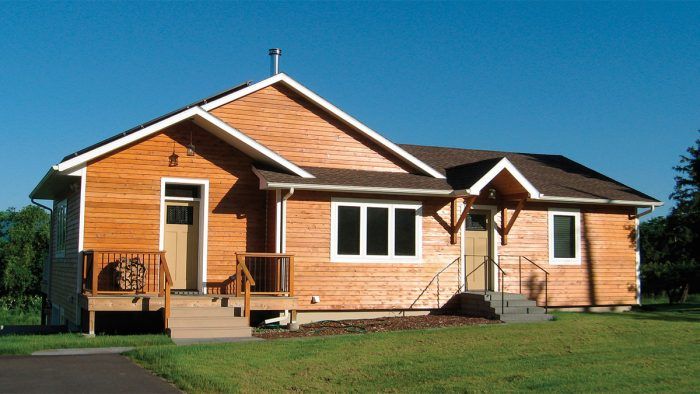
We started in August 2009 with an 860-sq.-ft., two-bedroom, onebath, run-down 1960s ranch. Nine months later, we moved into our 2200-sq.-ft., three-bedroom, two-bath, near-ZNE modern home.
– Bob Ritacco is a painting contractor and owner of Ritacco’s Retrofits in Gardiner, N.Y. 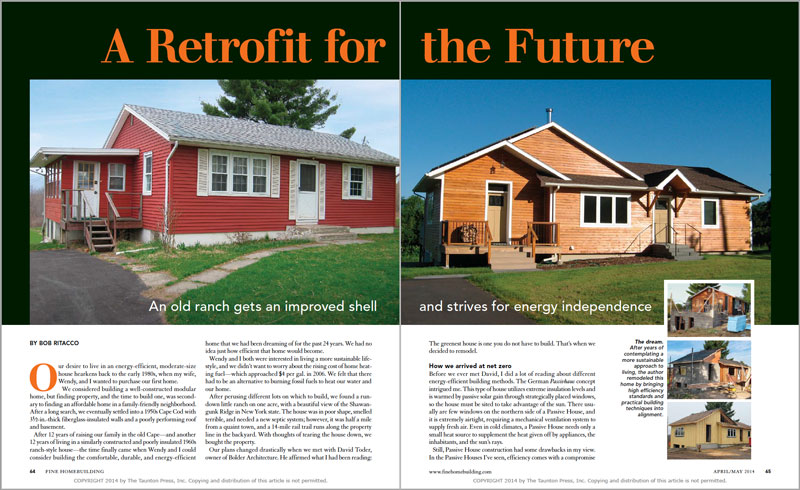
Photos by the author.
From Fine Homebuilding #242
