Is this renovation doomed from the start?

Cocteau3 wonders whether he’s witnessing a structural problem in the making.
“Sounds crazy, but I recently saw an old, restored house that has its original brick foundation,” Cocteau3 writes in a post at Fine Homebuilding’s Breaktime forum. “The foundation was in good shape structurally, but the renovators built a new single course concrete block wall around the perimeter, in front of the brick on the inside of the cellar walls.
“The attempt is to reduce the transmission of water vapor and reduce any mold issues,” Cocteau3 continues. “It looks good right now, but I am concerned the vapor will continue to pass through the brick and build up either behind the concrete block, or pass through the concrete block. It seems either scenario will cause the mortar to fail between the two, and possible cause the concrete block to give way.”
Cocteau3 says the non-for-profit renovation agency that’s doing the work is mainly concerned with mold, an issue best addressed by installing a waterproofing membrane on the outside of the foundation. But that’s not going to happen.
“Any thoughts on the success or failure of this concrete block veneering method?” Cocteau3 asks.
Moisture probably won’t be a problem
To Perry525, mold is unlikely to be a problem, and any condensation that collects on the wall surfaces will not pose a structural threat to the inner block wall.
“Mold needs both food and water to grow,” he writes. “The world is covered in mold spores, but if you look around mold doesn’t grow in most places, because either there is no food or no water. Mold doesn’t grow on clean brick or concrete–no food.”
Condensation should be minor, nothing that a ventilation system can’t handle, Perry525 says, and water problems collectively won’t bring down the inner walls.
“However, if the water table outside is high and there is a high rate of water ingress at some time, then the wall could come down,” Perry525 adds. “It is more likely that provision has been made for the water to run down the original brick wall, with it being lead to a sump to be pumped out safely. This type of provision is quite common.”
DanH agrees with Perry’s assessment. “So long as provision has been made to drain the space between, there should be no problem,” he writes. “Mold doesn’t grow on concrete (unless it’s ‘fiber-cement’ or some such).”
The only way that moisture could cause a problem, Perry525 adds, is if seeped into cracks and then froze, causing spalling. “This [is] unlikely to happen in a basement where the temperature basically remains setady around 40F,” he says. “Condensation on/in a concrete wall only happens when the wall is below dew point and the basement temperature is steady.”
When ‘mold’ is really something else
By rights, mold probably shouldn’t be growing on concrete or brick surfaces that don’t provide food for mold spores. Yet dust and organic material that collects over the years may be enough to give mold a toehold.
“Yeah, I’ve seen people using Chlorox solution to try to scrub “mold” off of [concrete masonry units],” DanH writes. “It doesn’t work very well, but hit it with weak acid and it will wash right off. You will occasionally see dark-colored mold on paint on CMU, but it’s very superficial.”
And the reason that acid works when bleach will not? The problem isn’t mold at all, but efflorescence, DanH writes, a buildup of “lime-like minerals.”
“The color will generally clue you–generally efflorescence deposits will be white or grayish. Sometimes bluish, and on rare occasions a darker color, depending on the types of dissolved minerals,” DanH continues. “Mold will occasionally be blue-gray, but most often a darker gray tending towards black.
“Efflorescence will have a rough, spiky appearance/texture, while mold will be smooth and slightly fuzzy. Efflorescence will appear near cracks in the masonry where water comes through the fastest. Mold will appear where the surface gets damp, but where fresh water isn’t constantly coming through. It’s really quite hard to confuse them once you learn how to recognize them.”
Acid, he says, will loosen or dissolve efflorescence while making only a slight effect on mold. A diluted bleach solution will turn mold a much lighter color instantly, but will have little effect on efflorescence.
And the real winner is … the mason
To Andy Engel, the source of the moisture is a mystery. “Where is it coming from?” he asks. “Is it from soil moisture, or is it from humid air condensing on the cold foundation? The solution depends on the answer to this question.”
Regardless, Engel doesn’t see the point of adding an inner block wall.
“In neither case can I imagine the inner block wall making any contribution except to the pocketbook of the mason,” he writes.
Fine Homebuilding Recommended Products
Fine Homebuilding receives a commission for items purchased through links on this site, including Amazon Associates and other affiliate advertising programs.

8067 All-Weather Flashing Tape

Affordable IR Camera

Reliable Crimp Connectors
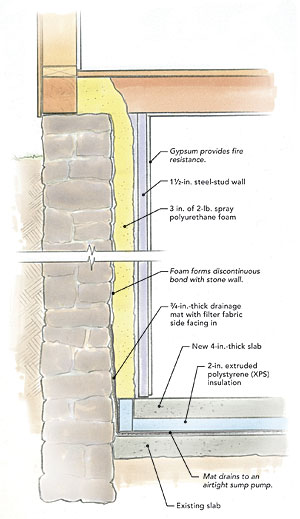
This approach to fixing a leaky block or stone foundation goes a few steps farther than adding an interior block wall. It provides drainage, insulation, and the option for finished space.


View Comments
I've posted on this topic several times; my interest stemmed from the expense of repairing a finished basement that had suffered a very minor amount of flooding.
"How to finish a basement" is one topic where there is no consensus, no standards, and plenty of conflicting opinions. We do, though, know what does NOT work.
What does NOT work is to finish the basement using the same materials and methods used for the frame house. Conventional framing, insulation, drywall, and even ventilation practices will only guarantee an early failure. Let's go back to the starting point...
When the homeowners called me about the flooded basement -about 1" of water has come in, under an exterior door- they had just been told by their insurance agent that the loss wasn't covered, that basement's were never meant to be lived in. That little flood cost nearly $15,000 to repair. That simple inch of water had wicked up nearly more than a foot inside the walls, causing a lot more repairs to be necessary.
The basement had a sump pump. However, the basement floor was nowhere near as smooth or as level as the typical driveway; about the only thing that did not see flooding was the sump pump! Put your face to the floor of nearly any 'nice' basement, and you'll be amazed at the waves in the concrete. Every wave is a future puddle.
So, your first step needs to be to level and smooth out that floor. Once you have a floor that actually drains, you need to select a flooring method that you can remove, dry out, and return after the flood.
I'll continue in further posts.
OK, I've spoken about the floor. Now we need to discuss where the water comes from.
Water can come from outside the basement, from with in the basement, and from the air in the basement. To address the troubles water can cause, you have to deal with that water.
Sealing the basement, to prevent water from entering, really isn't possible. If nothing else, ground water standing against the foundation exerts enormous pressure, and will push the walls down. Yea, you should do what you can to divert such water away from the house- but you will never completely eliminate it.
Water coming from within the basement - for example, an overflowing washing machine- won't be able to leave a 'water tight' basement either.
Finally, basements are typically a few degrees cooler than the house above. This means household air that enters the basement will condense out, on to the exterior walls.
Once the water gets IN, we need to provide it a way OUT. By arranging the floor to drain, we allow the sump pump to do its' job. (Thus, I do not agree with the "airtight" sump pump mentioned in this thread).
We also need to dry the air. We need to separate the basement HVAC from the house HVAC, and have the humidity of basement air controlled. In practice, this will mean a lot more fresh air will be brought into the basement than is usual for a house.
Drainage + dry air = A dry, must-free basement.
The last part of a basement remodel addresses how you make your walls and interior finishes.
Many folks say you should use metal studs. I disagree. Metal studs, installed in the usual manner, will only trap water in the bottom track. I believe the solution lies in SPACE.
That is, we need to leave a small space between our framing, and the walls and floor of the basement. "Hat channel" is one way to frame exterior walls and maintain a drainage space between the framing / insulation and the actual wall. Lag bolt heads can hold the bottom plates of walls slightly above the concrete floor. Hat channel can also hold a finished floor above the concrete, allowing for drainage.
As you might guess, I do not agree with the floor described in this thread. Close- but not quite there!
Your basement HVAC needs to operate independently from, and be apart from, the household HVAC. The HVAC that came with your house was not designed, or sized for, the basement. The basement has completely different temperature / humidity issues than the house above. Most importantly, have a separate source for make-up air.
Even with separate HVAC, materials need to be more moisture tolerant that the usual household ones. For example, I recommend the use tileboard and FRP panels over the usual gypsum and Masonite paneling. If you want a suspended ceiling, use the lightweight fiberglass tiles, rather than the usual 'cardboard' ones. "Plastic" baseboards and molding, rather than wood products. Throw rugs, that are small enough to be picked up when wet. And so on.
That's my take on the topic. Thank you for reading this far.