
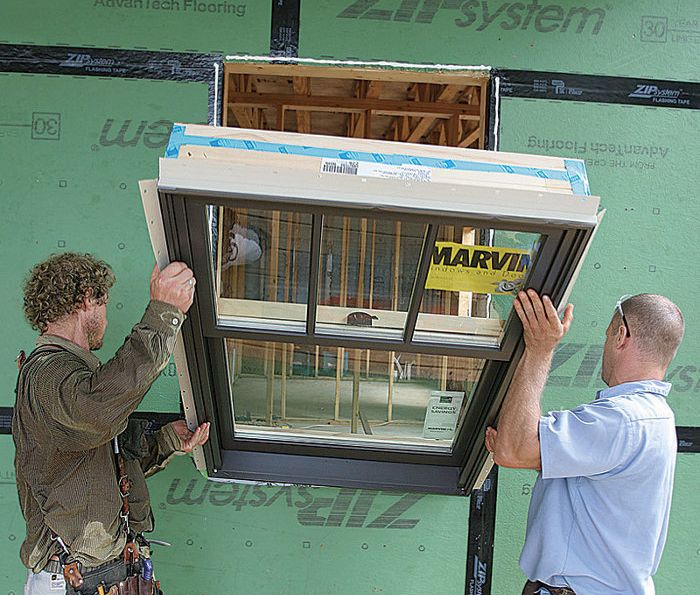
A Weatherproof Window Installation
Layers of redundant flashing and sealant ensure that the most expensive part of your house is also the best protected.
Synopsis: As the building industry tightens up on air-sealing and energy efficiency, builders need to be more aware of the risks associated with moisture and especially with bulk-water entry. Windows and their installation is an area ripe for major improvement for saving energy and increasing durability. The best installations keep water out, give it an escape path for when it inevitably leaks in, and block unwanted air movement. In this article, builder Brian Knight demonstrates his methods for ensuring window installations are as tight as possible.
Watch the Project House Video Series: Weatherproof Window Installation
As the building industry tightens up on air-sealing and improves energy efficiency, we need to be more aware of the risks associated with air and water intrusion. Materials that get wet won’t dry out as quickly or easily as they used to do in leaky, poorly insulated houses, and many of the materials being used to build houses aren’t as resistant to moisture as their predecessors. There’s no doubt that with windows accounting for such a large part of the building budget, and being one of the most direct connections to the elements, their installation deserves extra attention.
Windows Are Complicated, And So Is Their Installation
Compared to solid areas of wall and roof, windows and their interface with the air barriers and water-resistive barriers (WRBs) of a house are complicated and vulnerable. Many builders and designers are confused about best practices, and inferior techniques are rampant. As windows, tapes, sealants, and WRBs evolve, so do the installation guidelines for these products. It’s not uncommon for products that are typically used together to have conflicting installation instructions. When in doubt, I follow the window manufacturer’s instructions as a bare minimum, and add improvements from there.
The best window installations include redundant layers of protection for keeping water out, incorporate measures for blocking the air movement that can draw that water in through weak spots, and provide an escape path for water that enters before it has a chance to cause damage.
Not all windows are created equal, of course, and it’s tough to predict long-term performance. But I don’t discriminate or try to predict. Every window I install — regardless of brand, material, or price — gets the same belt-and-suspenders treatment to ensure that air and water leaks aren’t going to be an issue.
Aim For Waterproof, But Plan For Leaks
We should always assume that water will find its way into a window opening. Even if the installer does a perfect job with sealing and flashing, water can still leak through the window unit itself — especially as the materials, transitions, and sealants go through many cycles of expansion and contraction over time. Gravity, capillary action, blowing rain, and pressure differences can push and pull water into these weak points.
Water leaks from windows usually show up at the sill. Because this is the most vulnerable area of a window, it’s also where the weather-proofing efforts begin.
As long as there is an air gap in place, a sloped and flashed rough sill is the best way to protect this vulnerable area. Creating a back dam along the rear edge of the sill flashing is one way to ensure that leaks under the window can’t reach the interior of the opening, but I typically don’t use back dams unless specifically required by the window manufacturer. I’ve found that they can complicate rough-opening dimensions, interfere with shimming the window off of the sill pan, and make it difficult to air-seal the bottom of the window.
A piece of bevel siding laid across the rough sill of the opening is the traditional choice for creating a slope, but it requires planning to make sure there is adequate height in the rough opening to fit the siding and layers of flashing tape. Manufactured sill pans are another option and are certainly better than nothing, but I don’t like them. The ones I’ve tried don’t have the amount of slope I prefer; can make shimming, air-sealing, and trim installation more difficult; and often are two halves that need to be pieced together and are then never visible for inspection. I prefer to avoid questionable joints or seams in this vulnerable area.
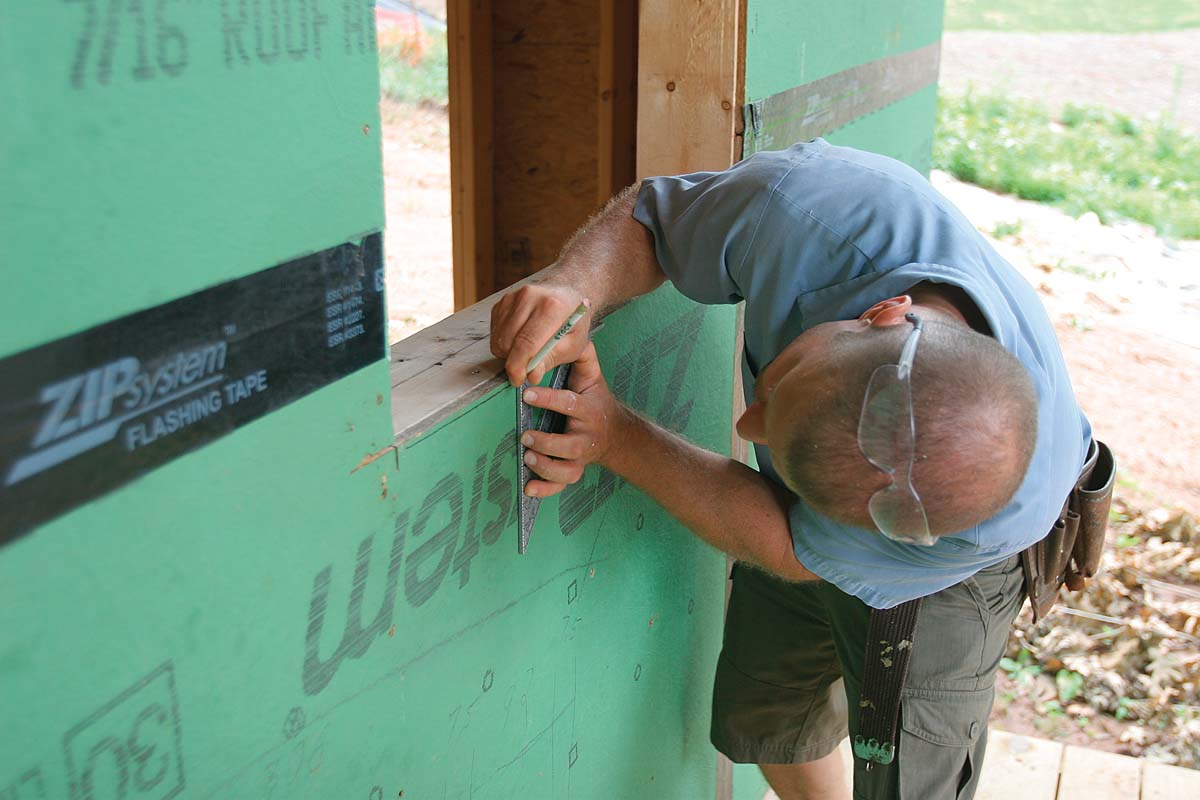
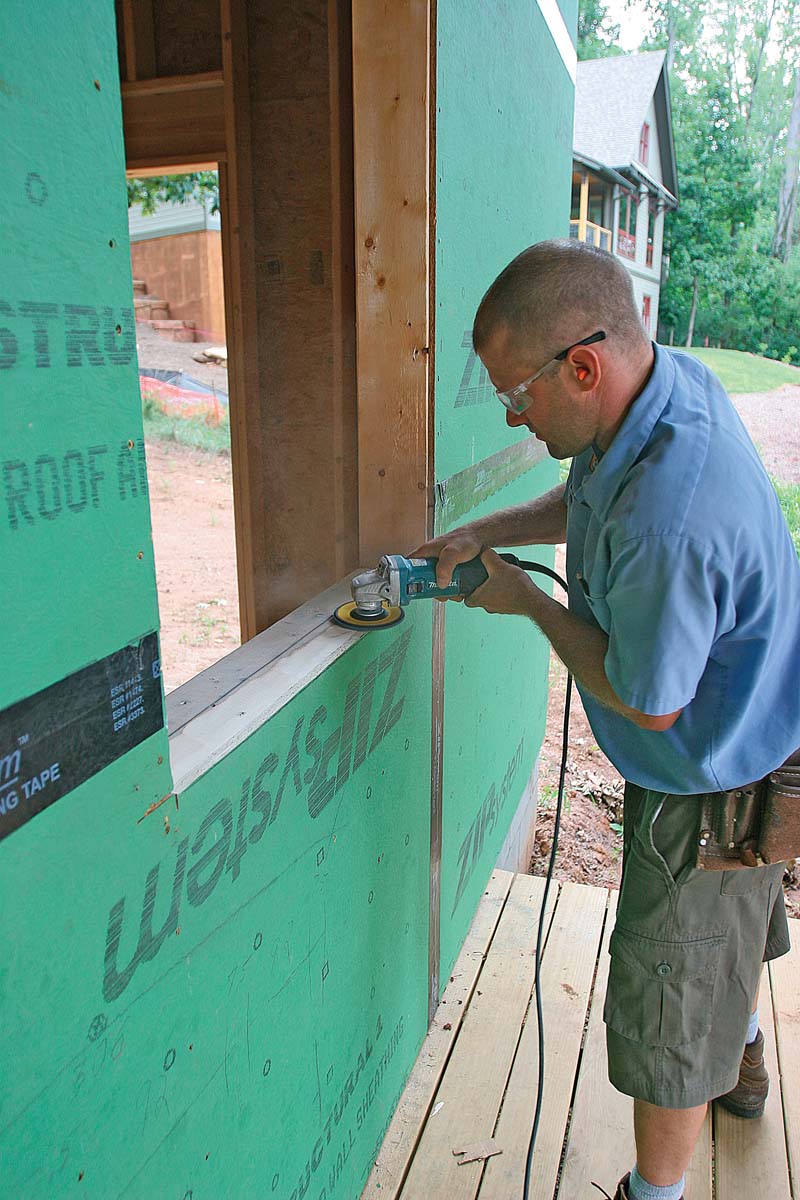
My favorite method is to add the slope right to the rough-sill framing. Sloping the sill after it has been framed eliminates any worry about reducing the height of the rough opening because you’re actually enlarging it.
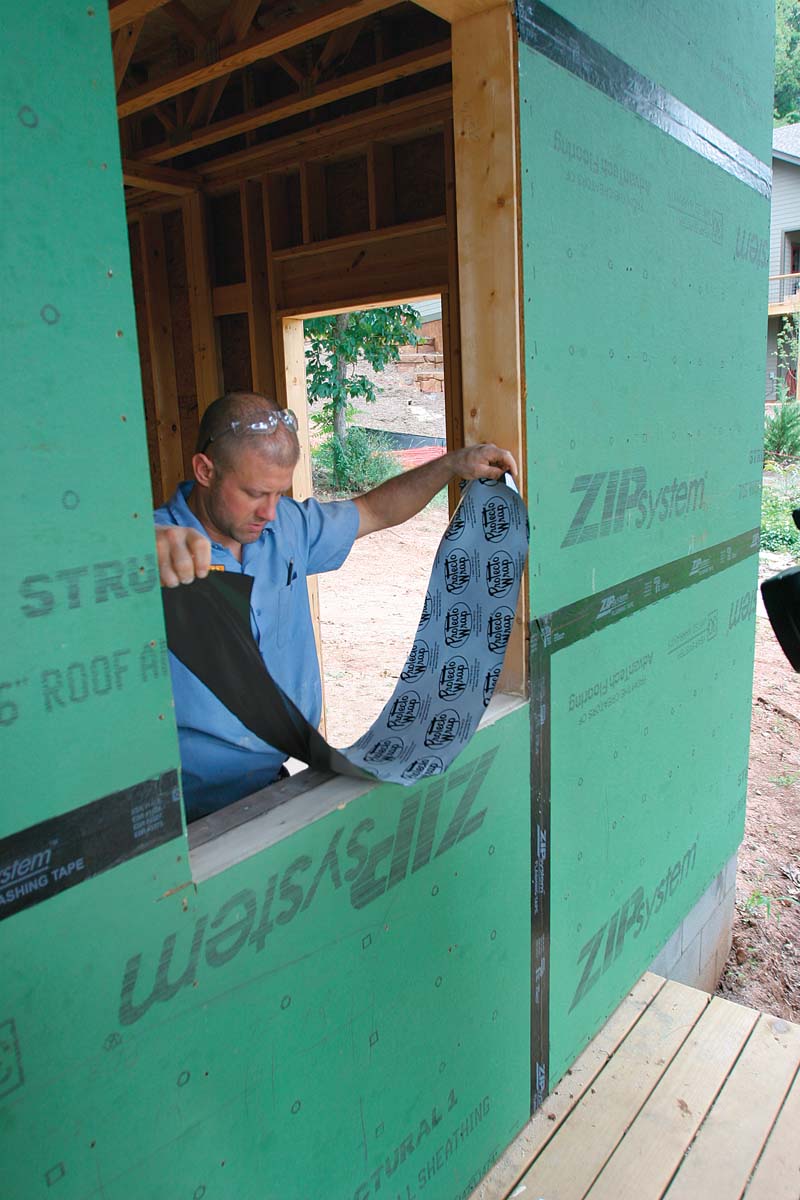
In addition to the sloped sill, the opening is protected with flashing tape, with the weakest interface being the spot where the sill meets the jack studs on each side. There are many ways of cutting flashing tape to fit this situation, but I prefer to stretch the sill flashing around the corner, eliminating the seam altogether.
If the window manufacturer allows it (some require continuous support at the sill), install the window atop spaced shims to increase the drainage and drying potential underneath the window unit and above the sloped, flashed sill.
The biggest obstacle in the drainage path is typically the window’s bottom nailing fin. Do not caulk it, do not tape it, do not seal it in any way. Some window manufacturers call for a dashed bead of caulk, but I believe this is just asking for trouble. It’s also much easier to
tell my crew “No caulk at the bottom” and get consistent results rather than “X lengths of Y diameter caulk with Z amount of space between them” and then hope for no problems. I like to go even one step beyond by providing a gap behind the nailing fin to promote further drainage.
Deal With Air From The Inside
In an ideal world, the window unit and any manufacturer-installed jamb extensions have airtight joints, but a builder’s best method for assessing airtightness is the blower door, and that means the window is already installed. I’m sure that some manufacturers seal this connection, but it’s safer not to assume. I eliminate the possibility of a leaky unit by applying tenacious acrylic-adhesive flashing tape over any seams and joints in the window frame before it’s installed. It pays to seal the joints in the rough opening as well to eliminate short circuits or air leakage from surrounding stud cavities. Control the window unit, control the rough opening, and then you can confidently address the space that’s left between the two.
Canned spray foam is probably the most common way of sealing between the window unit and the framing. My biggest gripe with this method is that it’s difficult to inspect for quality without a
blower-door test. On a house I tested recently, I was surprised to find air coming through the spray foam around windows and doors, most likely in the area of a shim, which I’ve found to be the most vulnerable leakage point.
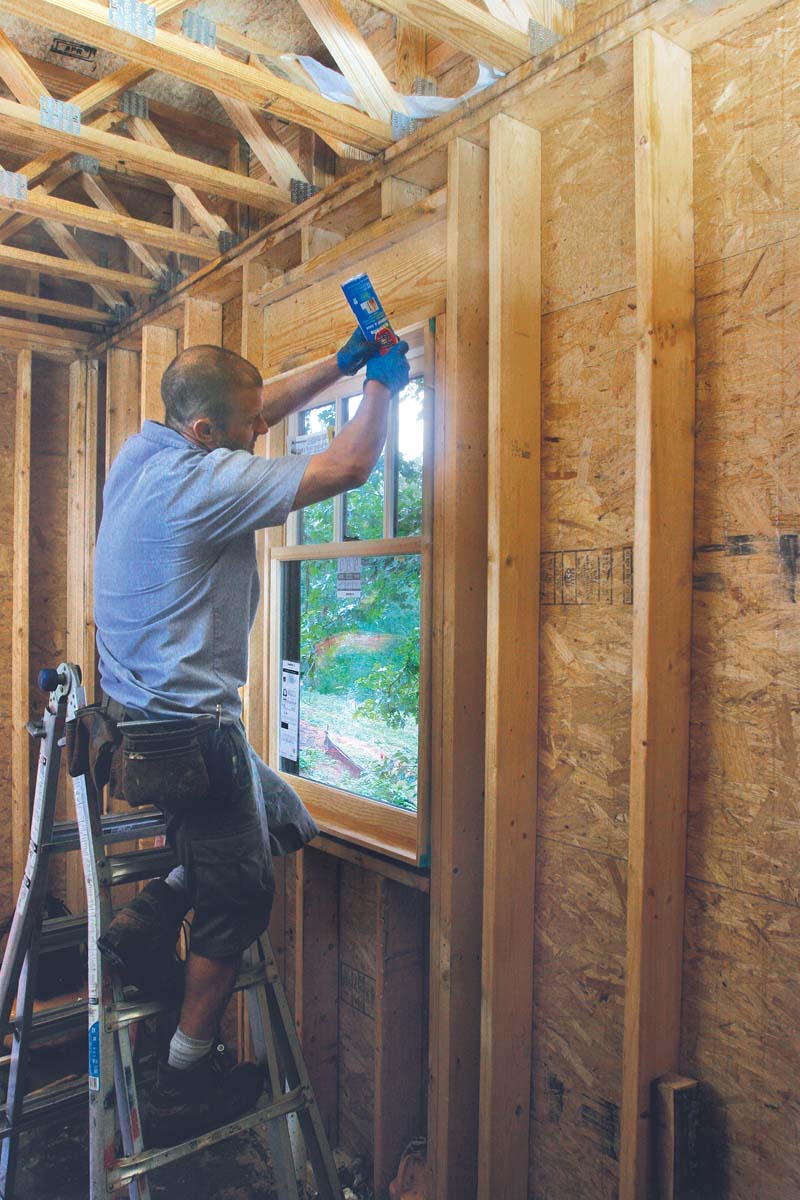
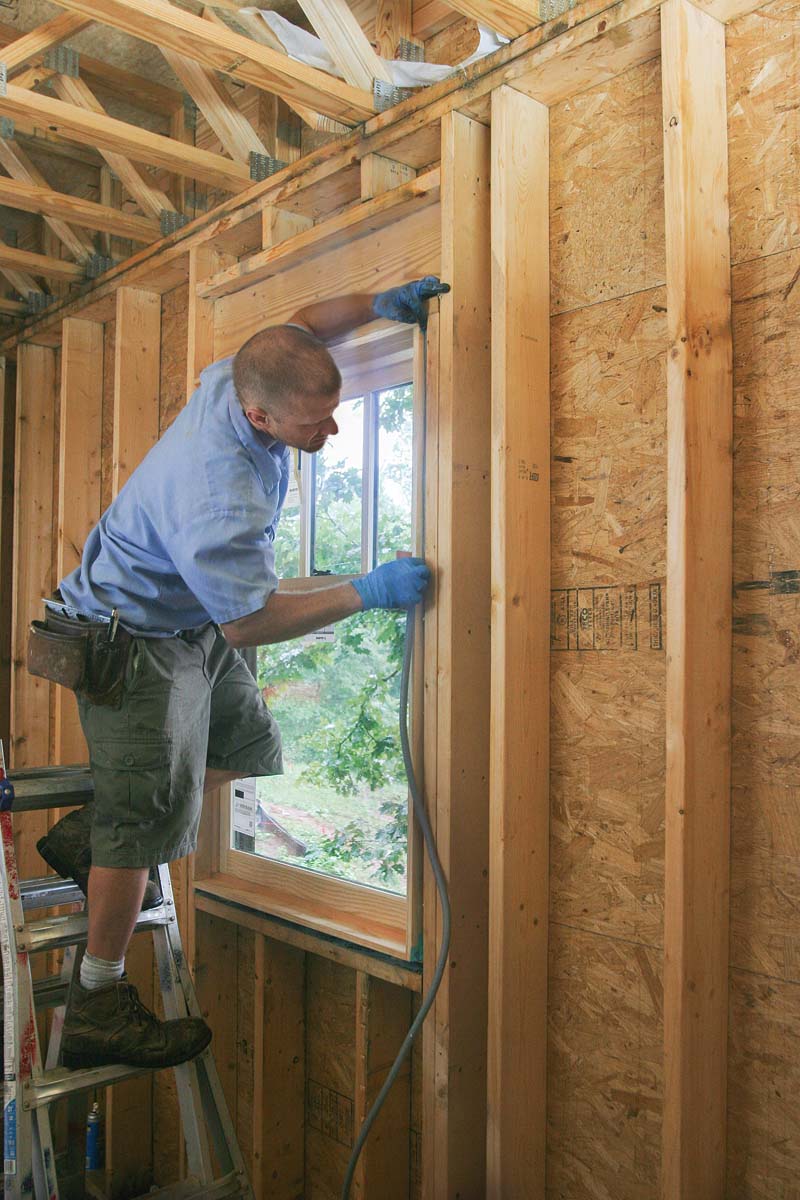
There are many variables to consider if you’re relying on spray foam as an air barrier in this location—the size, shape, and consistency of the bead; whether the can was shaken adequately; if the humidity is suitable; and the texture and temperature of the substrate—so I prefer to think of this spray foam only for insulating purposes. Backer rod and caulk followed by a layer of vapor-permeable flashing tape is what I use as my air-control layers.
I buy several packets of backer rod in diameters of 3⁄8 in., 1⁄2 in., 5⁄8 in., and 3⁄4 in. to accommodate the different-size gaps I typically encounter, and I always use a rod that is slightly fatter than the gap being filled. For gaps smaller than 3⁄16 in., I skip the backer rod and simply caulk the gap. In all cases, I use a high-quality elastomeric or polyurethane sealant made for windows and doors, such as Sonneborne’s NP1, Sika’s Sikaflex, or Dap’s 3.0. These sealants have better adhesion than typical silicone but still allow for plenty of expansion and contraction.
Flashing tape doesn’t receive enough attention for use in this location. It’s fast, durable, effective, and easy to inspect. Plus, it’s the one air-sealing layer that’s guaranteed to clear the shims installed around the window.
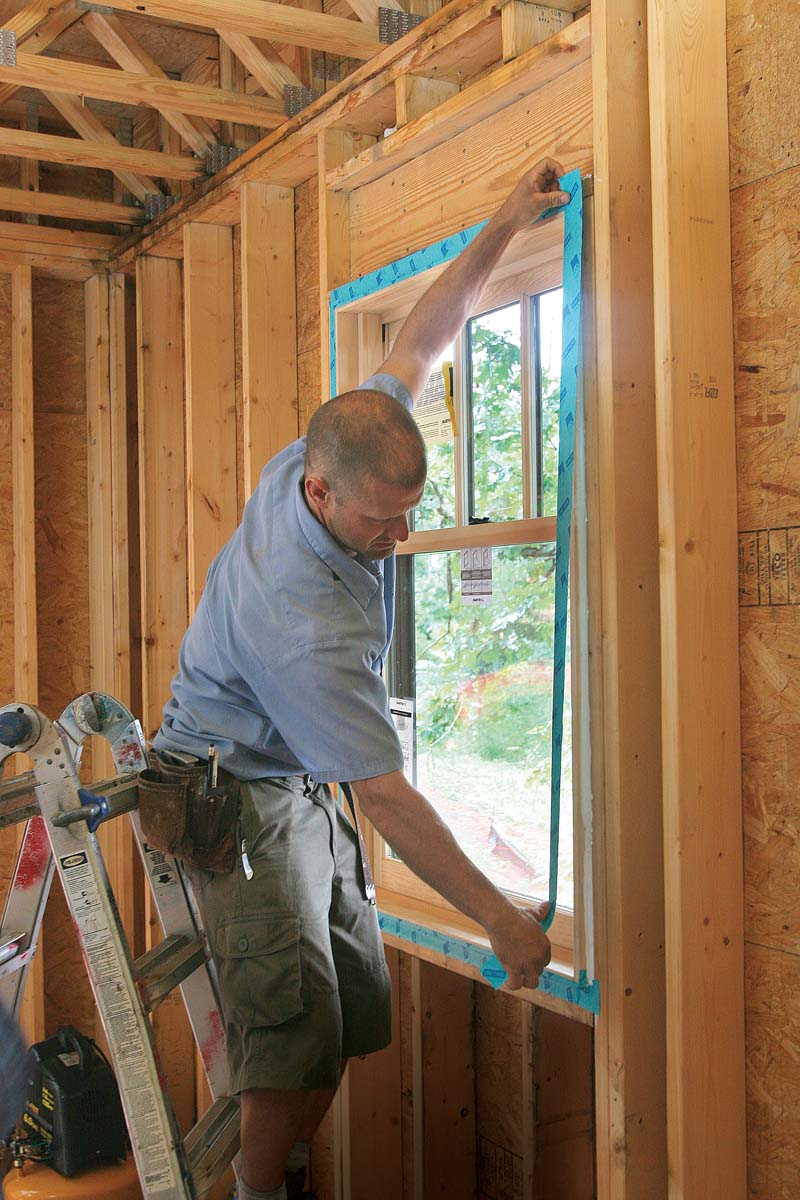
I prefer a tape that is vapor permeable—I use Pro Clima Uni-Tape—to eliminate it as a potential barrier should any moisture around the window need to dry toward the interior, but I would use something impermeable in a pinch. Tape is typically applied to the rough framing and the jamb-extension edge, but it’s important to keep in mind the exposed reveals of the trim when placing the tape.
When followed by careful installation of the drywall, the exterior trim, and the head flashing (all of which are areas that should be handled with care to avoid damaging flashing tapes and air-sealing tapes), you’ve improved the performance of one of your building’s weakest links.
It Starts With The Sill
 |
 |
|
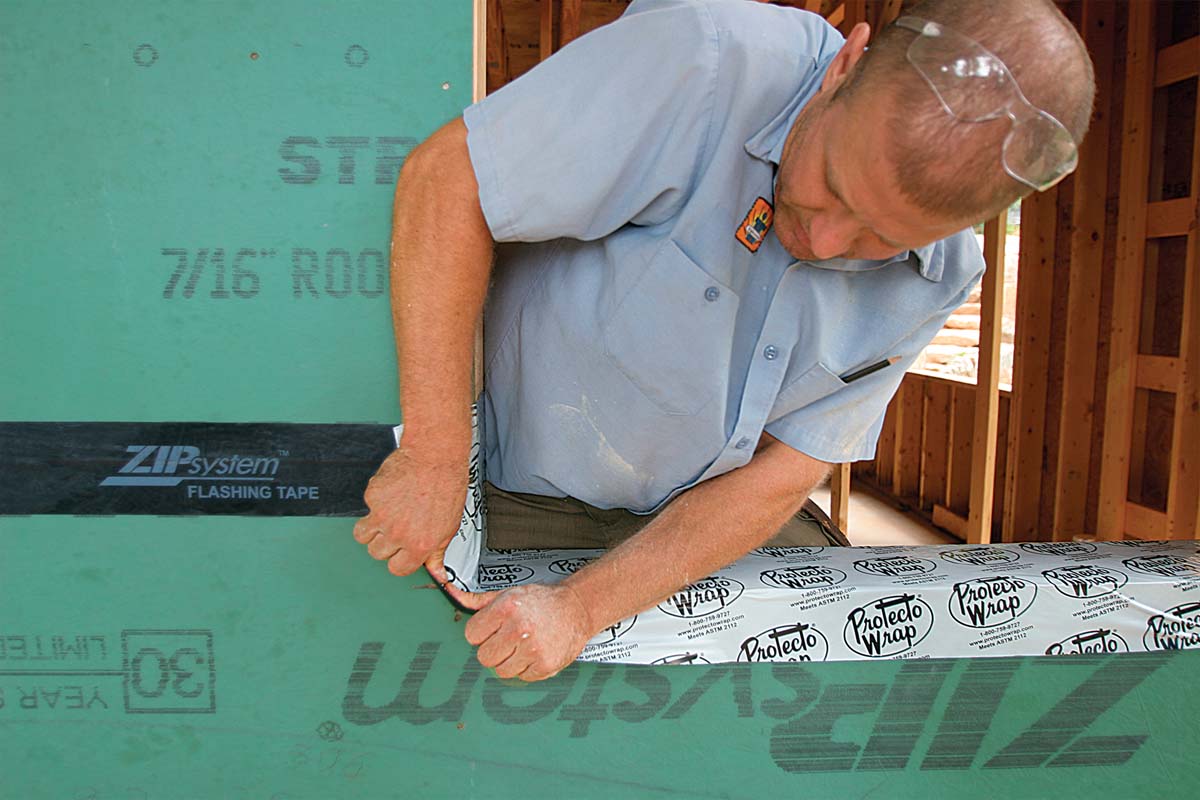
Create your own sloped sill. Remove stock from the rough sill to provide drainage in the case of leaks. Draw one line 3 in. from the outside face of the opening, and another about 1⁄4 in. down from its outside edge. To create the slope, use an angle grinder equipped with a rough-grit flap disk. |
 |
 |
|
Width plus 12. Cut a piece of flashing tape 12 in. longer than the width of the opening, which allows 6 in. of tape to extend up each side. |
Keep the transition tight. Use a rafter square to press the tape tightly into the corners where the sill meets the sides of the rough opening, eliminating bubbles under the tape that are vulnerable to puncturing. |
 |
 |
|
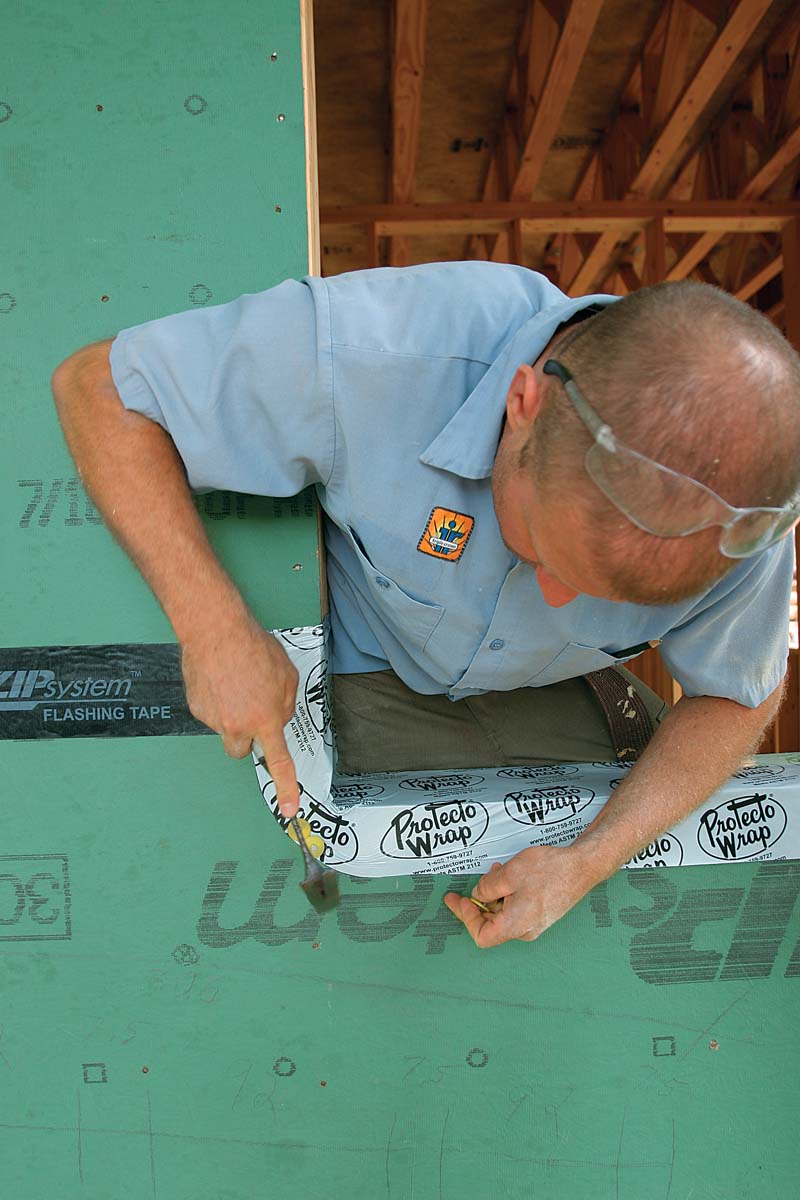
Continuous outside corners. You can buy flashing tapes made for curves, but they’re expensive. Protecto Wrap tape is far more affordable and has enough flexibility to be stretched down onto the sheathing, where I tack it in place with button-cap nails. |
Seal The Sides, But Let The Bottom Drain
|
|
 |
|
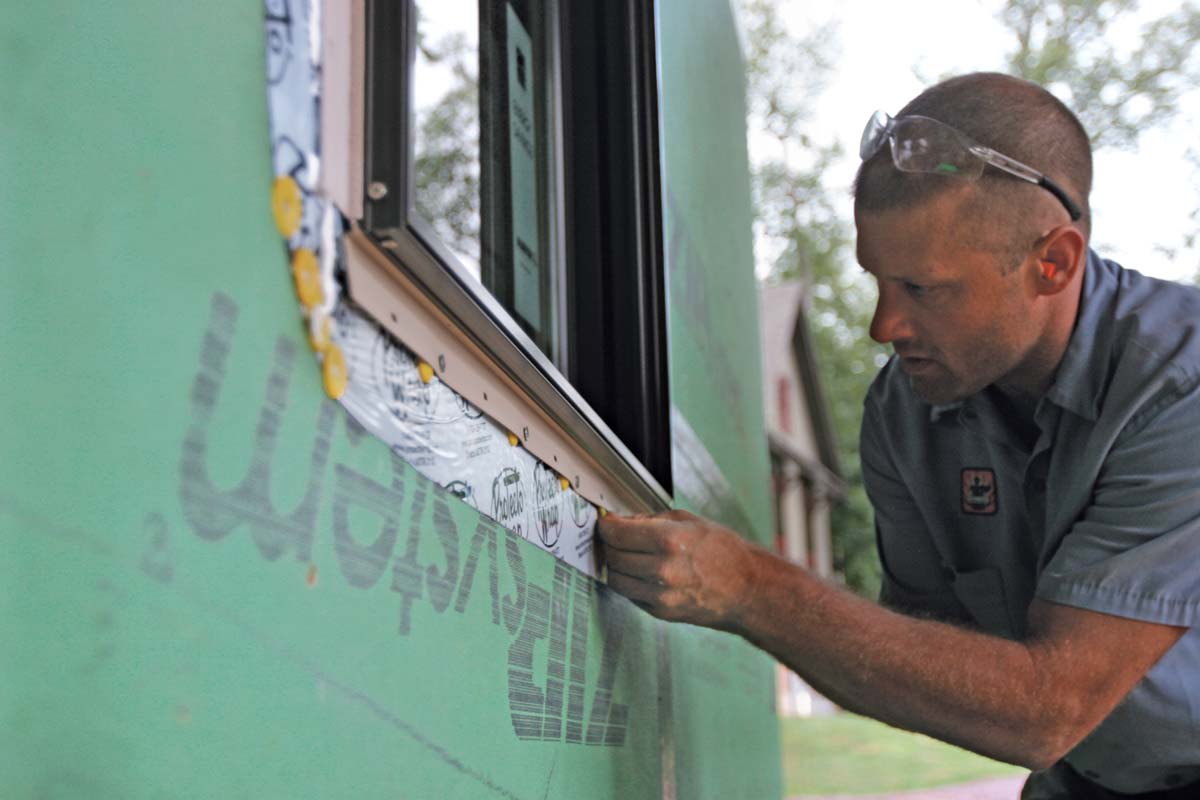
Sides are simple. Cover each side of the opening with a piece of flashing tape that bridges the gap between sheathing and framing and that extends down to and over the top of a horizontal piece of the same tape, reinforcing the seam where the sill flashing adheres to the wall. I like Zip System Tape or 3M All Weather Flashing Tape 8067. |
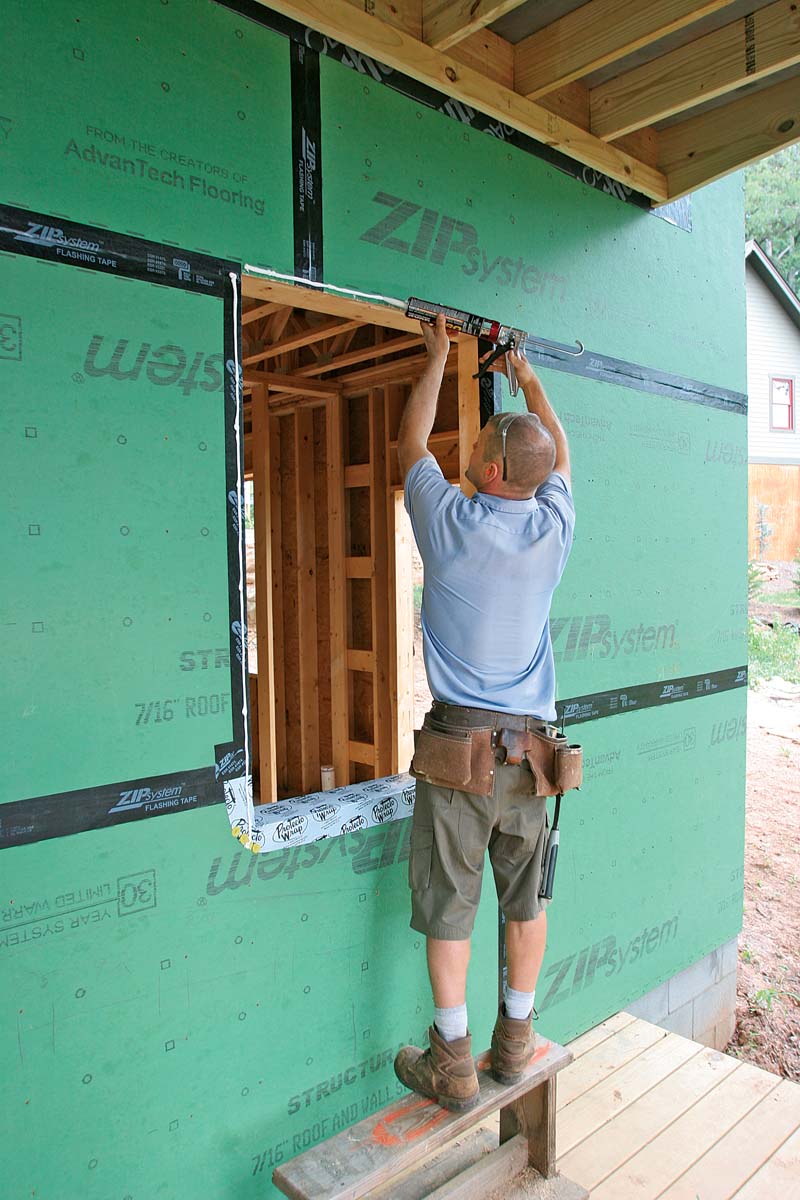
Caulk three sides. Lay a bead of high-quality caulk along the sides and top of the opening, keeping it close enough to the edge so that the nailing fin will compress it. Never caulk across the bottom. If the corners of the nailing fin are designed to receive a piece of manufacturer-supplied adhesive flashing, skip the caulk in the top corners, as shown here. |

 |
 |
|
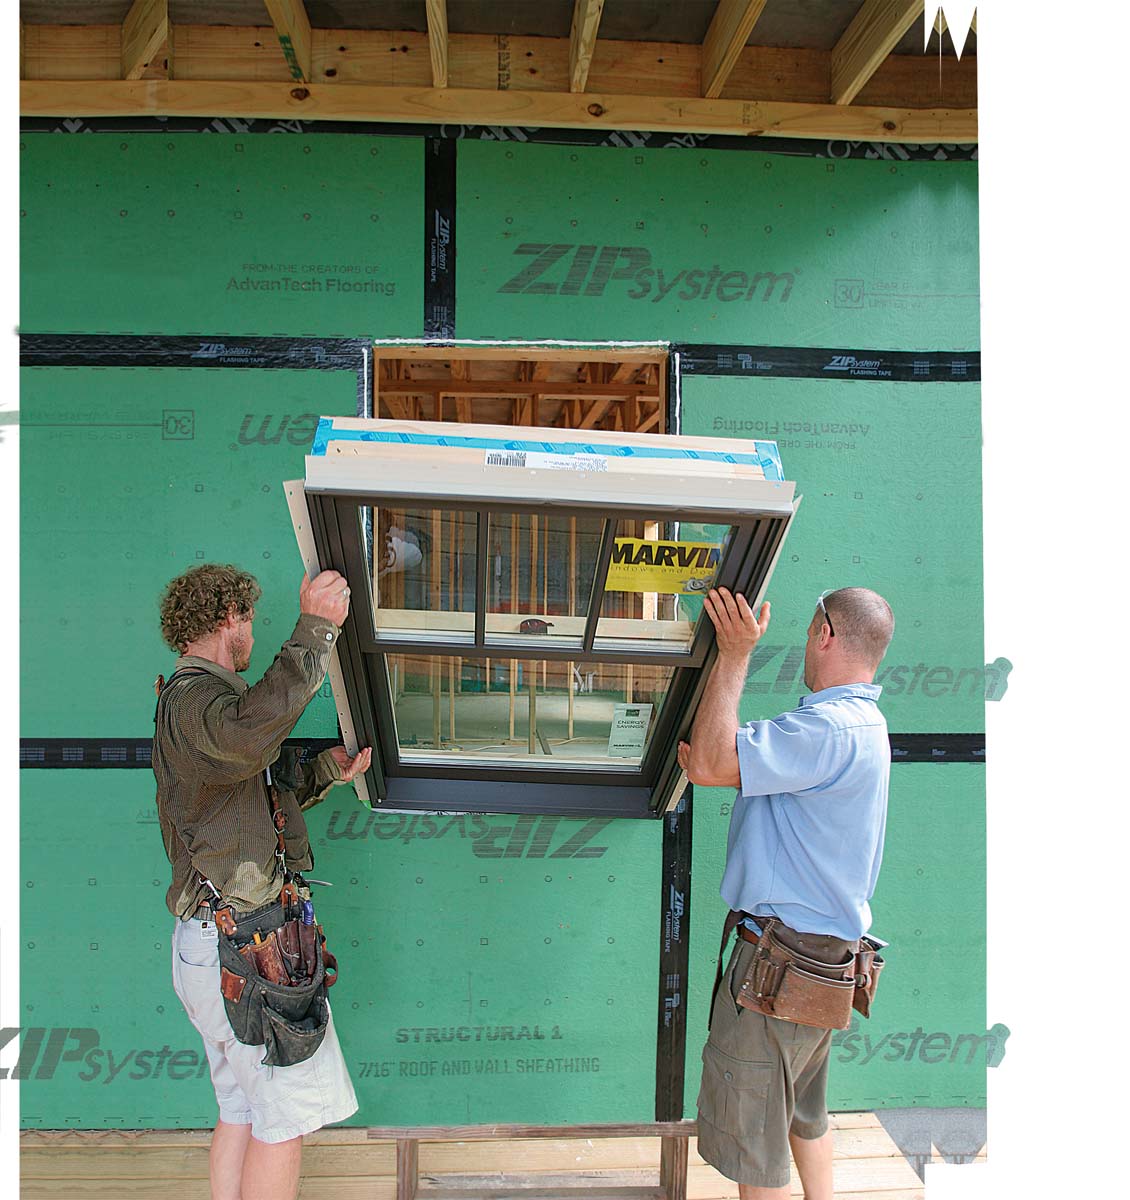
Bottom first.Rest the window on the edge of the sill, tip it upright, and slide it straight in against the caulked sheathing. |
Caps make a gap. To promote drainage, slide caps from button-cap nails under the bottom nailing fin, pressure-fitting one next to each nail. These caps are thick enough to create a gap but not so thick that they will complicate trim installation. |
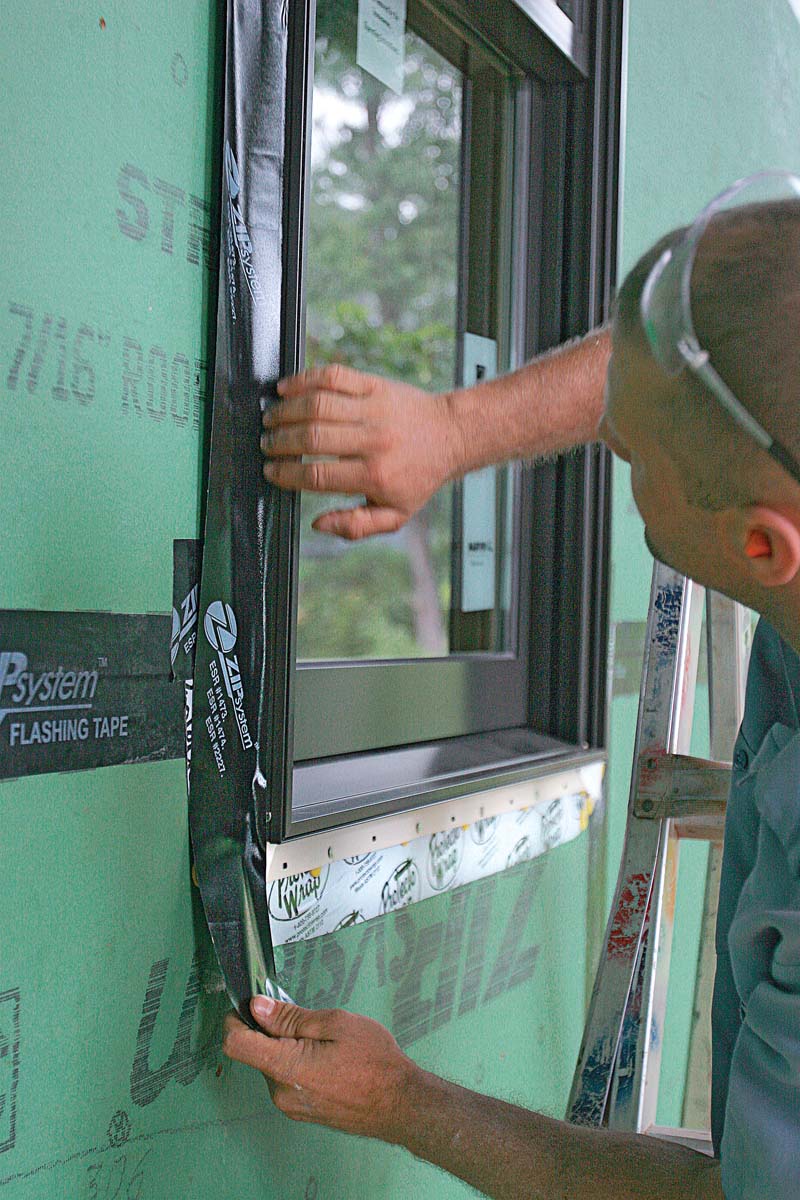 |
Reinforce the fin. Zip System Tape is 3-3⁄4 in. wide, which is wide enough for it to be adhered to the sheathing, across the nailing fin, and onto the side of the window frame. |
Air-Seal From The Inside
 |
 |
|
A conservative bead of foam. A thin bead of low-expansion spray foam offers limited air-sealing and insulation, but avoid filling the entire cavity, especially toward the bottom, to allow for drainage in the case of water entry. |
A caulk joint that will last. Foam backer rod cut and pressed in around the window jamb creates a flexible base for the bead of caulk that follows it. Use a wet finger to smooth the bead against the backer rod, creating the ideal hour-glass shape that allows the sealant to expand and contract without cracking or debonding. |
 |
Tape is the innermost air-seal. Applied so that it bridges the gap between rough frame and window jamb, flashing tape provides an easily inspectable air barrier that, like the backer rod and caulk, isn’t affected by the shims along the four sides of the window. |
For more photos, drawings, and details, click the View PDF button below:
