FHB Logo Facebook LinkedIn Email Pinterest Twitter X Instagram Tiktok YouTube Plus Icon Close Icon Navigation Search Icon Navigation Search Icon Arrow Down Icon Video Guide Icon Article Guide Icon Modal Close Icon Guide Search Icon Skip to content
Subscribe
Log In
  • How-To
  • Design
  • Tools & Materials
  • Restoration
  • Videos
  • Blogs
  • Forum
  • Magazine
  • Members
  • FHB House
  • Podcast
Log In

Fine Homebuilding Project Guides

Foundations and Masonry Work

Guide Home
  • Concrete & Masonry Basics
  • Building Foundations
  • Waterproofing Foundations
  • Retrofits and Add-ons
  • Masonry in the Landscape
  • Brick
How-To

Placing a Small Concrete Slab

Learn how to excavate, form, pour, and hand-finish a small slab.

By Andy Engel Issue 258 - April/May 2016
  • X
  • facebook
  • linkedin
  • pinterest
  • email
  • add to favorites Log in or Sign up to save your favorite articles

Although the amount of concrete that’s required is small, a landing for a deck stairway or, in this case, a pad for a propane tank requires nearly the same forming and finishing techniques as a full-size slab. First and foremost is subgrade preparation. Get that wrong, and the slab will crack. In most cases, slabs shouldn’t be placed next to new buildings until the backfill around them has settled for several years.

After digging out the area where the slab will be located, compact the soil. When prepping a large area—for a patio, for example, or a larger concrete slab—renting a mechanical compactor is a good idea. That would be overkill on a small area like this. A simple tamper is all you’ll need. Just make sure the area is well packed and there’s no loose soil.

Use a gravel base

One step that’s called for but rarely done on small jobs is to place gravel between the slab and the subgrade. This step is often skipped, but there are two reasons to use gravel even on a small concrete pad. First, concrete moves because of thermal expansion and contraction. Restricting this movement will lead to cracks in the concrete. A gravel base allows the slab to move freely. Second, slabs  need a flat base to ensure uniform thickness, and gravel is easier to grade than many soils.

Choosing concrete

For a slab that’s 40 sq. ft. or more (about 1/2 cu. yd. of concrete for a typical 4-in.-thick slab), it’s easiest to order truck-mixed concrete. This 3-ft.-sq. slab was small enough that mixing bagged concrete by hand made sense. At 9 sq. ft. and 4 in. thick, the project called for 3 cu. ft. of concrete. An 80-lb. bag of concrete mix makes 3/5 cu. ft., so this slab took five bags.

I used a crack-control concrete, which includes reinforcing fibers. The slab was small enough that no steel reinforcement was needed, but that little extra strength from the fibers only cost me $5. Larger slabs, say 5×5 and up, will benefit from reinforcement with rebar or wire mesh to control cracking.

Concrete needs moisture to cure. After finishing the slab, cover it with plastic and keep it damp for at least a day. A week is better, and 28 days ensures the best cure.

1) Prepare the subgrade. Dig 6 in. beyond where you want the slab edges and 8 in. deeper than where you want the top of the slab. Make sure the subgrade pitches away from the building, and tamp down loose soil.

Prepare the subgrade. Grade the gravel.

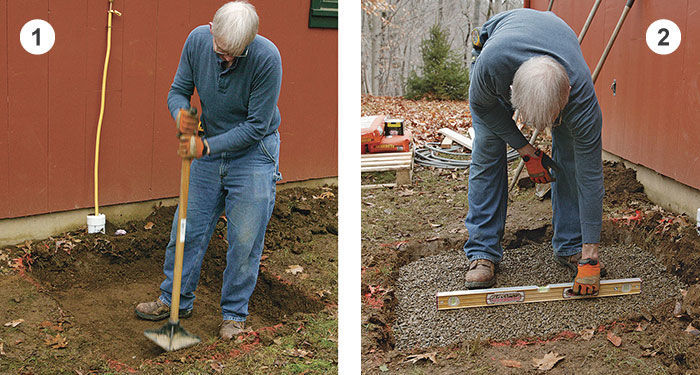
2) Grade the gravel. Fill the excavation with 4 in. of gravel. Rake it flat, and use a level to make sure it’s pitched about 1/4 in. per ft. so that the slab, which will parallel the base, drains water.

3) Make and set the form. Most 4-in. slabs are actually the 3-1/2-in. depth of standard 2x4s. Nail the corners together, and place the form on the graded gravel, making sure it doesn’t rock. Drive 12-in. lengths of rebar to just below the top of the form to keep it from moving.

Make and set the form. Mix the concrete.

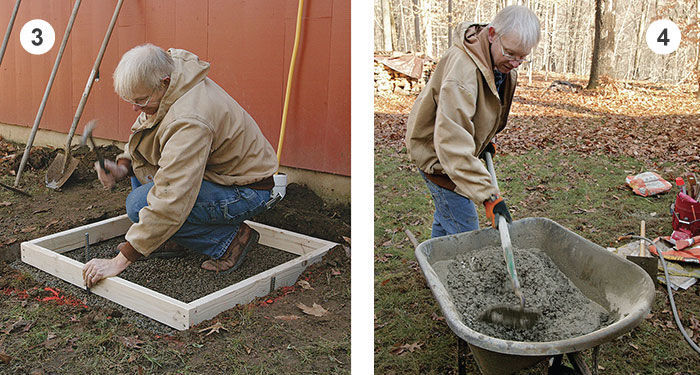
4) Mix the concrete. Dump two 80-lb. bags of mix in a wheelbarrow for each batch. Add 3 qt. of water per bag, and mix thoroughly with a hoe. Add small amounts of additional water if necessary to bring the concrete to a consistency that’s about the same as thick cake batter.

5) Settle the concrete. After dumping the mixed concrete in the form, jab into it all along the edges with a shovel. This helps to ensure that the mix fills the form without leaving voids.

Settle the concrete. Tap the sides of the form.

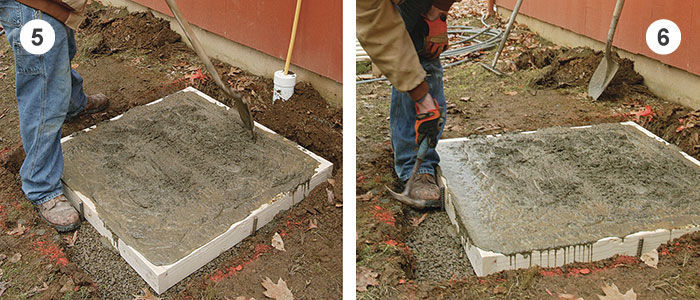
6) Tap the sides of the form. Lightly hammer the form all around the slab until you see bubbles rising from the concrete. This step makes for a smoother slab edge that won’t collect water, which can freeze and spall the concrete.

7) Screed the slab. Flatten the concrete using a straight 2×4 that’s about 1 ft. longer than the form width. Move the board forward with a back-and-forth sawing motion while keeping it on the form.

Screed the slab. Tamp the surface with a rake.

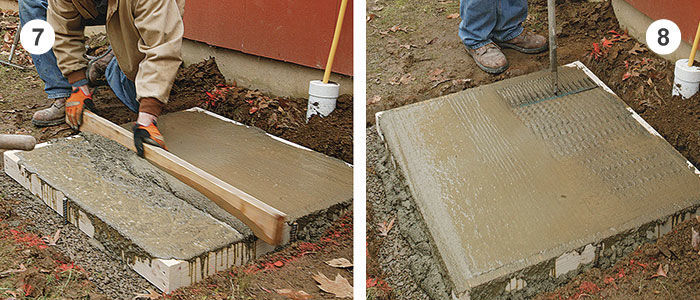
8) Tamp the surface with a rake. Gently tamp the entire surface of the slab. The rake pushes down the gravel that’s part of the concrete mix, and brings up a mixture of cement and sand that’s easier to smooth.

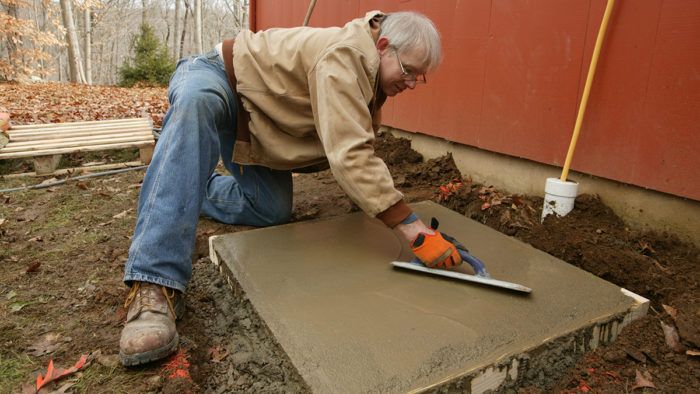
9) Smooth the rake marks with a mag float. Keep the leading edge of the float up. When the surface water dissipates, float the slab again. This is the final finish for exterior slabs. For a smooth interior slab, work it again with a steel float when the surface begins to lose its wet sheen.

Smooth the rake marks with a mag float. Round the corners.

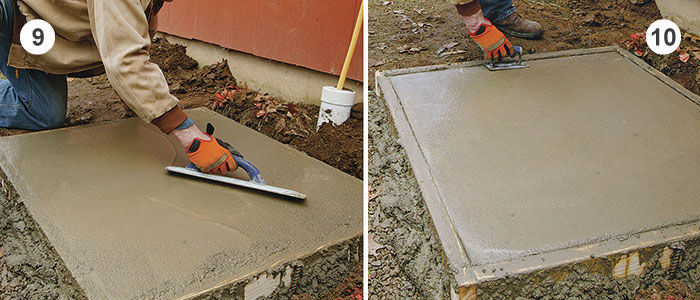
10) Round the corners. This leaves smooth, friendly edges that are less likely to chip. Use an edger once after each mag floating; on interior slabs with exposed edges, use it after the steel float. After the slab hardens for a day or more, pry the joints apart and remove the form.

Concrete tools

Concrete tools

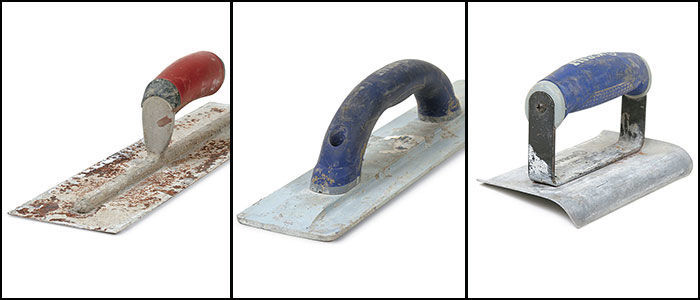
Steel float – A finishing tool that leaves a smooth, compacted surface that repels water but that also can be slippery when wet.

Mag float – Used in the initial tooling to bring up a creamy mix that’s easy to finish. As a final finishing tool, it leaves a coarse, slip-resistant surface that’s good for exterior slabs.

Edger – Rounds over the exposed edges of slabs, leaving a surface that’s more resistant to chipping than a simple square edge would be.

—Andy Engel is a senior editor.

Photos by Patrick McCombe, except where noted.

Tool photos: Rodney Diaz.

From Fine Homebuilding #258


More on working with concrete:

Mastered in a Minute:  Concrete Slabs — Here’s a video version of this article with a discussion of how to create a base, hand-mixing concrete, and placing and finishing the slab.

How to Finish a Concrete Patio Slab — Concrete can be finished in one of several ways. Here, Mike Guertin discusses several approaches, including brushing, troweling, and edging.

Reducing the Risk of Cracks in Concrete Slabs — Whether the slab is free-standing or tied into an existing structure, taking a few precautions will help prevent problems later.

Pouring Concrete Slabs — This is how a truckload of wet concrete is transformed into a smooth, flat slab. Less than ideal weather coming up? There are ways to handle that, too.

Fixing Concrete Cracks: Basement Slab Repair — Cracks in concrete basement slabs aren’t uncommon. Matt Risinger explains how to fix cosmetic defects with a two-part filler called RS-88.

Previous: How to Pour and Finish a Small Concrete Slab

Guide

Foundations and Masonry Work

Chapter

Concrete & Masonry Basics

Sign up for eletters today and get the latest how-to from Fine Homebuilding, plus special offers.

Signing you up...

This site is protected by reCAPTCHA and the Google Privacy Policy and Terms of Service apply.
See all newsletters
See all newsletters

View Comments

  1. user-7195315 | Jun 21, 2019 11:11am | #1

    Use a vibrating tool (i.e. palm sander) without any sand paper on it to vibrate the edge of the form. You sort of let the 'edge' of the sander (vs. the face) rattle along the form. You'll get tons of bubbles that come up and leaves you with a nice clean edge.

Log in or create an account to post a comment.

Sign up Log in

Become a member and get full access to FineHomebuilding.com

Foundations and Masonry Work

Foundations and Masonry Work

Trusted, comprehensive guidance from the pros for working with concrete and masonry

View Project Guide

View All Project Guides »

Become a member and get unlimited site access, including the Foundations and Masonry Work Project Guide.

Start Free Trial

Concrete & Masonry Basics
  • Choosing & Mixing Concrete
  • Concrete & Masonry Tools & Techniques
Building Foundations
  • Foundation Basics
  • Foundation Footings
  • Insulated Concrete Forms (ICFs)
Waterproofing Foundations
  • Waterproofing Strategies
  • Foundation Drains
Retrofits and Add-ons
Masonry in the Landscape
  • Patios, Walkways, and Driveways
  • Retaining Walls
  • Dry Stone Walls
  • Fire Pits
Brick

Fine Home Building

Newsletter Sign-up

  • Fine Homebuilding

    Home building tips, offers, and expert advice in your inbox.

  • Green Building Advisor

    Building science and energy efficiency advice, plus special offers, in your inbox.

  • Old House Journal

    Repair, renovation, and restoration tips, plus special offers, in your inbox.

Signing you up...

This site is protected by reCAPTCHA and the Google Privacy Policy and Terms of Service apply.
See all newsletters

Follow

  • Fine Homebuilding

    Dig into cutting-edge approaches and decades of proven solutions with total access to our experts and tradespeople.

    Start Free Trial Now
    • Facebook
    • Instagram
    • X
    • LinkedIn
  • GBA Prime

    Get instant access to the latest developments in green building, research, and reports from the field.

    Start Free Trial Now
    • Facebook
    • YouTube
  • Old House Journal

    Learn how to restore, repair, update, and decorate your home.

    Subscribe Now
    • Facebook
    • Instagram
    • X

Membership & Magazine

  • Online Archive
  • Start Free Trial
  • Magazine Subscription
  • Magazine Renewal
  • Gift a Subscription
  • Customer Support
  • Privacy Preferences
  • About
  • Contact
  • Advertise
  • Careers
  • Terms of Use
  • Site Map
  • Do not sell or share my information
  • Privacy Policy
  • Accessibility
  • California Privacy Rights

© 2025 Active Interest Media. All rights reserved.

Fine Homebuilding receives a commission for items purchased through links on this site, including Amazon Associates and other affiliate advertising programs.

  • Home Group
  • Antique Trader
  • Arts & Crafts Homes
  • Bank Note Reporter
  • Cabin Life
  • Cuisine at Home
  • Fine Gardening
  • Fine Woodworking
  • Green Building Advisor
  • Garden Gate
  • Horticulture
  • Keep Craft Alive
  • Log Home Living
  • Military Trader/Vehicles
  • Numismatic News
  • Numismaster
  • Old Cars Weekly
  • Old House Journal
  • Period Homes
  • Popular Woodworking
  • Script
  • ShopNotes
  • Sports Collectors Digest
  • Threads
  • Timber Home Living
  • Traditional Building
  • Woodsmith
  • World Coin News
  • Writer's Digest
Active Interest Media logo
X
X
This is a dialog window which overlays the main content of the page. The modal window is a 'site map' of the most critical areas of the site. Pressing the Escape (ESC) button will close the modal and bring you back to where you were on the page.

Main Menu

  • How-To
  • Design
  • Tools & Materials
  • Video
  • Blogs
  • Forum
  • Project Guides
  • Reader Projects
  • Magazine
  • Members
  • FHB House

Podcasts

  • FHB Podcast
  • ProTalk

Webinars

  • Upcoming and On-Demand

Podcasts

  • FHB Podcast
  • ProTalk

Webinars

  • Upcoming and On-Demand

Popular Topics

  • Kitchens
  • Business
  • Bedrooms
  • Roofs
  • Architecture and Design
  • Green Building
  • Decks
  • Framing
  • Safety
  • Remodeling
  • Bathrooms
  • Windows
  • Tilework
  • Ceilings
  • HVAC

Magazine

  • Current Issue
  • Past Issues
  • Magazine Index
  • Subscribe
  • Online Archive
  • Author Guidelines

All Access

  • Member Home
  • Start Free Trial
  • Gift Membership

Online Learning

  • Courses
  • Project Guides
  • Reader Projects
  • Podcast

More

  • FHB Ambassadors
  • FHB House
  • Customer Support

Account

  • Log In
  • Join

Newsletter

Get home building tips, offers, and expert advice in your inbox

Signing you up...

This site is protected by reCAPTCHA and the Google Privacy Policy and Terms of Service apply.
See all newsletters
See all newsletters

Follow

  • X
  • YouTube
  • instagram
  • facebook
  • pinterest
  • Tiktok

Join All Access

Become a member and get instant access to thousands of videos, how-tos, tool reviews, and design features.

Start Your Free Trial

Subscribe

FHB Magazine

Start your subscription today and save up to 70%

Subscribe

We hope you’ve enjoyed your free articles. To keep reading, become a member today.

Get complete site access to expert advice, how-to videos, Code Check, and more, plus the print magazine.

Start your FREE trial

Already a member? Log in

Privacy Policy Update

We use cookies, pixels, script and other tracking technologies to analyze and improve our service, to improve and personalize content, and for advertising to you. We also share information about your use of our site with third-party social media, advertising and analytics partners. You can view our Privacy Policy here and our Terms of Use here.

Cookies

Analytics

These cookies help us track site metrics to improve our sites and provide a better user experience.

Advertising/Social Media

These cookies are used to serve advertisements aligned with your interests.

Essential

These cookies are required to provide basic functions like page navigation and access to secure areas of the website.

Delete My Data

Delete all cookies and associated data