Caulk This Way
Joint design and prep may matter even more than choosing the right product.

Synopsis: Caulk and sealant joints are rarely taken seriously or done correctly in residential construction. This article covers proper joint design and prep as well as product selection.
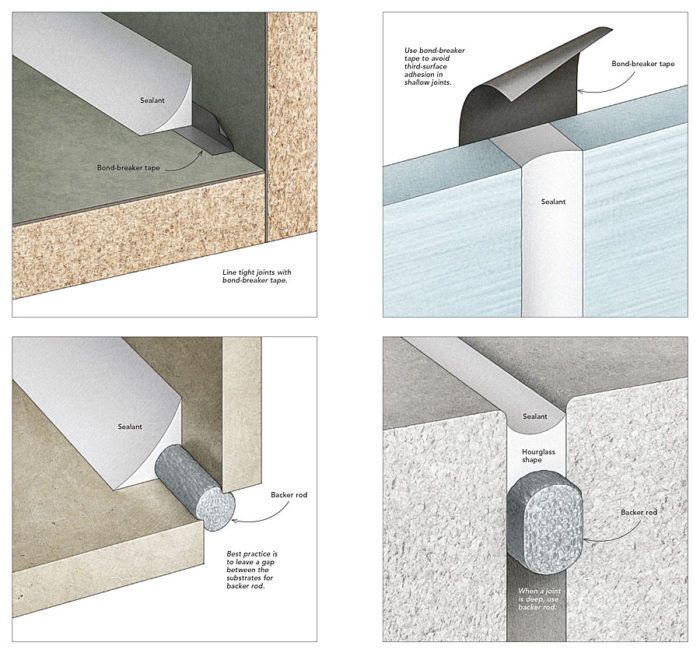
After researching and writing this article, I had an epiphany: In 35 years of doing and writing about residential construction, I have never seen a caulk joint executed properly. Most residential caulk joints I’ve seen have failed or are likely to. Builders, including myself, barely know which caulk or sealant to use where, and hardly anyone in residential construction knows how to execute a proper joint by considering crack width and depth and the use of backer rod or bond-breaker tape. There is a lot to know.
The first thing to know is that building components move. Builders don’t like to acknowledge this. That may be because it feels like a reflection on their work, or because it introduces complexities in material choices and procedures they’d rather avoid, or just because it never occurred to them. Movement happens mostly because of changes in temperature and humidity. We see the results in gaps between materials. In some instances, such as with interior trim, this is only an aesthetic issue. But in other cases—the corners of a shower, the gaps around a window, expansion joints in concrete—such spaces can lead to serious effects by allowing unwanted air or water to enter. The solution isn’t necessarily to make tighter joints, but rather to design the joints for the realities of the environment and the material, and then to install a good sealant properly.
I’m not arguing against good workmanship. The best caulk ever made still can’t make a badly executed interior-trim joint look good, for example. But good workmanship sometimes means leaving a gap that’s sized to allow a proper caulk joint. Many materials move so much with changes in temperature and humidity that no joint will stay tight, and so a flexible sealant is exactly the ticket. In fact, the manufacturers of building materials such as PVC trim, fiber-cement or wood-composite sidings, and vinyl windows actually specify gaps at joints to allow for movement and caulking. Good caulking is good workmanship, but maybe because caulking a joint feels like punting on quality—something done when a person lacks the skill or care to fit materials tightly—it gets short shrift. It’s often not even clear whose job it is. The painter’s? The carpenter’s?
In commercial and institutional construction, caulk joints are expected to last for 10 to 20 years. In fact, the materials aren’t even called caulks, but rather sealants. Joint design and sealant choice are handled by the designer (based on ASTM C1193), and the work is done by a specialty contractor. Mock-ups of building assemblies are made on-site so that the specified sealants can be tested for effectiveness with samples of the materials that will be used.
For more photos, drawings, and details, click the View PDF button below:


View Comments
So! I'm still at loss on how best to put in the lower shower caulk with what looks like a thin tape behind. Please eleaborate. mike from Colorado
I see Mike has not yet got a response from back in April, but I have the same question. We do tile work and are always looking to make the caulking look as good and be as durable as possible. No way could a wall/wall or floor/wall joint be anywhere near a quarter inch...most are a sixteenth to an eighth. How could a bond breaker tape be used in these situations, especially if the tape is 1/4 inch wide...that is an eighth on each side of the joint...much too big for most people.