
2 Rules for Building Comfortable Stairs
As the rise goes down, the run needs to go up correspondingly, or vice versa.
On the first stairs I built, I sized them for a 1×8 riser and a 2×8 tread. The result was a disastrously uncomfortable stair, with treads too short for adult feet. Although the rise itself wasn’t terrible, something about using it felt very cramped, and I set out to find what went into a safe, comfortable stair. Since then, I’ve built and/or designed many stairs, and every time I think about the lessons I learned on that first one.
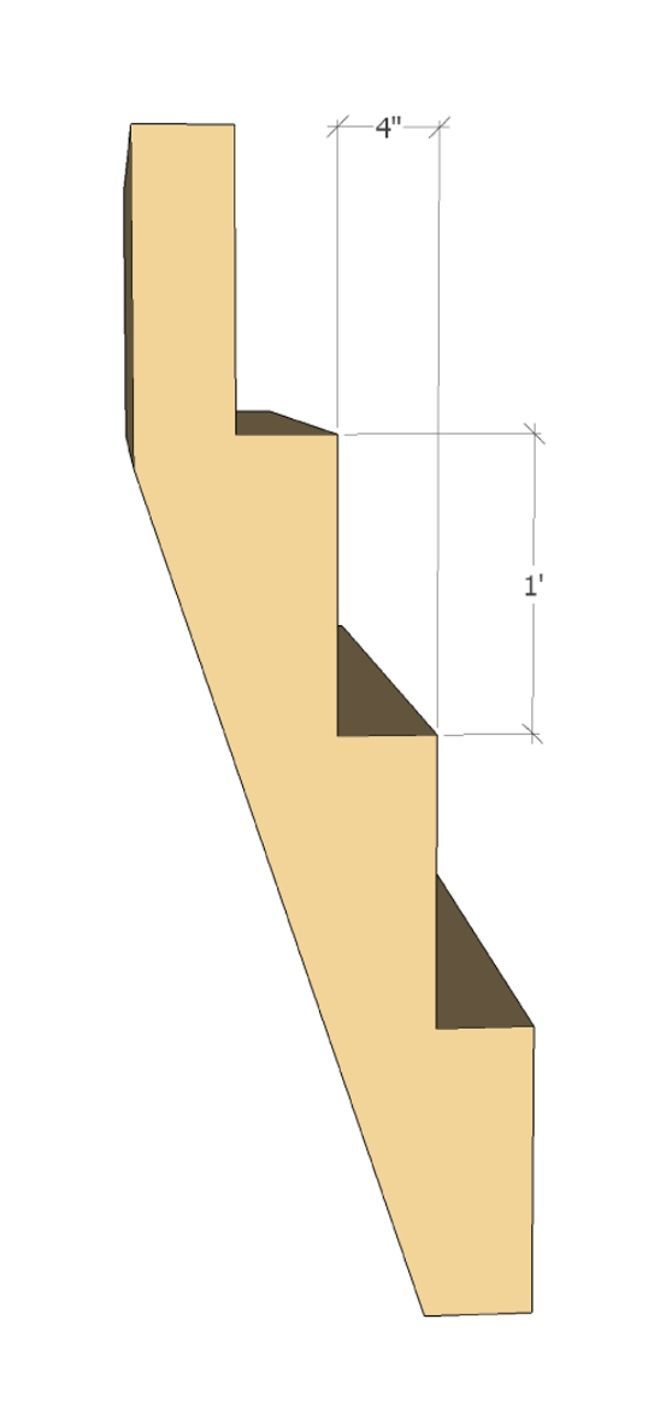
For anyone not familiar with the terms, “Rise” refers to the vertical distance from the top of one tread to the top of the next tread. It also happens to be the dimension of one of the cuts on each of the actual stair stringers–the framing members that hold up the stair treads. The “Run,” however, seems to cause some confusion. It’s the horizontal distance from the face of one riser to the face of the next riser, or from nosing to nosing, and the other stringer cut—it’s NOT the size of the tread itself, which includes a leading edge overhang of ¾” to 1 ¼” (according to the IRC for most residential stairs).
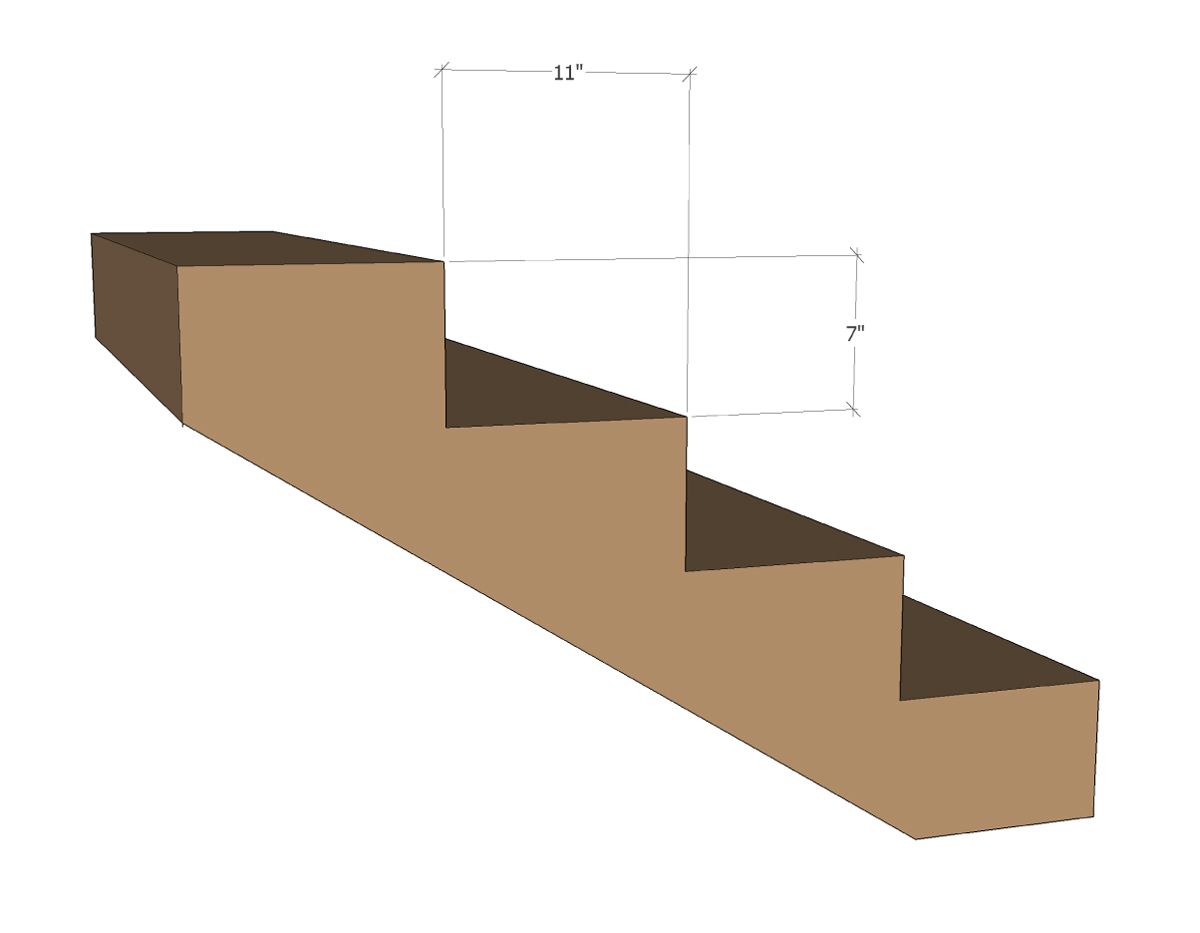
The IRC (International Residential Code) calls for a maximum rise (“r”) of 7 ¾” and a minimum run (“R”) of at least 10”. They use the term “tread” instead of “run” but I think that’s the cause of some confusion, so I’ll use the standard term “run.”

rise r ≤ 7 3/4″
run R ≥ 10″
r+R = 17 3/4″ (good)
2r+R = 25 1/2″ (within range)
→ stair will be comfortable
Rule one says that rise plus run (r+R) should equal 18 inches. Why? That’s what most people find to be a comfortable stride on most stairs. You can cheat a bit up or down, but below 17” and more than 19” will result in steps that require strides either too big or too small for most people. On my first stair, r+R was roughly 15 inches—way too far from 18” to be comfortable or safe. The IRC limit gives an r+R of 17 ¾”—pretty darn close to 18.
I relied on the 18” rule for several years, until I met another carpenter who insisted that a better measure was that twice the rise plus (2r+R) the run should be 25 inches. After trying to decide which rule really was better, I settled on the idea of using both. If a stair meets both numbers, it will be comfortable. If it meets only one of the numbers, it will be less comfortable. If it meets neither number, it will not be comfortable.
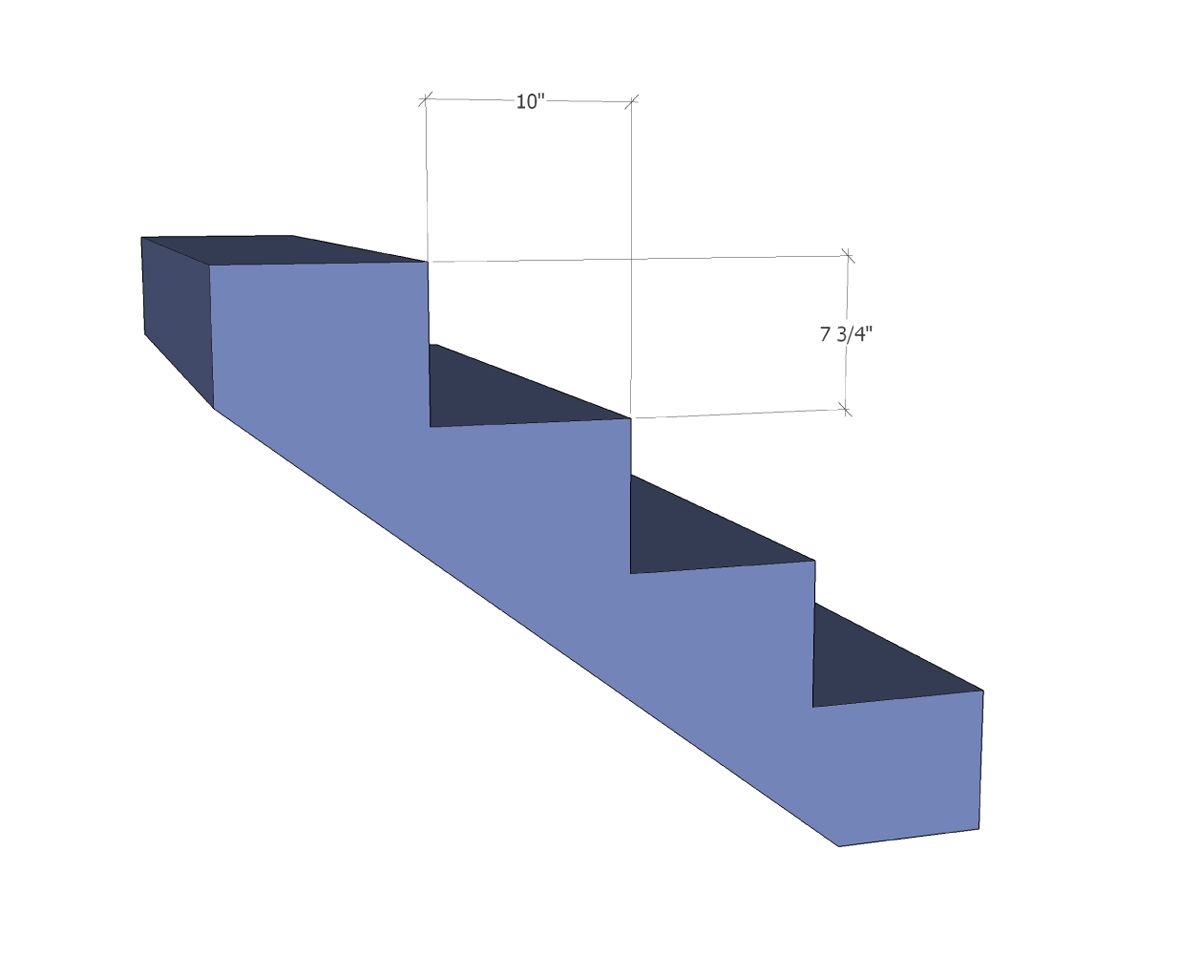
My first stair had a 2r+R of about 23. The IRC limit gives a 2r+R of 25 ½”. My ideal stair has a 7” rise and an 11” run. I usually end up having to squeeze the stair for one reason or another, but on the rare occasions I can include a 7-11 stair, it ends up being very comfortable. I call it a lazy stair, because it seems to take no effort to use (but you still feel like you’re getting somewhere). Its r+R is 18” and its 2r+R is 25”, right where they should be.
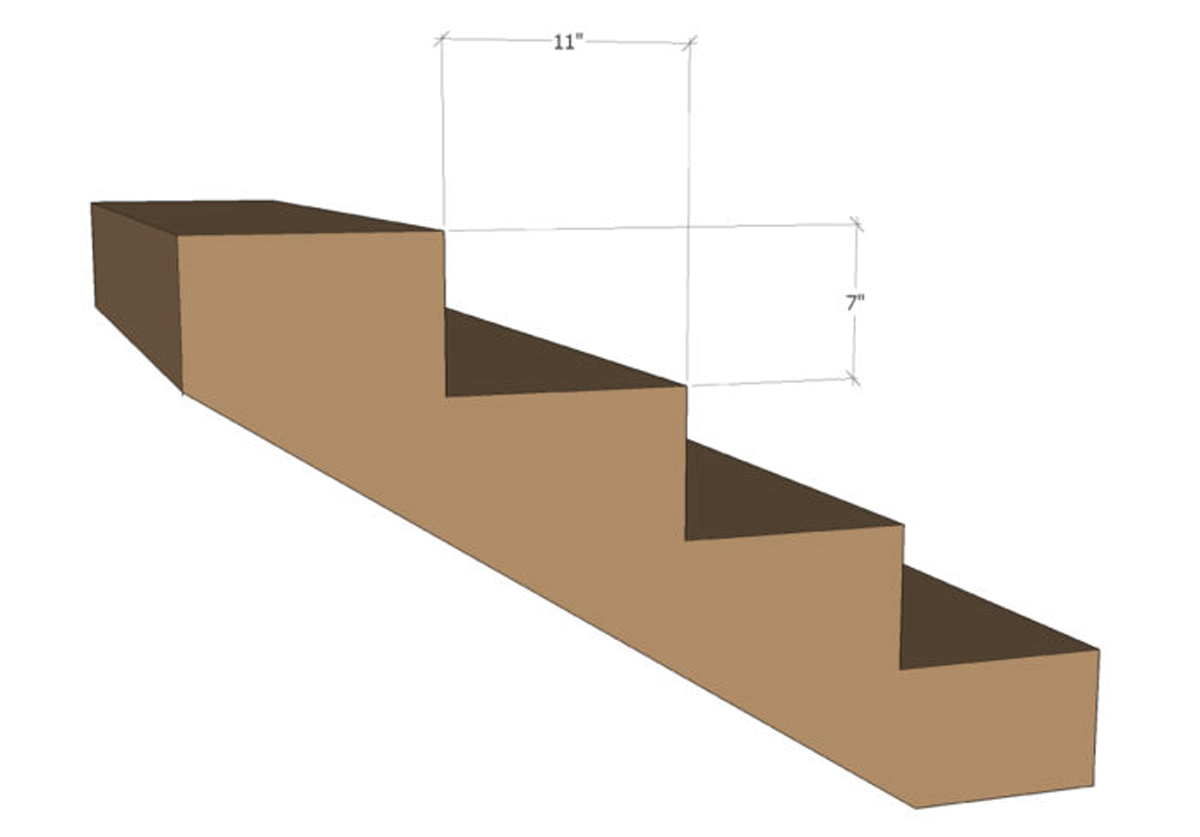
rise r = 7″
run R = 11″
r+R = 18″ (perfect)
2r+R = 25″ (perfect)
→ Stair will be comfortable
You have probably had the experience of using stairs, often in an institutional setting, that felt ridiculously shallow, possibly even requiring stutter steps, or inducing the strong desire to take two steps at once. A not-too-extreme example of that would be something like a 4” rise and a 14” run. That would give an r+R of 18”, right on the money for stride length. But 2r+R is only 22”, pretty far from 25”, and results in the stairs feeling like you need to take them two at a time, or that you are shuffling up them one step at a time.
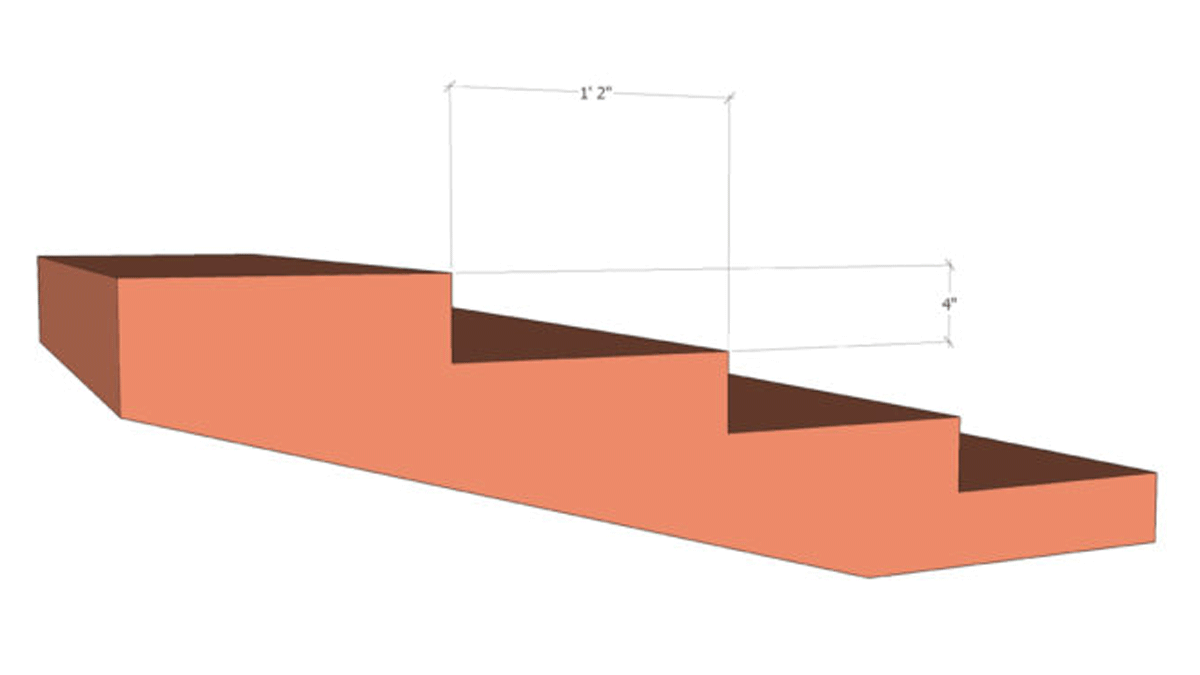
rise r = 4″
run R = 14″
r+R = 18″ (perfect)
2r+R = 22″ (too low)
→ won’t be comfortable
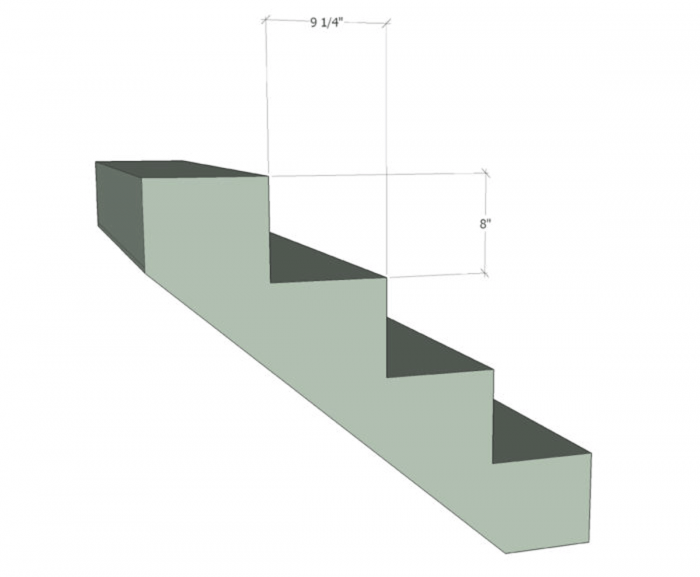
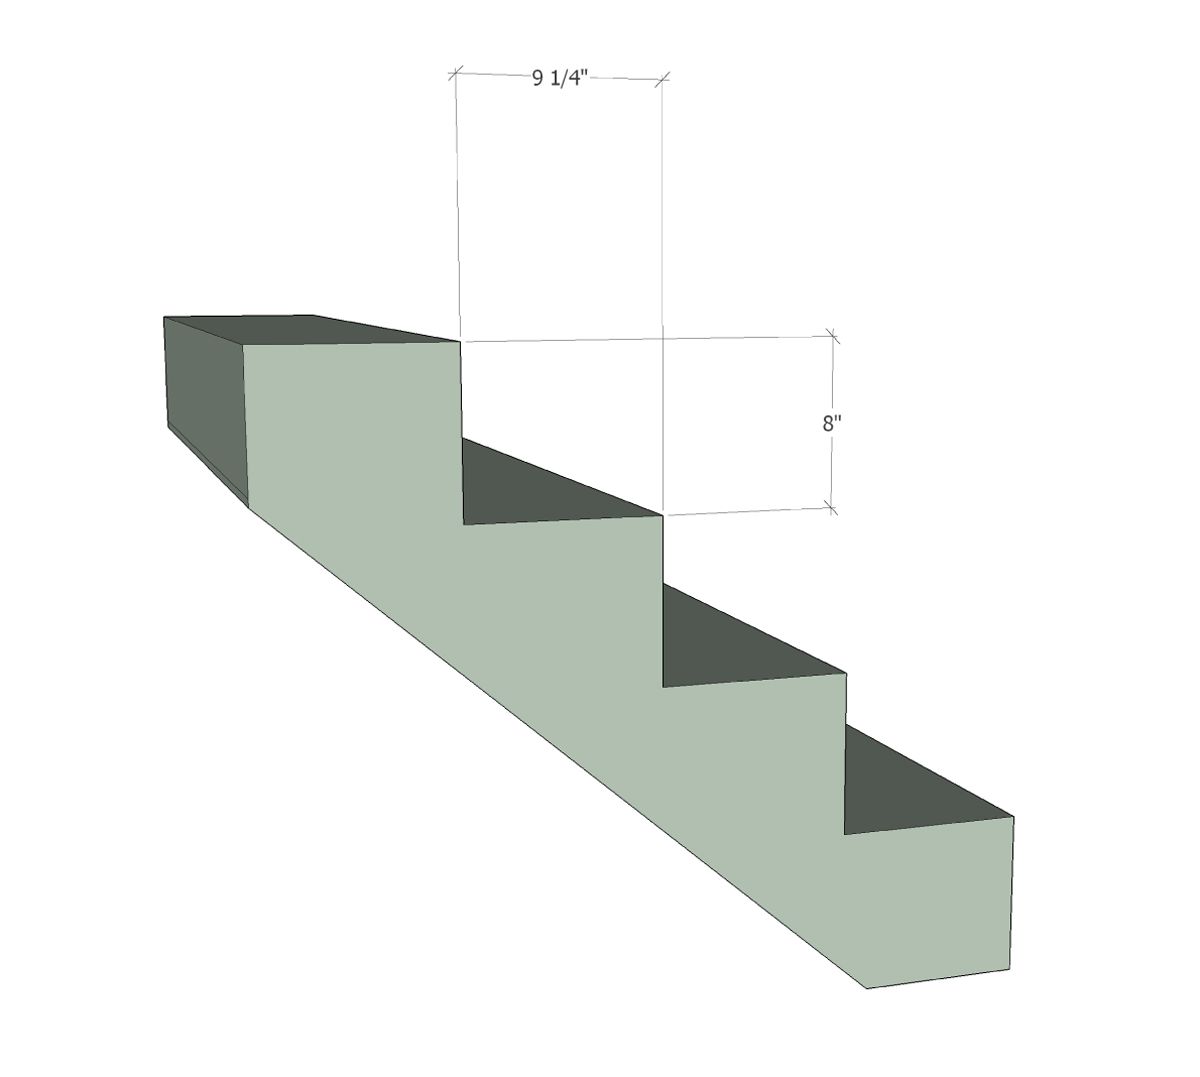
Rhode Island amended the IRC to allow a maximum rise of 8 ¼” and a minimum run of 9”. With an r+R of 17 ¼” and a 2r+R of 25 ½”, both numbers are close enough to the ideal to be comfortable for most people. On the ProHOME, Mike Guertin used Rhode Island’s amendment to his advantage. I had designed the stairs with a 7 7/16” rise and 10” run (r+R≈17.5”, 2r+R≈25”, good numbers). Mike was able to eliminate a tread and riser and use the headroom gained to create more floor space and an interesting nook in one of the bedrooms, using a rise of 8” and a run of 9 ¼”, for r+R of 17 ¼” and 2r+R of 25 ¼”, well within the comfort zone.

rise r = 8″
run R = 9 1/4″
r+R = 17 1/4″ (good)
2r+R = 25 1/4″” (almost perfect)
→ stairs will be comfortable
What if situation allowed for keeping the maximum rise of 8 ¼” and we expanded the run to 10 1/2”? Then r+R would be 18 ¾”, acceptable, but 2r+R would be 27”, which is more than ideal. Very tall people may find stairs with those dimensions comfortable, but the vertically challenged among us would not. How about a minimum run of 9 ½” but keep the riser down at 7”? 2r+R would be 24 ½”, pretty good, but r+R is only 16 ½”, not enough, and the stair would feel diminutive.
 |
 |
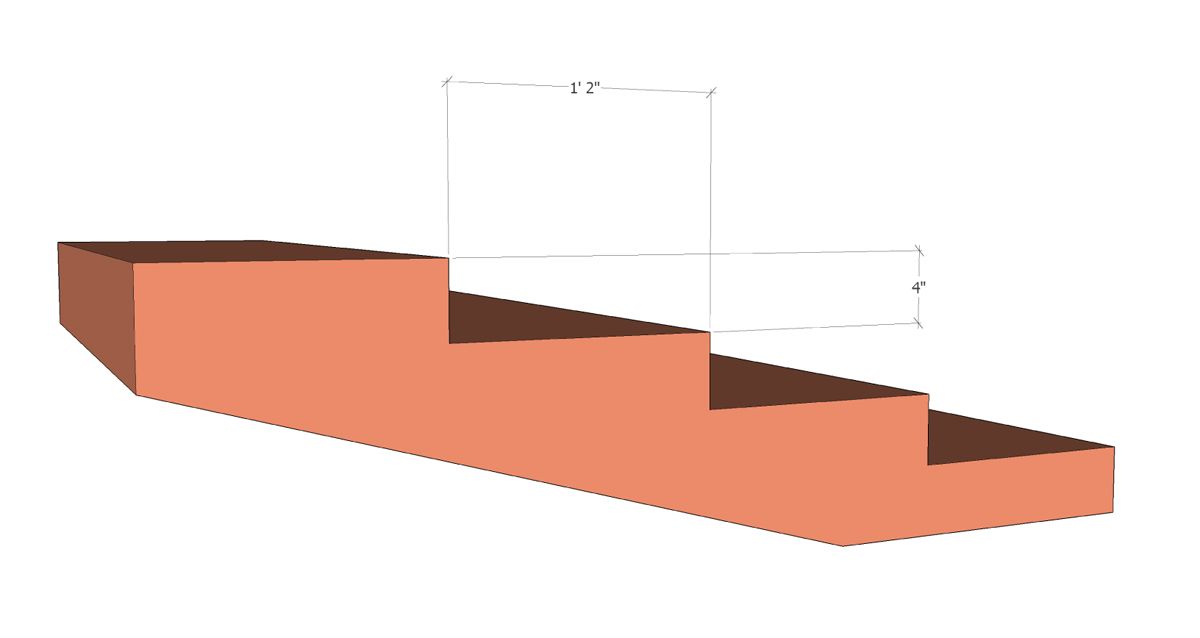
Here’s a good example of a stair I don’t think anyone would mistake for being comfortable. I designed and built it many years ago, but recall using a stepladder for dimensional inspiration. Aside from the treads being too small for safety, the rise would have been about 12” and the run about 4”. The r+R, then, was 16” (too low) and 2r+R was 28” (too high). Fortunately, the stair is used primarily for storage.
rise r = 12″
run R = 4″
r+R = 16″ (too low)
2r+R = 28″ (too high)
→ won’t be comfortable
To summarize:
The rise plus the run (r+R) should be within an inch of 18”.
Twice the rise plus the run (2r+R) should be within an inch of 25”.
Break those rules at your own risk.
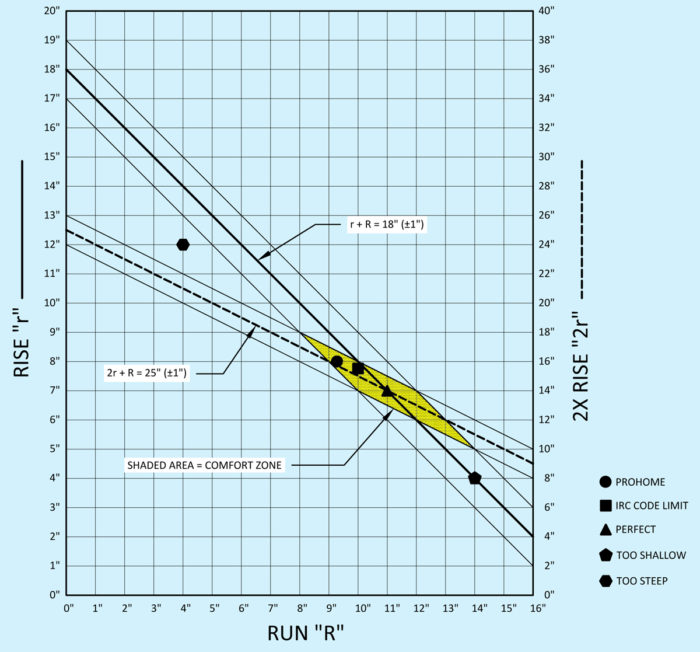
Molasseskat commented with a good idea; here is a graph that shows what I consider the “sweet spot” for stair design. I included icons for each of the stairs described in this article:
More great stair-building articles:
 |
 |
| Laying Out Basic Stair Stringers – To ensure level tread cuts and plumb riser cuts on stair stringers, it’s crucial to get the layout right. | Deck-Stair Layout 101 – Deck stair layout is simple, right? Probably right, unless it’s the first time you’ve tackled the task. With numerous “stair calculators” available, figuring rise and run dimensions is easy. Applying those dimensions is another matter. Watch this tutorial to see how to layout a basic set of deck stairs. |
 |
|
| Lay Out Accurate Stair Stringers With This Custom Tool – If you’re framing a staircase, you could hope that the stair gauges on your framing square bear against the edge of a nice straight board, but they might not—in that case there’s a better way. Watch this video to learn how to lay out accurate stair stringers. | Framing a Staircase – Regardless of the method you choose, every set of stairs requires the same basic approach to get from one floor to another safely, comfortably, and legally. In this photo slideshow, Fine Homebuilding author John Spier takes you through the steps of framing a staircase. |
Fine Homebuilding Recommended Products
Fine Homebuilding receives a commission for items purchased through links on this site, including Amazon Associates and other affiliate advertising programs.
Not So Big House

Tajima Chalk Rite Chalk Line
Anchor Bolt Marker
-
The Perfect Stair (in my opinion): rise r = 7" run R = 11" r+R = 18" (perfect) 2r+R = 25" (perfect) → Stair will be comfortable
-
IRC code limit stair: rise r = 7 3/4" run R = 10" r+R = 17 3/4" (good) 2r+R = 25 1/2" (within range) → stair will be comfortable
-
Mike Guertin's ProHOME adjusted dimensions: rise r = 8" run R = 9 1/4" r+R = 17 1/4" (good) 2r+R = 25 1/4"" (almost perfect) → stairs will be comfortable
-
Shallow stair example: rise r = 4" run R = 14" r+R = 18" (perfect) 2r+R = 22" (too low) → won't be comfortable
-
Steep stair example: rise r = 12" run R = 4" r+R = 16" (too low) 2r+R = 28" (too high) → won't be comfortable


View Comments
It might be best described using a graph of run vs. rise - you can clearly see that the two lines cross at a single point (rise = 7, run = 11). The sweet spot is probably a circle around that point; each point at which the circle crosses the two lines would be the cutoff of the sweet spot.
My architect has done drawing for our stairs and they now stand at Rise 7 3/8" - Run 11". I'm pushing for 7'' - 11'' but there are consequences..more floor space needed. I'm curious what is meant by the words "squeeze the stair" in this article. Can someone further explain?
Molasseskat, I'm sorry I missed your comment (six months ago!) but I thought you had a great idea so I created a graph. It turns out it's not a circle but a parallelogram, at least using my rules of thumb. It may be a little busy but the yellow area represents a stair that most people will find comfortable. Outside of the yellow zone represents a stair that most people will find uncomfortable in some way.
Austinindian, the rise and run your architect designed is well within the comfort zone, though a run of 10 1/2" might be slightly more comfortable.
By "squeeze the stair," I mean that on my jobs space is usually at a premium, so we cheat the stair to be steeper than ideal, often with code-minimum 10" Run and approaching the code-maximum 7 3/4" Rise.
In your case, if you'd like a shallower but still-comfortable stair, you'll need to add one or more risers to what is currently designed, then adjust the tread depth (aka Run), staying within the yellow zone on the new graph at the end of the article. For example, your floor-to-floor height as designed might be 118" (16 risers at 7 3/8"). You could change that to 17 risers at 6.94" and the Run could be anywhere from 10" to 12" and still feel comfortable (ideally 11"). Or if your design allows, you could have 18 risers at 6.56" with a Run of 12".
Just be aware that some building codes specify a maximum number of risers from landing to landing, and that shorter risers results in more treads and greater tread depth, extending the overall run of the stairs.
Is there a rule of thumb for taking stairs around a corner. To be able to fit mine in there would need to be three stairs on the corner.
The problem is when you have a small space in your ground floor like 40 square meters floor area placing your stair with that measurement (7" - 11") is really a challenge.
Looking for a little more info give this blog a read...
https://www.aricgitomerarchitect.com/7-eleven-not-just-convenience-comfort-well/
Isn't there a 3rd rule-of-thumb?
Run x rise = (70 to 75)
Any idea how to add it to the graphic representation? :)
I wonder if the graph should be a curve not a line? What about something like this?
Is there a different approach for disabled access, such as individual who has hip arthritis and can do 5x19 much easier than steeper stairs?
https://inspectapedia.com/Stairs/Stair_Design_for_Seniors.php I found this article about designing stairs for seniors. It seems like the takeaway is that with shorter step heights, you want longer tread depths to make climbing the stairs less awkward.
Excellent article, delighted you settled on 7 and 11, which is commercial spec and should be residential. Stair safety is a crucial consideration. Tread is not run, you subtract nosing overhang to get the run of the stair. Another article on stairs: https://www.proremodeler.com/beautiful-hazard
The IRC (New Jersey Edition allow a minimum tread of 9" & maximum riser of 8 1/4" which is good if you're tight for space.