FHB Logo Facebook LinkedIn Email Pinterest Twitter X Instagram Tiktok YouTube Plus Icon Close Icon Navigation Search Icon Navigation Search Icon Arrow Down Icon Video Guide Icon Article Guide Icon Modal Close Icon Guide Search Icon Skip to content
Subscribe
Log In
  • How-To
  • Design
  • Tools & Materials
  • Restoration
  • Videos
  • Blogs
  • Forum
  • Magazine
  • Members
  • FHB House
  • Podcast
Log In

A Workaround Approach to Kneewall Built-Ins

Without modifying the framing, a carpenter tucks storage and style beneath the roof in a second-floor hallway.

By Andrew Young Issue 269 - Aug/Sept 2017
  • X
  • facebook
  • linkedin
  • pinterest
  • email
  • add to favorites Log in or Sign up to save your favorite articles

This Cape Cod-style bungalow was built just before World War II (the war that would change everything, including the way houses are built). It’s compact and efficient, with a steep roof made of intersecting gables and eaves with no overhangs. It has simple moldings and few extras. The house reflects its era—a time of great struggle—with a modest amount of comfort.

Though the current homeowners appreciate their home’s history, they’re a growing modern family and needed more storage. But adding built-ins that protrude into any of the home’s small rooms would mean losing valuable floor space, which is at a premium in this house. So when I was hired for the project, I suggested we turn our attention to the narrow second-floor hallway at the top of the home’s steep winder stairs. It’s a spacious, light-filled area, and the 4-ft.-high kneewall under the sloped ceiling left us with an unclaimed triangle of attic space to work with—or, perhaps more accurately, to work around.

Designed to fit in

Like most roofs of its day, these 2×4 rafters were framed 24 in. on center, and the kneewall was framed to match with a stud aligned with each rafter. Though they are undersize according to modern building codes, these simple roof assemblies seem to stand the test of time in our climate and under our limited snow load. All the elements of the assembly are critical to its success—the rafters, collar ties, kneewall, exterior wall, and floor joists create strength through geometry. This means old roof frames such as this one are a lot like roofs framed with modern engineered trusses: You can’t modify them in any way without creating a major weakness.

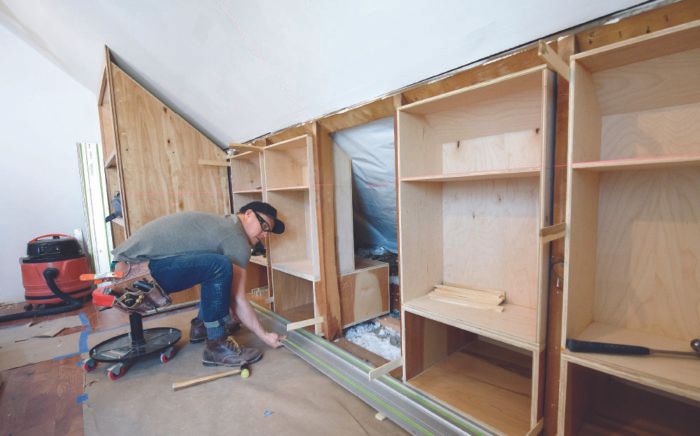
Not wanting to open a can of engineering worms, we decided to work around the existing framing to reclaim the attic space, setting a row of built-ins into the spaces between the studs. To avoid mistakes, we determined that it would be best to build the cabinet carcases in the shop, and then assemble the face frames on site after the carcases had been installed. The homeowners asked for a seamless look, and we felt that doing the face frames on site would offer flexibility in the process and allow us to fine-tune how everything would fit, making the new built-ins look like part of the original design.

The final plan uses five stud bays at the face of the kneewall—each approximately 22-1⁄2 in. wide and 44 in. tall—for a run of bookcases. Each open-shelf bookcase is anchored with a deep bottom drawer, and the assembly is complemented by a linen closet set in the corner at the top of the stairs, which does not enter into the attic space. We replaced an existing linen cabinet with this larger unit, pulling the piece farther forward to create additional storage and make better use of the jogged hallway.

Because the stud spacing varied slightly, we chose to build the bookcases to the smallest dimension. This simpified the process so the caracases would fit in all the bays with enough space to shim them level and plumb. Making the most of the triangular space, the open bookshelves are only 11-1⁄4 in. deep, but the bottom drawers extend back 24-1⁄2 in.

The built-ins are intended to look simple and clean. Because we were working around the kneewall studs, we knew that the stiles between the units would be wider than usual, as would the top rail, which has to accommodate the kneewall top plate. We opted for overlay drawer fronts to help de-emphasize the chunky face frame.

An extra-careful install

We’re used to working in older homes that present unique challenges, and this project was no different. The surrounding walls, floor, and ceiling were all out-of-level and out-of-plumb, ranging from mild to wild. The corner linen cabinet was straightforward to install and the first thing we tackled. Once that was in place, we began prepping the attic space to receive the built-in carcasses. After removing the drywall, the first step was to fasten a 2×4 (on the flat) over the floor joists for the back of the carcases to rest on. The 2×4 brought the cabinets level with the hardwood floors on the finished side of the kneewall (3⁄4-in. subfloor + 3⁄4-in. hardwood floors = 1-1⁄2 in.). Once we determined the height we wanted the cabinets to sit above the finished floor, we used blocking to lift and shims to level the individual units.

The key to a successful installation on this project was keeping all the carcases square and in plane with each other so that we could install the face frames as a (mostly) single unit, tying all five carcases together. Taking the time at this stage to get all the carcases in the correct position made the rest of the install much easier. We weren’t concerned with getting the spacing between the units exactly uniform. As long as they were vertically parallel, the stiles would fit nicely, and we were happy to rip each stile to a custom width. Because the stiles are wider than usual to begin with, the differences in spacing aren’t noticeable.

Using a laser level to set the elevation, we started by installing the end units and worked toward the middle. This allowed us to use a straightedge to check that we were keeping all the carcase fronts in plane with each other.

Finely tuned face frame

With the carcases installed, we turned our attention to the face frame, starting with the stiles at the ends of the units and the top and bottom rails. First we fit the stiles on the left and right ends, scribing them to the walls and ceiling as needed while also setting the proper overlap over the sidewall of the carcases. A 1⁄8-in. overlap creates an inside corner between stile and carcase that can be caulked to hide any gaps that may show up once the cabinets are painted white. Once these stiles fit well, we temporarily screwed them in place to ensure they didn’t move as we measured for the top and bottom rails and marked where they should attach to the stiles.

The bottom rail was fairly simple to fit as the floor is mostly level and we planned to add a base shoe to cover any slight gaps. The top rail was another story—the sloped ceiling has a significant cant from left to right and is bowed in the middle. With both end-stiles fit from floor to ceiling, we realized that we could use the stiles themselves as reference points to rip the top rail, which we left extra wide and then cut after the face frame was assembled (drawing left). In this way, the beveled rip matches the cant of the ceiling from one end of the built-ins to the other.

Once we were happy with the fit of the perimeter frame, adding the intermediate stiles was a fairly straightforward process, as we had already done the work of ensuring that all components were square. We marked the position of the interior stiles, cut them each to the necessary width, and again removed the frame to install them using pocket screws.

Finally, we installed the assembled face frame using glue on the carcase edges and countersunk screws driven into the kneewall framing (not the carcases, because the 1⁄2-in. plywood chosen for the carcase sides would have been a risky target for finish nails). The remaining shelf rails were glued and nailed in place before we spent a couple hours plugging the screw holes, filling the pinholes, and sanding everything to create a seamless frame. It’s worth noting that this approach is best suited for a painted installation. It could be done on a stain-grade project, but you would be adding a complication when it comes time to hide all your fasteners.

We returned to complete the installation of the drawer boxes, fronts, and hardware after the painters had done their work. The final result is as functional as it is charming and adds a lot of visual interest in what would otherwise be a rather unremarkable hallway. And we did it all without disturbing the framing, which would have required an engineer, permits, additional trades, and a much larger budget.

Sign up for eletters today and get the latest how-to from Fine Homebuilding, plus special offers.

Signing you up...

This site is protected by reCAPTCHA and the Google Privacy Policy and Terms of Service apply.
See all newsletters
See all newsletters
×

Get home building tips, offers, and expert advice in your inbox

Signing you up...

This site is protected by reCAPTCHA and the Google Privacy Policy and Terms of Service apply.
See all newsletters
See all newsletters
View PDF

New Feature

Fine Homebuilding Forums

Ask questions, offer advice, and share your work

  • X
  • facebook
  • linkedin
  • pinterest
  • email
  • add to favorites Log in or Sign up to save your favorite articles

Log in or create an account to post a comment.

Sign up Log in

Become a member and get full access to FineHomebuilding.com

Up Next

Video Shorts

Featured Story

Making the Move to Multifamily

A high-performance single-family home builder shares tips from his early experience with two apartment buildings.

Featured Video

Micro-Adjust Deck-Baluster Spacing for an Eye-Deceiving Layout

No math, no measuring—just a simple jig made from an elastic band is all you need to lay out a good-looking deck railing.

Related Stories

  • FHB Podcast Segment: Finding the Right Fixer-Upper
  • Ramon Martinez, Site Supervisor
  • Eichlers Get an Upgrade
  • Custom Built-ins With Job-Site Tools

Discussion Forum

Recent Posts and Replies

  • |
  • |
  • |
  • |
  • |
  • |
View More Create Post

Highlights

Fine Homebuilding All Access
Fine Homebuilding Podcast
Tool Tech
Plus, get an extra 20% off with code GIFT20

"I have learned so much thanks to the searchable articles on the FHB website. I can confidently say that I expect to be a life-long subscriber." - M.K.

Get home building tips, offers, and expert advice in your inbox

Signing you up...

This site is protected by reCAPTCHA and the Google Privacy Policy and Terms of Service apply.
See all newsletters
See all newsletters

Video

View All Videos
  • Upward Expansion
  • A New Approach to Foundations
  • A Closer Look at Smart Water-Leak Detection Systems
  • FHB Podcast Segment: Finding the Right Fixer-Upper
View All

Cape Cod

View All Cape Cod Articles
  • Modern Mountain Farmhouse
  • Cape Connection
  • Podcast 535: Air-Sealing Cape Houses, Smart Watches for Builders, and Repairing Spalling Concrete
  • Insulate a Cape Roof to Avoid Ice Dams
View All Cape Cod Articles

Fine Homebuilding Magazine

  • Issue 332 - July 2025
    • Custom Built-ins With Job-Site Tools
    • Fight House Fires Through Design
    • Making the Move to Multifamily
  • Issue 331 - June 2025
    • A More Resilient Roof
    • Tool Test: You Need a Drywall Sander
    • Ducted vs. Ductless Heat Pumps
  • Issue 330 - April/May 2025
    • Deck Details for Durability
    • FAQs on HPWHs
    • 10 Tips for a Long-Lasting Paint Job
  • Issue 329 - Feb/Mar 2025
    • Smart Foundation for a Small Addition
    • A Kominka Comes West
    • Making Small Kitchens Work
  • Issue 328 - Dec/Jan 2024
    • How a Pro Replaces Columns
    • Passive House 3.0
    • Tool Test: Compact Line Lasers

Fine Home Building

Newsletter Sign-up

  • Fine Homebuilding

    Home building tips, offers, and expert advice in your inbox.

  • Green Building Advisor

    Building science and energy efficiency advice, plus special offers, in your inbox.

  • Old House Journal

    Repair, renovation, and restoration tips, plus special offers, in your inbox.

Signing you up...

This site is protected by reCAPTCHA and the Google Privacy Policy and Terms of Service apply.
See all newsletters

Follow

  • Fine Homebuilding

    Dig into cutting-edge approaches and decades of proven solutions with total access to our experts and tradespeople.

    Start Free Trial Now
    • Facebook
    • Instagram
    • X
    • LinkedIn
  • GBA Prime

    Get instant access to the latest developments in green building, research, and reports from the field.

    Start Free Trial Now
    • Facebook
    • YouTube
  • Old House Journal

    Learn how to restore, repair, update, and decorate your home.

    Subscribe Now
    • Facebook
    • Instagram
    • X

Membership & Magazine

  • Online Archive
  • Start Free Trial
  • Magazine Subscription
  • Magazine Renewal
  • Gift a Subscription
  • Customer Support
  • Privacy Preferences
  • About
  • Contact
  • Advertise
  • Careers
  • Terms of Use
  • Site Map
  • Do not sell or share my information
  • Privacy Policy
  • Accessibility
  • California Privacy Rights

© 2025 Active Interest Media. All rights reserved.

Fine Homebuilding receives a commission for items purchased through links on this site, including Amazon Associates and other affiliate advertising programs.

  • Home Group
  • Antique Trader
  • Arts & Crafts Homes
  • Bank Note Reporter
  • Cabin Life
  • Cuisine at Home
  • Fine Gardening
  • Fine Woodworking
  • Green Building Advisor
  • Garden Gate
  • Horticulture
  • Keep Craft Alive
  • Log Home Living
  • Military Trader/Vehicles
  • Numismatic News
  • Numismaster
  • Old Cars Weekly
  • Old House Journal
  • Period Homes
  • Popular Woodworking
  • Script
  • ShopNotes
  • Sports Collectors Digest
  • Threads
  • Timber Home Living
  • Traditional Building
  • Woodsmith
  • World Coin News
  • Writer's Digest
Active Interest Media logo
X
X
This is a dialog window which overlays the main content of the page. The modal window is a 'site map' of the most critical areas of the site. Pressing the Escape (ESC) button will close the modal and bring you back to where you were on the page.

Main Menu

  • How-To
  • Design
  • Tools & Materials
  • Video
  • Blogs
  • Forum
  • Project Guides
  • Reader Projects
  • Magazine
  • Members
  • FHB House

Podcasts

  • FHB Podcast
  • ProTalk

Webinars

  • Upcoming and On-Demand

Podcasts

  • FHB Podcast
  • ProTalk

Webinars

  • Upcoming and On-Demand

Popular Topics

  • Kitchens
  • Business
  • Bedrooms
  • Roofs
  • Architecture and Design
  • Green Building
  • Decks
  • Framing
  • Safety
  • Remodeling
  • Bathrooms
  • Windows
  • Tilework
  • Ceilings
  • HVAC

Magazine

  • Current Issue
  • Past Issues
  • Magazine Index
  • Subscribe
  • Online Archive
  • Author Guidelines

All Access

  • Member Home
  • Start Free Trial
  • Gift Membership

Online Learning

  • Courses
  • Project Guides
  • Reader Projects
  • Podcast

More

  • FHB Ambassadors
  • FHB House
  • Customer Support

Account

  • Log In
  • Join

Newsletter

Get home building tips, offers, and expert advice in your inbox

Signing you up...

This site is protected by reCAPTCHA and the Google Privacy Policy and Terms of Service apply.
See all newsletters
See all newsletters

Follow

  • X
  • YouTube
  • instagram
  • facebook
  • pinterest
  • Tiktok

Join All Access

Become a member and get instant access to thousands of videos, how-tos, tool reviews, and design features.

Start Your Free Trial

Subscribe

FHB Magazine

Start your subscription today and save up to 70%

Subscribe

You have 1 free article remaining.

Get complete site access, including thousands of videos, how-to tips, tool reviews, and design features.

Start your FREE trial

Already a member? Log in

We hope you’ve enjoyed your free articles. To keep reading, become a member today.

Get complete site access to expert advice, how-to videos, Code Check, and more, plus the print magazine.

Start your FREE trial

Already a member? Log in

Privacy Policy Update

We use cookies, pixels, script and other tracking technologies to analyze and improve our service, to improve and personalize content, and for advertising to you. We also share information about your use of our site with third-party social media, advertising and analytics partners. You can view our Privacy Policy here and our Terms of Use here.

Cookies

Analytics

These cookies help us track site metrics to improve our sites and provide a better user experience.

Advertising/Social Media

These cookies are used to serve advertisements aligned with your interests.

Essential

These cookies are required to provide basic functions like page navigation and access to secure areas of the website.

Delete My Data

Delete all cookies and associated data