Small Moldings Solution
This technique will help eliminate the risk of projectile offcuts and also improve the smoothness of the cut.
I do a little bit of everything in my remodeling work, including some finish carpentry, but nothing frustrates me more than dealing with the little miter returns on window casing, crown, wainscot, and so forth. I have a good-quality miter saw with a sharp blade, but I’m still getting mixed results. Got any tips for lowering my blood pressure on these jobs?
—Billy, via email
Justin Fink: You’re not alone. Working with small moldings and miter returns is like a subspecialty in the world of trim carpentry, and it demands some changes in working habits.
You’re on the right track with a good saw and a quality blade, and need to ensure both are set up to make accurate cuts. If they aren’t, start there. But even a well-tuned miter saw can be improved.
The trouble is that miter saws aren’t particularly well-suited for this work. The trough in the bed of the saw is much wider than the blade, as is the gap between the two upright fences. This means that small moldings are poorly supported, which can lead to tearout on the backside of cuts, and scraps flying dramatically through the air as the blade cuts through them.
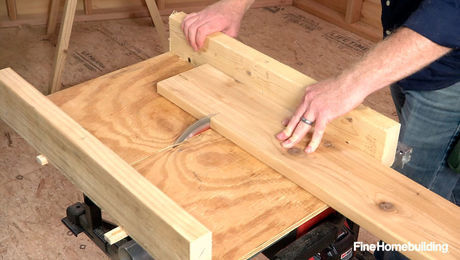
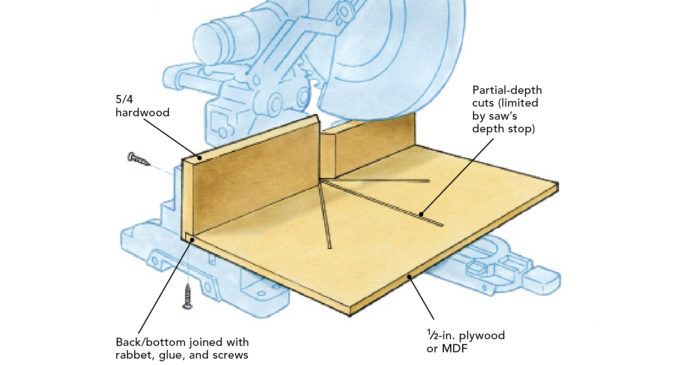
Solve these issues by setting up your miter saw with a subfence assembly. I make these L-shaped assemblies out of scraps of hardwood and plywood or MDF, which I join together at a 90° angle with the help of a rabbet joint, wood glue, and screws that go up into the rear fence and are kept at least a couple of inches from the path of the sawblade.
After assembly, fasten the L-shaped setup to the fence of the miter saw, and ensure it’s sitting flat. If it’s not tight to the bed of the saw, use some pieces of double-stick carpet tape on the nonadjustable portion of the saw’s bed to help keep the base of the subfence assembly from lifting.
Set the saw for a shallow depth of cut—you don’t want to cut all the way through the base of the subfence or it won’t be as sturdy and accurate—and cut kerfs at the commonly used angles. A cut at 90° and two at 45° to the left and right of 90° will have you set for most jobs.
The kerfs in the base of the subfence match the actual thickness of the blade, so it’s easy to line up a marked piece and know exactly where the blade will land without trying to sneak up on the cut. Plus, the kerf means both sides of the cut are fully supported, so you won’t get tearout.
Having the subfence set up for 45° cuts to both sides of 90° creates a gap in the rear fence that is bigger than the kerfs you just cut in the base, but this is still better than using the stock metal fence of the saw itself, and still offers the same benefits of the base kerfs when it comes to alignment and tearout reduction.
When it’s time to make cuts, never try to work with a piece less than 10 in. to 12 in. long. This could mean buying more stock than you need, but having your fingers that close to the blade on small, flimsy moldings is not worth the risk. It’s also best to always move the blade through angled cuts so that you’re entering the wood at the short point and exiting at the long point, not the other way around. When you cut a piece of wood “downhill”—long point to short point—it will leave you with a rougher cut. Finally, always let the sawblade spin to a complete stop before lifting it out of the cut. This will help eliminate the risk of projectile offcuts and also improve the smoothness of the cut.


