FHB Logo Facebook LinkedIn Email Pinterest Twitter X Instagram Tiktok YouTube Plus Icon Close Icon Navigation Search Icon Navigation Search Icon Arrow Down Icon Video Guide Icon Article Guide Icon Modal Close Icon Guide Search Icon Skip to content
Subscribe
Log In
  • How-To
  • Design
  • Tools & Materials
  • Restoration
  • Videos
  • Blogs
  • Forum
  • Magazine
  • Members
  • FHB House
  • Podcast
Log In
How-To

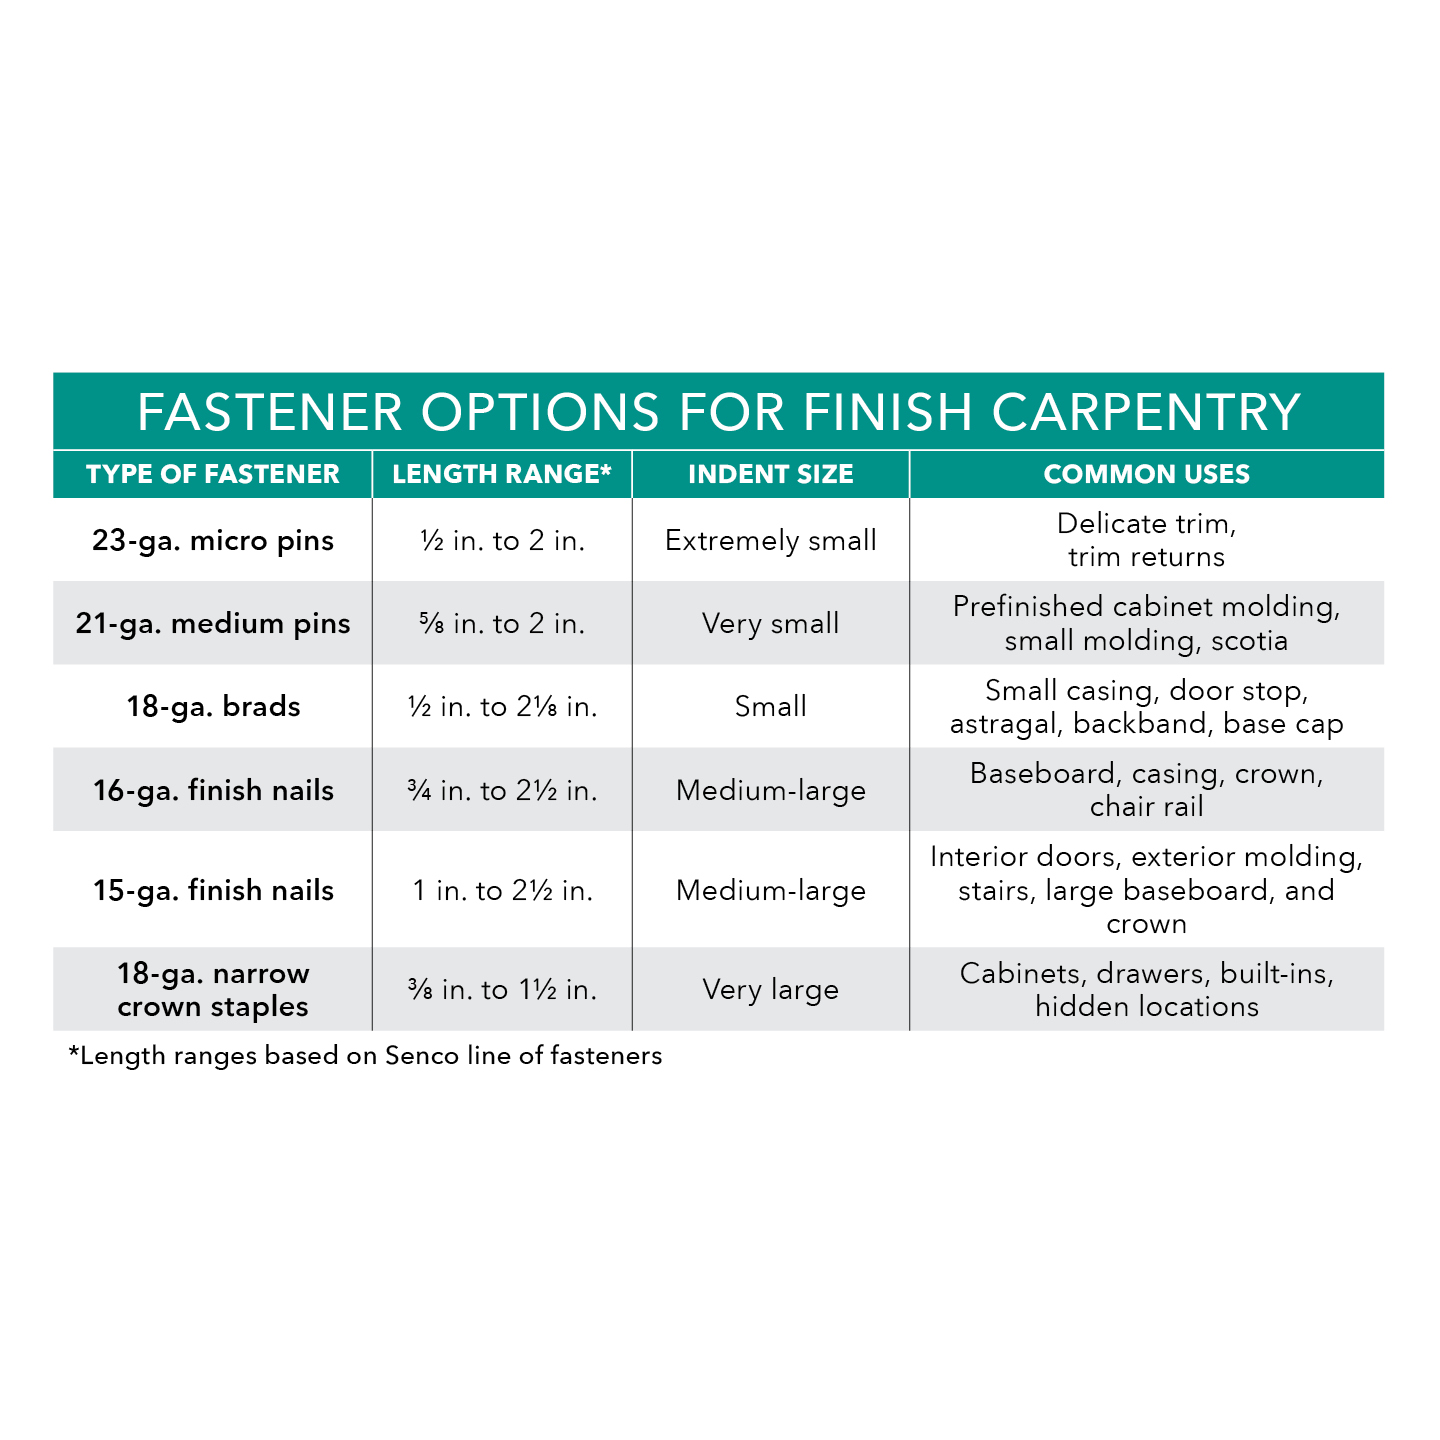
Floating Shelves Made Strong and Simple

These grain-matched, mitered floating shelves slide onto a cleat for easy installation and a clean, modern look.

By Cliff Ham Issue 276 - July 2018
  • X
  • facebook
  • linkedin
  • pinterest
  • email
  • add to favorites Log in or Sign up to save your favorite articles

Synopsis: Floating shelves have a modern, seamless look. This article explains how to create floating shelves from 3/4-in. rift-sawn white-oak plywood, from cutting the mitered corners, to glue up, to installation. The author puts extra emphasis on the finishing touches—wire brushing, light sanding, and touch-ups.

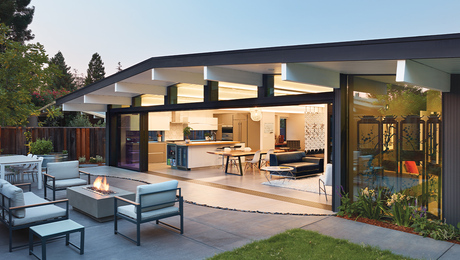
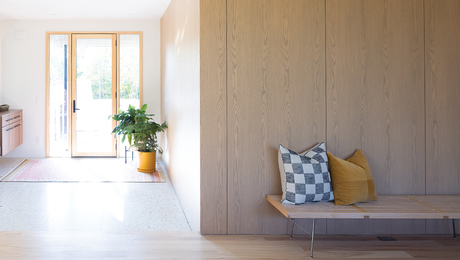
You don’t always need to gut a kitchen to give it a new look and better function. We recently completed a partial-kitchen remodel in which we removed some cabinets, modified some cabinets to upgrade their appearance and purpose, and added some new cabinets to match the originals. We painted everything, and installed new countertops, a new backsplash, and a new range hood. And to give the kitchen the modern look the homeowners were after, we built and installed four floating shelves.

The seamless look of floating shelves

These floating shelves are made from 3⁄4-in. rift-sawn white-oak plywood. This grain-matched look is popular right now and it’s a particularly interesting detail to me as a carpenter, because I think a lot about wood grain—in terms of how to best use it both for the performance of what I’m building, and for the best looks. Because these floating shelves are made from veneered plywood, I don’t have to worry about seasonal wood movement. In fact, the grain is purely aesthetic. Though the shelves appear as one big piece of white oak, there is no end grain. Instead, the grain is continuous, wrapping from the front of the shelf around each side. The grain also continues from the front of the shelf to the top and bottom. So the look doesn’t actually mimic a solid board, but the shelves have a superclean, seamless appearance.

This seamless effect is achieved by laying out the front, sides, top, and bottom of each shelf next to each other on the plywood and making as few cuts as possible, thereby losing as little material as possible to sawkerfs.
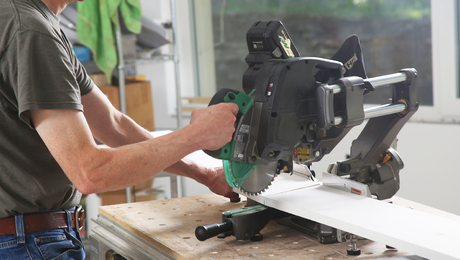
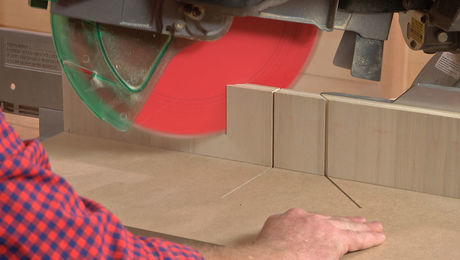
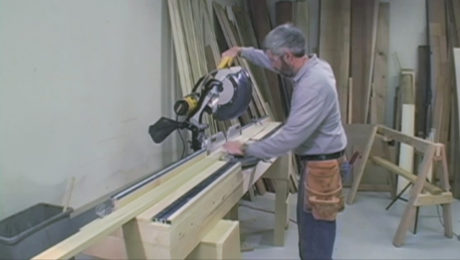
Cut precise parts

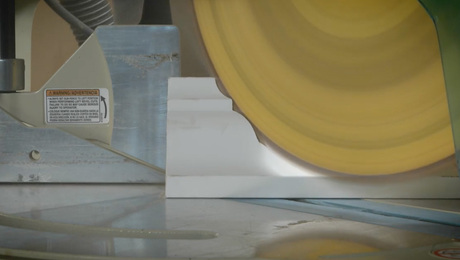
The first thing I do is rip the full sheet of plywood down to just what I need for each of the floating shelves. Then I lay out the parts show-side up and mark them to make it easy to remember how they’ll go together. I also leave everything laid out on the table as I cut the parts. I square-cut all the parts first, then cut the angles on all of the edges. This two-step process ensures that I’m not losing any more grain when I cut the angled edges. The only material removed by the miter saw (for the 45° crosscuts) and tablesaw (for the 45° rip cuts) is from the core of the plywood, not the veneer.

Because of the way I later fold these parts back together to glue up the shelves, accurate dimensions are crucial. Each shelf’s top, bottom, and front must be exactly the same length; the top and bottom must be exactly the same width; and the length of the sides must precisely match the width of the top and bottom. Any error and the joints won’t be tight. To have enough contact for strong glue joints, the miters can’t be much more than 45°, but you can back-cut by an extra degree or two to make sure the front of the joints come together without a visible seam.

Clean cuts on the miter saw and tablesaw require good technique and sharp, high-quality blades. Make sure you have both before you try to build floating shelves like these.

The right grain for tight miters

These shelves have a particularly modern look, with the grain wrapping from the front of the shelf to the top, bottom, and sides. The right plywood is one of the keys to getting this effect. The tight and straight grain of the rift-sawn white-oak plywood used here is a perfect choice. To ensure a good grain match as the veneer wraps around the shelf, the parts are laid out next to each other on one section of the plywood.

Go easy on the sanding

To glue up the shelves, I lay all the parts out flat on a table with the angled edges facing down, and then connect all the joints with clear packing tape. Other tapes will work, but clear packing tape is strong enough to hold the parts together and I can see the joints and make sure everything comes together tightly during glue up, which is a matter of folding the parts together, adding a bit more tape, and clamping.

Sanding veneered plywood can be risky. A light touch before finishing is okay, but on shelves like these, you need to be careful at the miters. It’s very easy to sand through the veneer. So, instead of using sandpaper to remove glue squeeze-out, use a card scraper. While I sanded these shelves very little, I did do some things to get them ready for finish.

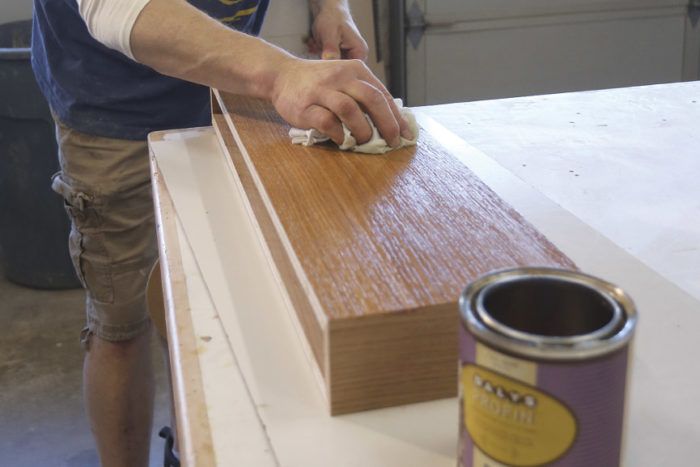
First, I wire-brushed the plywood. The effect is subtle, but it adds depth and texture to the grain when finished. I also gently rolled the edges with a screwdriver shaft. This turns the veneer down, closing any small gaps at the miter joints, and reduces the risk of sanding off the veneer and exposing the core below. Then, I very lightly sanded the edges. Where there was a small gap, I touched it up with a paint pen to match the color of the veneer. For an accurate color match, I wet the plywood to mimic the clear poly I was planning to finish the shelves with before choosing a color for the touch-up pen. After blowing the shelves clean with compressed air, I finished them with wipe-on poly, one coat a day for three days.

Don’t overthink the install

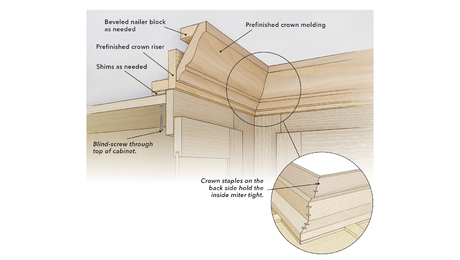
There are lots of ways to install floating shelves, but I don’t think it needs to be too complicated. I slipped these onto cleats made of three pieces of 3⁄4-in. plywood, glued and screwed together. Because we had opened the wall where the shelves are installed, I was able to put blocking where I needed it, but it would be perfectly fine to screw the cleats to studs if the layout works. I screwed the cleats to the blocking with TimberLok screws.

For a clean look, I made the shelves to match the height of the subway tile and worked with the tile installer to align the shelves with the tile courses. The cleat matches the inside dimension of the hollow shelves, so the fit is very tight. All I did was add a little glue inside the shelves before slipping them onto the cleat. I have no doubt that these shelves will hold anything that the homeowners choose to put on them.

I recently returned to the kitchen, and these floating shelves are holding up great. I’m always looking for ways to make my methods and finished work better, and sometimes the best way to learn is to revisit projects and build things a second time. I was able to revisit this project, and found that there’s no need to change a thing. This process works and these shelves look awesome.

For further reading on this topic, check out these links:

  • Floating Shelves Done Well
  • Strong Floating Shelves

For details and many more photos in this article, please click the View PDF button below.

Sign up for eletters today and get the latest how-to from Fine Homebuilding, plus special offers.

Signing you up...

This site is protected by reCAPTCHA and the Google Privacy Policy and Terms of Service apply.
See all newsletters
See all newsletters
×

Get home building tips, offers, and expert advice in your inbox

Signing you up...

This site is protected by reCAPTCHA and the Google Privacy Policy and Terms of Service apply.
See all newsletters
See all newsletters
View PDF

New Feature

Fine Homebuilding Forums

Ask questions, offer advice, and share your work

  • X
  • facebook
  • linkedin
  • pinterest
  • email
  • add to favorites Log in or Sign up to save your favorite articles

Log in or create an account to post a comment.

Sign up Log in

Become a member and get full access to FineHomebuilding.com

Up Next

Video Shorts

Featured Story

Eichlers Get an Upgrade

Performance improvements for the prized homes of an influential developer who wanted us all to be able to own one.

Featured Video

How to Install Exterior Window Trim

Learn how to measure, cut, and build window casing made of cellular PVC, solid wood, poly-ash boards, or any common molding material. Plus, get tips for a clean and solid installation.

Related Stories

  • FHB Podcast Segment: Hand Tool Sharpening Tips
  • What Size Nails?
  • An Easier Method for Mitered Head Casings
  • Making and Installing Wood Wall Paneling

Discussion Forum

Recent Posts and Replies

  • |
  • |
  • |
  • |
  • |
  • |
View More Create Post

Highlights

Fine Homebuilding All Access
Fine Homebuilding Podcast
Tool Tech
Plus, get an extra 20% off with code GIFT20

"I have learned so much thanks to the searchable articles on the FHB website. I can confidently say that I expect to be a life-long subscriber." - M.K.

Get home building tips, offers, and expert advice in your inbox

Signing you up...

This site is protected by reCAPTCHA and the Google Privacy Policy and Terms of Service apply.
See all newsletters
See all newsletters

Video

View All Videos
  • Why You Should Use a Cordless Saw
  • How to Make a Zero-Clearance Miter Saw Fence
  • Coping Crown Molding on Inside Corners
  • Build a Built-in Mudroom Series: A Versatile Miter Saw Station
View All

Finish Carpentry

View All Finish Carpentry Articles
  • Installing Prefinished Cabinet Molding
  • Sand Smooth Contours
  • That Modern Look
  • Template for Bullnose Base Corners
View All Finish Carpentry Articles

Fine Homebuilding Magazine

  • Issue 332 - July 2025
    • Custom Built-ins With Job-Site Tools
    • Fight House Fires Through Design
    • Making the Move to Multifamily
  • Issue 331 - June 2025
    • A More Resilient Roof
    • Tool Test: You Need a Drywall Sander
    • Ducted vs. Ductless Heat Pumps
  • Issue 330 - April/May 2025
    • Deck Details for Durability
    • FAQs on HPWHs
    • 10 Tips for a Long-Lasting Paint Job
  • Old House Journal – August 2025
    • Designing the Perfect Garden Gate
    • Old House Air-Sealing Basics
  • Issue 329 - Feb/Mar 2025
    • Smart Foundation for a Small Addition
    • A Kominka Comes West
    • Making Small Kitchens Work

Fine Home Building

Newsletter Sign-up

  • Fine Homebuilding

    Home building tips, offers, and expert advice in your inbox.

  • Green Building Advisor

    Building science and energy efficiency advice, plus special offers, in your inbox.

  • Old House Journal

    Repair, renovation, and restoration tips, plus special offers, in your inbox.

Signing you up...

This site is protected by reCAPTCHA and the Google Privacy Policy and Terms of Service apply.
See all newsletters

Follow

  • Fine Homebuilding

    Dig into cutting-edge approaches and decades of proven solutions with total access to our experts and tradespeople.

    Start Free Trial Now
    • Facebook
    • Instagram
    • X
    • LinkedIn
  • GBA Prime

    Get instant access to the latest developments in green building, research, and reports from the field.

    Start Free Trial Now
    • Facebook
    • YouTube
  • Old House Journal

    Learn how to restore, repair, update, and decorate your home.

    Subscribe Now
    • Facebook
    • Instagram
    • X

Membership & Magazine

  • Online Archive
  • Start Free Trial
  • Magazine Subscription
  • Magazine Renewal
  • Gift a Subscription
  • Customer Support
  • Privacy Preferences
  • About
  • Contact
  • Advertise
  • Careers
  • Terms of Use
  • Site Map
  • Do not sell or share my information
  • Privacy Policy
  • Accessibility
  • California Privacy Rights

© 2025 Active Interest Media. All rights reserved.

Fine Homebuilding receives a commission for items purchased through links on this site, including Amazon Associates and other affiliate advertising programs.

  • Home Group
  • Antique Trader
  • Arts & Crafts Homes
  • Bank Note Reporter
  • Cabin Life
  • Cuisine at Home
  • Fine Gardening
  • Fine Woodworking
  • Green Building Advisor
  • Garden Gate
  • Horticulture
  • Keep Craft Alive
  • Log Home Living
  • Military Trader/Vehicles
  • Numismatic News
  • Numismaster
  • Old Cars Weekly
  • Old House Journal
  • Period Homes
  • Popular Woodworking
  • Script
  • ShopNotes
  • Sports Collectors Digest
  • Threads
  • Timber Home Living
  • Traditional Building
  • Woodsmith
  • World Coin News
  • Writer's Digest
Active Interest Media logo
X
X
This is a dialog window which overlays the main content of the page. The modal window is a 'site map' of the most critical areas of the site. Pressing the Escape (ESC) button will close the modal and bring you back to where you were on the page.

Main Menu

  • How-To
  • Design
  • Tools & Materials
  • Video
  • Blogs
  • Forum
  • Project Guides
  • Reader Projects
  • Magazine
  • Members
  • FHB House

Podcasts

  • FHB Podcast
  • ProTalk

Webinars

  • Upcoming and On-Demand

Podcasts

  • FHB Podcast
  • ProTalk

Webinars

  • Upcoming and On-Demand

Popular Topics

  • Kitchens
  • Business
  • Bedrooms
  • Roofs
  • Architecture and Design
  • Green Building
  • Decks
  • Framing
  • Safety
  • Remodeling
  • Bathrooms
  • Windows
  • Tilework
  • Ceilings
  • HVAC

Magazine

  • Current Issue
  • Past Issues
  • Magazine Index
  • Subscribe
  • Online Archive
  • Author Guidelines

All Access

  • Member Home
  • Start Free Trial
  • Gift Membership

Online Learning

  • Courses
  • Project Guides
  • Reader Projects
  • Podcast

More

  • FHB Ambassadors
  • FHB House
  • Customer Support

Account

  • Log In
  • Join

Newsletter

Get home building tips, offers, and expert advice in your inbox

Signing you up...

This site is protected by reCAPTCHA and the Google Privacy Policy and Terms of Service apply.
See all newsletters
See all newsletters

Follow

  • X
  • YouTube
  • instagram
  • facebook
  • pinterest
  • Tiktok

Join All Access

Become a member and get instant access to thousands of videos, how-tos, tool reviews, and design features.

Start Your Free Trial

Subscribe

FHB Magazine

Start your subscription today and save up to 70%

Subscribe

You have 1 free article remaining.

Get complete site access, including thousands of videos, how-to tips, tool reviews, and design features.

Start your FREE trial

Already a member? Log in

We hope you’ve enjoyed your free articles. To keep reading, become a member today.

Get complete site access to expert advice, how-to videos, Code Check, and more, plus the print magazine.

Start your FREE trial

Already a member? Log in

Privacy Policy Update

We use cookies, pixels, script and other tracking technologies to analyze and improve our service, to improve and personalize content, and for advertising to you. We also share information about your use of our site with third-party social media, advertising and analytics partners. You can view our Privacy Policy here and our Terms of Use here.

Cookies

Analytics

These cookies help us track site metrics to improve our sites and provide a better user experience.

Advertising/Social Media

These cookies are used to serve advertisements aligned with your interests.

Essential

These cookies are required to provide basic functions like page navigation and access to secure areas of the website.

Delete My Data

Delete all cookies and associated data