Tackling an Energy Remodel in New Hampshire
A new homeowner weighs two energy update options: gutting walls to install new insulation, or adding rigid foam to the building's exterior.

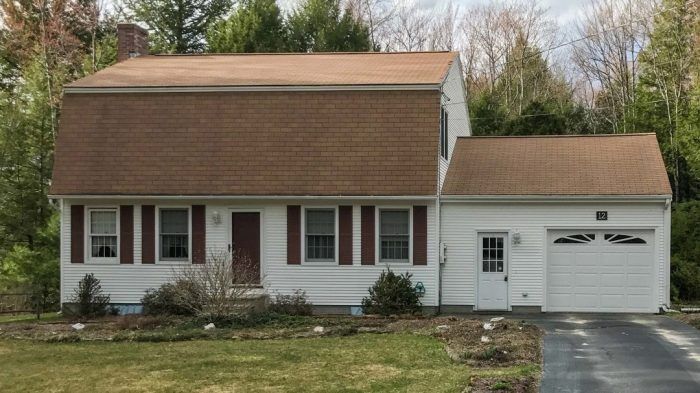
From the sound of it, Ben Balcombe is about to buy a house built like many others in New England in the 1980s: 2×6 walls (presumably insulated with fiberglass batt insulation), double-pane windows, baseboard hydronic heat linked to an oil-fired boiler, and vinyl siding. The house is in southern New Hampshire in Climate Zone 5.
Balcombe plans to renovate the house in phases. He’d launch a kitchen and bath remodel “as soon as we get the keys,” with other upgrades to follow.
His list includes the installation of some new windows and a new slider to replace an existing French door opening onto a three-season sunroom. He also plans on adding a wood stove on the first floor, with the stovepipe exiting the house through a side wall, and replacing an aging electric water heater with a heat-pump water heater.
Because the boiler is only two years old and runs at an efficiency of 86%, Balcombe has no plans to replace it.
For now, the most important question he faces is how to upgrade the insulation in exterior walls.
“Would it be worth taking down the drywall on the exterior walls where I’m remodeling to replace the insulation, or would I be better served looking to apply a layer of rigid foam to the exterior at some point in the future?” Balcombe asks in a Q&A post at Green Building Advisor.
What strategy would make the most sense for Balcombe? That’s the starting point for this Q&A Spotlight.
Don’t rip out the walls quite yet
Before jumping into something as drastic as a gut-remodel, Dana Dorsett advises, it would make sense to do some sleuthing first.
“It’s worth at least some [infrared] imaging of the walls during blower door pressurization/depressurization before committing to rip out the wallboard and start over,” Dorsett writes. “That will give you a sense of how well the existing insulation was installed and is holding up over time.”
If Balcombe’s plans include the replacement of the existing vinyl siding, he’d get more bang for his buck by adding insulating sheathing than he would replacing cavity insulation in the walls. If cavity insulation has settled or otherwise developed voids, those problems can often be handled on a spot basis by drilling into the wall from the exterior for a lot less money than a full gut rehab on the interior, he adds.
Balcombe should be careful to consider whether exterior walls contain a polyethylene vapor barrier.
“If there is a pre-existing polyethylene vapor barrier, it’s advisable to give yourself a lot of margin over the [International Residential Code] prescriptives. [You want at least] R-5 [rigid foam] for Climate Zone 5, R-7.5 for Zone 6, depending on which side of the line you’re located. Or use rigid rock wool, to ensure adequate drying capacity toward the exterior.
“If the wall cavities are leaking scads of air under blower-door testing, it may be worth dense-packing over the crummy R-19s from the exterior, even before re-siding, as a tightening measure,” Dorsett adds.
Improvements in the basement
Balcombe should not overlook potential energy savings in the basement, Dorsett says, even if he never plans to finish the space.
Assuming that the basement is where the oil-fired boiler lives, temperatures should hover in the 50s with no insulation, but rise to the mid-60s when insulation is added. As is the case with adding rigid foam insulation to exterior walls, using reclaimed roofing foam instead of buying new stock would help Balcombe save a lot of money.
His most economical approach might prove to be adding between 2 inches and 3 inches of reclaimed polyiso insulation, held in place with 1×4 furring strips, followed by 1/2-inch drywall (or holding the insulation in place with an insulated 2×4 stud wall). He’ll also need to insulate the band joist with at least 2 inches of spray polyurethane foam, either with a DIY kit or by hiring a professional installer.
The basement slab is another area that would profit from some insulation, adds GBA senior editor Martin Holladay. It’s not required by code, he says, but it’s a good idea nonetheless, especially if he intends to convert the basement into finished space in the future.
The bottom line, Dorsett adds, is that an insulated and air-sealed basement should reduce his oil bill by between 10% and 25%.
Working with a basement drainage system
There is one footnote to considerations for a basement insulation upgrade. In response to the posted suggestions, Balcombe says the basement got a WaterGuard perimeter drain a few years ago (see the video below for more). This below-the-slab system includes a plastic collector that’s dropped into a channel cut into the slab at the intersection of walls and floor. The collector is then concealed with a fresh topping of concrete.
WaterGuard is designed to pick up any water that seeps through the foundation walls. Balcombe wonders whether he should add some kind of dimpled mat on the walls before he puts up the first layer of foam.
In a word, Holladay says, yes.
Other suggestions come from Scott Mangold, who urges Balcombe to make sure his oil tank is in good repair to avoid the potential for a leak; and from Charlie Sullivan, who recommends a test for radon, an odorless, radioactive gas common in many parts of granite-rich New Hampshire. The introduction of the WaterGuard drainage system could provide a path for radon to enter the house, Sullivan says.
Adding a new wood stove
In his original post, Balcombe said that he planned to install a wood stove on the first floor “with the stovepipe exposed to the room and exiting through the west-facing wall towards the ceiling in order to maximize the heat generated.”
Is this a good idea? Probably not, Holladay says.
“It’s a very bad idea to try to vent a wood stove horizontally through an exterior wall,” Holladay writes. “That method guarantees that your flue will be cold (and subject to creosote accumulation) and difficult to clean. Instead, run your metal chimney straight up through the roof.”
“With regards to the stovepipe, it’s a two-story house,” Balcombe replies, “so to take the pipe through the roof would require taking it through one of the bedrooms. I actually quite like this idea as it would serve as a heat source for the second floor, but I would worry about it over heating that space and making one of the rooms unusable?”
No, Holladay adds, a chimney running vertically through the house would not be single-wall stovepipe but a double-wall pipe, usually made from stainless steel with a layer of insulation between the inner and outer wall.
“Because this is an insulated metal chimney, there is no reason to believe that the chimney will cause overheating in your upstairs bedroom,” he says. “But you can box in the chimney if you want, installing mineral wool insulation between the chimney and the box, as long as you maintain any clearances required by the chimney manufacturer.”
Our expert’s opinion
Here’s how GBA technical director Peter Yost would approach this project:
There’s certainly a lot to consider here. I’d work through the priorities based on this premise: manage moisture and energy with equal intensity. Since it’s energy that dries buildings out, if you increase energy management you need to ensure that you are managing moisture just as well.
Here are the priorities:
(1) Bulk water management.
(2) Air control layer continuity and maintaining indoor air quality.
(3) Vapor profile (directional drying potential).
(4) Thermal control layer continuity.
These are in order. It means that before changing anything, assess how the home currently manages bulk water. Make sure that flashings are weather-lapped with water-resistive barriers (WRBs) so that water moves off and away from the structure.
Next, assess air leakage, as already recommended with blower door-assisted infrared imaging. And go after the lid (the air barrier at the attic) and the rim joist in the basement, and then other likely air leakage culprits per the Energy Star Thermal Bypass Checklist. (For more information on these tasks, see Air Sealing an Attic and Air Sealing a Basement.)
And as you do this work, take steps to maintain or improve indoor air quality. That means maintaining combustion safety of atmospherically vented appliances (like the boiler), exhaust venting moisture-prone spaces, and conducting radon testing.
Assessing current (and then future) directional drying potential means identifying all the layers of existing building assemblies, with the hardest being exterior walls. Cutting access ports into these exterior wall assemblies can be done pretty easily by dropping baseboard.
Note that continuous insulation comes as the last priority. It’s not that thermal insulation is unimportant; it’s just that the other issues carry more moisture management considerations.
And here are some lessons from a slew of deep energy retrofits done and documented on GBA over the years:
(1) Getting below 4 ach50 for airtightness when you remodel room by room from the interior has proven really difficult.
(2) Going with a whole new continuous overcoat of air sealing and insulation from the exterior has led to airtightness of 1 ach50.
(3) Deep energy retrofits don’t have consistent impact on radon levels; sometimes the work means that radon levels go up, sometimes it means that radon levels go down. But one thing is for certain: dealing with unacceptable levels of radon is way easier when planned and done early rather than band-aided after the fact.
(4) One of the most intractable moisture management problems in existing homes is capillary continuity and wicking from the concrete foundation up into the mud sill or sill beam. If the structural integrity of the wood members bearing on the concrete foundation is compromised, well, then you have no choice but to jack up the whole structure and as you replace the rotten mud sill or sill beam, introduce a capillary break as part of this repair.
If the sill beam or mud sill is fine, then it gets a little trickier. Are the changes you have made and will make to address energy issues and moisture management likely to increase or decrease the drying potential of the mud sill or sill beam? Has your work warmed the sill and rim joist and made the basement drier or the opposite? Has your work moved the surface moisture load further away from the foundation?
I have found that it is often necessary to monitor the moisture content of the mud sill or sill beam still in capillary contact with the concrete foundation. If the changes you have made result in increasing moisture content of the mud sill, then you may have to further manage the moisture load the foundation system is “seeing.”
Originally published on GreenBuildingAdvisor.com.
Fine Homebuilding Recommended Products
Fine Homebuilding receives a commission for items purchased through links on this site, including Amazon Associates and other affiliate advertising programs.

Caulking Gun

Utility Knife

Insulation Knife


