Easy-Read Wire Strippers
A simple modification makes stripping wires faster and more reliable.

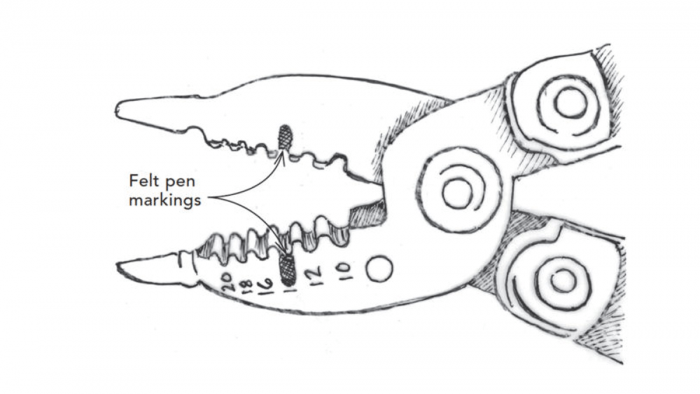
When I’m wiring a house, I find it difficult to see the correct stripping gauge on the stripping tool because of my aging eyes. The problem is worse when there’s not enough light. But I found the perfect solution.
I mark the 14-ga. stripping notch (the most common size) with a black felt-tip pen (on the front and the back side of the tool). With this modification, I now can easily strip a wire’s insulation without worrying about nicking the conductor by using a notch that’s too small.
— Ron Wlock; North Vancouver, B.C.
From Fine Homebuilding #281
RELATED STORIES
- Wiring a Single-Pole Switch
- How to Test Paint Stripper for Your Next Refinishing Project
- Attaching Wires to Devices
Got a Tip?
Do you have any great tips like this one on how to make an easy-to-read stripping gauge on your wire strippers? Share your methods, tricks, and jigs with other readers. Tag them @FineHomebuilding on social, email them to us at [email protected], or upload them to FineHomebuilding.com/reader-tips. We’ll pay for any we publish.
Fine Homebuilding Recommended Products
Fine Homebuilding receives a commission for items purchased through links on this site, including Amazon Associates and other affiliate advertising programs.

Milwaukee Compact Cordless Router (2723-20)

Handy Heat Gun

Milwaukee Cordless Tablesaw (2736)


View Comments
Fantastic!!
Very nice!!
Lovely!
Good!
Most of the wiring I do is 12 gauge, so I hope you are only wiring lights to use mostly 14 Otherwise, my wire cutters always seem to be black, so I will try to find a white marker, since I too have aging eyes.
Nice tip. But I usually just count back from the cutter, 10, 12, 14, etc. to whatever gauge I am working with.
My 12 gauge is the one that has burn marks from the few times I stripped back a live wire. The same effect as a marker, just more permanent. ;-)
Thanks for this post!
Very Informative!
Thanks for this posting!
Thanks for sharing the post!