Podcast Episode 167: How Detailed Should a Remodeling Estimate Be?
The Fine Homebuilding editors discuss questions about running a remodeling business, maintaining access to buried plumbing, dealing with leaky soffits, and more.
Follow the Fine Homebuilding Podcast on your favorite app. Subscribe now and don’t miss an episode:
 |
 |
After celebrating Rob’s viral success with an online video of his pedal-powered snow plow in action, Rob, Patrick, and Matt try to find answers to listeners’ problems with leaky pipes, leaky walls, and leaky attic vents. Maybe we can nail down some solutions for the ever-present old-house moisture issues once and for all.
Editors’ updates:
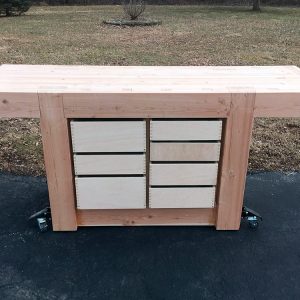
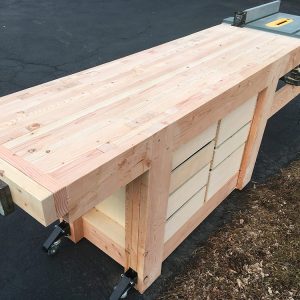
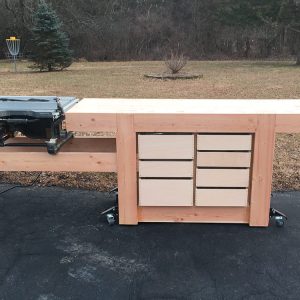
Matt’s workbench and Patrick talks about his friend’s pipe bursting trench-less sewer line replacement.
 |
 |
 |
Related links:
Question 1: How can I maintain easy access to bathroom plumbing?
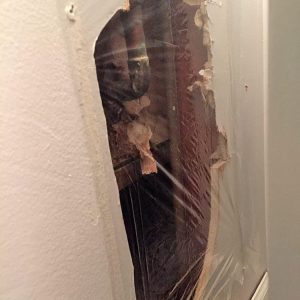
Jonathan from Silver Spring, MD writes: Hey guys. I did a minor bathroom makeover a couple years ago. Upon removing the old vanity I discovered a large hole in a wall that was probably used to access the bath and shower plumbing for a repair. I covered the hole with an access panel. The hole was still too large so I added another smaller access panel.
I recently felt a cold draft through the gaps so I covered the hole with plastic. It looks terrible.
I don’t shy away from patching the drywall but I’m afraid that I will need to fix a plumbing issue as soon as the joint compound dries. How can I seal up the hole without losing easy access to the plumbing?
Thanks again for all you do. You are developing a loyal following.
 |
 |
Related links:
- Oatey Access Panels on Amazon.com
- There’s a Better Way: Large Drywall Patch
- Discussion Forum: Plumbing up against an exterior wall
Question 2: Is moisture a concern when sealing walls with AeroBarrier?
Scott from New Jersey writes: Guys, I love the podcast and listen religiously!
I am currently renovating and adding to a 1950’s side split (with 5/6 levels) in Climate zone 4 and less than half of a mile, as the crow flies, from zone 5 due to county based demarcations in NJ.
In podcast #148, you were talking about using the aero-barrier to air-seal a house post-drywall. I completely get it post sheathing but, post drywall? Are there no concerns about moisture collecting behind the drywall? I understand that vapor will travel through the sheathing and vapor permeable WRB, drying to the outside. But, will it be at a high enough rate to prevent mold growth on the drywall and in the studbay during hot and humid summers with a heavy cooling load? I do plan on spraying down the studbays with BORA-CARE®.
With the goal being a tight house that’s well ventilated we have been exploring the application of an ERV along with our forced air a/c and heating systems (our intention is a VRF condensing unit and are exploring pricing on going ductless or semi-ductless). To that end, we have been exploring the idea of working against the stack affect and having the stale air being pulled from the basement, conditioned, and released in an upper floor hallway. In speaking to a number of HVAC contractors they don’t seem to understand the idea of drawing from the sink of cooler more humid basement air in the basement to either temper or be tempered by the upstairs air. We don’t plan on having any closed doorways from top to bottom.
Should we be exploring a ventilating dehumidifier understanding that the VRF condenser can perform the same function? So many options, so little local knowledge.
Furthermore, we are planning on cantilevering the upper floors to gain some square footage while also building over a 2 car, attached, garage. We are concerned about the comfort above the garage and are curious about the best plan for insulating the cantilevered space and the garage. While closed cell spray foam seems the best option, it is also the priciest. Are there other options that could perform on bar or better than spray foam?
All exterior walls will be 2×6 16oc and joists are either 2×10 or 2×12 depending on load and span.
One last question. We will be expanding a bit with slab on grade and are also concerned about room comfort. No one we have spoken to has heard of putting EPS under the slab, are we crazy to be fighting for it? Would the same hold true in a full basement (putting 2.5 inches of EPS sub-slab)??
Thank you guys so much for providing me some weekly education and entertainment.
Related links:
Question 3: What is causing mold and icicles near my soffit?
Patrick from Upstate, NY writes: Hello Folks, Please excuse another question about moisture control (or lack of).
On one half of my upper roof, the underside of the roof sheathing is covered with mold/mildew. With the following information, can you suggest a cause and a mitigation approach?
• The 20-year-old house is located in Schenectady County, New York and has perforated soffits with a continuous ridge vent (see attached picture).
• The other side of the upper roof and both sides of the lower roof have no mold/mildew.
• The mold/mildew is worse near the soffits and lessens closer to the ridge.
• Two years ago, the entire roof was replaced. All the sheathing on the one side of the roof with the mold/mildew was replaced, assuming the problem was blocked air flow from the perforated soffit due to mis-installed baffles providing airflow over the insulation. Alas, the mold/mildew has already returned, and it seems worse.
• The ventilation of the bathrooms was also upgraded two years ago with a new blower and insulated ducts emptying through a wall vent on one of the gables.
• As a newer house, minimal penetrations exist and seemed sealed. I recently sealed and insulated the attic access panel using details from the GBA site.
As an avid listener of the FHB podcast, I have learned that mold/mildew is caused by moist, warm air escaping from the heated space with the moisture condensing on the underside of the sheathing. Blocked airflow in a ventilated attic likely causes icicle formation not mold/mildew. The house has no icicle formations. Based on visible frost on the underside of the sheathing, the source of the moist air is near the soffits along the entire side of the roof with the mold/mildew.
I used a diagnostic camera in the attic to explore the area near top plates supporting the trusses. I found extensive mold/mildew on the attic side of the perforated soffit. So, the source of the moist air is near the soffit.
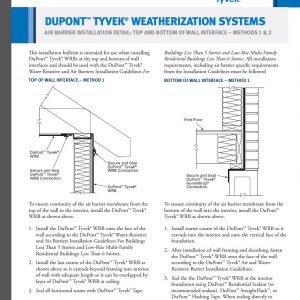
My hunch is that a construction detail was omitted on the wall supporting the side of the roof with mold/mildew. The wall sheathing is OSB wrapped with Tyvek. See the attached installation information from DuPont Tyvek for the detail at the top plate and truss interface. The mold/mildew could be caused because the ‘Secure and Seal DuPont Tyvek WRB Connection’ element was omitted.
The soffit on the side of the roof with the mold/mildew is about 25 feet above the ground, and I cannot reach the soffit from the attic.
Thanks for any input, and thanks for the excellent information provided in the podcast.
 |
 |
 |
Related links:
Question 4: Am I giving away too much info in my remodeling-project bids?
Kevin from Newtown, CT writes: Hey guys, Thanks for having such a great show. Keep up the good work.
I’m a younger general contractor in Newtown, CT doing home remodeling work. I’ve hired sub contractors for several years now and am starting to do bigger remodels.
Question/discussion point: for bids and estimates, I break down the bid into different categories such as demolition, carpentry, plumbing, electrical, etc. Each category has its own price with a good amount of detail and then a total price for the job.
The older general contractors in my area (and almost all my subs) all do one number bids, and often without a lot of detail.
Which way is better? Older contractors think I’m crazy. I think it’s part of the reason people hate contractors. Homeowners like my approach but am I naive.
Any advice is appreciated. My bad if you’ve already discussed this on a previous episode.
Thanks again.
Related links:
 JLC-LIVE and #KeepCraftAlive
Join us at JLC-LIVE in Providence, RI from March 27 – 30, 2019.
And don’t forget to support the trades! Buy a #KeepCraftAlive hat or t-shirt.
This episode of the podcast is brought to you by MiTek, ZipSystems, and Danner boots
This episode of the Fine Homebuilding Podcast is brought to you by MiTek for Breakthroughs in Building. MiTek offers integrated Solutions… for more affordable, sustainable, safe, healthy, efficient and resilient homes. As a diversified, global supplier of software, engineered structural connections, engineering services and automated manufacturing equipment, MiTek provides a technologically advanced, high-quality, and reliable approach to building better homes with better technology. Work with the industry leader to solve the labor shortage, reduce cycle times and eliminate waste.
Also brought to you by ZIP System building enclosures. With thirteen flashing tapes, stretch tapes, and liquid flashings that can be applied between zero and one hundred- and twenty-degrees Fahrenheit, ZIP System products offer a seam sealing solution for every twist and turn. Easily flash corners and curves, including door and window frames, pipe penetrations, and panel seams, using an enhanced acrylic formula. Find your flashing fit at your local lumberyard or Amazon dot com. ZIP System building enclosures – the fastest way to a tight, dry house.
Also brought to you by Danner boots. We’re not fortune tellers, but when you lace up our new Stronghold work boots, it’s easy to see that the future looks strong. We’re Danner, and after 85 years of making boots for the unforgiving Pacific Northwest… well, that means our boots come with deep roots. And the new Stronghold work boot is no exception. This is what happens when iconic quality runs into modern technology. You get tomorrow’s classic today. Get into the Stronghold for strength that starts right from where you stand. Find your local store at Danner.com.
We hope you will take advantage of a great offer for our podcast listeners: A special 20% off the discounted rate to subscribe to the Fine Homebuilding print magazine. That link goes to finehomebuilding.com/podoffer.
The show is driven by our listeners, so please subscribe and rate us on iTunes or Google Play, and if you have any questions you would like us to dig into for a future show, shoot an email our way: [email protected]. Also, be sure to follow Justin Fink and Fine Homebuilding on Instagram, and “like” the magazine on Facebook. Note that you can watch the show above, or on YouTube at the Fine Homebuilding YouTube Channel.
The Fine Homebuilding Podcast embodies Fine Homebuilding magazine’s commitment to the preservation of craftsmanship and the advancement of home performance in residential construction. The show is an informal but vigorous conversation about the techniques and principles that allow listeners to master their design and building challenges.
Other related links
- All FHB podcast show notes: FineHomebuilding.com/podcast.
- #KeepCraftAlive T-shirts support scholarships for building trades students. So go order some shirts at KeepCraftAlive.org.
- The direct link to the online store is here.









View Comments
Guys, Really enjoy the podcasts! Just tried accessing the link on today's podcast notes for the sewer line repair method. The link is connected to the electricity usage tracking video from a prior episode. I am a few towns away from you guys working in condominium management. I am looking to share the sewer line fix with our staff. It could be a huge savings to our client communities. Karl
Hi Condo Karl. Thanks for the heads-up on the wrong link. I just updated it. Patrick McCombe
Hi guys! I had my side sewer replaced last spring with the pipe bursting method. We had concrete pipe with 2 segments out of alignment and several areas of root intrusion. (The contractor said rhododendrons have aggressive roots around sewers.) My house has a full in-ground basement with the sewer exiting about 18" below the basement floor, or about 9' down in the ground. The sewer leaves the side of the house and heads to the front corner and then angles across the front yard to connect with the city sewer. Total run of the line needing to be replaced was 55'.
The contractor dug three holes: 1) at the side of the house where the sewer exits, 2) at the front corner of the house, and 3) next to the sidewalk where the city maintained connection is. The holes were each 4' square and 9' deep, dug with a small Kubota excavator. Sections of new 4" ABS pipe were heat welded together on the ground and attached behind the conical puller head. This was attached to the cable already pulled through the old sewer line. On the 'pull' side near the sidewalk was the hydraulic ram, used to pull the cable, which looked sort of like a bottle jack with a hole through the center axis and this backed up to a thick 2' square steel plate against the earth around the old sewer line. Up on the sidewalk was the pump unit, sort of looked like a gas powered pressure washer. The actual pulling of the line took only about 5 minutes.
The contractor made the connections at each end and backfilled the holes. His total time on site was 4 days, all just the one guy. Included was breaking up the concrete monolith of steps and landing (about 3'x5'x2' tall) above where the sewer exits the house and redoing 15' of storm drain next to the house at the first two pits. Total cost was $11,500 plus tax.
Jeff in Seattle
Thanks for the comment Jeff. Cool technology, right?