Podcast Episode 169: Efficient Fireplaces, Healthy Humidity Levels, and Soundproofing Solutions
The FHB crew recaps details of a job-site video shoot they just wrapped up, and then address some listener questions about a variety of construction and remodeling projects.
Follow the Fine Homebuilding Podcast on your favorite app. Subscribe now and don’t miss an episode:
 |
 |
Patrick, Matt, bring in video director Colin Russel to discuss the history, construction details, and benefits of the Rumford fireplace before answering questions about the pros and cons of interior footing drains, the best way to soundproof an in-law apartment, providing make-up air for fireplaces, and more.
Editor Projects
Colin and Matt talk about their trip to photograph and videotape the construction of a Rumford fireplace–an old type of fireplace design that uses shallow angled walls to reflect heat into the room instead of most of it going up the chimney.
Keep your eyes out for the video and article on FineHomebuilding.com
In the meantime, here are some classic Fine Homebuilding articles about building efficient wood-burning fireplaces:
- Rumfordizing Brick by Brick
- Building an Efficient Fireplace
- Framing, Layout, and Bricklaying Techniques for a Fireplace
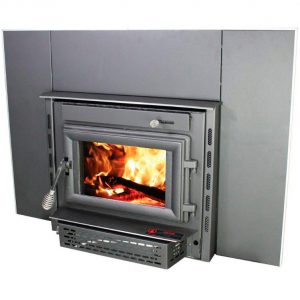
Question 1: How can I supply makeup air for my wood-burning fireplace?
Spenser writes: I recently purchased a home in northern IL. It was built in 1989 as the model home for the “community” I live in. It has a beautiful masonry fire place and my wife and I love to use it as often as we can.
However… There is no fresh air, or make up air in the back of the chimney. So, the only air I have to feed this fire and send up the flue is the already conditioned air in my house.
I’ve asked two different contractors AND two different fireplace stores to install a vent and they act like I’ve got rabbit ears or something growing out of my head! (They don’t seem to have ever heard of vent in the back of a fireplace before).
I’m starting to feel like Will Ferrell in Zoolander! “It’s all the same look! I feel like I’m taking crazy pills or something!!!!”
This is a thing, right? Any idea how I can stop sending money up the flue?
 |
Related links:
- How to Provide Combustion Air for a Woodstove
- Brick Chimneys Are Incompatible With Airtight Homes
- Is My Abandoned Chimney Hurting My Energy Efficiency?
Question 2: How much indoor humidity is too much?
Matt writes: Love the show! My basement is (relatively) humid, and a waterproofing contractor told me it should be below 55% to prevent mold growth.
Questions:
- Is 55% the target? Backed by research?
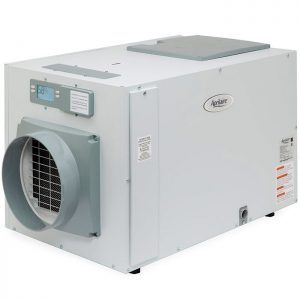
- Our basement is finished (via method in Andy Engels article!) so I’d like to avoid a unit sitting in the living space. Is it possible to install a dehumidifier in a closet and duct through a wall? The sump is in a under-stair closet, so I could add it there.
- Is it wise to drain directly into the sump? I can’t really think of another option besides emptying water myself. Just want to make sure this is considered OK.
- Any recommendations on brand? Or sizing of the unit?
The basement is 600 sq. feet and only halfway below grade on 3 sides. 4th side is unconditioned garage.
 |
From the National Institute of Health: “This study showed that it is practical to maintain an indoor RH of less than 51% during the humid summer season in a temperate climate, and this resulted in significant reductions in mite and allergen levels.”
From CDC: “Keep humidity levels as low as you can—no higher than 50%–all day long. An air conditioner or dehumidifier will help you keep the level low. Bear in mind that humidity levels change over the course of a day with changes in the moisture in the air and the air temperature, so you will need to check the humidity levels more than once a day.”
Related links:
- Reducing relative humidity is a practical way to control dust mites and their allergens in homes in temperate climates
- Revolutionary New HVAC Equipment – A Split Dehumidifier
- How it Works: Dehumidifiers
Question 3: Should I install an interior or exterior foundation drain?
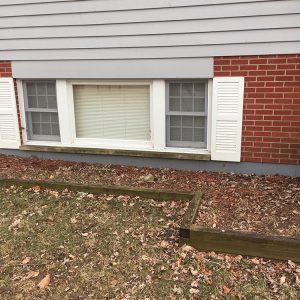
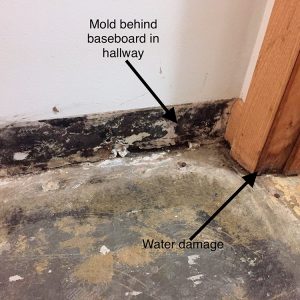
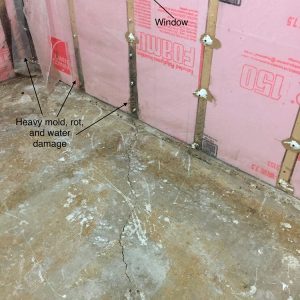
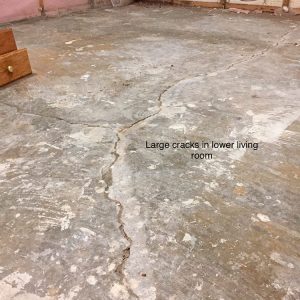
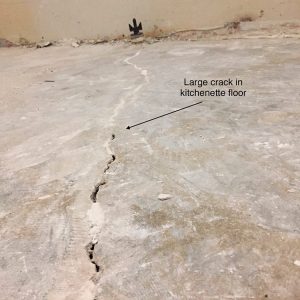
Brandon from Illinois writes: Hello, I’ve subscribed to FHB magazine for about 4 years and just recently got into the podcasts. I really enjoy listening to you all! I’ve run into some bad luck, and could use your advice. I bought a 1970’s bi-level house recently and got stuck with seepage and mold in the lower level. The cement slab is also heaved up and cracked in places.
The foundation walls are cinder block and go below grade approximately three and a half feet. There is not a sump pit or pump installed. I had a few of the big waterproofing companies in my area come out and quote me around $7,000 to install an interior remediation system. Each of them believe the floor heaving was caused by hydrostatic pressure and the freeze/thaw cycles over time.
Although I have only had the house for two months, I have seen some water coming in through the cinder blocks, and also dampness where the floor meets the walls. I’m sure this spring will tell me a lot more about the problem. They all want to remove 12” of concrete around the perimeter of the walls, install draintile and a sump pit, re-pour cement with a piece of cove between the floor and wall to catch any water weeping from the blocks, and drill holes in the blocks as well.
They all claim that this method is better and has a longer warranty than the traditional exterior drain tile method, as well as less expensive than the exterior method. Since the footer of my foundation less than 4 feet below grade, I was considering digging up the outside of the foundation myself and parging the blocks, applying waterproofing coatings and membranes, draintile, and either have it drain by gravity if possible, or installing a pit and pump.
We aren’t using the lower level of our house until the problem is fixed and I can install everything that was ripped out down there. Have any of you encountered either of these methods of waterproofing a house with a pre-existing seepage problem? Of the two, which is actually the right way of tackling the problem? Is the interior method only dealing with the result of the problem, instead of the problem itself? I’m not afraid of hard work and if everything else becomes equal, would you spend your summer evenings and weekends digging up a foundation like mine or just pay the $7,000 to have someone do the work on the inside?
 |
 |
 |
 |
 |
Related links:
- Taming a Basement from Hell
- Interior vs. exterior foundation drains
- How Should a Foundation Drain be Installed?
Question 4: What are the best solutions for insulation, soundproofing, and flooring in a finished basement?
Jeff from New Jersey writes: Hi Guys, Love the Podcast. I look forward to it every Week. I’m gearing up to finish my basement and would love you input on the wall, ceiling, and floor assemblies I’m looking to use. I built the house in central New Jersey myself 3 years ago. It has a walk out basement that is already rough plumbed for a bathroom. I’m looking to finish the bathroom and approx. 900 square feet of the basement. The main use will be for my 3 boys, all under the age of 5, to burn energy when they can’t go outside. I should also add that the basement is bone dry, as a civil engineer this is something I paid particular attention to when building.
For the walls I am considering two options. One is to frame a conventional 2×4 stud wall in front of the existing poured concrete foundation. I would leave a 1” gap between concrete and the stud wall. I would then have 2” of closed cell foam installed on the concrete. The gap between the framing and the concrete would allow the foam to create one continuous layer. I would then drywall the walls as is typical. The second option is to glue 2” XPS foam to the concrete walls then install sleepers over the foam to attach the drywall to. I would use Tapcon screws to attach the sleepers through the foam board to the concrete. I’m leaning toward Option 1. Although it is more expensive and I would lose some additional room due to the wall thickness I feel that it would be a better product. Any thoughts?
For the ceiling I am mostly concerned with sound transmission, one day I may end use this are for my in-laws. The first floor above this area is all hardwood. The first-floor joists are 14” deep TJIs at 16” on center. For the ceiling my insulation subcontractor recommends R30 un-faced fiberglass batt insulation over 4” of Rockwool between the joists. I would then install ½” drywall to the floor joists. I also saw a video that said a better system to stop sound transmission would be to install two layers of 5/8” drywall to the joists with a layer of glue between them to create a small gap. The video said the additional drywall would act better to absorb sound that the fiberglass and Rockwool. Is there a better option you would recommend?
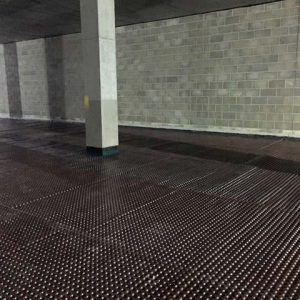
At the time I was building I didn’t think to install foam board under the 4” concrete slab so the concrete stays cold, in the 50’s year-round. My initial plan was to install a vinyl tile floor directly over the concrete but I’m thinking that would be too cold and not comfortable. Plus, if there ever was a moisture issue there is no way for the slab to dry. I’ve been looking in to the dimple membrane systems such as Delta FL or DMX to create an air gap to act as a thermal break and allow any moisture in the slab room to dissipate. My problem with these systems is that most of them require you to install plywood or OSB over them. Aside from additional cost and labor I’m not crazy about having wood over the concrete even with the membrane. Any moisture that gets through the membrane would get absorbed by the wood and could cause problems down the road. I have seen some of these systems do not require the use of a wood layer between the membrane and the flooring. Have you seen this system in use? I’m curious how they work and how they will hold up.
 |
 |
Related links:
And finally…

JLC-LIVE and #KeepCraftAlive
Join us at JLC-LIVE in Providence, RI from March 27 – 30, 2019.
And don’t forget to support the trades! Buy a #KeepCraftAlive hat or t-shirt.
This episode of the podcast is brought to you by MiTek, ZipSystems, and Danner boots
This episode of the Fine Homebuilding Podcast is brought to you by MiTek for Breakthroughs in Building. MiTek offers integrated Solutions… for more affordable, sustainable, safe, healthy, efficient and resilient homes. As a diversified, global supplier of software, engineered structural connections, engineering services and automated manufacturing equipment, MiTek provides a technologically advanced, high-quality, and reliable approach to building better homes with better technology. Work with the industry leader to solve the labor shortage, reduce cycle times and eliminate waste.
Also brought to you by ZIP System building enclosures. With thirteen flashing tapes, stretch tapes, and liquid flashings that can be applied between zero and one hundred- and twenty-degrees Fahrenheit, ZIP System products offer a seam sealing solution for every twist and turn. Easily flash corners and curves, including door and window frames, pipe penetrations, and panel seams, using an enhanced acrylic formula. Find your flashing fit at your local lumberyard or Amazon.com. ZIP System building enclosures – the fastest way to a tight, dry house.
Also brought to you by Danner boots. We’re not fortune tellers, but when you lace up our new Stronghold work boots, it’s easy to see that the future looks strong. We’re Danner, and after 85 years of making boots for the unforgiving Pacific Northwest… well, that means our boots come with deep roots. And the new Stronghold work boot is no exception. This is what happens when iconic quality runs into modern technology. You get tomorrow’s classic today. Get into the Stronghold for strength that starts right from where you stand. Find your local store at Danner.com.
We hope you will take advantage of a great offer for our podcast listeners: A special 20% off the discounted rate to subscribe to the Fine Homebuilding print magazine. That link goes to finehomebuilding.com/podoffer.
The show is driven by our listeners, so please subscribe and rate us on iTunes or Google Play, and if you have any questions you would like us to dig into for a future show, shoot an email our way: [email protected]. Also, be sure to follow Justin Fink and Fine Homebuilding on Instagram, and “like” the magazine on Facebook. Note that you can watch the show above, or on YouTube at the Fine Homebuilding YouTube Channel.
The Fine Homebuilding Podcast embodies Fine Homebuilding magazine’s commitment to the preservation of craftsmanship and the advancement of home performance in residential construction. The show is an informal but vigorous conversation about the techniques and principles that allow listeners to master their design and building challenges.
Other related links
- All FHB podcast show notes: FineHomebuilding.com/podcast.
- #KeepCraftAlive T-shirts support scholarships for building trades students. So go order some shirts at KeepCraftAlive.org.
- The direct link to the online store is here.








View Comments
Consider a water powered sump pump as a backup when electricity is out.
Jeff
https://www.youtube.com/watch?v=E33soAR0Nts
Fireplace makeup air requirement: 2012 IRC R1006. Exterior air requirement, R1006.2.
Thought I would share my experience with a wet basement. The house was rebuilt in 1983 after a fire and the basement had been put under the original house a few years before, but not well done, lacking proper drainage. There was no moisture control under the slab.
In 2010, I dug out around the foundation and replaced all the drainage tile with perforated pipe and gravel, and added R-25 blue foam to the outside walls at the same time. Now the basement was cozy warm, but some water would come up through the center of the floor almost all the time, not just during the rainy season. The ground is heavy clay, so I felt that water was stilled being trapped under the floor.
I dug a 6 inch trench across the middle of the trouble areas, which involved using a rotary hammer drill, and trenched to the sump pump. Small stone was placed in the trench, along with a half round 4 inch pipe. Then the concrete was replaced.
It was a lot of work, but now the basement is dry. Winter humidity is around 20-25% in the basement, compared to 55-60% before this was done.
A lot of work but the outcome made it worthwhile.