Air-Sealed and On Piers
Carpenter Tim Holton and his crew came up with an up-in-the-air solution for sealing an addition with an elevated floor.

Synopsis: Carpenter Tim Holton describes a project in which his team added a sunroom to the back of a client’s home, and the site’s unique requirements made a piered foundation with deck-style footings the best solution. He details the process of building the floor frame on the pressure-treated foundation attached to concrete piers, and then lifting the floor to sheathe it from beneath. Using this method, the crew was able to forgo excavating machines and minimize damage to the yard and surrounding areas.
As a remodeling contractor, I often find myself with unique projects that take some outside-the-box thinking, and this job was no different. My customers wanted to add a 12-ft. by 16-ft. sunroom to the back of their home, and property lines, patios, gardens, and a septic system made it near impossible to get excavation equipment and concrete trucks to the location.
After some research and talking with inspectors and other respected contractors, I decided to build the addition on deck-style footings and a subframe of built-up pressure-treated beams. This is not the standard foundation for sunrooms in our area, but the pros greatly outweighed the cons in this situation. We were able to hand-dig each footing 42 in. deep and place 18-in. concrete forms in the holes, then wheel the concrete around from the driveway to fill the forms. By forgoing excavating machines and distributing the soil from the footing holes to the gardens, we minimized damage to the yard and surrounding areas.
Since the addition is a conditioned space without a crawlspace or basement, we had to come up with a way to seal the floor from air and moisture. We placed a 6-mil polyethylene vapor barrier and stone on the ground under the floor system to help prevent ground moisture from wicking and diffusing up through the bottom. We kept the floor approximately 6 in. above our stone and vapor barrier to allow some airflow under the space.

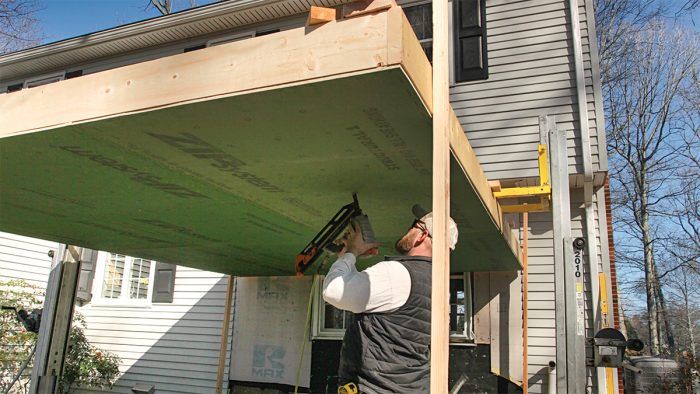
That just left air-sealing. After many hours of figuring, we devised a way to build a standard floor, raise it up, sheathe and tape it, and lower it back down. We rented two manually operated material lifts, each with a 1000-lb. load capacity, from our local supplier and used them to raise up the floor frame. Once it was up at a comfortable working height, we could sheathe it from below—similar to hanging drywall on a ceiling, albeit nailed as in normal wall construction. Once the underside was sheathed and the seams were taped, we lowered the structure back into place, nailed it off, insulated it, sheathed the top side, and continued with our wall framing just as if we were building on a standard floor system. (We didn’t tape the perimeter of the sheathing to the floor frame, but it wouldn’t hurt to do so.)
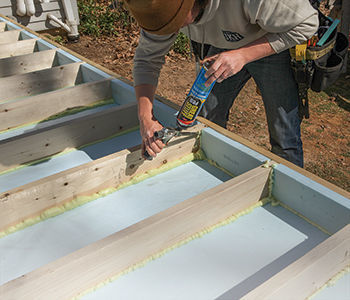
To fully insulate the floor, we placed strips of 1 1/2-in.-thick rigid foam in each joist bay and along the rim joists, and sealed the perimeter of the strips with spray foam. Fiberglass- batt insulation fills the remainder of the joist cavity, and 3/4-in. AdvanTech subflooring caps the floor system. Wire mesh attached to the perimeter framing and buried 2 in. deep in the soil around the perimeter will help keep rodents out.
This method of construction is an unorthodox approach and presents some challenges, but on a tight site such as this, it can be a better and more cost-effective option than a traditional foundation.
See these articles that demonstrate techniques similar to what Tim used:
How to Insulate a Cold Floor — For better energy performance, homes built on piers, rooms above garages, and cantilevered bays need properly air-sealed and insulated floors.
Get Your Deck Joists Right — Learn how to calculate cantilevers and determine simple spans—plus find a series of installation tips for creating robust joist connections, weatherizing, and more.
From Fine Homebuilding #285
To view the entire article, please click the View PDF button below.


