Windows in Thick Walls
Thick-wall assemblies offer better comfort and energy efficiency, but installing windows presents a challenge for builders.
Synopsis: Design/build contractor Michael Maines explains the difficulty of installing windows in thick, highly insulated walls. With a series of detailed illustrations he presents a number of options for installation, including recessed windows with extension jambs as the only exterior trim, recessed windows with traditional casing, recessed windows with shingled returns, windows curbed to the exterior, and curbed windows with ThermalBuck, a product premade for the situation.
Thick, highly insulated walls are great for lowering energy bills and creating a more comfortable interior environment for occupants, but they present some unique challenges for builders when it comes to installing windows and doors.
I’ve designed and/or built homes with many different types of thick walls, including 2×4 walls wrapped with continuous exterior insulation, cross-strapped 2×6 walls (aka “Mooney walls”), 12-in. double-stud walls, and 18-in.-plus panelized walls—and that’s not all of the different types of thick walls out there. In this first part of a two-part series, I describe some of the snags I’ve hit when installing windows in these thick-wall assemblies, and the solutions I designed or used in response. The details shown here are for moderately high-performance envelopes in climate zones 3 and higher, but they can be used for warmer zones or adapted for Passive House performance levels. In the next issue, I’ll address the issue of installing doors in thick walls.
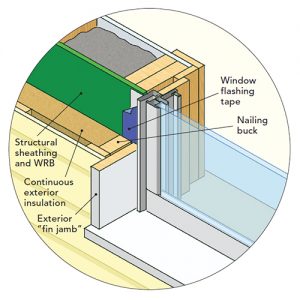
Recessed windows with “fin jambs”
Windows have to perform the functions of both the water-resistive barrier (WRB) and the air barrier. With the WRB and airtight layer at the sheathing, in some ways it’s easiest to keep the window flanges at the sheathing as well. This leaves the window recessed from the wall’s exterior plane and provides some welcome shadowlines, which are often absent from modern facades where everything is in plane. Before the continuous exterior insulation is installed, it’s business as usual. Once you add the exterior insulation, though, you have to create extension jambs toward the exterior, as well as a sill extension. This takes extra time and materials. One way to keep the added cost to a minimum is to eliminate the conventional exterior casing and allow the extension jambs to be the only exterior trim. It’s a modern look that not everyone likes, but the clean lines work well with some architectural styles. The jamb must project far enough to terminate the siding cleanly. I have been looking for a name for this detail for years and have not found one that fits, so I’m coining it a “fin jamb.” (Walls that project into space are called fin walls, as in radiator fins, so I’m drawing from that term.) I recommend using 5/4-in. or thicker material for the fin jambs so they have a substantial-enough look and remain straight. I like using real wood, but a composite such as fly-ash trim or a cellular PVC material would also work. Preassemble the jambs and sill and install as a unit.
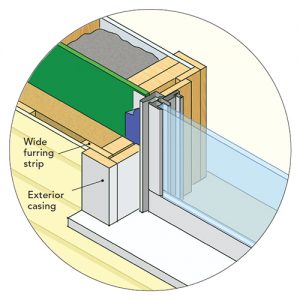
Recessed windows with traditional casing
If exterior casing is required, you can do that—the other details remain the same. In all cases, slope the sill extension (the ones on old homes were usually 10° to 15° to shed water, but steeper ones can provide visual appeal). The sill material does not have to match the jamb and casing material; it can be wood, fly-ash trim, stone, or metal. (Stone or metal have to be installed before the jambs.)
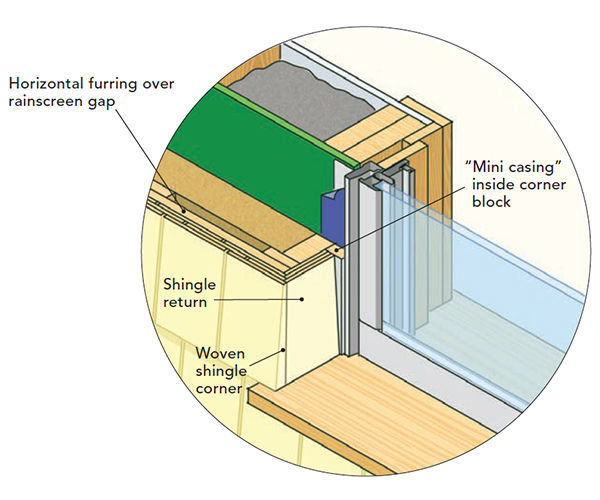
Recessed windows with shingled returns
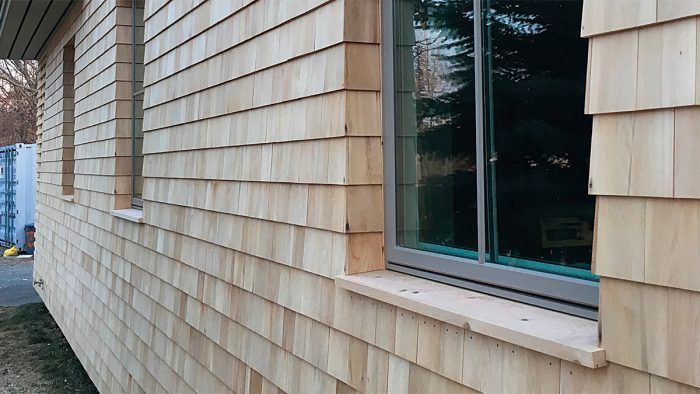
Another detail I’d been waiting to try, after seeing it first in a Fine Homebuilding article many years ago, is shingled returns, which I did recently. Instead of using extension jambs at all, just install the sill extension and wrap sidewall shingles around the corner. With flangeless windows, you can run the shingles right up to the window frame, but with flanged windows you would end up with an awkward void, so I would first install a small casing, similar to using an inside-corner block when siding walls.
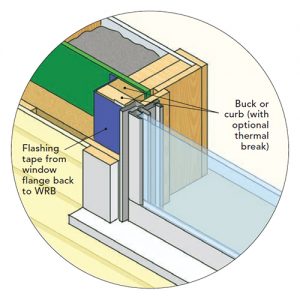
Windows curbed to the exterior
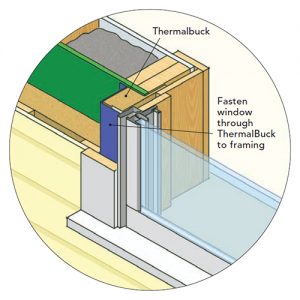
Windows located at the center of the wall depth usually perform the best thermally and they allow for easy integration of the WRB and airtight layer, but sometimes it’s necessary to place the windows closer to the outer plane of the wall. When using continuous exterior insulation, one approach is to create a buck or curb around the rough opening. It’s important to seal the windows back to the WRB, so this curb should be built and wrapped with a self-adhering or fluid-applied membrane before the exterior insulation is installed. The curb can be made of solid wood. With an insulating value of about R-1.2 per in., wood is not bad as a thermal bridge, and it will likely perform better than the window frames. But to reduce thermal bridging, first run a layer of foam, cork, or wood-fiber insulation behind an outer layer of framing lumber to create the curb. The detail locates the window flange behind the 1x rainscreen furring. The furring behind the window casing would not be visible in most cases, and you can seal the casing to the furring to prevent water infiltration. This detail creates a slight shadowline at the windows.
Curbed windows with ThermalBuck
The above approach requires several steps, but you can eliminate one by using a buck premade for the situation: ThermalBuck. ThermalBuck comes in different depths that work with different thicknesses of exterior insulation (for more, see p. 82). It has various installation details, but whichever one you choose, be sure to make the WRB continuous to the window flanges using tape, membrane, or sealant, and plan ahead for the long fasteners that are required to fasten the flanges through the buck and into the wall framing.
From Fine Homebuilding #285
Fine Homebuilding Recommended Products
Fine Homebuilding receives a commission for items purchased through links on this site, including Amazon Associates and other affiliate advertising programs.

Staple Gun

Respirator Mask

Disposable Suit
