Deciding on Wood Fillers
Learn how to choose the right filler, putty, epoxy, or spackle products for repairing everything from common nail holes to major rot.
Synopsis: There are a huge variety of products for repairing holes and rot in wood. Green Building Advisor editor Brian Pontolilo describes the differences between fillers, putties, epoxies, and spackle, as well as when each is most appropriately used. Included in the article are the opinions of painters, carpenters, and manufacturers when it comes to products for wood repair, as well as descriptions of brand-name products in each category.
Building a house is a process of “getting to pretty.” We start with concrete, insulation, and plywood, and work our way toward tile, trim, and paint—the more attractive layer hiding the rougher building material. Along the way, we do a lot of filling with a variety of products.
I recently spoke to a number of painters, carpenters, and manufacturers to learn as much as I could about the products available for filling holes and making repairs in wood. What I found is that there are way too many products to fit into one article, and that preferences vary almost as much as the products do. While I tend to value the experience of pros who work with them every day, some education on the products’ chemistry is also helpful in understanding how to use them.
Filler, Putty, and Beyond
You can divide a lot of these products into two categories—fillers and putties. Many articles I read and experts I spoke to referred to these categories in broad strokes. It turns out that the only distinction that holds up the majority of the time is this: Most wood fillers dry hard, while most wood putties are nonhardening.
Bruce Johnson is a woodworker and consultant for Minwax. He says that non-hardening putties are the best choice for filling small holes in stain-grade work. Johnson recommends staining the wood first, using a color-matched putty, and then applying the top coat. “I choose between putty and filler based on the size of the hole and if it is sandable work,” he says. “Putty isn’t sandable. Using a filler generally implies that you will need to sand.” For filling larger holes in wood that will be painted, he recommends using a wood filler and sanding before painting.
“In my world, a putty is a nonhardening product,” says Megan Youngs, a senior product manager at DAP, agreeing with Johnson. But that doesn’t mean that putties can’t be used for painted work, she explains. Some nonhardening putties can be used to fill nail holes in painted wood because they develop a skin. Conversely, some fillers are designed for color-matching stain.
All of this is to say that choosing a hole filler or a putty is less about finding the best product, and more about understanding the subtle differences in each product and how to use them properly. Moreover, putties and fillers aren’t the only choices for patching holes in wood. On the far ends of the spectrum are lightweight spackle, which can be used successfully for filling holes and making cosmetic repairs, and two-part epoxy systems, preferred by the pros for serious restoration work. These products not only fill voids, but have a tenacious grip that can add structural integrity back to the woodwork.
I’ve seen large sections of porch columns successfully rebuilt with epoxy. Yet I’ve been warned to proceed with caution. South Dakota woodworker and remodeler Ben Brunick has done extensive repair to damaged window sashes and other exterior trim with epoxy. He is quick to remind me that unless you first fix the problem that is causing the rot, you are wasting your time. The wood around the repair will just continue to degrade and the repair will fail.
Grace Ombry, marketing director at West System, an epoxy manufacturer, told me that when a repair is big enough and when it’s possible, they recommend starting with a solid-wood dutchman to create a patch. And Marsha Caporaso, president of Abatron, another epoxy manufacturer, warned that people can get carried away when making repairs with epoxy. “It’s not intended to be used as a coating,” she says. “If you encapsulate wood with epoxy, you could be trapping moisture inside and causing more trouble.”
Painters Fill a Lot of Holes
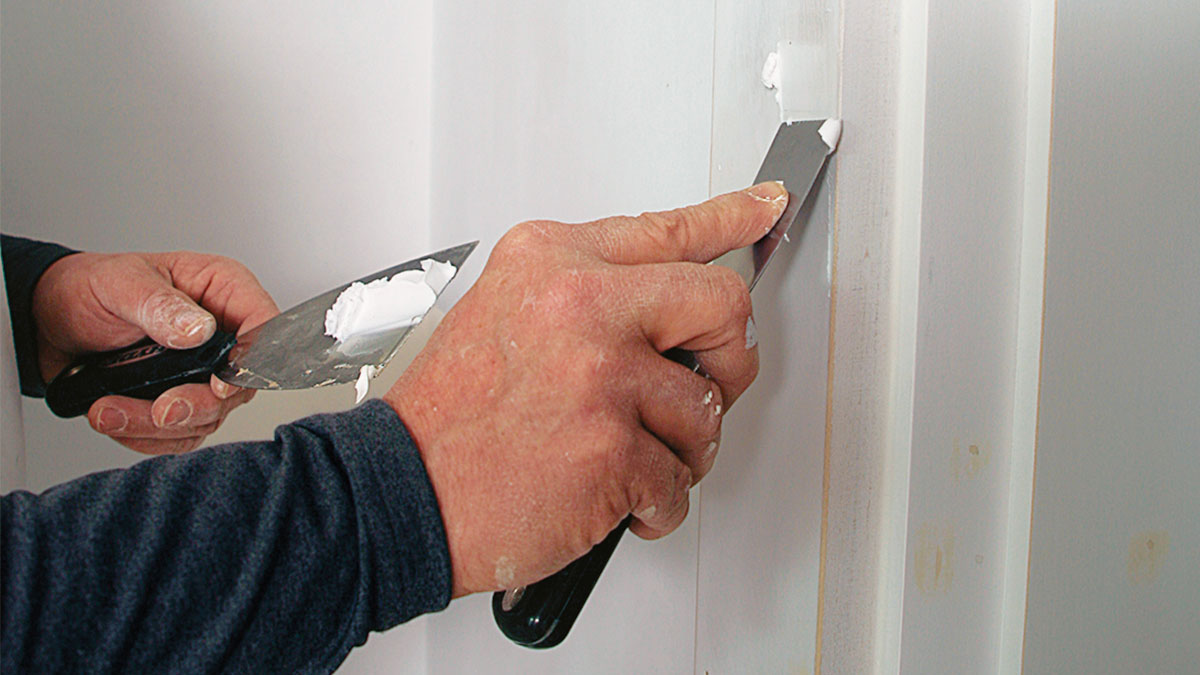
When it comes time to fill the holes, professional painter Jason Eidsness relies primarily on two products that he says are readily available and have never let him down: Elmer’s Carpenter’s Wood Filler and Crawford’s Vinyl Spackling Paste. What’s interesting is that he often mixes the two together until he reaches a consistency that he likes. “The less of the Elmer’s I use, the less it shrinks and the easier it is to sand,” says Eidsness, “but I want a denser fill than the spackle alone gives me.”
Eidsness, who can be found online as XC Painter, also insists on cleaning and vacuuming all holes prior to filling, and, expecting some shrinkage, prefers to overfill the nail holes, using a putty knife to feather the filler into the surface of the trim. Next, he’ll sand the filled holes with an orbital sander, vacuum again, and, if necessary, apply a second round of filler. Whether he’s used just Elmer’s or a mix for the first round, the second application of filler is always the lighterweight spackle.
On the most demanding projects, Eidsness will shine raking light on the primed trim to inspect the filled holes and may sand more and apply a final round of filler to fix subtle imperfections. For this work, he uses an autobody product called “glazing and spot putty,” available from Bondo and Dynatron. These one-part nitrocellulose fillers are designed to hide minor surface imperfections in automotive bodywork. These products shrink very little, can be sanded in 30 minutes, and retain some flexibility—a perfect combination to topcoat nail holes.
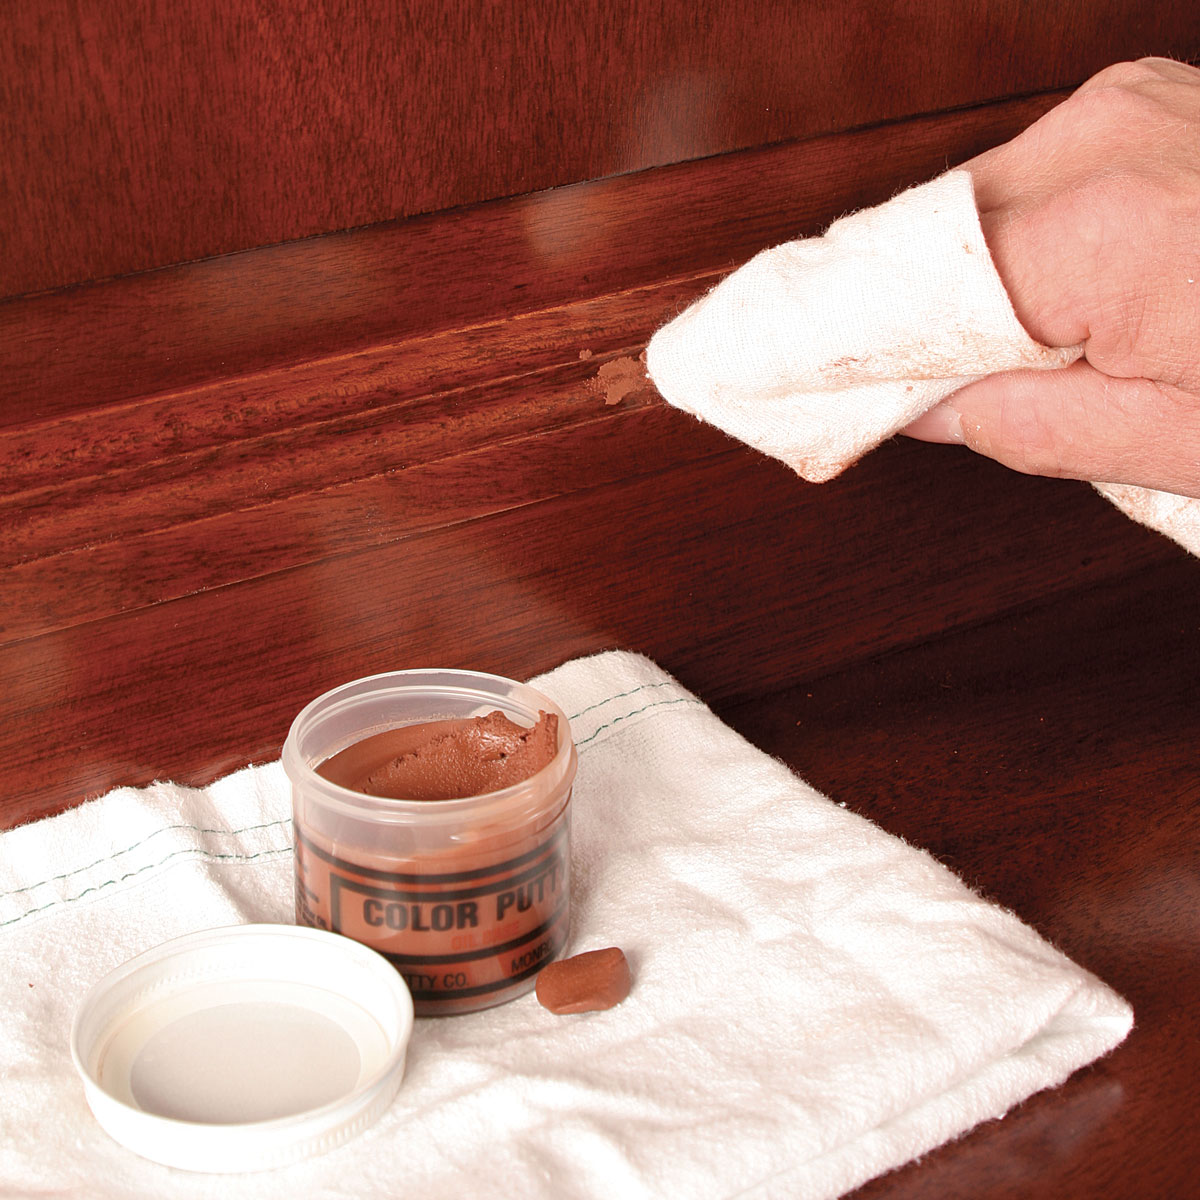
For stain-grade work, Eidsness uses colored wood putties. He blends premixed colors until he’s created a few shades that match the color variations in the wood he’s working with, using different shades depending on the particular spot in the wood. “You also have to account for the color change of the wood over time,” he says. “Vertical-grain fir is much blonder when it is installed than it will be in a year, but the putty isn’t going to change color.” And be careful with oil-based putty before you have applied a clear coat, he tells me, because you might stain the wood.
Carpenters’ Go-To for Repairs
Connecticut remodeler Chris Green takes a tiered approach to filling holes and making repairs, and has a few go-to products. For repairs that are more structural in nature, Green prefers West System epoxy. “It’s a super adhesive and gap filler all in one. The ability to adapt the viscosity from a maple-syrup consistency to mashed potatoes and everything in between is a huge advantage.” The one downside, he tells me, is that it is slow-drying.
For a speedier process on holes and repairs that need to disappear but don’t require such a strong grip, Green likes Minwax High Performance Wood Filler. This is another two-part product. It has a peanut-butter-like consistency and is easy to spread according to Green, who appreciates its fast drying time. Just try not to mix more than you can use pretty quickly, he cautions. For common nail holes and cosmetic repairs, Green’s go-to is Zinsser’s Ready Patch, a water-soluble spackle that dries hard, doesn’t shrink, and sands easily.
Brunick has similar opinions. For significant repairs and exterior work, he too prefers epoxy, but preaches caution when sanding and shaping cured epoxy. It may be harder than the surrounding material, and if you’re not careful you can do more damage. He recommends isolating the repair with painter’s tape and using sanding blocks to make sure that you’re shaping the repair evenly.
For a durable, color-matched repair in stain-grade surfaces, like a stair tread, Brunick says that he sometimes mixes fine sanding dust into the epoxy until the color is close to what he is looking for and the epoxy has the right consistency for the type of repair he needs to make.
For common nail-hole filling, Brunick prefers Famowood Original Wood Filler. It’s a solvent-based filler and Brunick likes that he can change the consistency, and reactivate an old can that is drying out, by adding acetone. He’s also a believer in using Bondo for interior repairs. “People get bent out of shape about using Bondo for woodwork,” says Brunick, “But I’ve never had a problem with it. Just don’t use it where you shouldn’t!”
Brunick wasn’t the only professional I spoke to who likes Bondo for wood repairs. Yet many of them seem to need to defend this opinion. Perhaps their detractors don’t realize that Bondo doesn’t just make autobody products. They also have a filler meant for specifically for wood.
Filler and Putty
There are two differences between filler and putty that hold true for most of the products on the market. First, wood filler dries hard and can be sanded, while putty remains flexible. Second, fillers are applied before paint or finish (sometimes over primed wood), and putties are applied after finish, usually stain and/or clear coat. Beyond these distinctions, it is not a good idea to generalize the differences between wood fillers and wood putties. There are water-based, oil-based, and solvent-based products in each category. Some are interior only, while others are okay for exterior use. Some products are ready for paint in under 20 minutes, and others need 48 to 72 hours to set up.
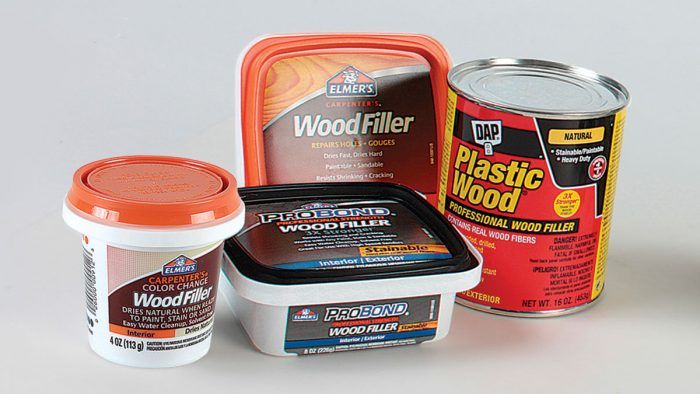
Elmer’s Carpenter’s Wood Filler
A go-to product for many professional painters, this filler is hard-drying, sandable, and paintable for interior use. Elmer’s Color Change stainable interior fillers are purple when applied and dry white (or one of many other available colors) to signal that they are ready to be sanded and finished. Elmer’s exterior fillers include their stainable exterior Carpenter’s Wood Filler and their ProBond line. Both products are acrylic, so they retain some flexibility and expand and contract with wood movement. Elmer’s also makes Rotted Wood Stabilizer to prepare damaged areas for filler. A 4-oz. container of the Carpenter’s Wood Filler costs about $5, a 4-oz. Color Change is about $6, and ProBond Wood Filler is about $10 for a pint.
Dap Plastic Wood
Available in two formulations, Plastic Wood Latex Wood Filler is water-based, and Plastic Wood Professional Wood Filler (shown here) is a solvent-based, cellulose polymer. Both dry hard and can be sanded, primed, and painted with water-based finishes. They are both rated for interior and exterior use, though DAP suggests the solvent-based product for more significant exterior repairs. The Professional product is also stainable and available in six premixed colors. Expect to pay about $7 for a 16-oz. tub of the water-based filler, and about $8 for a 16-oz. container of the Professional filler.
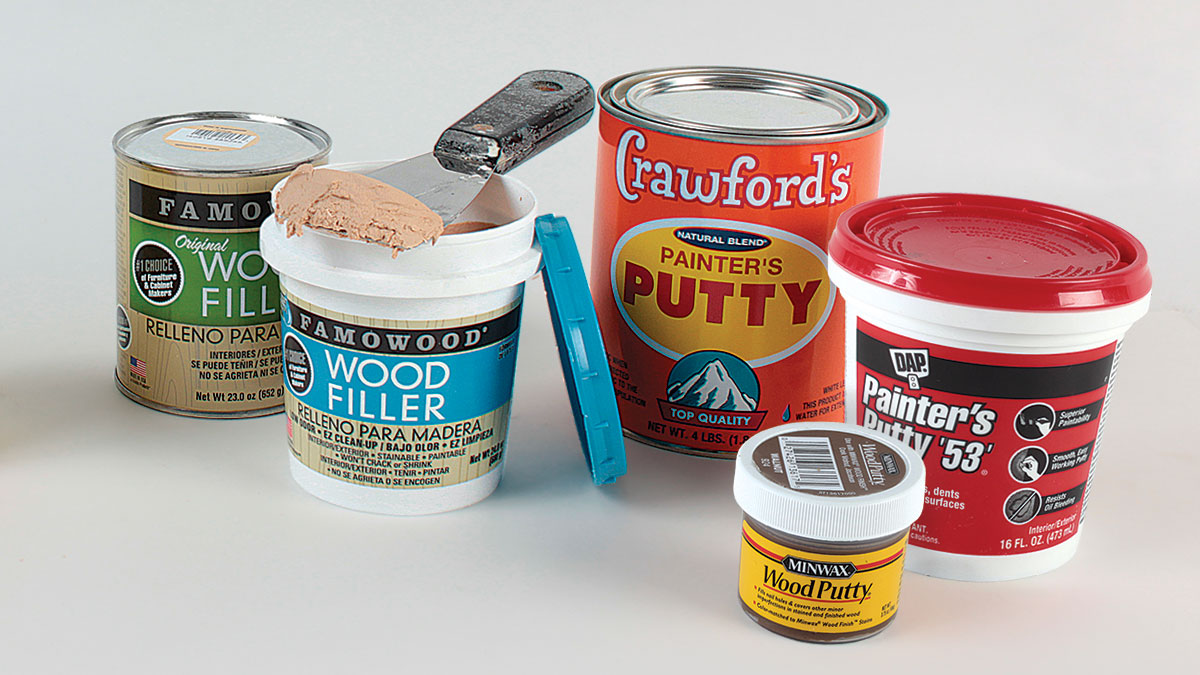
Famowood Wood Filler
Famowood filler is available in water-based and solvent-based versions. Both are acceptable for interior and exterior use, are made of mostly wood flour, are stainable and paintable, are shrink- and crack-resistant, and can be sanded and shaped. They both also have very short dry times: about 30 minutes for the water-based product and 15 minutes for the solvent-based product. The only difference, according to the company, is that the solvent-based filler is available in a few more colors than the water-based version. Otherwise, it’s a matter of personal preference. Both cost about $6 for a 1-pint container.
Crawford’s Painter’s Putty
This filler seems to be a true hybrid product. It’s linseed-oil based, so it dries slow but hard, and can be painted in 60 to 80 hours. Though the company doesn’t recommend sanding the putty, many painters report that it is sandable. It can be tinted with oil-based stain and can be topcoated with stain once it is dry, and cleans up with soap and water. Crawford’s, a family-owned company, prides themselves on making environmentally safe products, and their website lists the harmful ingredients found in competitive brands that they won’t use in theirs. A 4-lb. can costs about $12.
Minwax Wood Putty
If there’s a product that fits the common definition of “wood putty,” this is it. Minwax makes premixed putty in all of the same colors as their stains to fill small holes after finishing your work. The putty does not harden and can’t be sanded, so it is not recommended for painted work. You can clean it up with soap and water, and linseed oil can be used to rehydrate the putty when it begins to dry out in the container. A 33⁄4-oz. container is about $4.
Dap Painter’s Putty ‘53’
Dap’s non-hardening oil-based putty is paintable (after a few days) because the exposed surface develops a skin. It cannot be sanded, so a practiced application technique is required to fill holes just right. If there is a good reason to use this product, it’s because it remains flexible, making it a worthy choice for exterior woodwork and window glazing. It dries white and is not suitable for staining. A 16-oz. container is about $7.
Epoxy
To understand the value of epoxy, remember that it is the only filler that is also a reliable adhesive. In the most basic terms, epoxy is plastic. These two-part products combine a resin and a hardener and cure through a thermal chemical reaction. If you are looking for a tenacious bond and structural characteristics to repair damaged wood, particularly outside, use a product that is 100% epoxy solids. Because there is no water or solvent to evaporate, epoxy does not shrink.
Epoxy can be sanded and shaped to match profiles in millwork, and it can be painted or colored with pigments. Check the pot life of the product you choose before mixing to make sure that you’ll have time to use it all, and keep in mind that epoxy dry times vary and can be affected by weather conditions. Unlike other two-part products, you should never add extra hardener to speed curing with epoxy. Instead, to slow the setup time, you can spread your mixed epoxy out on a flat surface like a paint-roller pan; to speed things up, add heat with a blow dryer.
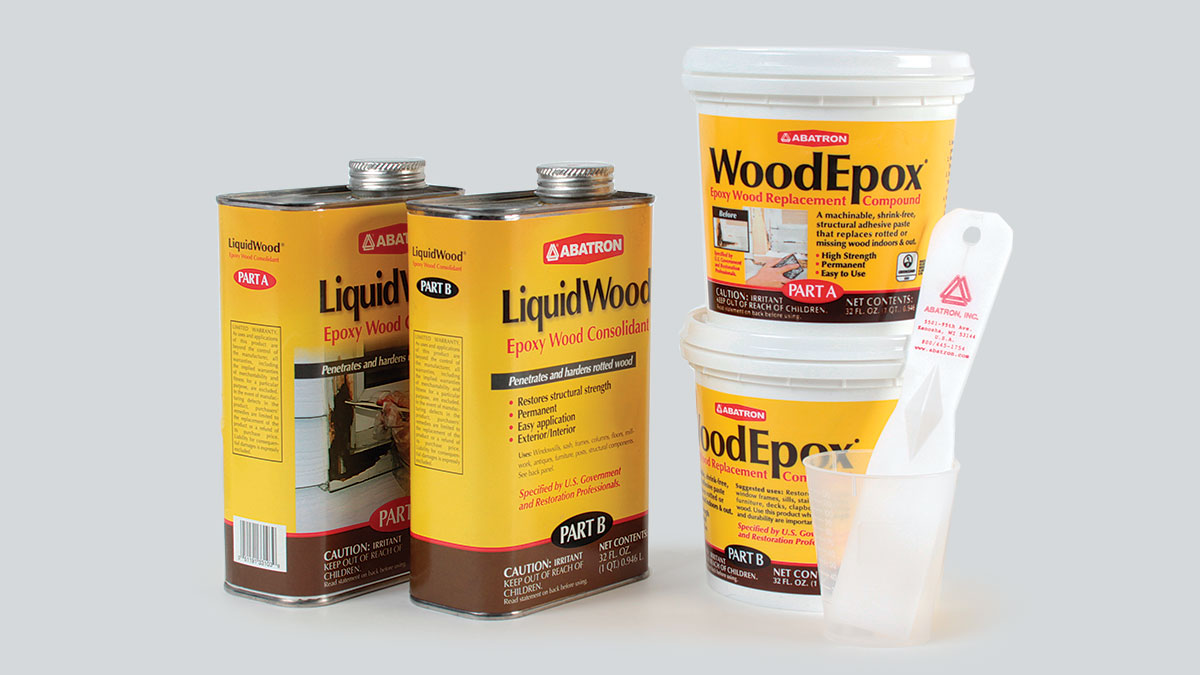
Abatron Wood Restoration Kit
Epoxy doesn’t just stick to wood. It will bond tenaciously to metal, concrete, and many other materials. But when the team at Abatron realized that epoxies were being adopted for home-restoration projects, they decided to give it some attention and developed their Wood Restoration Kit specifically for this application. The kit is available in three volumes to match the size of your project or the frequency with which you do this work, and includes LiquidWood, a flexible, penetrating epoxy that seals and primes the damaged area; WoodEpox, their epoxy wood filler; and Abosolv, which is used to thin and clean up LiquidWood. Like all of these epoxy products, the material can be sanded and shaped, colored with pigments, and painted. The kit starts around $85.
 |
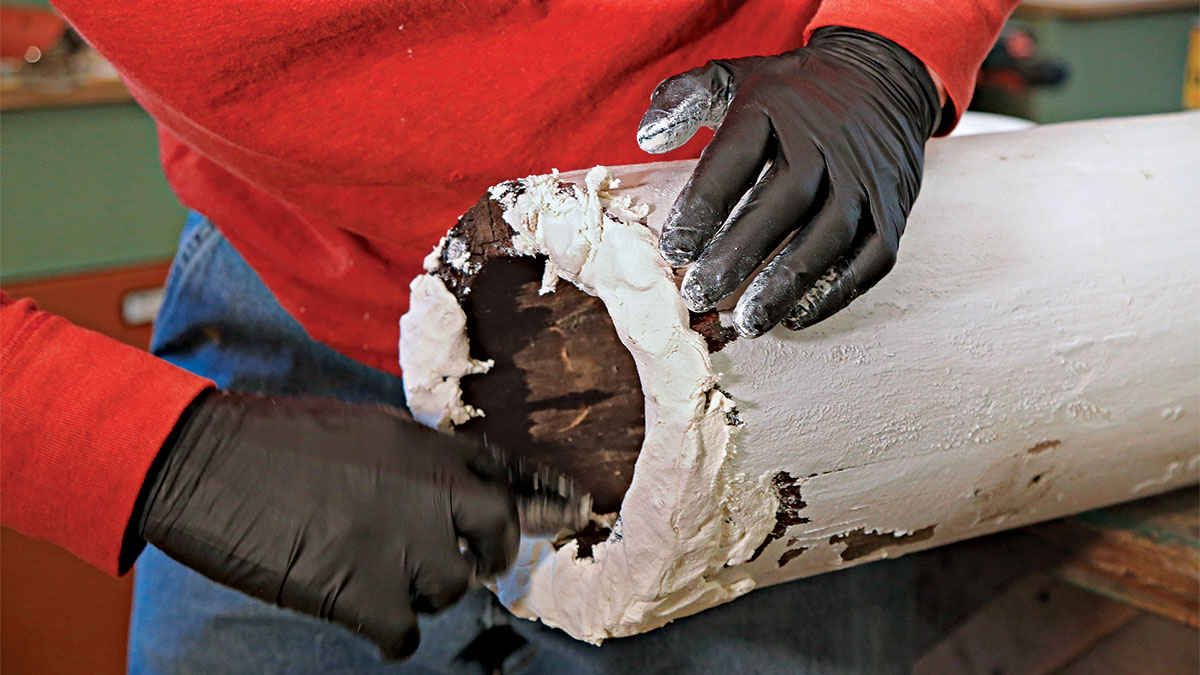 |
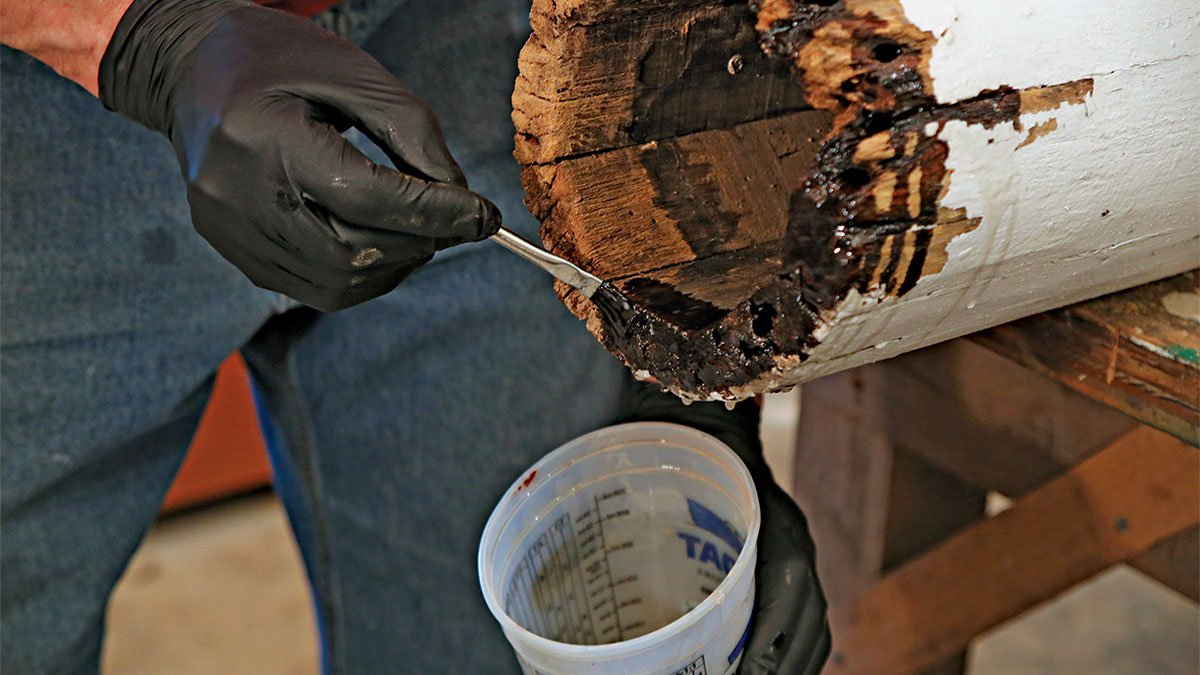
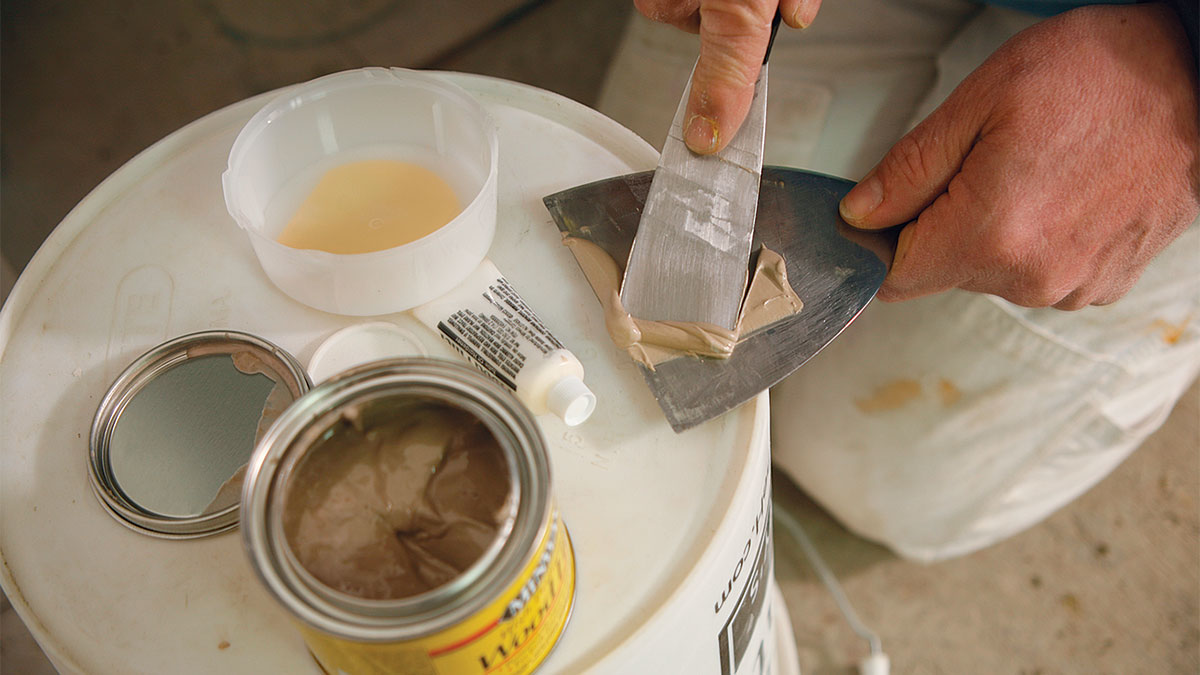
Two-step repair. Epoxy putty is typically applied after a soaking coat of wood consolidant, which reinforces damaged wood.
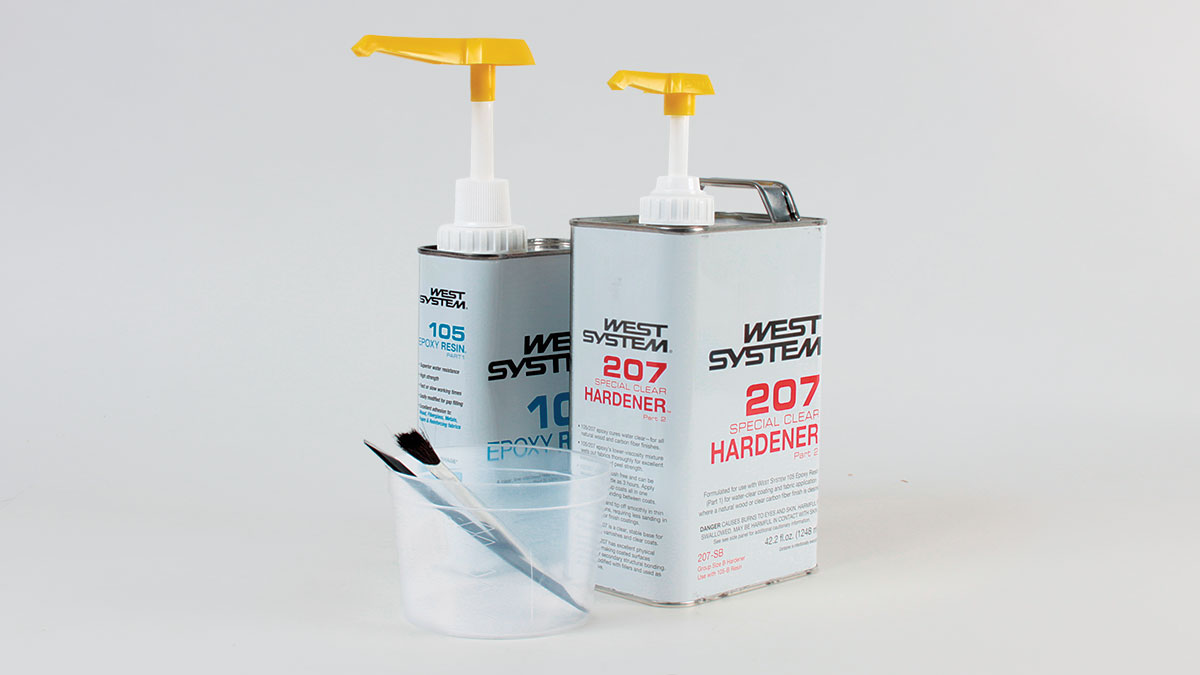
West System Epoxy
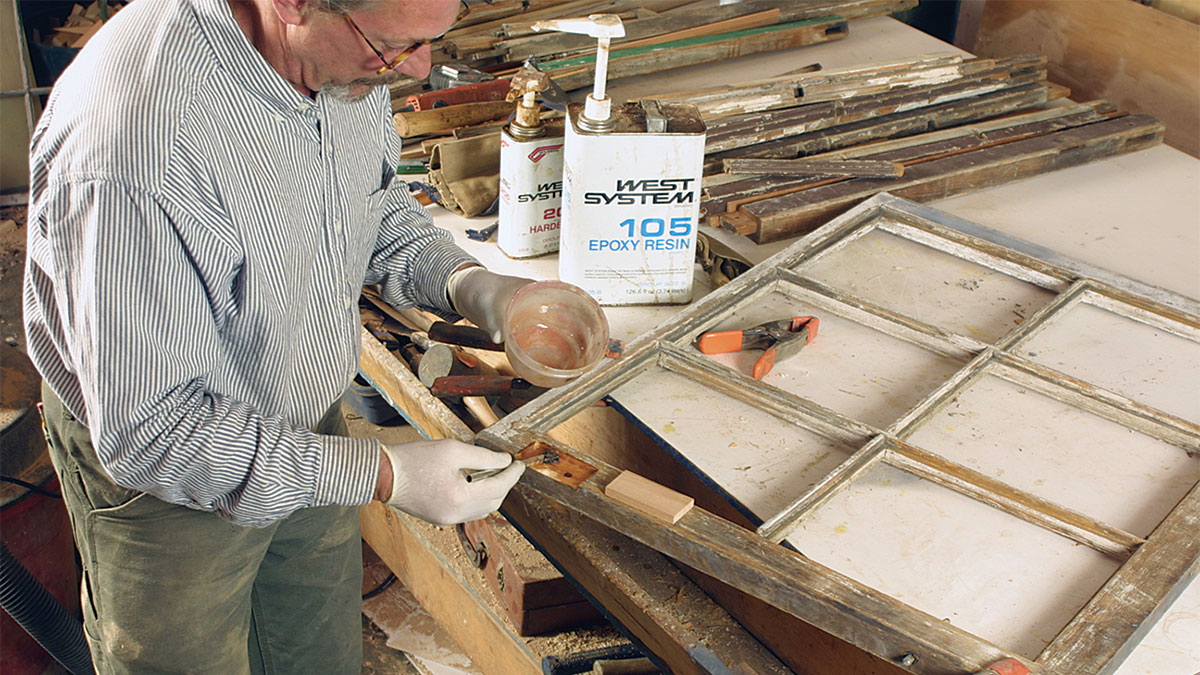
Though West System epoxy is preferred by many professionals, their products aren’t marketed to home builders, so you’ll have to order components individually to put together a kit for the repairs you need to make. You can start with the 105 Epoxy Resin. From there, pick a hardener based on how fast you want it to set up. Keep in mind that the cure time of epoxy increases in colder temperatures and decreases in heat. So don’t just consider the desired working time when choosing a hardener, but also the weather you’ll be working in. Finally, you can choose from a number of fillers for the type of work you will be doing—and definitely order the calibrated pumps, which make mixing resin and hardener a one-pump to one-pump ratio. Expect to spend about $85 to get started with West System products.
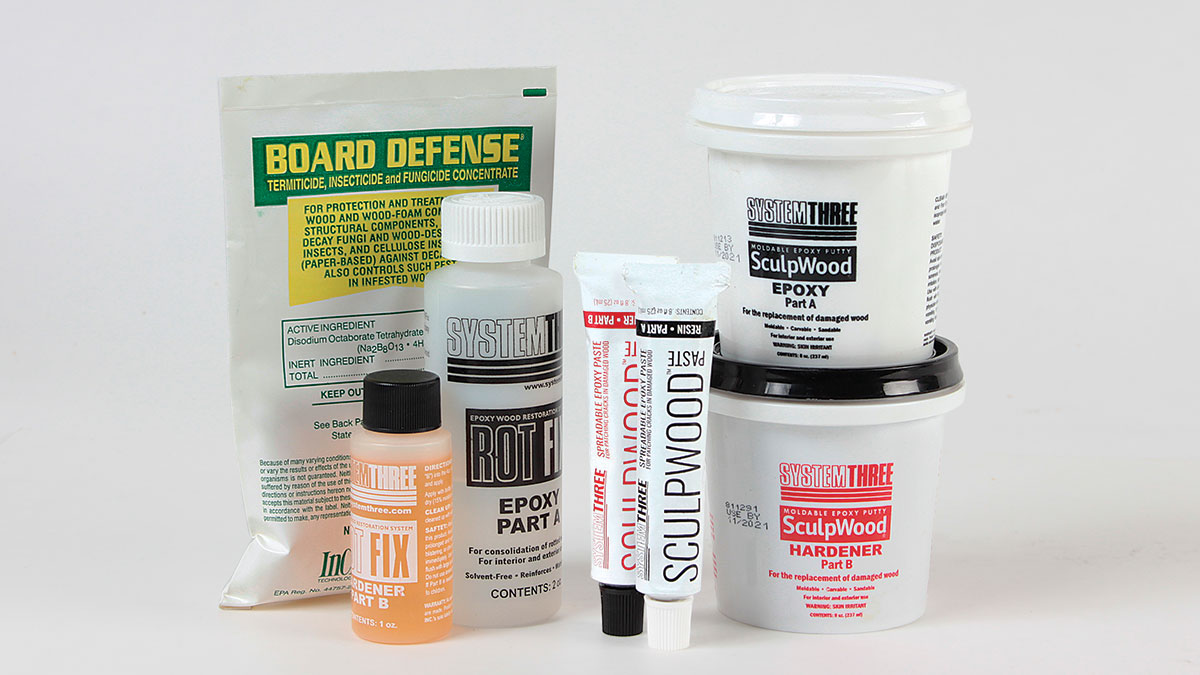
System Three Endrot Wood Restoration Kit
The folks at System Three want you to remember that before you make repairs to rot-damaged wood, it’s important to stop the rot from continuing. This may mean fixing leaks that are allowing the wood to get wet, excavating damaged wood from the area, and then treating the wood to kill the fungus that is creating the rot. In this kit, you’ll find their Board Defense borate powder, which is a water-soluble insecticide, termiticide, and fungicide used for treating rotting wood. Once the damaged wood is treated, their low-viscosity RotFix is used to seal and harden the wood. RotFix also acts as a primer for their SculpWood Putty, which is used to fill the void. And finally, the SculpWood Paste is a top coat used to refine the repair. The repair will be sandable, machinable, and structural . The System Three Endrot wood restoration kit costs around $40.
Two-Part Filler
Numerous articles and videos online refer to these products as “epoxy-based.” But that’s not correct. They are polyester resins. Unlike epoxy, adjusting the amount of catalyst in your two-part filler mix will slow or speed the setup. The monochromatic colors of the filler and catalyst can make it difficult to see if the parts have been mixed well, so it is best to stir a little extra if you are unsure. These fillers are acceptable for repairs of all sizes inside and outside. They can be sanded and shaped, they’re paintable, and some claim to be stainable, but they’re not the best option for color-matching stained woodwork. While you can use a wood hardener to strengthen the substrate before making repairs with these products, if you’re making a large repair partially intended to hold the woodwork together, epoxy is a better choice.
 |
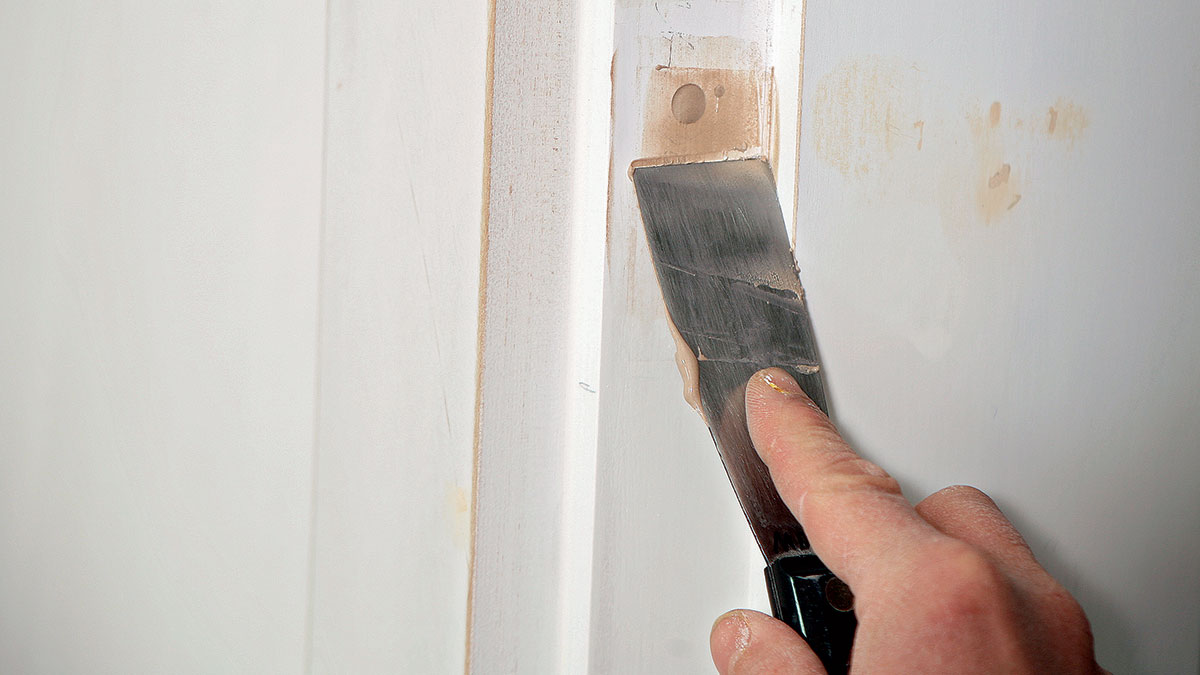 |
Quick-dry option. By tweaking the mixing ratio of two-part fillers, holes can be filled and ready to finish at whatever pace is necessary, and multiple thin coats can be built up quickly.
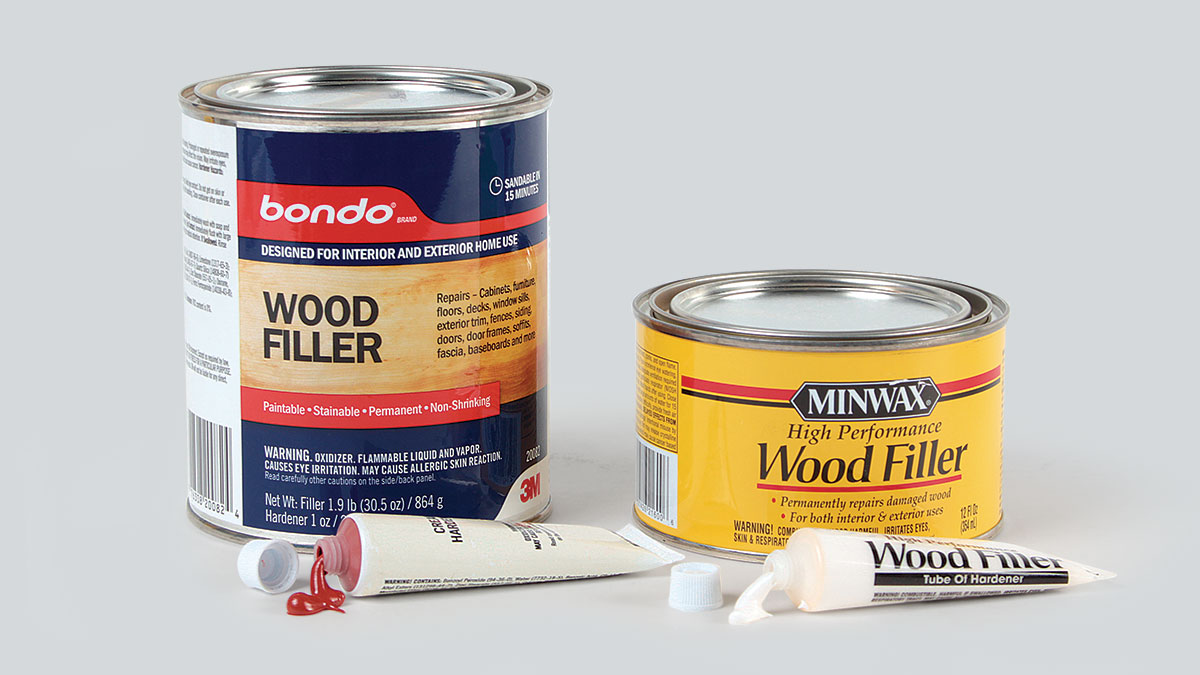
3M Bondo Wood Filler
This product is similar to both automotive Bondo and the Minwax filler. As soon as you open the can, you’ll notice that they all share a distinct smell. And like Minwax, 3M recommends first treating your repairs, in this case with Bondo Rotted Wood Restorer. There are some differences between the two products: Most notably, Bondo is marketed for a speedy repair and can be sanded in 15 minutes and painted in 25. Bondo Wood Filler can also be stained, though it’s unlikely that it will absorb stain the same as the surrounding wood. A 1-quart can of Bondo Wood Filler with hardener costs about $14.
Minwax High Performance Wood Filler
Minwax recommends removing paint, dirt and debris, grease, and any loose or flaking wood—and suggests using their wood hardener to treat damaged areas—before filling, which is excellent advice for all fillers. Also, instead of packing the void to be filled, they suggest applying the filler in 1⁄8-in. layers. Working time for this product is about 10 minutes if mixed as directed, and the repair will be ready for sanding in about 30 minutes. The manufacturer does not recommend this product for stain-grade work. A 12-oz. container of Minwax High Performance Wood Filler with hardener costs about $13.
Spackle
“Spackle” is now a generic term used to describe a number of different products from a number of manufacturers that, like fillers and putties, are difficult to categorize. Sometimes “spackle” is used synonymously with “drywall compound,” an association that reflects the intended use of Spackle Paste, a trademarked product from Muralo. Spackles are typically vinyl, water-based products that dry hard and sand easily—and many are indeed intended for drywall repair. However, some of today’s spackles are acceptable fillers for small holes in wood, and their creamy texture makes it easy to achieve a smooth surface.
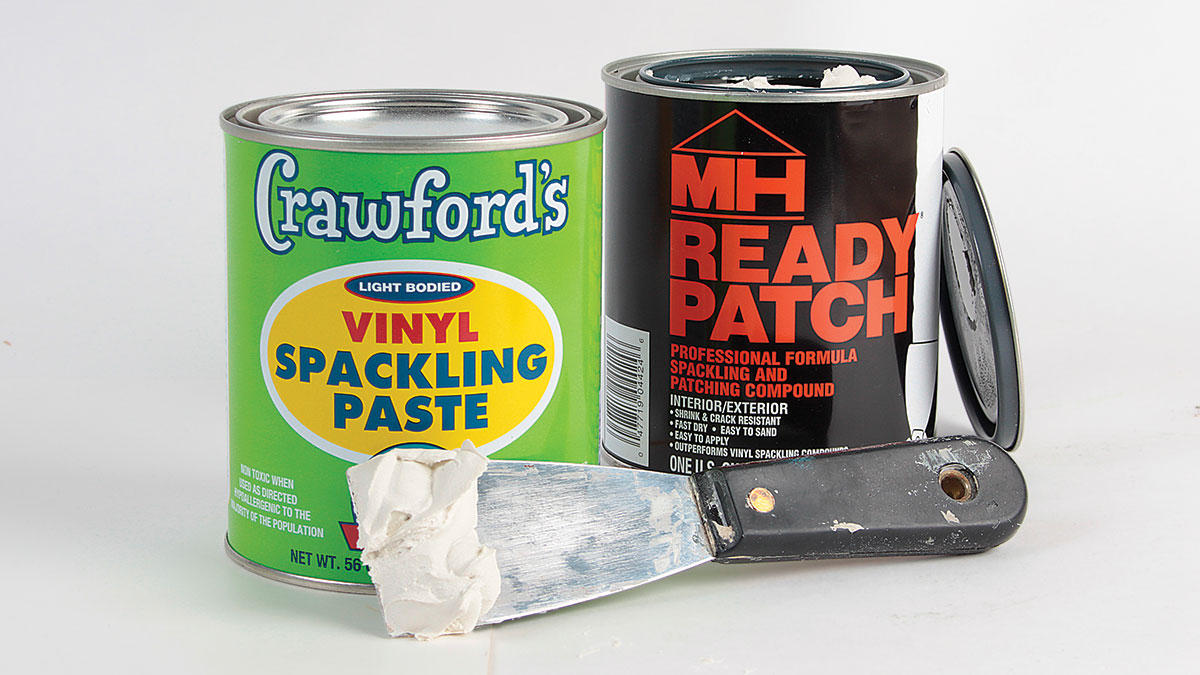
Crawford’s Vinyl Spackling Paste
True to its name, this lightweight, easy-sanding spackling paste is formulated for drywall and plaster repair. But it’s also an acceptable wood filler for nail holes, surface scratches, small cracks, and other surface imperfections. The water-based product is meant to be applied with a trowel and dries hard and sandable in 24 hours, but like all products, actual dry time depends on weather conditions. Crawford’s specifically calls for a primed surface for their Vinyl Spackling Paste. A 4-lb. can cost about $13.
Zinsser Ready Patch
This “Spackling and Patching Compound” is a modified alkyd resin formulated to compete with vinyl spackles. It is recommended for repairs in everything from masonry to metal, and the list includes new or previously painted wood. It can be used for interior and exterior work and can be primed and painted. It can also be tinted with a universal colorant. For deep repairs, Zinsser recommends multiple applications. Ready Patch can be primed in about an hour, and is fully set up and can be sanded in about two. One quart of Zinsser Ready Patch sells for about $10.
From Fine Homebuilding #288