How to Use a Pocket-Hole Jig
Create strong, flush joints in your carpentry projects with this simple tool and its accompanying pocket screws.
Pocket screws are popular fasteners for making sturdy connections when building cabinets, window casings, or any other carpentry project where a butt joint is needed. The screws are typically paired with a glue or adhesive that matches the material being joined to make a strong, permanent joint. They are simple alternatives to traditional joinery and floating-tenon systems, and have the advantage of not needing to be clamped after assembly while glue is drying.
Note: The screw holes will be visible on one side of the assembly, so plan your projects accordingly if you wish to hide these holes.
Pocket screws require pocket-hole jigs
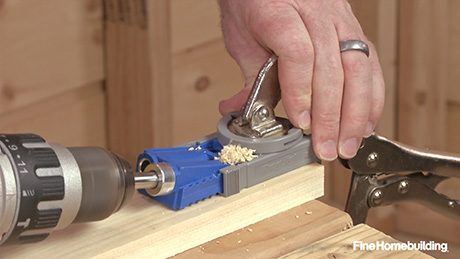
Pocket-hole jigs create angled holes in one workpiece for the special self-tapping screws which, when driven into the hole, protrude just enough to bite into to the adjoining piece and form a strong joint. The angled holes made by the jig are stepped so that the shank of the screw goes all the way through but the head of the screw stops on the bearing surface in the wider, shallower portion of the hole, just as in a typical countersunk screw.
Pocket holes can go into edge, end, or face grain on the piece that is getting drilled, but for strength, the screws must only be driven into face or edge grain of the receiving piece—never into end grain.
What you will need:
- A pocket-hole-jig kit (jig, drill bit, and special clamps)
- Pocket screws of a length that matches the size of your workpieces (check with manufacturer’s guidelines for screw sizing)
- A drill/driver (both for drilling the pocket holes and for driving the screws)
- Glue or adhesive (optional, though recommended for permanent joints)
- Workpieces to be joined (which should fit tight and flush)
How to use a pocket-hole jig and pocket screws:
Adjust the drill guide on the jig to the thickness of your stock; in this video ours is 3/4 in. thick.
Then adjust the stop collar on the supplied drill bit to the same thickness; again, our stock is 3/4 in.
To drill the holes, align the drill guide over the joint end of the piece to be drilled and clamp the jig down.
Then insert the bit into the jig and drill down all the way to the stop. Note: Each pocket-screw joint requires at least two screws for stability.
To assemble, apply glue (if desired) to the workpieces and use the supplied clamps to hold the pieces in plane as you drive the screws home and complete the connection.
More about pocket-hole joinery:
Video: Using a Pocket-Hole Jig – A pocket-hole jig makes cabinet assembly fast and easy.
An Affordable Production Pocket-Hole Machine – For big projects and for small cabinet shops, the Kreg Foreman DB 210 benchtop pocket-hole machine might be a better option than a simple pocket-hole jig.
www.kregtool.com (source for pocket-hole jigs and other carpentry tools)








View Comments
Really wonderful article. It helped me a lot to complete the carpentry works.
Finally University of Rajshahi Admission Result has been Published. RU Admission Test Result can be known by Sending SMS from any Mobile Phone. It can also be known from the Admission Website admission ru ac bd.