Locate and Dig Deck Footings
Builder Mike Guertin demonstrates the entire process of measuring, marking, and forming the foundation for a backyard deck.

To locate the footings that support the outside of the deck, and also the footing for the stairs, I started by locating the ledger on the house. Then I set up a stringline at the location of the deck frame’s outermost face. Using the Pythagorean theorem, I created perpendicular lines from the ends of the ledger to the stringline. This established the deck’s perimeter, which I needed to lay out and dig the footings.
I calculated the load each footing would carry and determined the necessary size. However, instead of digging 13-in.-dia. holes for the outboard footings and a 16-in.-dia. hole for the middle (which carries a greater load than the outboard footings), I dug 10-in.-dia. holes and flared the holes’ bottoms. Plastic bags attached to cardboard form tubes allowed the concrete to fill the holes and create spread footings. The required footing depth in this jurisdiction is 42 in.
After digging the holes and pouring concrete into our modified footing tubes, we placed the anchor bolts and checked their locations with the stringline. Once everything was set, we graded the soil from the footing holes to establish a positive slope away from the house. This was the last chance to adjust the grade beneath the low deck before we started to erect the frame. After raking the footing spoils smooth, we compacted them with a tamper.
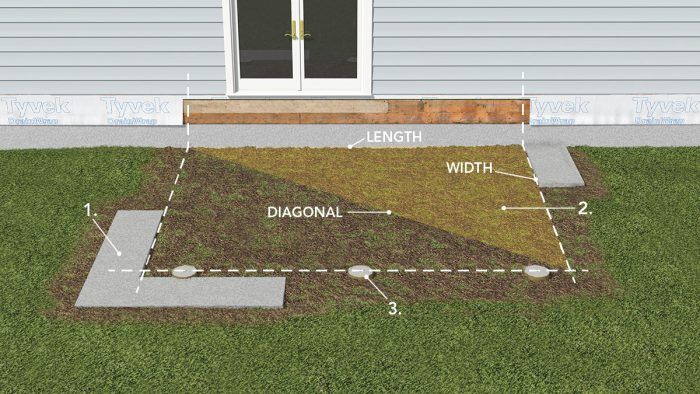
1. These 12-in.-deep footings support the stairs. They were sized to match the box that frames the bottom steps.
2. Using the Pythagorean theorem to find the outside corners, make sure the length squared (A2) plus width squared (B2) equals the diagonal squared (C2).
3. Concrete footings support the rim beam.
Stringline defines the outside edge of the deck. Set a string between batter boards, and adjust it to match the width of the deck. Diagonal measurements pulled from the ends of the ledger location give the precise outside corners, which in turn determine the footing locations.
An easy job. With only three footings to dig, it doesn’t make sense to rent a gas-powered auger. Ten-in.-dia. holes go pretty quickly with post-hole diggers and a digging bar. Widen out the last 12 in. of footing depth to the width of the spread footings.
Economical spread-footing. Tape garbage bags to the bottom of 30-in.- long, 10-in.-dia. cardboard footing tubes. When filled with concrete, the bags balloon into the bottom of the holes to a width greater than the tube.
The footings must be located directly below the beam. After placing the bags and tubes, pour enough concrete to fill the bags up to the cardboard tubes. Then reset the string, align the tubes to the center of the beam, and backfill around the tubes.
Site-mixed concrete. Mix concrete in a wheelbarrow-style mixer, then shovel it directly into each form. When all are filled, reset the string, and place the J-bolts in the wet mix directly below the string.
Mark and dig the stair footings. Use a 2x as a straightedge to mark the position of the stair footing pads. Dig square and flat holes to the dimensions of the stair frame. Form the top with 2x stock for even edges at the precise position of the stairs.
To see how we built this entire deck, read the article:
The Complete Guide to Building a Grade-Level Deck
Fine Homebuilding Recommended Products
Fine Homebuilding receives a commission for items purchased through links on this site, including Amazon Associates and other affiliate advertising programs.

Lithium-Ion Cordless Palm Nailer

MicroFoam Nitrile Coated Work Gloves

Flashing and Joist Tape


View Comments
Couple of Comments: Pythagorean theorem? Although I do know what that is , a simple 3/4/5 method is just as good. Simply nail a temporary floor joist on the end of the ledger. Level it (doesn't have to be perfect.) Nail a temporary support on the opposite end to hold it and measure 3' on the inside and 4' on the inside, and the diagonal is 5' . 6/8/10 works too 6' 8' and 10' . As for the bags on the end of the tubes . I have no idea how they are going to stay in place while you wait for a footing inspection. Use big foots , very easy and meets all codes. Just my opinion .