FHB Logo Facebook LinkedIn Email Pinterest Twitter X Instagram Tiktok YouTube Plus Icon Close Icon Navigation Search Icon Navigation Search Icon Arrow Down Icon Video Guide Icon Article Guide Icon Modal Close Icon Guide Search Icon Skip to content
Subscribe
Log In
  • How-To
  • Design
  • Tools & Materials
  • Restoration
  • Videos
  • Blogs
  • Forum
  • Magazine
  • Members
  • FHB House
  • Podcast
Log In

Fine Homebuilding Project Guides

Decks

Guide Home
  • Design & Planning
  • Tools & Materials
  • Footings & Foundations
  • Framing a Deck
  • Installing Decking
  • Installing Railings
  • Deck Stairs
  • Custom Details
  • Finishes, Repairs, and Maintenance
  • Complete Deck Builds
How-To

Installing Deck Beams

Having a helper is better than working alone when setting the beams in place, but it can be done solo if you work smart.

By Scott Grice
  • X
  • facebook
  • linkedin
  • pinterest
  • email
  • add to favorites Log in or Sign up to save your favorite articles

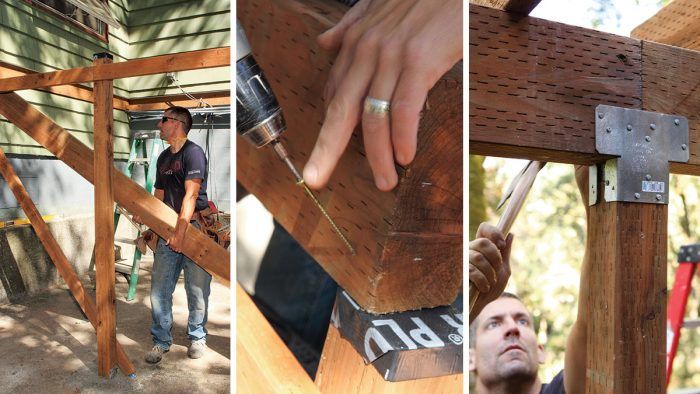
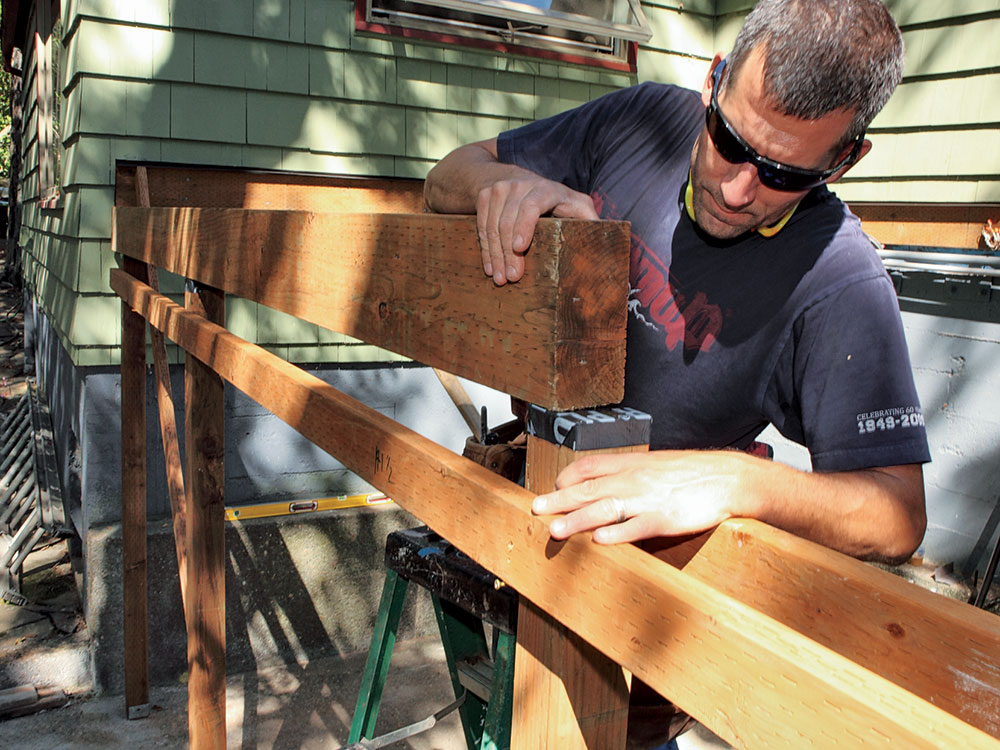
If you are going to call on a friend to help build a deck, there is no better time to do it than when setting the beams. To be able to support the joists and decking, beams are necessarily big, heavy, and hard to move into place. Whether you are working with a helper or alone, double-check the post locations and bracing before tackling beams: Standing on a ladder with the beam on your shoulder is not the time to realize a post is in the wrong spot or cut to the wrong height. Also, take the time to work out a plan for how you will lift the beam; be realistic. Slipping a disc in your back will slow down the project more than taking the time to get enough hands on a beam to safely lift it into place.

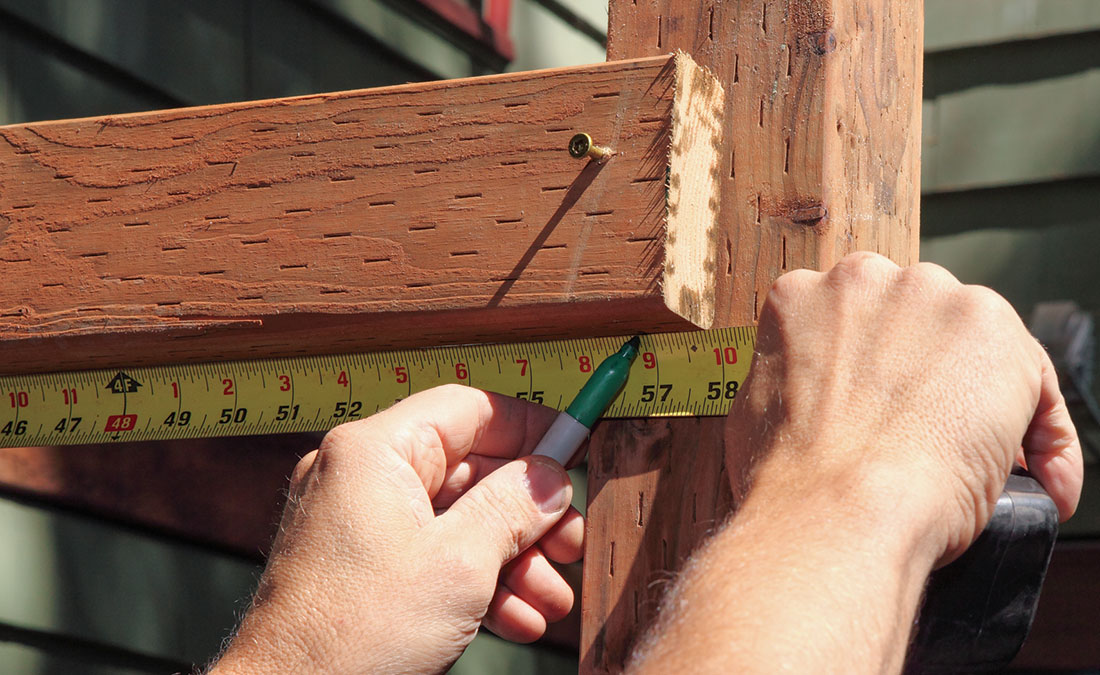
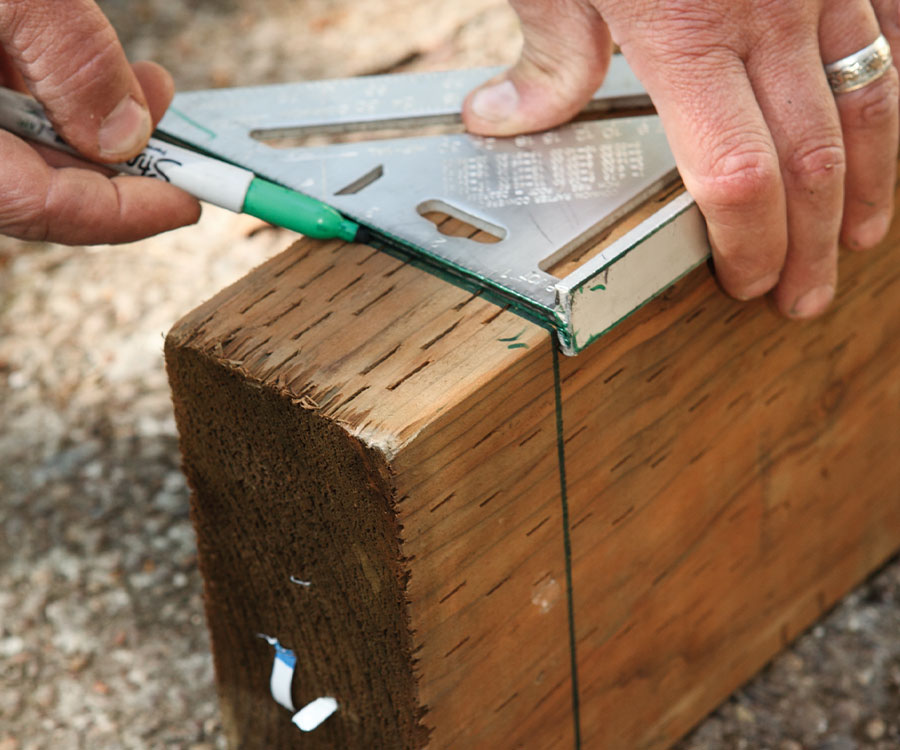
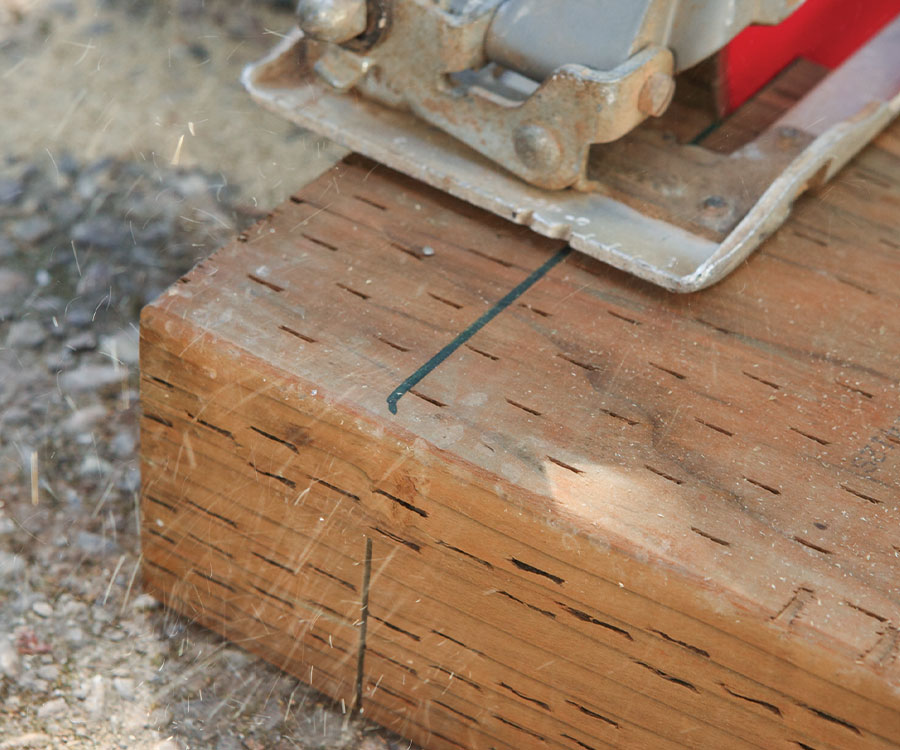
On the deck shown here, we decided to use two 10-ft. beams spliced in the middle rather than a 20-ft. beam, which would have been more expensive, required special delivery, and been harder to manage on the job site. To set a beam, measure the beam’s length centered on the post you will split the beam on (see photos below). Later you will add some hardware to beef up this connection. Because there is minimal bearing on a 4×4 post, take the time to make perfectly square cuts where the beams meet. Clearly mark the cut line on all four sides of the beam. If the saw is out of square, you will know it after one cut and can make a correction for the second cut. Because the blade on a typical circular saw will not clear the beam, there is no need to sticker the lumber off the ground. However, before applying the wood preservative, block the beam’s end off the ground and place a scrap under it so excess preservative does not contaminate the soil. If you are lifting the beam alone, raise one end into place and make sure it is secure. Here, we were able to use some of the bracing to hold the beam in place. With one end secure, lift the other end into place. This method allows you to raise the beam into position while having to support only half of the weight at any given moment. Position the beam to split on the post and toe-screw the end to the post to secure it temporarily. Once the abutting beam is in place, toe-screw it to the first beam instead of the post. The screws are needed only until the connecting hardware gets installed.


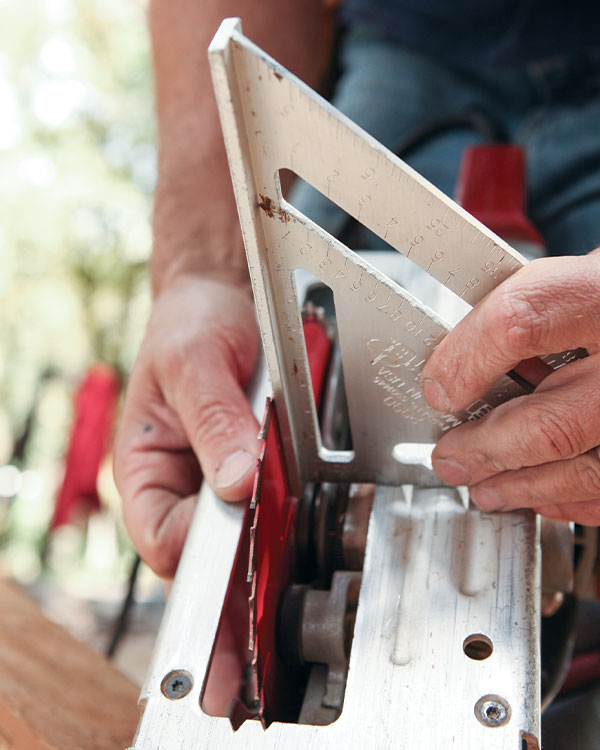
1. Measure the length of the beam from the end to the center of the post you want to split the beam over.

2. Mark the cutline on all four sides of the beam to ensure the squarest cut possible.

3. Place the beam in a stable location to make the cut, then make two passes, one from each face, with a circular saw.


Trade Secret:

Cutting a 4-in. by 6-in. beam with a typical circular saw requires two deep passes. To make a good cut, the sawblade needs to be dead-on-square to the saw foot, so it’s a good habit to check the blade for square before making the cut. Remember to unplug the saw when checking.


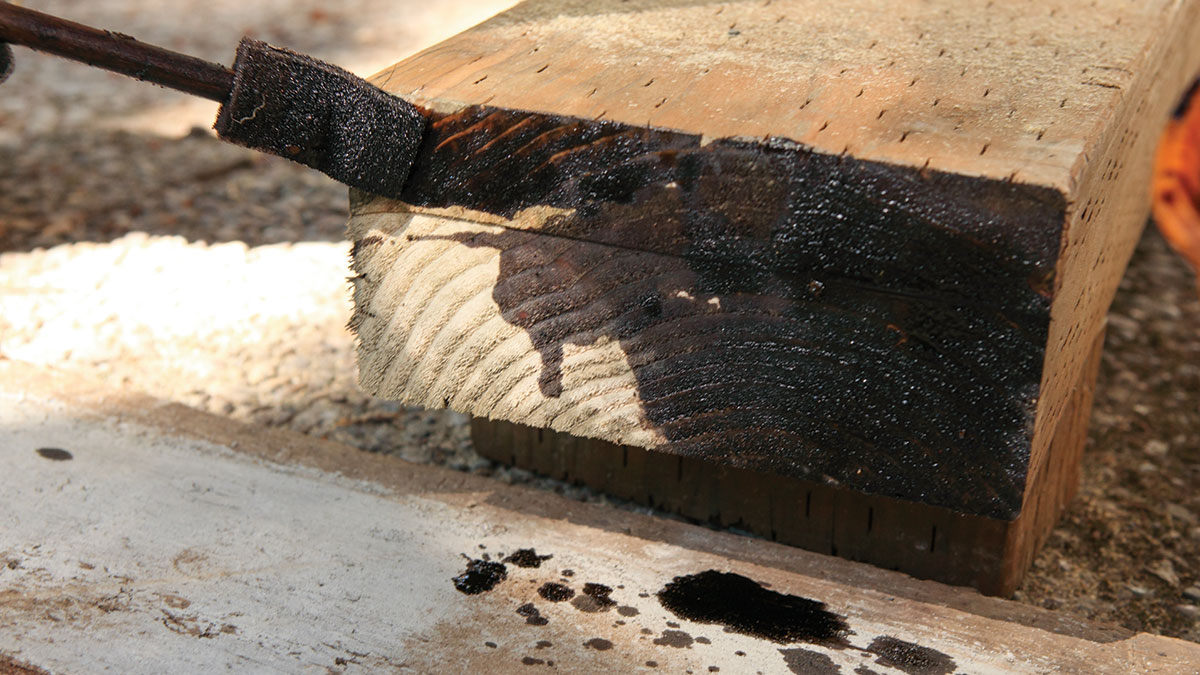
4. Apply a wood preservative to protect the end of the beam against rot and insect damage.

5. Lift one end of the beam and rest it securely close to its final position.

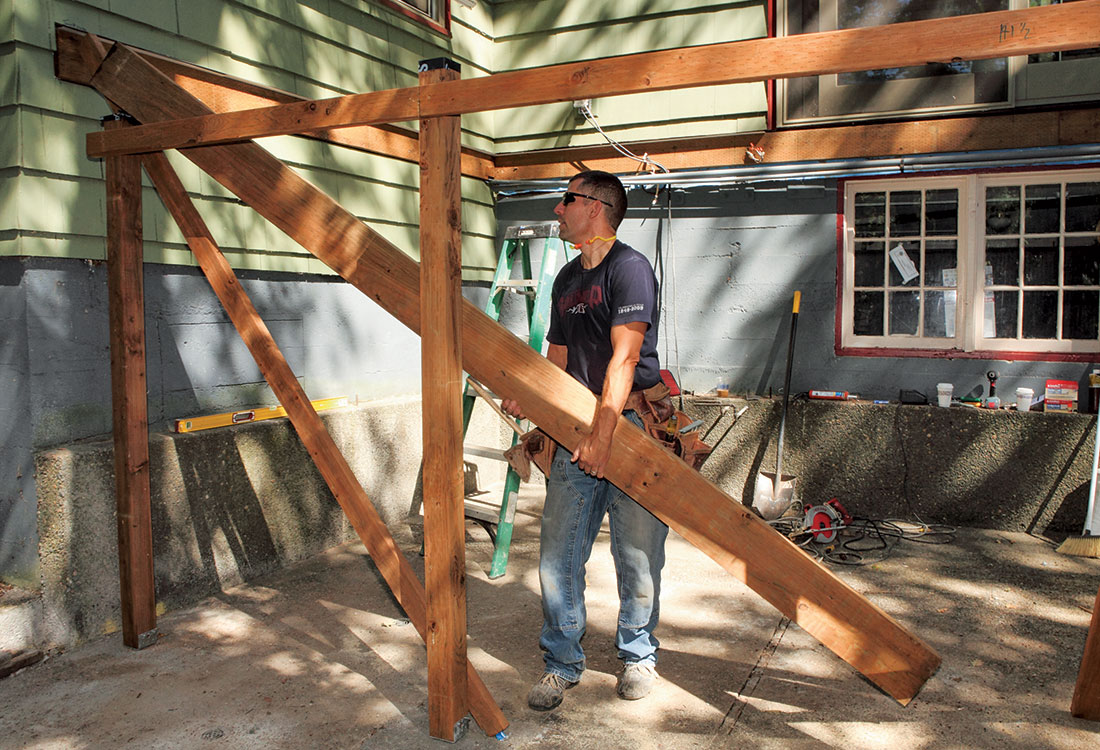
6. Lift the other end of the beam and rest it on top of the post.


Trade Secret:

Mind the gap! A beam will often have a slight crown. Before toe-screwing the beam to the post at the midspan or installing hardware, seat the beam to the post. An easy, low-tech way to do this is to sit on it while driving in the screw.


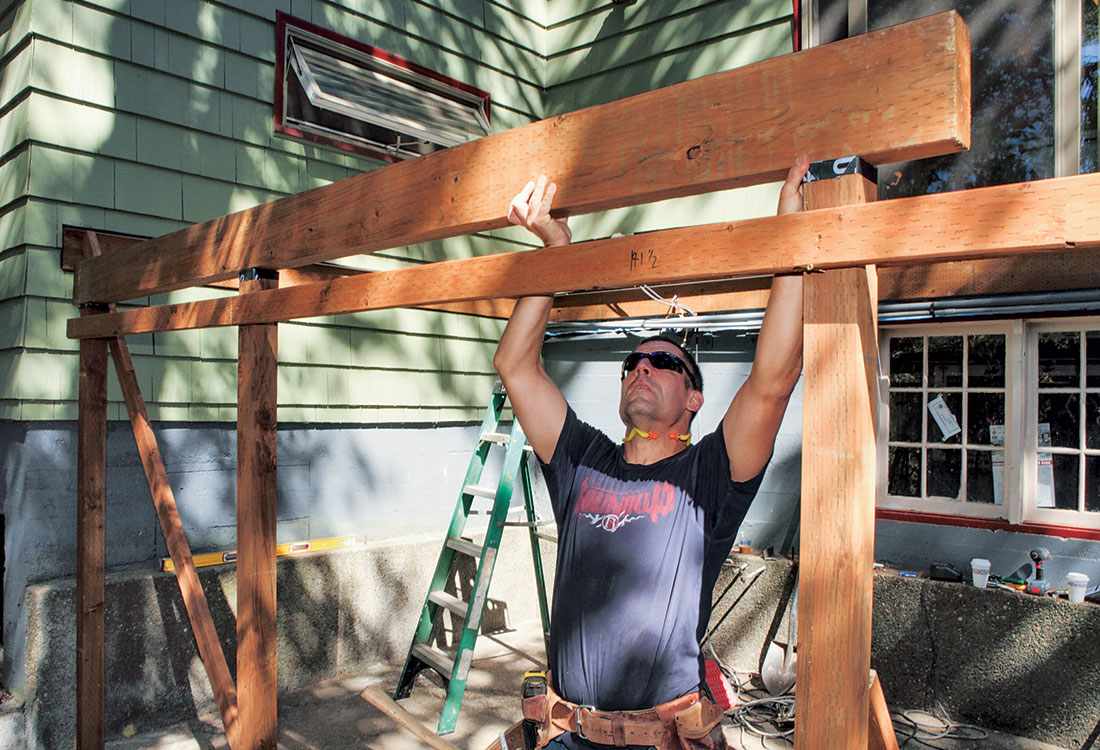
7. Shift the beam until it bears on half the post.

8. Drive a screw, toed at an angle, to temporarily secure the beam.

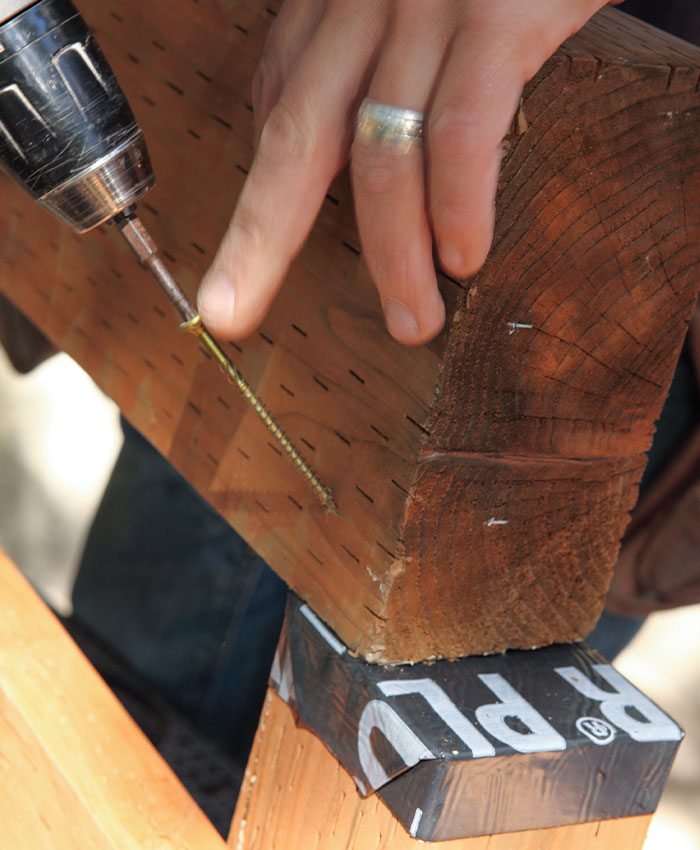
9. Follow the same procedure to lift the adjoining beam and secure it with a screw.
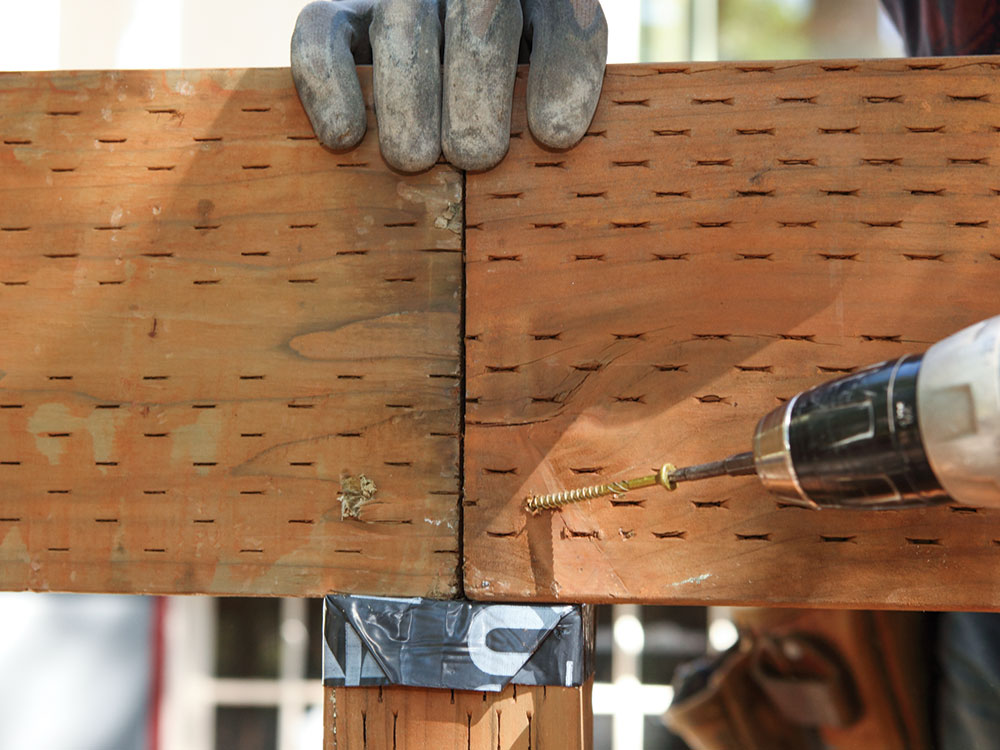
 

Trade Secret:

When assembling framing, we prefer to use screws rather than nails for two reasons. First, after you’ve taken the time to carefully position a beam, it’s too easy to knock it out of alignment while nailing. Second, if you find you want to reposition the beam, it’s much easier to back out a screw than to pull a galvanized nail.


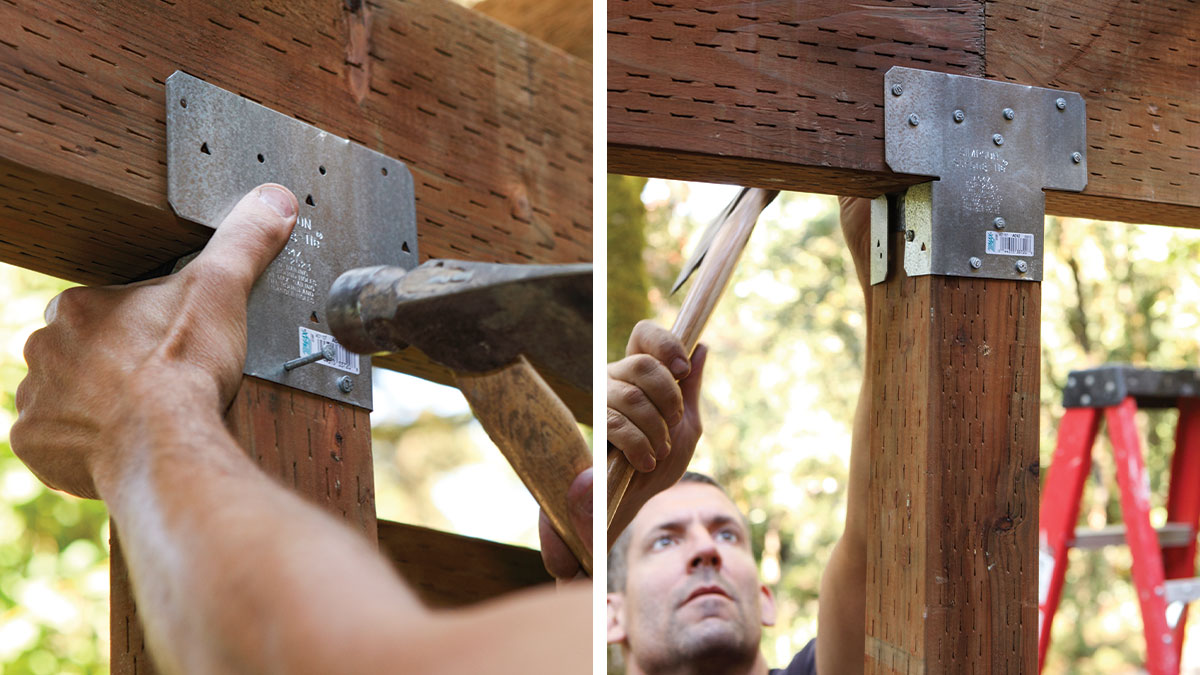
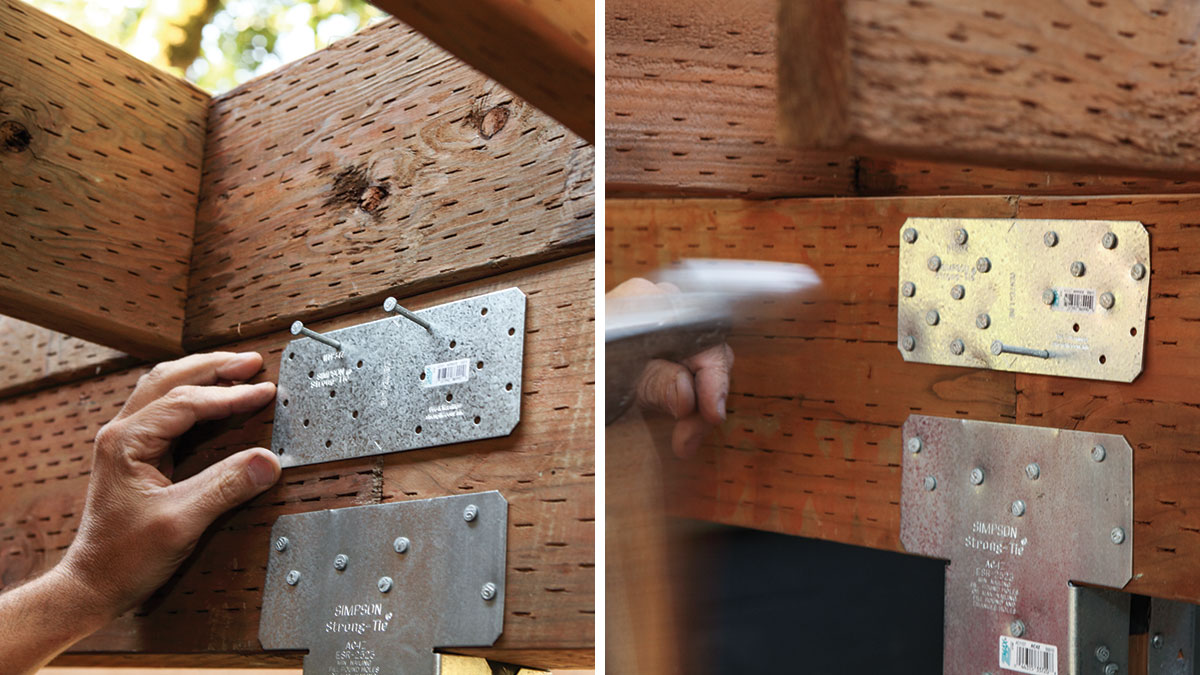
Installing post caps

Complete the framing assembly before installing the post-to-beam hardware. This will save time during construction and allow you to easily make corrections where necessary.

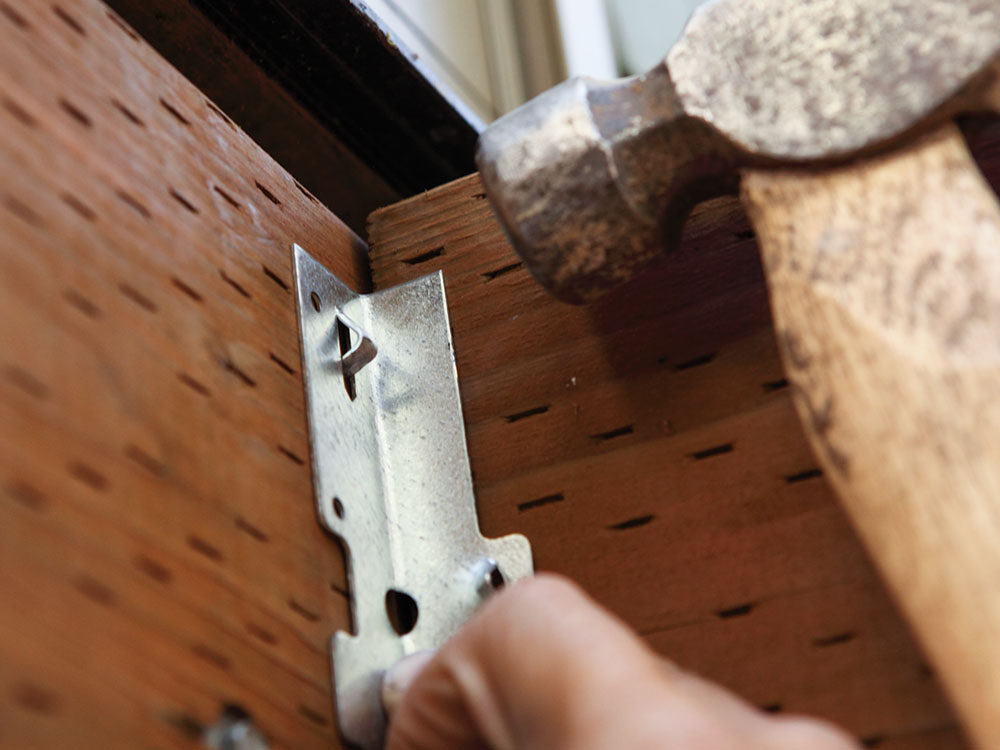
Position the post-to-beam hardware snug against the framing materials and drive a galvanized fastener through the lower flange to secure it to the post. Install one side of the two-part unity, filling every hole with a fastener. Then move on to the other side.

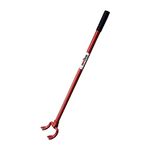
Secure the joint between two beams adding a mending plate above the post-cap flange. I tack the plate on either side level and then drive the rest of the fasteners. Fill every fastener hole. There is a tendency not to fill every hole since there are so many but the engineered plate rating is based on all the fasteners being installed.

Fine Homebuilding Recommended Products

Fine Homebuilding receives a commission for items purchased through links on this site, including Amazon Associates and other affiliate advertising programs.

Angel Guard Deck Demon

Demo has never been easier with the deck demon. The tool keeps the worker in an upright position and uses leverage to remove decking from framing, a must have tool for demo.
Buy at Amazon

Flashing and Joist Tape

Flashing joists is a great way to prolong the life of a deck frame — after all, moisture management is key to longevity.
Buy at Amazon

Cepco BoWrench Decking Tool

This tool makes straightening deck boards a breeze during installation.
Buy at Amazon
Previous: Setting Deck Posts From the Top Down Next: Moving Lumber Alone

Guide

Decks

Chapter

Framing a Deck

Sign up for eletters today and get the latest how-to from Fine Homebuilding, plus special offers.

Signing you up...

This site is protected by reCAPTCHA and the Google Privacy Policy and Terms of Service apply.
See all newsletters
See all newsletters

Log in or create an account to post a comment.

Sign up Log in

Become a member and get full access to FineHomebuilding.com

Decks

Decks

Hundreds of articles and videos by top deck-building pros on how to design and build a beautiful, sturdy, and safe deck

View Project Guide

View All Project Guides »

Become a member and get unlimited site access, including the Decks Project Guide.

Start Free Trial

Design & Planning
  • Basic Design Options
  • Generating Plans
  • Calculating Deck Loads
  • Code Compliance
Tools & Materials
  • Deck Building Tools
  • Foundation and Framing Materials
  • Decking Materials
  • Fasteners and Hardware
Footings & Foundations
  • Choosing a Foundation
  • Sizing and Laying Out Footings
  • Excavation
  • Pouring the Foundation
Framing a Deck
  • Framing Overview
  • Installing the Ledger
  • Setting Posts and Beams
  • Installing Joists
Installing Decking
  • Decking Basics
  • Installation Process
  • Adding Fascia and Other Decorative Elements
Installing Railings
  • Installing Deck Railing Posts
  • Building Wood Rails and Balustrades
  • Non-Wood Railing Options
  • Installing Nonwood Balustrades
Deck Stairs
  • Deck Stairs Overview
  • Laying Out, Cutting, and Installing the Stringers
  • Installing Treads, Risers, and Stair Railings
Custom Details
  • Benches, Planters, and Privacy Features
  • Pergolas
  • Lighting
Finishes, Repairs, and Maintenance
  • Deck Finishes
  • Cleaning and Refinishing
  • Inspection and Repair
Complete Deck Builds
  • Grade-Level Decks
  • Raised Decks

Fine Home Building

Newsletter Sign-up

  • Fine Homebuilding

    Home building tips, offers, and expert advice in your inbox.

  • Green Building Advisor

    Building science and energy efficiency advice, plus special offers, in your inbox.

  • Old House Journal

    Repair, renovation, and restoration tips, plus special offers, in your inbox.

Signing you up...

This site is protected by reCAPTCHA and the Google Privacy Policy and Terms of Service apply.
See all newsletters

Follow

  • Fine Homebuilding

    Dig into cutting-edge approaches and decades of proven solutions with total access to our experts and tradespeople.

    Start Free Trial Now
    • Facebook
    • Instagram
    • X
    • LinkedIn
  • GBA Prime

    Get instant access to the latest developments in green building, research, and reports from the field.

    Start Free Trial Now
    • Facebook
    • YouTube
  • Old House Journal

    Learn how to restore, repair, update, and decorate your home.

    Subscribe Now
    • Facebook
    • Instagram
    • X

Membership & Magazine

  • Online Archive
  • Start Free Trial
  • Magazine Subscription
  • Magazine Renewal
  • Gift a Subscription
  • Customer Support
  • Privacy Preferences
  • About
  • Contact
  • Advertise
  • Careers
  • Terms of Use
  • Site Map
  • Do not sell or share my information
  • Privacy Policy
  • Accessibility
  • California Privacy Rights

© 2025 Active Interest Media. All rights reserved.

Fine Homebuilding receives a commission for items purchased through links on this site, including Amazon Associates and other affiliate advertising programs.

  • Home Group
  • Antique Trader
  • Arts & Crafts Homes
  • Bank Note Reporter
  • Cabin Life
  • Cuisine at Home
  • Fine Gardening
  • Fine Woodworking
  • Green Building Advisor
  • Garden Gate
  • Horticulture
  • Keep Craft Alive
  • Log Home Living
  • Military Trader/Vehicles
  • Numismatic News
  • Numismaster
  • Old Cars Weekly
  • Old House Journal
  • Period Homes
  • Popular Woodworking
  • Script
  • ShopNotes
  • Sports Collectors Digest
  • Threads
  • Timber Home Living
  • Traditional Building
  • Woodsmith
  • World Coin News
  • Writer's Digest
Active Interest Media logo
X
X
This is a dialog window which overlays the main content of the page. The modal window is a 'site map' of the most critical areas of the site. Pressing the Escape (ESC) button will close the modal and bring you back to where you were on the page.

Main Menu

  • How-To
  • Design
  • Tools & Materials
  • Video
  • Blogs
  • Forum
  • Project Guides
  • Reader Projects
  • Magazine
  • Members
  • FHB House

Podcasts

  • FHB Podcast
  • ProTalk

Webinars

  • Upcoming and On-Demand

Podcasts

  • FHB Podcast
  • ProTalk

Webinars

  • Upcoming and On-Demand

Popular Topics

  • Kitchens
  • Business
  • Bedrooms
  • Roofs
  • Architecture and Design
  • Green Building
  • Decks
  • Framing
  • Safety
  • Remodeling
  • Bathrooms
  • Windows
  • Tilework
  • Ceilings
  • HVAC

Magazine

  • Current Issue
  • Past Issues
  • Magazine Index
  • Subscribe
  • Online Archive
  • Author Guidelines

All Access

  • Member Home
  • Start Free Trial
  • Gift Membership

Online Learning

  • Courses
  • Project Guides
  • Reader Projects
  • Podcast

More

  • FHB Ambassadors
  • FHB House
  • Customer Support

Account

  • Log In
  • Join

Newsletter

Get home building tips, offers, and expert advice in your inbox

Signing you up...

This site is protected by reCAPTCHA and the Google Privacy Policy and Terms of Service apply.
See all newsletters
See all newsletters

Follow

  • X
  • YouTube
  • instagram
  • facebook
  • pinterest
  • Tiktok

Join All Access

Become a member and get instant access to thousands of videos, how-tos, tool reviews, and design features.

Start Your Free Trial

Subscribe

FHB Magazine

Start your subscription today and save up to 70%

Subscribe

We hope you’ve enjoyed your free articles. To keep reading, become a member today.

Get complete site access to expert advice, how-to videos, Code Check, and more, plus the print magazine.

Start your FREE trial

Already a member? Log in

Privacy Policy Update

We use cookies, pixels, script and other tracking technologies to analyze and improve our service, to improve and personalize content, and for advertising to you. We also share information about your use of our site with third-party social media, advertising and analytics partners. You can view our Privacy Policy here and our Terms of Use here.

Cookies

Analytics

These cookies help us track site metrics to improve our sites and provide a better user experience.

Advertising/Social Media

These cookies are used to serve advertisements aligned with your interests.

Essential

These cookies are required to provide basic functions like page navigation and access to secure areas of the website.

Delete My Data

Delete all cookies and associated data