FHB Logo Facebook LinkedIn Email Pinterest Twitter X Instagram Tiktok YouTube Plus Icon Close Icon Navigation Search Icon Navigation Search Icon Arrow Down Icon Video Guide Icon Article Guide Icon Modal Close Icon Guide Search Icon Skip to content
Subscribe
Log In
  • How-To
  • Design
  • Tools & Materials
  • Restoration
  • Videos
  • Blogs
  • Forum
  • Magazine
  • Members
  • FHB House
  • Podcast
Log In

Fine Homebuilding Project Guides

Insulation

Guide Home
  • Energy Efficiency
  • Air-Sealing
  • Choosing Insulation
  • Installing Insulation
  • Water Management
How-To

A Case for Double-Stud Walls

Straightforward construction, common materials, and low embodied carbon are just some of the benefits of this superinsulated assembly.

By Dan Kolbert Issue 291 - June 2020
  • X
  • facebook
  • linkedin
  • pinterest
  • email
  • add to favorites Log in or Sign up to save your favorite articles

Synopsis: High-performance builder Dan Kolbert’s ideal wall is a double-stud approach filled with dense-pack cellulose insulation. In this article, he uses photographs and a detailed illustration to showcase how his team builds the vapor-open double-stud wall assembly, beginning with the exterior wall framing all the way to the ridge and then turning to the interior walls. He includes a sidebar about modeled risks of cold sheathing in double-stud assemblies—a much-talked-about but rarely seen phenomenon.


A vapor-open assembly
A VAPOR-OPEN ASSEMBLY: Our 12-in.-thick double-stud wall assembly includes two 2×4 walls separated by 5 in. of uninterrupted insulation space. Though we’re confident that these walls have no greater chance of moisture issues than any other assembly, we use plywood sheathing, which becomes more permeable than OSB when it gets wet; a vapor-open, fully-adhered water-resistive barrier (WRB), which also provides the exterior air-sealing; and only a class III vapor retarder when combined with ventilated cladding. Cellulose insulation is used because it can absorb and redistribute moisture, then dry when conditions are right. Drawing: Michael Gellatly

The ideal wall is debated constantly among conscientious builders, and unsurprisingly, opinions vary. Since my company is focused mostly on renovations, and we rarely build more than one new house per year, I have a lot of time to rethink my wall sections between each build. In the end, I keep coming back to the method we’ve used since we built our first high-­performance home more than a decade ago—double-stud walls filled with dense-pack cellulose insulation. This double-stud wall approach not only uses an insulation you can feel good about, but it’s relatively affordable, easy to build, and can dry in both directions.

Even the best-performing wall design will only succeed if it’s buildable. The more complex water management, air-sealing, and other details become, the more likely you’ll fail.

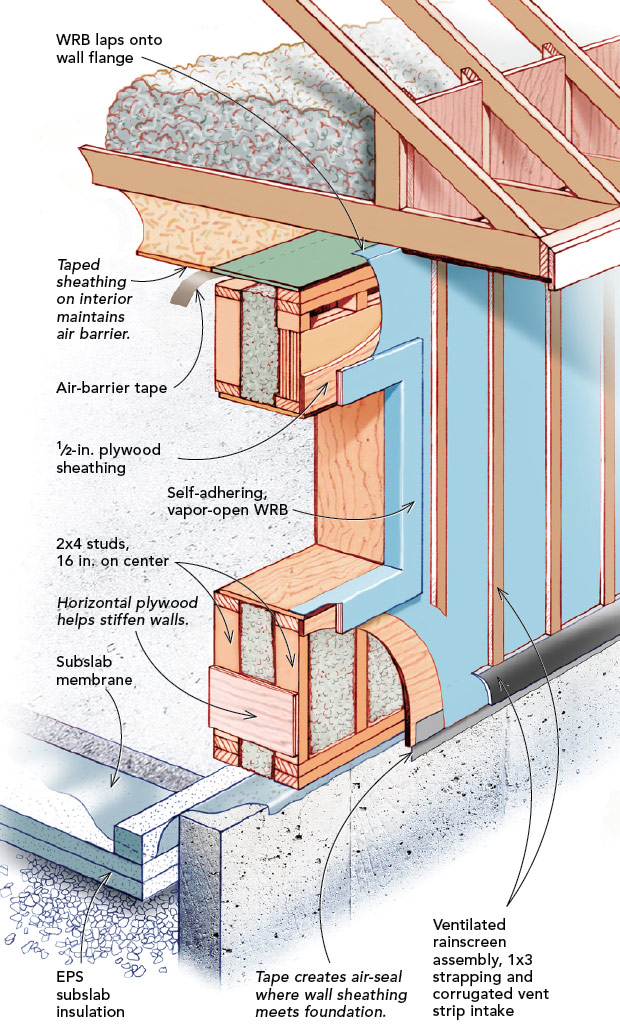
There’s nothing in a double-stud wall that a competent carpenter doesn’t already know how to do. We make our walls about 12 in. thick, for an R-value of about R-44, with a full 5 in. of thermal break between the two 3-1⁄2-in.-thick stud walls. By contrast, other methods of building high-performance, thermally broken walls, like installing rigid foam or other continuous exterior insulation, require additional detailing to get the flashing and air barrier right, and to provide adequate nailing for trim and siding. Plus, exterior insulation has to be protected from rodents and insects. With double-stud walls, all of the insulation is inboard of the sheathing.

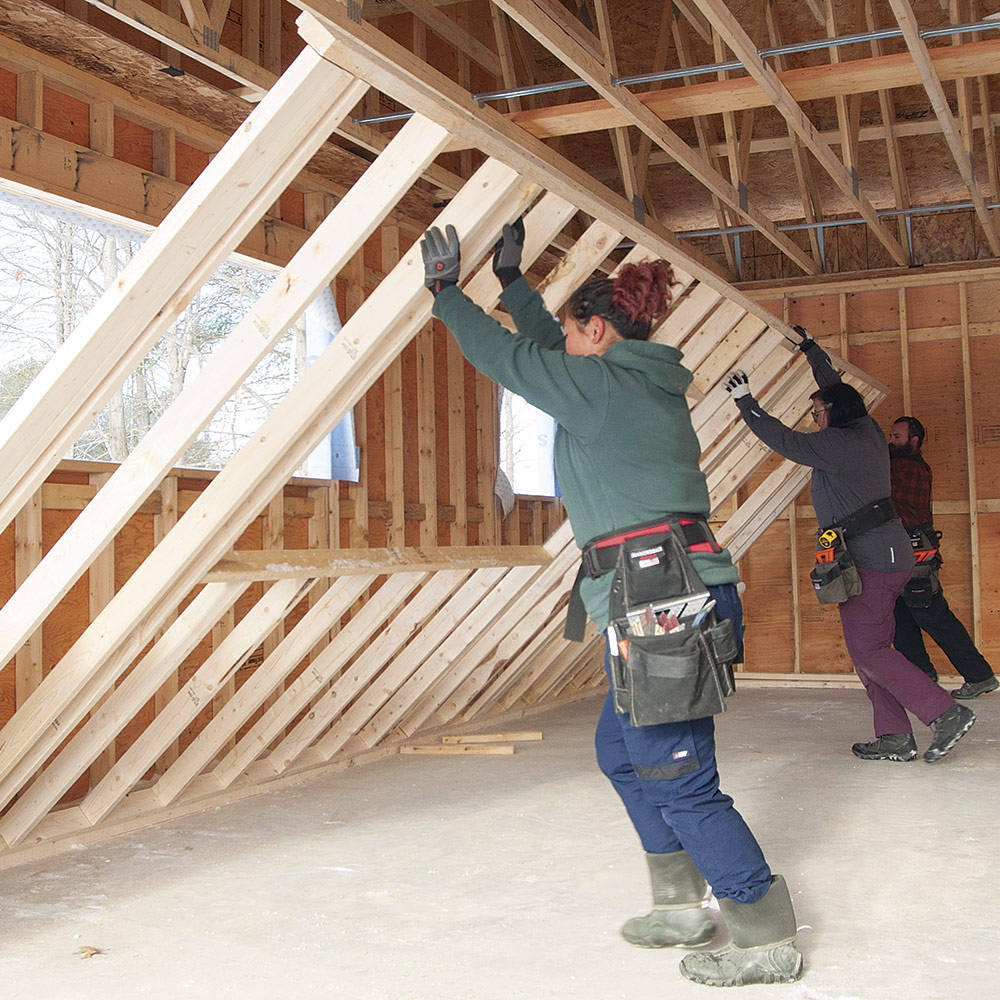
Sequencing the build

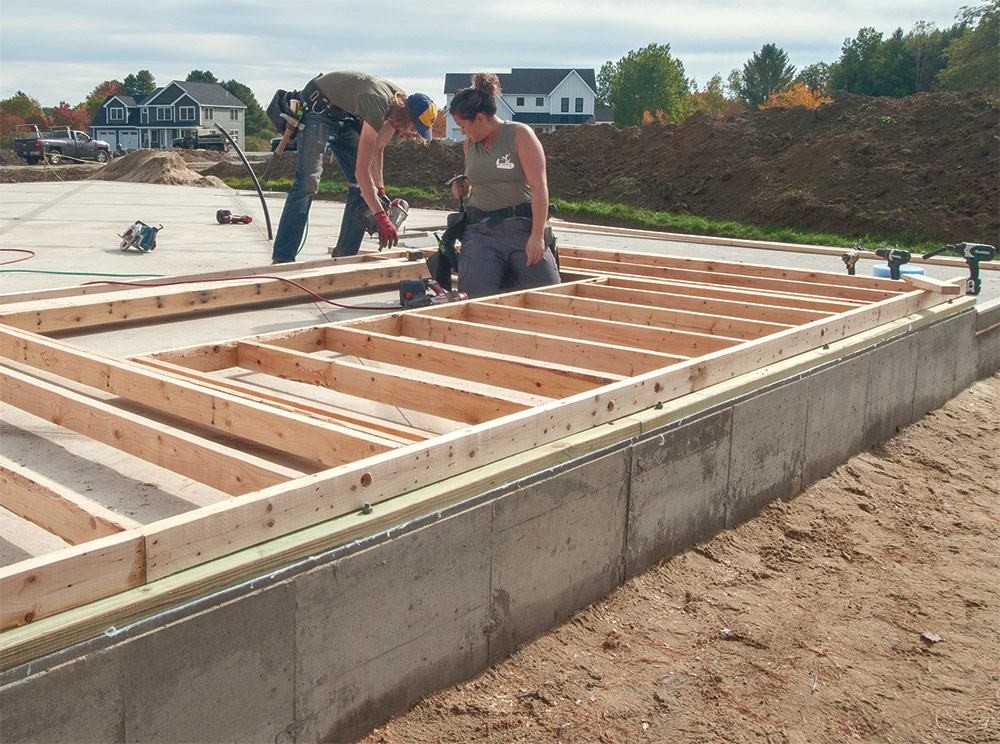
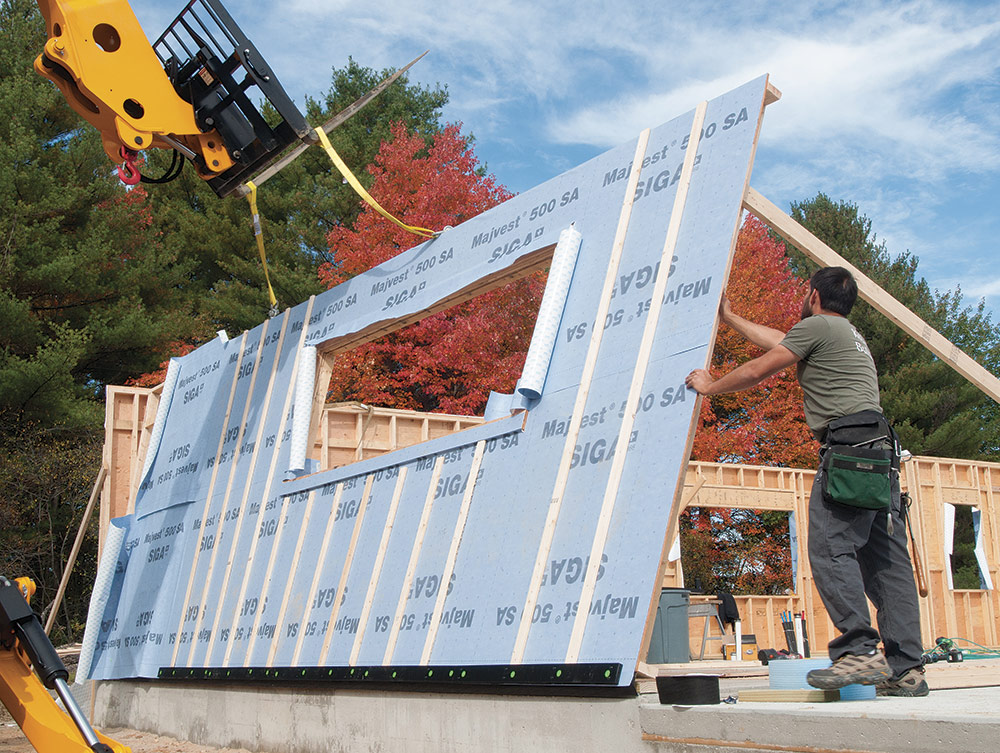
There are different ways to build a double-stud wall, but my preference is to keep it as much like building a standard house as possible. This means the exterior walls are built first and are the load-bearing portion of the assembly. This is one area that’s actually easier than single-wall construction—the exterior walls are 2×4 rather than 2×6, so they’re faster to build and easier lift into place. With 2×4 exterior walls, keep in mind that you may need an engineer to sign off on your wall design, especially if the walls are taller than normal or you want to space studs 24 in. on center, and that you will need to size your headers to fit on 2×4 jacks.

Set the stage
SET THE STAGE: After snapping lines for the walls, we fasten a pressure-treated sill plate to the foundation. Although a redundant measure, we always include sill seal under the plate for air-sealing.

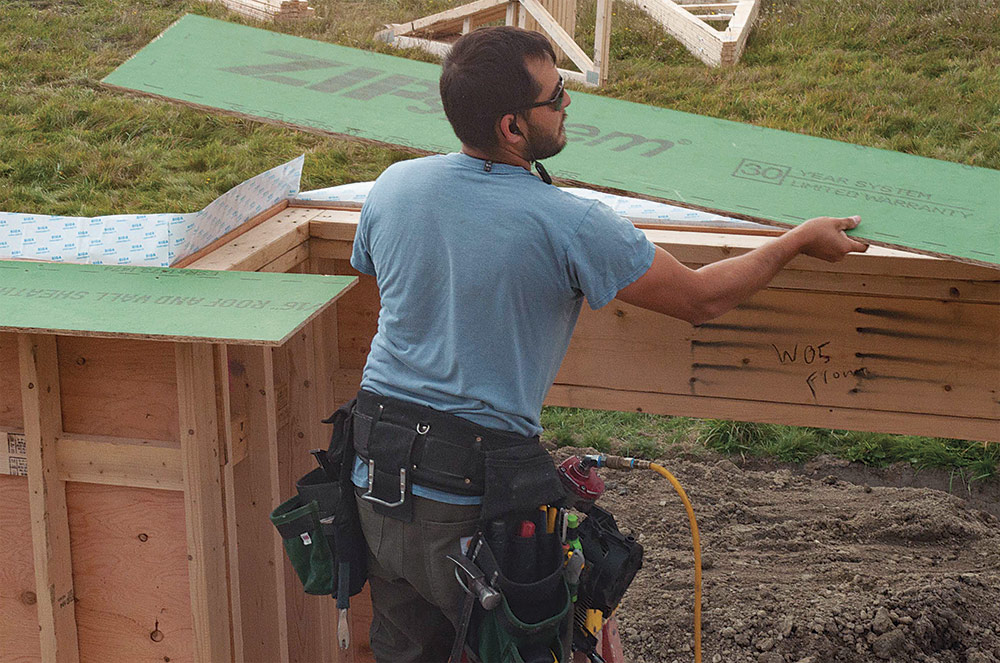
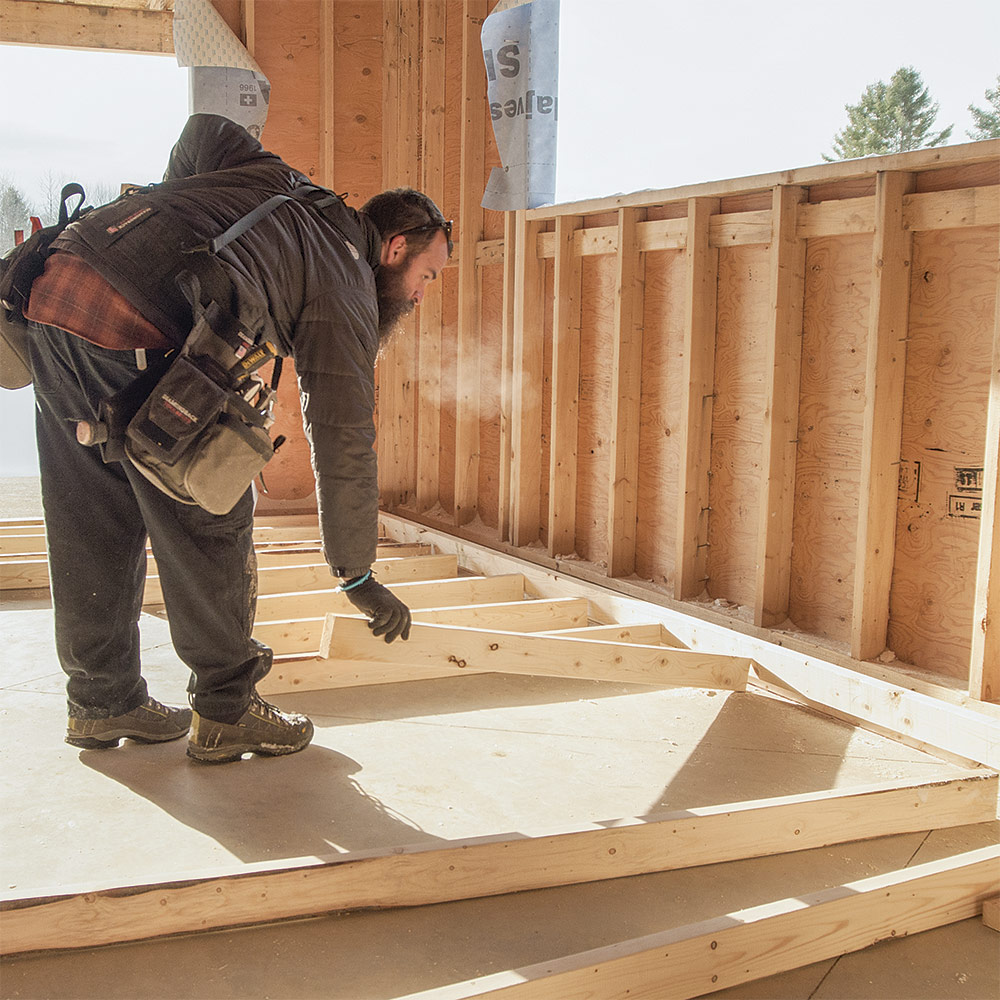
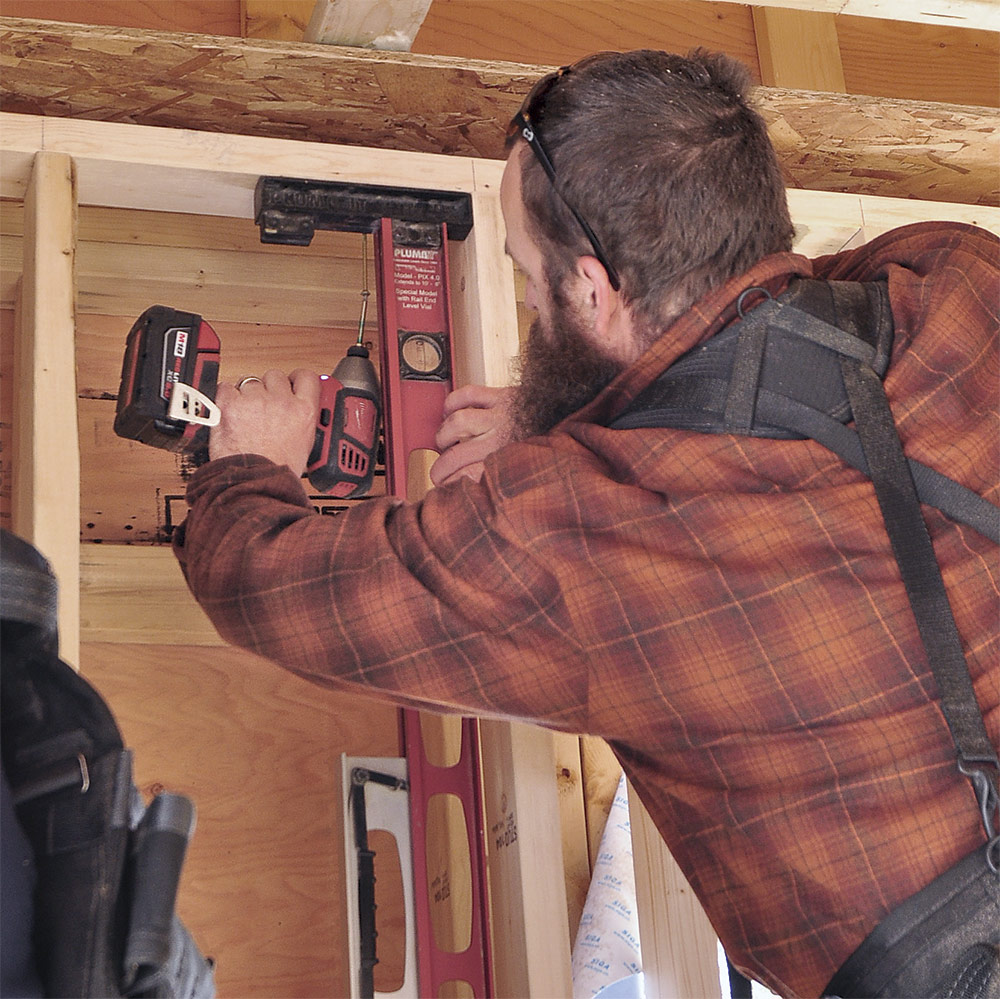
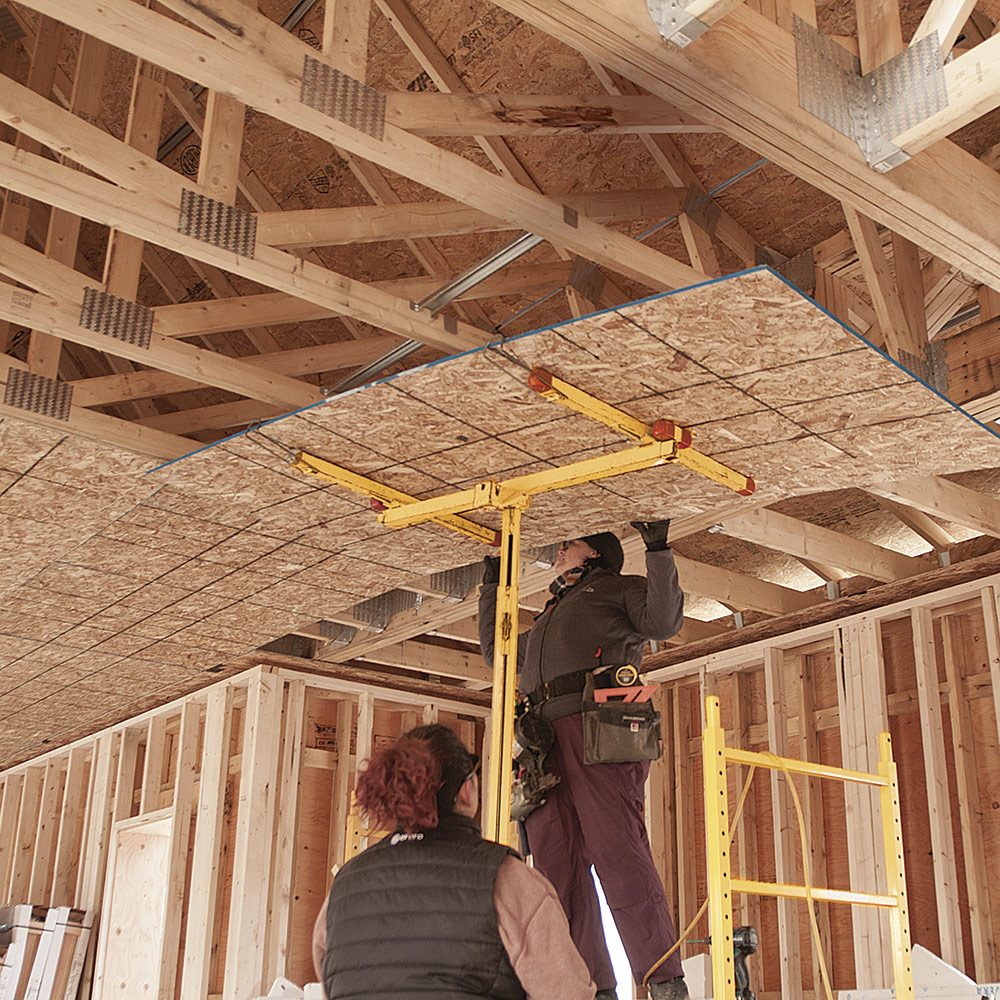
We typically get the entire exterior of the house framed all the way to the ridge, then come back and build our interior walls. Since they’re not load bearing, there are no structural headers in the interior walls. You can align the interior wall plates against the exterior walls and transfer window and door locations, and then frame the interior walls short enough so that you can lift them into place under the ceiling joists or strapping. Another benefit of double-stud walls is that you can lay out the exterior walls specifically for sheathing and the interiors specifically for drywall.

Some builders have tried to use 2x3s for the interior half of double-­stud walls. It may seem like a good idea, but it’s not worth the trouble. The quality of 2×3 lumber is typically awful, and even if the pieces are straight when you get them, they tend to warp and twist after installation.

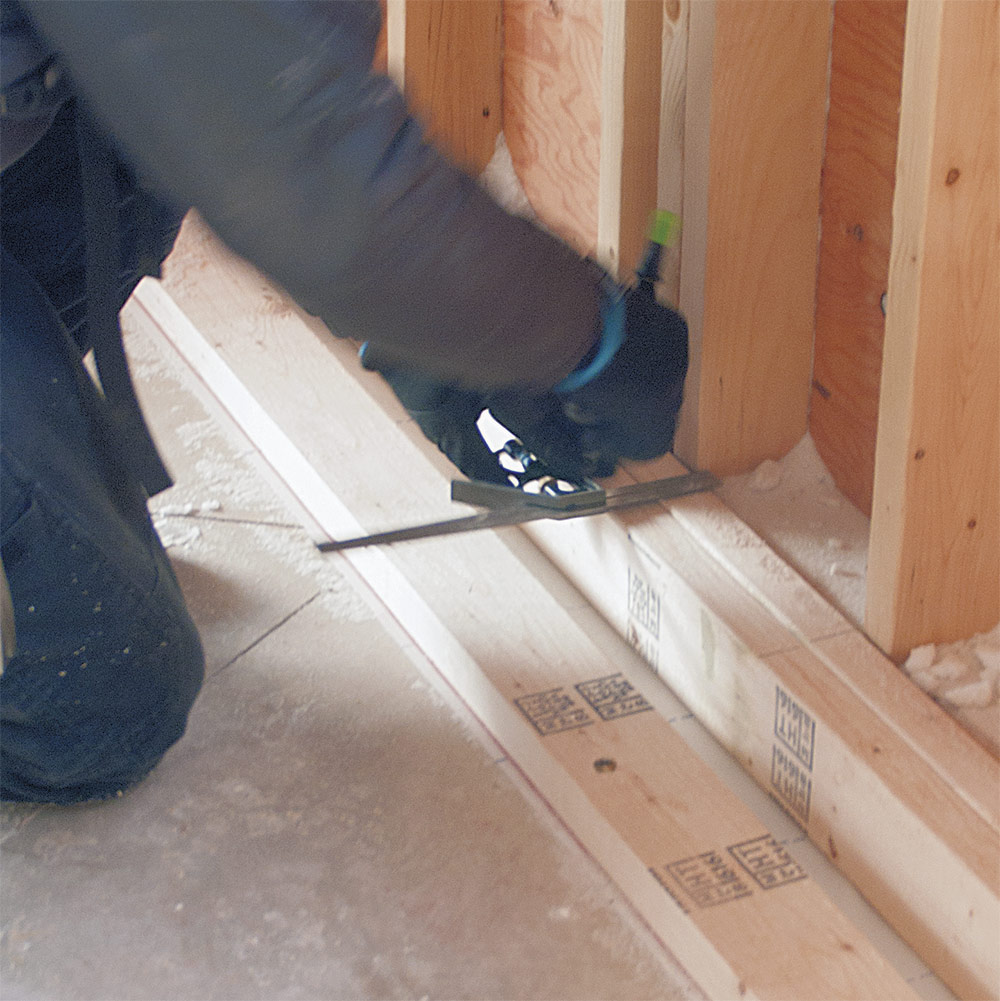
If your house is slab-on-grade, the double walls may not be sitting on much. We typically have an 8-in. foundation wall, then 4 in. of perimeter foam, then the slab. With a 12-in. wall thickness, our interior wall is sitting on top of foam. To deal with this, we cut scraps of 2x or strips of scrap plywood to 12-in. lengths and use them to connect the two walls at the base to hold the interior wall rigid.

Outer walls are easy
OUTER WALLS ARE EASY: We rely on the outer walls to carry the loads of the structure, but since there isn’t much concern about limited cavity insulation or thermal bridging, we use 2x4s and space them at the conventional 16-in. layout.
Why ply
WHY PLY: We prefer plywood, which is relatively vapor-open compared to OSB options, to allow the wall assembly to dry to the exterior. We pad out window and door openings to match the thickness of the rainscreen before installing the self-adhering WRB, making it easier to integrate the window flashing later.

Think ahead
THINK AHEAD: Split-release air-sealing tape is a clean and effective way to connect the wall framing to the foundation below. Apply it before the WRB and rainscreen system are installed, overhanging it to be adhered to the concrete after the wall is tipped into place.

Let it breathe
LET IT BREATHE: The vapor-open nature of plywood only helps if you choose a vapor-open WRB and provide ventilation between the WRB and the cladding.
Furring while it’s flat
FURRING WHILE IT’S FLAT: Before lifting or tipping the wall into place, we like to get the rainscreen system in place. Our go-to is a corrugated plastic intake vent and 1×3 battens.

There’s a lot to like about cellulose

I’m always looking for ways to simplify the construction process, and I think a building with one insulation material is better than one with multiple. Cellulose allows us to use the same material everywhere except at the foundation and slab. It is an affordable material, has very low embodied energy, can be repaired, and works very well as a buffer when vapor drive spikes. It can hold and redistribute moisture, releasing it to the dry side, in ways that foam, fiberglass, or mineral wool can’t. Finally, using wood rather than foam or other petroleum-based materials is key to reducing the carbon footprint of new buildings, and cellulose is wood. (On that note, it’s important to make sure that the cellulose your installer uses is a borate-treated product for resistance to fire, insects, and rot.)

While our climate is overwhelmingly heating dominated, with vapor drive to the exterior for much of the year, our summers are getting hotter and more humid. This increases my interest in wall assemblies that allow drying in both directions—another reason why skinning a house in rigid-foam insulation makes me more nervous than the cold-sheathing risk of a double-stud wall packed with cellulose (see “Modeled risks remain unproven in our builds,” below).

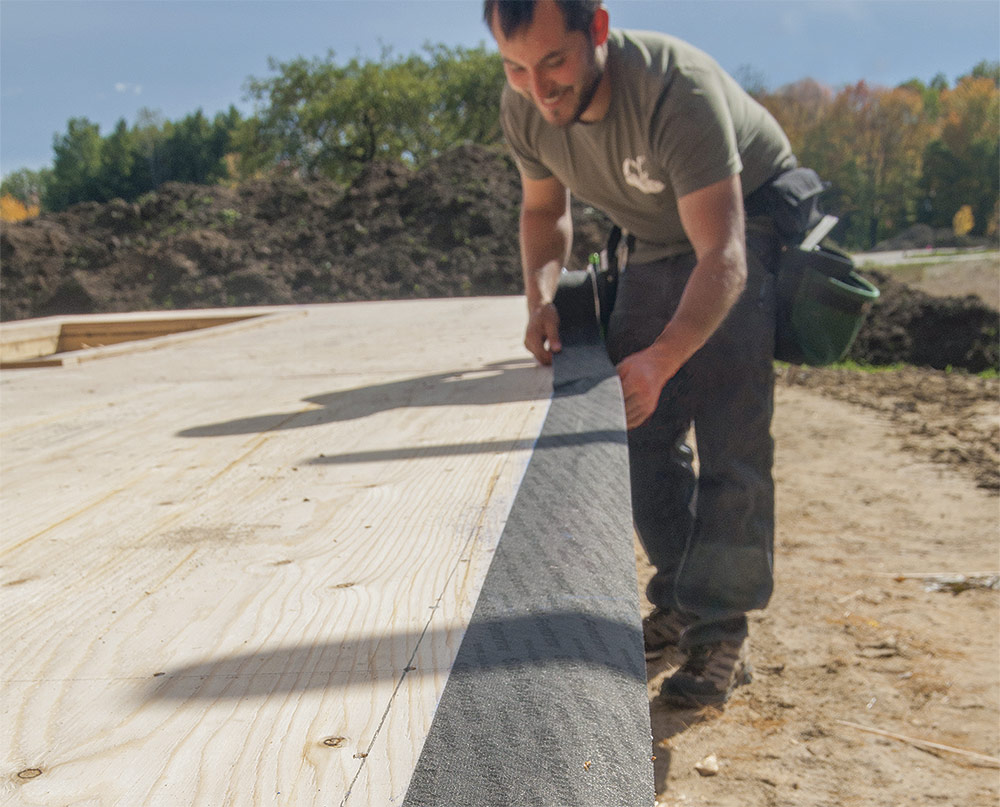
It is critical to note that all of the houses our firm builds include a rainscreen of some sort, which varies depending on the siding. We typically use a three-dimensional mesh product like Benjamin Obdyke’s HomeSlicker for shingle siding, and 1x3s or plywood rips for clapboard siding. This allows any moisture from vapor drive in either direction to drain or evaporate instead of getting trapped and rotting out the siding, sheathing, or both. I think it is very dangerous to not include a rainscreen in any super­insulated wall assembly.

Cap the wall
CAP THE WALL: To connect the inner and outer walls and maintain the continuity of the air barrier, we install strips of sheathing to the outer-wall top plates, overhanging toward the inside. The flanges should be a few inches wider than the total wall thickness.

Outer marks the inner
OUTER MARKS THE INNER: We build the inner wall using a double bottom plate. The first bottom plate is fastened to the slab.

And then the second is held, along with the top plate, against the outer wall for marking, eliminating concerns about offset framing.

Room to raise
ROOM TO RAISE: To make the inner stud wall easy to tip into place, we frame it 1-1⁄2 in. shorter than the exterior—easy to do by simply using one less plate than the exterior wall.

Fasten through to framing
FASTEN THROUGH TO FRAMING: Once the wall is upright, it has to be plumbed in both directions before being fastened. We use screws driven through the top plate and into the flange above, which should already be backed up by the ceiling framing.

Keep it continuous
KEEP IT CONTINUOUS: After skinning the ceiling with sheathing, we tape all the seams…

…including the connection to the double-stud wall flange, to maintain the continuity of the air barrier.

A skilled insulation installer is a must

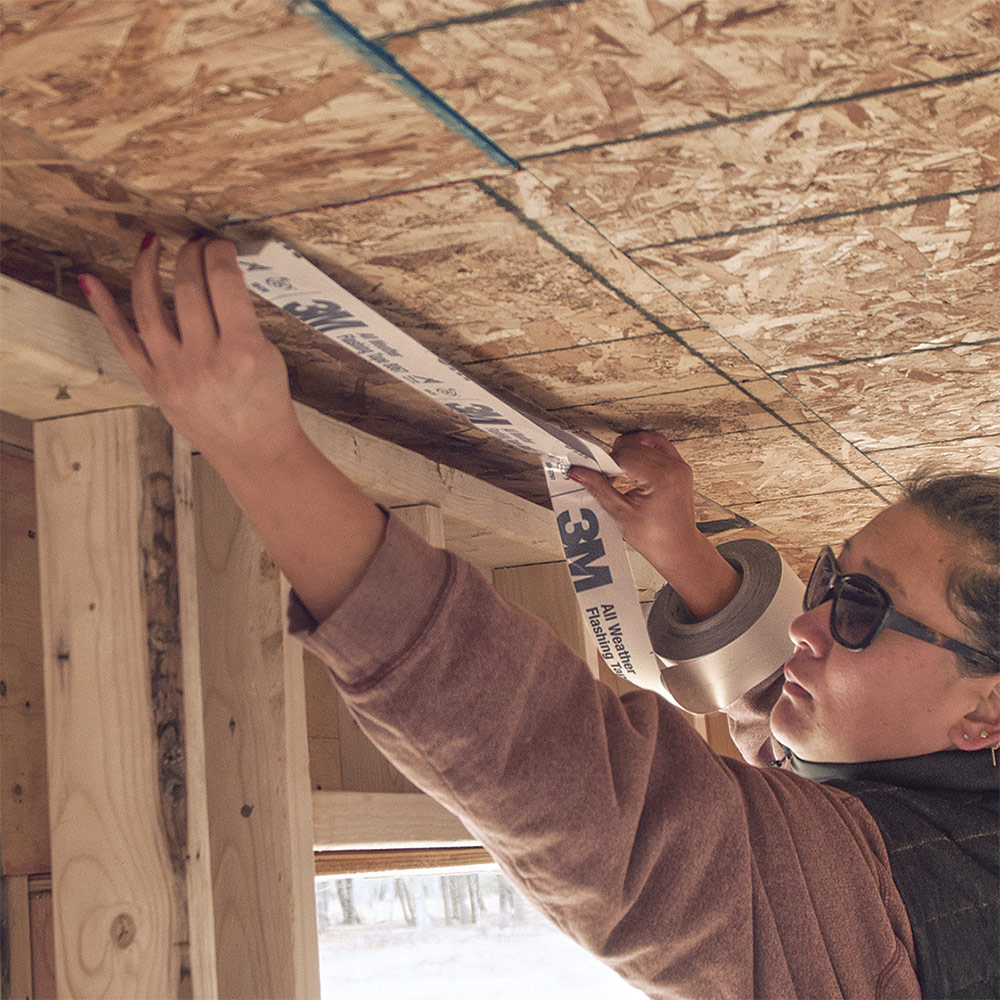
Once the house is framed, things progress pretty much as on any other house. Unlike with other thermally broken methods, window and door installation and flashing is the same as on a “standard” assembly. The drainage plane is in line with the window flanges, making lapping of materials simple. And our clients love the deep interior window stools these thick walls create.

Since we’re not production builders and all of our projects are custom homes, it’s hard to develop meaningful cost comparisons. The exterior walls are less expensive than most high-performance assemblies, since 2×4 walls use less material and less labor. The interior wall adds cost, but the walls are easy to lay out and fast to build, and electricians and plumbers love that they can do their rough-in with far less drilling. The insulation will cost more than in a code-level wall, but not necessarily more than a home with continuous exterior rigid foam and cavity insulation. On top of all that, you have to weigh the savings in the homeowners’ heating bills, and in the durability of the home itself.

Double-stud walls do require highly skilled installers to get the right density of the cellulose insulation. We break up walls by blocking between bays with plywood or netting so the installers don’t have to dense-pack huge volumes.

A common question is whether you can use batts instead of dense-pack cellulose. We’re cautious of that approach. I think the reason that moisture-profile modeling of double-stud walls misses the mark is that it doesn’t take into account the moisture-buffering capacity of cellulose. No other readily available insulation can mimic this phenomenon of absorption and redistribution. Dense-pack cellulose is fairly common in New England, less so in other parts of the country.

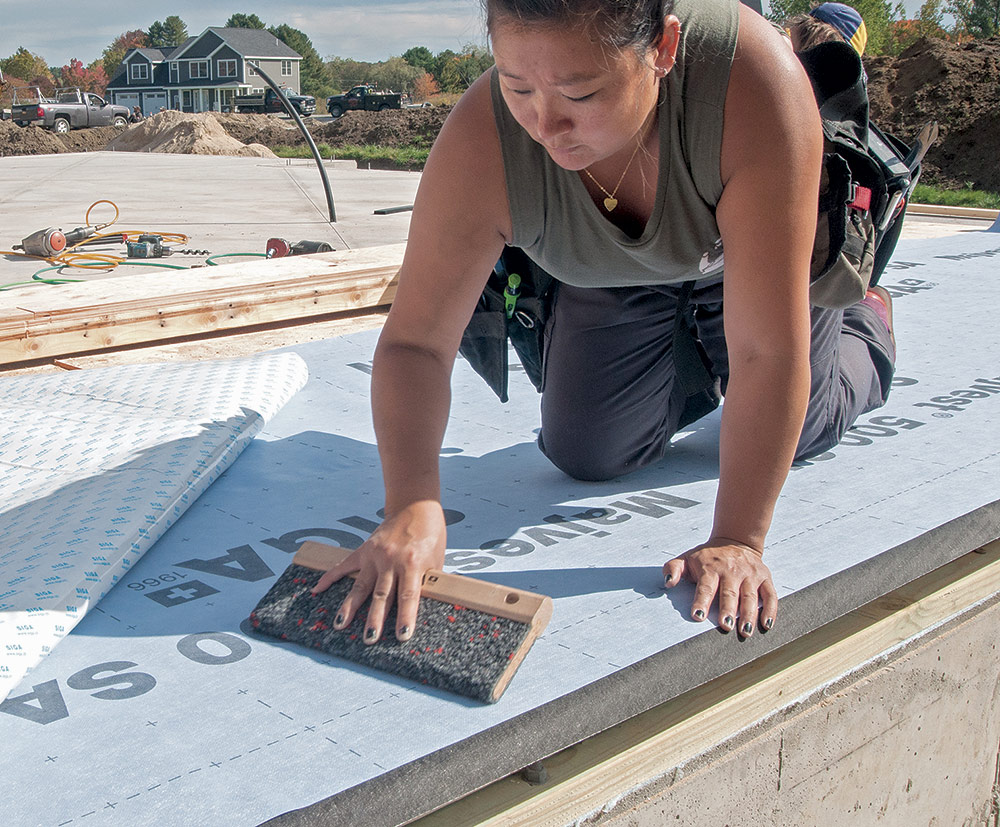
There are other blown-in products available, such as mineral wool and fiberglass. Mineral wool may have sufficient density to mitigate convective loops or moisture transport, but I have less faith in blown-in fiberglass. And batt insulation of any type is extremely difficult to install well enough for safety. Finally, while I am undecided on the need for a “smart” vapor retarder with cellulose, with any other product I would definitely recommend a variable-permeance membrane like SIGA’s Majrex, CertainTeed’s MemBrain, or Pro Clima’s Intello.


Modeled risks remain unproven in our builds

The main argument that I hear against dense-packed double-stud walls is the concern about “cold sheathing” that comes up when the assemblies are computer modeled. I consider this the Yeti of building science—it is much discussed, yet rarely seen.

We returned to our first double-stud house several years ago to replace a window with a door. The window was on a wall that was not only north-facing, but faced the water as well. If there was anywhere on the house where we should have seen moisture problems, it was here. Nevertheless, when we cut into the wall we saw no signs of condensation or leaking on the sheathing.

On several more recent houses, we have buried OmniSense wireless monitors in the walls and ceilings to measure temperature, relative humidity, dew point, and wood moisture content. Nothing in the data indicates the kind of problems that the modeling suggests is unavoidable, at least in our area (climate zone 6). Even so, if these walls are even theoretically dangerous, why do we continue with them? Simply put, I think they are better walls on almost every front.

More about double-stud walls

Is There a Chance For Condensation in Double-Stud Walls?

Energy-Smart Details – Lstiburek’s Ideal Double-Stud Wall

Windows and Doors in Double-Stud Walls

—Dan Kolbert is a builder and remodeler in Portland, Maine. Photos by Scott Gibson.

A Case for Double-Stud Walls

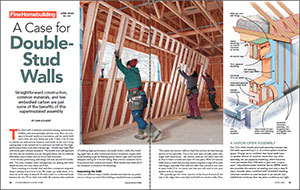
For more photos and details, click the View PDF button below.

From Fine Homebuilding #291  


Fine Homebuilding Recommended Products

Fine Homebuilding receives a commission for items purchased through links on this site, including Amazon Associates and other affiliate advertising programs.

Portable Wall Jack

Raise walls safely with the Guardian wall jack — we’ve personally seen small teams raise large walls with these devices, and they work great.
Buy at Amazon

Tajima Chalk Rite Chalk Line

Snapping a line should be quick, clean, and accurate, and the Tajima certainly doesn’t disappoint. It’s pro-grade and works as advertised.
Buy at Amazon

QuikDrive PRO300s

Whether you're installing floor sheathing or decking, this tool will keep the installer upright, putting less stress on workers while saving time and energy.
Buy at Amazon
View PDF
Previous: Insulating an Uninsulated Block-Wall Home Next: Working With ZIP R-Sheathing

Guide

Insulation

Chapter

Installing Insulation

Sign up for eletters today and get the latest how-to from Fine Homebuilding, plus special offers.

Signing you up...

This site is protected by reCAPTCHA and the Google Privacy Policy and Terms of Service apply.
See all newsletters
See all newsletters

Log in or create an account to post a comment.

Sign up Log in

Become a member and get full access to FineHomebuilding.com

Insulation

Insulation

Trusted, comprehensive guidance from the pros for a home that is healthy, comfortable, and energy efficient

View Project Guide

View All Project Guides »

Become a member and get unlimited site access, including the Insulation Project Guide.

Start Free Trial

Energy Efficiency
  • Understanding Energy and Houses
  • Building Energy-Efficient Homes
Air-Sealing
  • Air-Sealing Basics
  • Air-Sealing Tools and Materials
  • Foundations and Floors
  • Walls, Windows, and Doors
  • Attics and Roofs
Choosing Insulation
  • Insulation Basics
  • Material Choices
Installing Insulation
  • Insulating Attics and Roofs
  • Insulating Walls
  • Insulating Floors, Footings, and Slabs
  • Insulating Foundation Walls
Water Management
  • Water-Management Principles
  • Materials
  • Installation Methods

Fine Home Building

Newsletter Sign-up

  • Fine Homebuilding

    Home building tips, offers, and expert advice in your inbox.

  • Green Building Advisor

    Building science and energy efficiency advice, plus special offers, in your inbox.

  • Old House Journal

    Repair, renovation, and restoration tips, plus special offers, in your inbox.

Signing you up...

This site is protected by reCAPTCHA and the Google Privacy Policy and Terms of Service apply.
See all newsletters

Follow

  • Fine Homebuilding

    Dig into cutting-edge approaches and decades of proven solutions with total access to our experts and tradespeople.

    Start Free Trial Now
    • Facebook
    • Instagram
    • X
    • LinkedIn
  • GBA Prime

    Get instant access to the latest developments in green building, research, and reports from the field.

    Start Free Trial Now
    • Facebook
    • YouTube
  • Old House Journal

    Learn how to restore, repair, update, and decorate your home.

    Subscribe Now
    • Facebook
    • Instagram
    • X

Membership & Magazine

  • Online Archive
  • Start Free Trial
  • Magazine Subscription
  • Magazine Renewal
  • Gift a Subscription
  • Customer Support
  • Privacy Preferences
  • About
  • Contact
  • Advertise
  • Careers
  • Terms of Use
  • Site Map
  • Do not sell or share my information
  • Privacy Policy
  • Accessibility
  • California Privacy Rights

© 2025 Active Interest Media. All rights reserved.

Fine Homebuilding receives a commission for items purchased through links on this site, including Amazon Associates and other affiliate advertising programs.

  • Home Group
  • Antique Trader
  • Arts & Crafts Homes
  • Bank Note Reporter
  • Cabin Life
  • Cuisine at Home
  • Fine Gardening
  • Fine Woodworking
  • Green Building Advisor
  • Garden Gate
  • Horticulture
  • Keep Craft Alive
  • Log Home Living
  • Military Trader/Vehicles
  • Numismatic News
  • Numismaster
  • Old Cars Weekly
  • Old House Journal
  • Period Homes
  • Popular Woodworking
  • Script
  • ShopNotes
  • Sports Collectors Digest
  • Threads
  • Timber Home Living
  • Traditional Building
  • Woodsmith
  • World Coin News
  • Writer's Digest
Active Interest Media logo
X
X
This is a dialog window which overlays the main content of the page. The modal window is a 'site map' of the most critical areas of the site. Pressing the Escape (ESC) button will close the modal and bring you back to where you were on the page.

Main Menu

  • How-To
  • Design
  • Tools & Materials
  • Video
  • Blogs
  • Forum
  • Project Guides
  • Reader Projects
  • Magazine
  • Members
  • FHB House

Podcasts

  • FHB Podcast
  • ProTalk

Webinars

  • Upcoming and On-Demand

Podcasts

  • FHB Podcast
  • ProTalk

Webinars

  • Upcoming and On-Demand

Popular Topics

  • Kitchens
  • Business
  • Bedrooms
  • Roofs
  • Architecture and Design
  • Green Building
  • Decks
  • Framing
  • Safety
  • Remodeling
  • Bathrooms
  • Windows
  • Tilework
  • Ceilings
  • HVAC

Magazine

  • Current Issue
  • Past Issues
  • Magazine Index
  • Subscribe
  • Online Archive
  • Author Guidelines

All Access

  • Member Home
  • Start Free Trial
  • Gift Membership

Online Learning

  • Courses
  • Project Guides
  • Reader Projects
  • Podcast

More

  • FHB Ambassadors
  • FHB House
  • Customer Support

Account

  • Log In
  • Join

Newsletter

Get home building tips, offers, and expert advice in your inbox

Signing you up...

This site is protected by reCAPTCHA and the Google Privacy Policy and Terms of Service apply.
See all newsletters
See all newsletters

Follow

  • X
  • YouTube
  • instagram
  • facebook
  • pinterest
  • Tiktok

Join All Access

Become a member and get instant access to thousands of videos, how-tos, tool reviews, and design features.

Start Your Free Trial

Subscribe

FHB Magazine

Start your subscription today and save up to 81%

Subscribe

We hope you’ve enjoyed your free articles. To keep reading, become a member today.

Get complete site access to expert advice, how-to videos, Code Check, and more, plus the print magazine.

Start your FREE trial

Already a member? Log in

Privacy Policy Update

We use cookies, pixels, script and other tracking technologies to analyze and improve our service, to improve and personalize content, and for advertising to you. We also share information about your use of our site with third-party social media, advertising and analytics partners. You can view our Privacy Policy here and our Terms of Use here.

Cookies

Analytics

These cookies help us track site metrics to improve our sites and provide a better user experience.

Advertising/Social Media

These cookies are used to serve advertisements aligned with your interests.

Essential

These cookies are required to provide basic functions like page navigation and access to secure areas of the website.

Delete My Data

Delete all cookies and associated data