FHB Logo Facebook LinkedIn Email Pinterest Twitter X Instagram Tiktok YouTube Plus Icon Close Icon Navigation Search Icon Navigation Search Icon Arrow Down Icon Video Guide Icon Article Guide Icon Modal Close Icon Guide Search Icon Skip to content
Subscribe
Log In
  • How-To
  • Design
  • Tools & Materials
  • Restoration
  • Videos
  • Blogs
  • Forum
  • Magazine
  • Members
  • FHB House
  • Podcast
Log In

Fine Homebuilding Project Guides

Drywall

Guide Home
  • Drywall Basics
  • Tools and Materials
  • Hanging Drywall
  • Taping and Sanding
  • Special Installations
  • Drywall Repairs
  • Plaster
How-To

Estimating Materials

Whether you're drywalling a single room or the whole house, you'll need to work up an accurate materials list.

By Myron R. Ferguson
  • X
  • facebook
  • linkedin
  • pinterest
  • email
  • add to favorites Log in or Sign up to save your favorite articles

On most drywalling jobs, I figure out a rough material list from the blueprints and job specifications. I use this information to estimate the cost of the job. Once the building is framed, I obtain my exact material list by measuring the actual walls and ceilings.

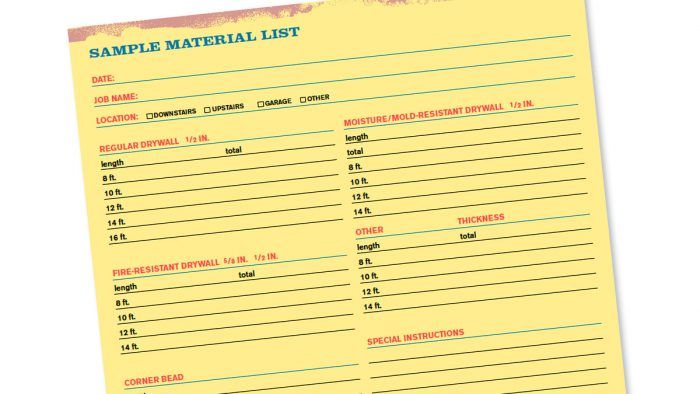
Measuring the walls and ceilings makes it easier to visualize how to hang the drywall, decide which lengths and types to use, and figure out where to hang them. As I measure each room, I write down exactly what I’ll need on a material list, using a separate list for each story of the building (see the sample material list below). The material list makes it easy to calculate the square footage of drywall, which helps me estimate the cost for the entire job (I usually estimate a job by the square foot). From the square footage, I can calculate the approximate amount of screws, nails, joint tape, joint compound, and paint needed to complete the job.

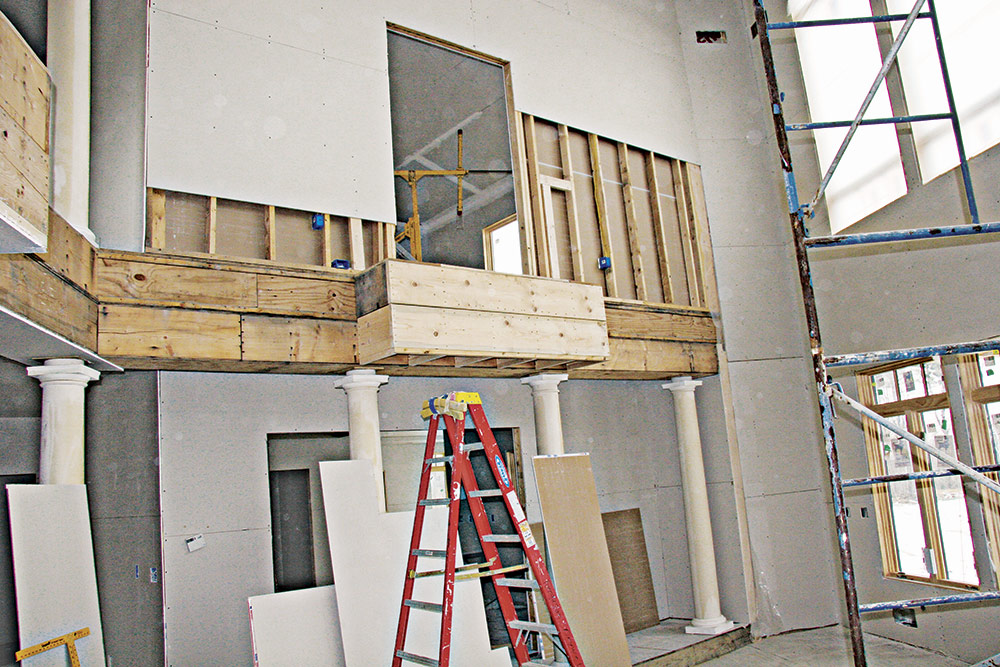
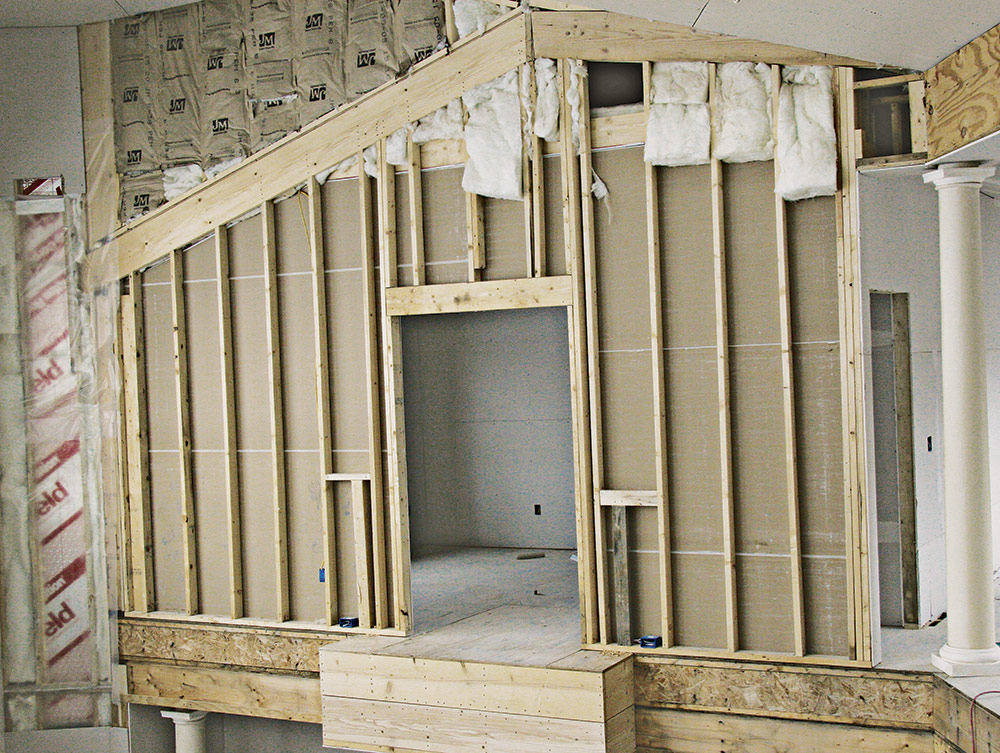
Sometimes figuring materials for a larger wall or ceiling with a lot of framing issues is difficult. I study the area and as always think about ways to reduce seams, especially butted seams. I am also concerned with seam location more than ever—a seam placed at a transition point in the framing can result in a ridged seam that will be difficult to conceal and may crack as settling and structural movement occur. Don’t simply start at the bottom and work your way up with drywall; you may have to start with a ripped piece so that an upper seam falls in the best location. Remember that on highly visible areas any little bump, ridge, or defect will be on display after the drywall is painted.

Avoid butted seams
Avoid butted seams: When the final sheets are attached to this wall, the seams will be quite visible—any defects in the finishing will be on display.

Create a game-plan
Create a game-plan: There are a lot of framing transitions to consider before hanging the first sheet of drywall on a wall like this.


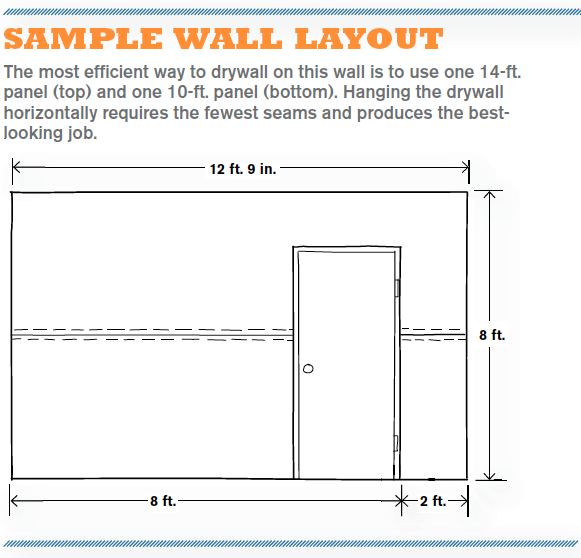
When working up the material list, I usually round lengths of walls and heights of ceilings to the next highest 2-ft.-length panel. For example, if a wall is 12 ft. 9 in. long, I order a 14-ft. panel (see the drawing “Sample Wall Layout”). In this example, the lower 4 ft. of the wall is broken up by a doorway, so I would order a 10-ft. panel to complete each side of the doorway with a minimum amount of waste. Keep in mind that the idea is to use panels that span the entire length of the wall or ceiling whenever possible.

Sample Wall Layout

The “Sample Room Estimate” drawing shows how I estimate drywall for an entire room. In this particular example, I can use one length (16 ft.) for the wall with the window, because the window doesn’t go all the way to the ceiling or the floor and the wall is less than 16 ft. long. On the ceiling, I can use either three 16-ft. panels or four 12-ft. panels. In this example, I’d choose the four 12-ft. panels, because it’s preferable to attach the panels perpendicular to the ceiling joists and the shorter lengths are easier to handle.

WORK SMART: If you are planning to hang drywall vertically on the walls, the on-center spacing of the framing has to be correct and care must be taken not to attach a seam to a crooked stud. This is much more critical than when you’re hanging the drywall horizontally.


Estimating materials for an entire house

When I’m working up a material list for a job, I usually don’t need to figure out a separate list for each room—I know to use the maximum length possible for each wall. If a room is 12 ft. by 16 ft., I mainly use 12-ft.- or 16-ft.-long panels—unless a doorway allows me to use a shorter length.

As I walk through a house, I note any rooms that will require special treatment. In the example shown in the plans below, the upstairs master bedroom has a cathedral ceiling, so I need to allow extra drywall for the ceiling and the gable ends. It’s not a good idea to plan a butted seam directly under the ridge beam on the ends of a cathedral ceiling—there could be structural weight and some movement or settling, which would eventually cause the seam to crack—so I figure on spanning the end wall with 16-ft. panels.

Sample Drywall House Estimate

In addition, cement board or tile backer will need to be used in the shower area of the master bathroom. I would also plan for the rest of the bathroom walls to be covered with 1/2-in. moisture/mold-resistant drywall—and the ceiling to be covered with 5/8-in. moisture/mold-resistant panels.

The garage ceiling joists are 24 in. o.c., so I would estimate the entire ceiling using 5/8-in. fire-resistant drywall. All the garage walls adjacent to the house will need 5/8-in. fire-resistant drywall, too; for the rest of the garage I could switch over to regular 1/2-in. drywall. The garage walls are 10 ft. high, so I’d stand 10-ft. panels on end to avoid butted seams and to keep the linear footage of seams to a minimum.

After tallying the number and types of drywall panels needed, the next step is to calculate the total square footage of drywall required. Multiply the number of panels needed for each length by the square footage in one panel, and then add all the totals together. For example, the total square footage of drywall needed for the house shown in the plans is displayed in the chart below.

Calculating Total Square Footage

Rough estimating a house

A quicker but less accurate way to estimate the amount of drywall needed for a house is to multiply the square footage of the living-area floor space for each story by 3.5 (for a home with 8-ft.-high ceilings). I use this method to give a rough estimate over the phone, for example. In the house in our example, multiplying the square footage of the up-stairs and downstairs living areas (1,984 sq. ft.) by 3.5 gives a rough drywall total of 6,944 sq. ft. We also need to add the total for the garage. Multiply the total length of the garage walls by the height (112 ft. 3 10 ft. = 1,120 sq. ft.), and then add the ceiling (approximately 700 sq. ft.): 1,120 + 700 = 1,820 sq. ft.

Using the rough-estimating method, the total square footage of drywall needed for this house works out to be 8,764 sq. ft. (6,944 + 1,820). This figure is reasonably close to the actual square footage needed (9,128 sq. ft.) and a lot quicker to calculate.

For a house with 9-ft.-high ceilings, use 3.82 as the multiplier. Many houses have 8-ft.-high ceilings upstairs and 9-ft.-high ceilings downstairs. In those cases, calculate each floor separately and then add the totals together to obtain the rough estimate.


Previous: Plan Ahead: Accessing a Drywall Job Site Next: Basement Ceilings: Drywall or a Drop Ceiling?

Guide

Drywall

Chapter

Drywall Basics

Sign up for eletters today and get the latest how-to from Fine Homebuilding, plus special offers.

Signing you up...

This site is protected by reCAPTCHA and the Google Privacy Policy and Terms of Service apply.
See all newsletters
See all newsletters

Log in or create an account to post a comment.

Sign up Log in

Become a member and get full access to FineHomebuilding.com

Drywall

Drywall

Trusted, comprehensive guidance for choosing, hanging, taping, sanding, and repairing drywall—the right way

View Project Guide

View All Project Guides »

Become a member and get unlimited site access, including the Drywall Project Guide.

Start Free Trial

Drywall Basics
  • Types and Uses of Drywall
  • Planning the Job
Tools and Materials
  • Hanging Tools
  • Taping Tools and Materials
  • Sanding and Finishing Tools and Materials
Hanging Drywall
  • Prep for Hanging
  • Measuring and Cutting Drywall
  • Guidelines for Hanging and Fastening Drywall
  • Hanging Ceilings
  • Hanging Walls
  • Hanging Airtight Drywall
  • Trim Accessories/Corner Beads
Taping and Sanding
  • Taping Basics
  • Taping Seams
  • Taping Inside and Outside Corners
  • Sanding
Special Installations
  • Tricky Transitions
  • Curved Surfaces
  • Other Special Installations
  • Decorating with Drywall
Drywall Repairs
  • Patching Holes, Cracks, and More
Plaster
  • Working with Lime Plaster
  • Plaster Repair
  • Classic Plaster Techniques

Fine Home Building

Newsletter Sign-up

  • Fine Homebuilding

    Home building tips, offers, and expert advice in your inbox.

  • Green Building Advisor

    Building science and energy efficiency advice, plus special offers, in your inbox.

  • Old House Journal

    Repair, renovation, and restoration tips, plus special offers, in your inbox.

Signing you up...

This site is protected by reCAPTCHA and the Google Privacy Policy and Terms of Service apply.
See all newsletters

Follow

  • Fine Homebuilding

    Dig into cutting-edge approaches and decades of proven solutions with total access to our experts and tradespeople.

    Start Free Trial Now
    • Facebook
    • Instagram
    • X
    • LinkedIn
  • GBA Prime

    Get instant access to the latest developments in green building, research, and reports from the field.

    Start Free Trial Now
    • Facebook
    • YouTube
  • Old House Journal

    Learn how to restore, repair, update, and decorate your home.

    Subscribe Now
    • Facebook
    • Instagram
    • X

Membership & Magazine

  • Online Archive
  • Start Free Trial
  • Magazine Subscription
  • Magazine Renewal
  • Gift a Subscription
  • Customer Support
  • Privacy Preferences
  • About
  • Contact
  • Advertise
  • Careers
  • Terms of Use
  • Site Map
  • Do not sell or share my information
  • Privacy Policy
  • Accessibility
  • California Privacy Rights

© 2025 Active Interest Media. All rights reserved.

Fine Homebuilding receives a commission for items purchased through links on this site, including Amazon Associates and other affiliate advertising programs.

  • Home Group
  • Antique Trader
  • Arts & Crafts Homes
  • Bank Note Reporter
  • Cabin Life
  • Cuisine at Home
  • Fine Gardening
  • Fine Woodworking
  • Green Building Advisor
  • Garden Gate
  • Horticulture
  • Keep Craft Alive
  • Log Home Living
  • Military Trader/Vehicles
  • Numismatic News
  • Numismaster
  • Old Cars Weekly
  • Old House Journal
  • Period Homes
  • Popular Woodworking
  • Script
  • ShopNotes
  • Sports Collectors Digest
  • Threads
  • Timber Home Living
  • Traditional Building
  • Woodsmith
  • World Coin News
  • Writer's Digest
Active Interest Media logo
X
X
This is a dialog window which overlays the main content of the page. The modal window is a 'site map' of the most critical areas of the site. Pressing the Escape (ESC) button will close the modal and bring you back to where you were on the page.

Main Menu

  • How-To
  • Design
  • Tools & Materials
  • Video
  • Blogs
  • Forum
  • Project Guides
  • Reader Projects
  • Magazine
  • Members
  • FHB House

Podcasts

  • FHB Podcast
  • ProTalk

Webinars

  • Upcoming and On-Demand

Podcasts

  • FHB Podcast
  • ProTalk

Webinars

  • Upcoming and On-Demand

Popular Topics

  • Kitchens
  • Business
  • Bedrooms
  • Roofs
  • Architecture and Design
  • Green Building
  • Decks
  • Framing
  • Safety
  • Remodeling
  • Bathrooms
  • Windows
  • Tilework
  • Ceilings
  • HVAC

Magazine

  • Current Issue
  • Past Issues
  • Magazine Index
  • Subscribe
  • Online Archive
  • Author Guidelines

All Access

  • Member Home
  • Start Free Trial
  • Gift Membership

Online Learning

  • Courses
  • Project Guides
  • Reader Projects
  • Podcast

More

  • FHB Ambassadors
  • FHB House
  • Customer Support

Account

  • Log In
  • Join

Newsletter

Get home building tips, offers, and expert advice in your inbox

Signing you up...

This site is protected by reCAPTCHA and the Google Privacy Policy and Terms of Service apply.
See all newsletters
See all newsletters

Follow

  • X
  • YouTube
  • instagram
  • facebook
  • pinterest
  • Tiktok

Join All Access

Become a member and get instant access to thousands of videos, how-tos, tool reviews, and design features.

Start Your Free Trial

Subscribe

FHB Magazine

Start your subscription today and save up to 70%

Subscribe

We hope you’ve enjoyed your free articles. To keep reading, become a member today.

Get complete site access to expert advice, how-to videos, Code Check, and more, plus the print magazine.

Start your FREE trial

Already a member? Log in

Privacy Policy Update

We use cookies, pixels, script and other tracking technologies to analyze and improve our service, to improve and personalize content, and for advertising to you. We also share information about your use of our site with third-party social media, advertising and analytics partners. You can view our Privacy Policy here and our Terms of Use here.

Cookies

Analytics

These cookies help us track site metrics to improve our sites and provide a better user experience.

Advertising/Social Media

These cookies are used to serve advertisements aligned with your interests.

Essential

These cookies are required to provide basic functions like page navigation and access to secure areas of the website.

Delete My Data

Delete all cookies and associated data