FHB Logo Facebook LinkedIn Email Pinterest Twitter X Instagram Tiktok YouTube Plus Icon Close Icon Navigation Search Icon Navigation Search Icon Arrow Down Icon Video Guide Icon Article Guide Icon Modal Close Icon Guide Search Icon Skip to content
Subscribe
Log In
  • How-To
  • Design
  • Tools & Materials
  • Restoration
  • Videos
  • Blogs
  • Forum
  • Magazine
  • Members
  • FHB House
  • Podcast
Log In

Fine Homebuilding Project Guides

Drywall

Guide Home
  • Drywall Basics
  • Tools and Materials
  • Hanging Drywall
  • Taping and Sanding
  • Special Installations
  • Drywall Repairs
  • Plaster
How-To

Taping Fastener Heads and Seams: First Coat

Work in this order to efficiently tackle the first phase of drywall finishing.

By Myron R. Ferguson
  • X
  • facebook
  • linkedin
  • pinterest
  • email
  • add to favorites Log in or Sign up to save your favorite articles

When I start taping a room, I apply a coat of joint compound to all fasteners in the field on a wall, then embed tape on the seams, and then embed tape in the corners. If there is an outside corner, I finish the section by applying a coat of joint compound over the corner bead before progressing to the next wall. This is an efficient way of taping rather than first taping all fasteners, then walking around the job again and taping only seams, and so on. In the interest of clarity, however, I’ll present all the information on taping fasteners, taping seams, taping inside corners, and taping outside corners in separate sections.


Taping Fastener Heads

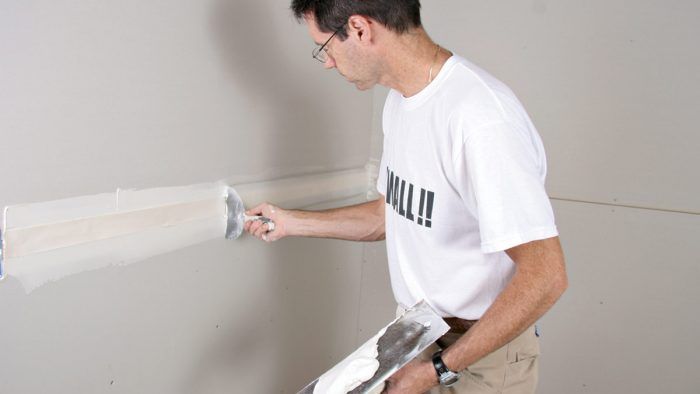
I like to tape fastener (screw and nail) heads first, so that I don’t accidentally mess up a seam that I’ve already taped. You need only a thin layer of joint compound to conceal the fasteners, and it’s easiest to tape a row of two or three fasteners in a single strip rather than individually. Using a 5-in. or 6-in. taping knife, apply just enough pressure to fill the indentation and leave the face of the drywall panel covered with a thin film of compound. Don’t be tempted to fill the indentation with one thick coat; applying three thin coats of compound and tapering the edges brings the indentations level with the panel surface and requires only minimal sanding. If necessary, apply the second and third coats to fasteners as you apply the second and third coats on the seams.


Cover the fasteners

Before taping any of the seams, make sure that nails or screws in the middle of panels are covered and smoothed with joint compound. Fasteners along seams and corners will be coated when the tape is embedded, so there’s no need to cover them with compound first.

Lay on the compound
Lay on the compound: Apply compound to a strip of fasteners in one smooth motion—in this case I worked my way up the wall.

Remove the excess
Remove the excess: Remove the compound by pulling the knife in the opposite direction.

Leave a smooth surface
Leave a smooth surface: When correctly removed, only the dimpled area is filled with compound.


Taping Seams

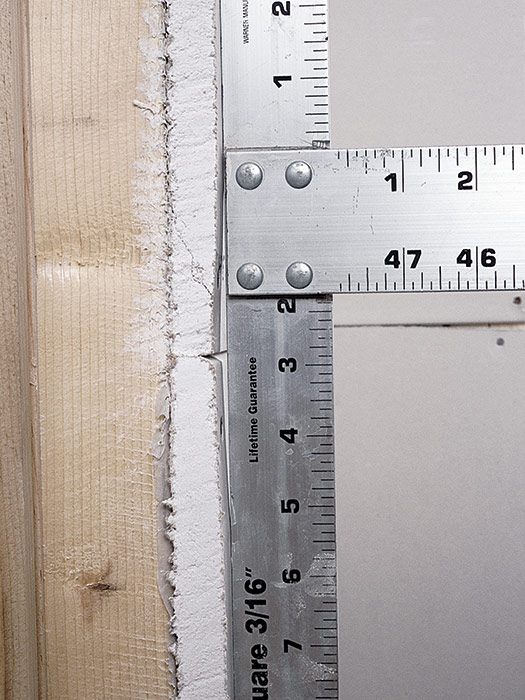
There are two types of drywall seams: tapered-edge seams between panels, formed when two long edges of the panels come together, and butted seams, which are created when nontapered panel ends are joined together.

Panels designed with tape in mind
Panels designed with tape in mind: To allow room for tape and compound, the taper along the long edge of drywall panels creates a recessed joint where panels butt together.


First coat

The seams between drywall panel edges take considerably longer to first-coat than do fastener heads, because the tape has to be embedded in the joint compound. There are two ways to tape these seams: with fiberglass-mesh tape or with paper tape.


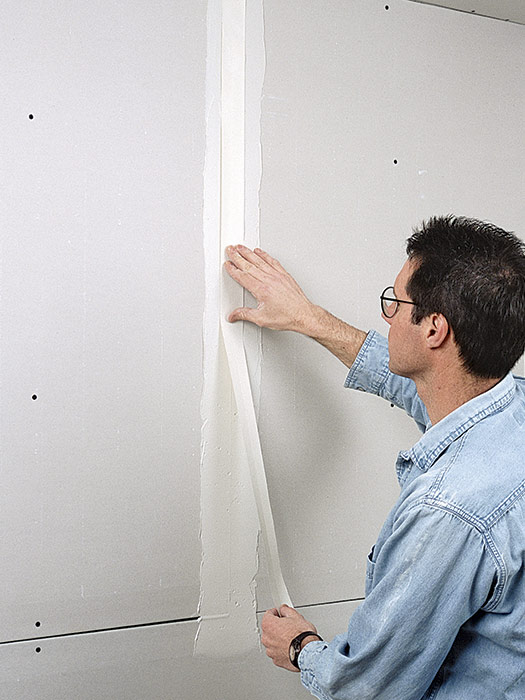
Mesh-tape method I often use self-adhesive fiberglass-mesh tape on the tapered-edge seams between panels. Mesh tape is fast and easy to use, and you don’t have to worry about loose tape and air bubbles under the tape, which can be problems with paper tape.

On the downside, most mesh tape is not as strong as paper tape, so it’s important to use the right type of joint compound. You can embed mesh tape in any type of setting-type compound, but if you’re working with drying-type compounds, make sure you use a taping compound, not a topping or an all-purpose compound. I prefer to use a setting-type compound, which is stronger and shrinks and cracks very little when drying.

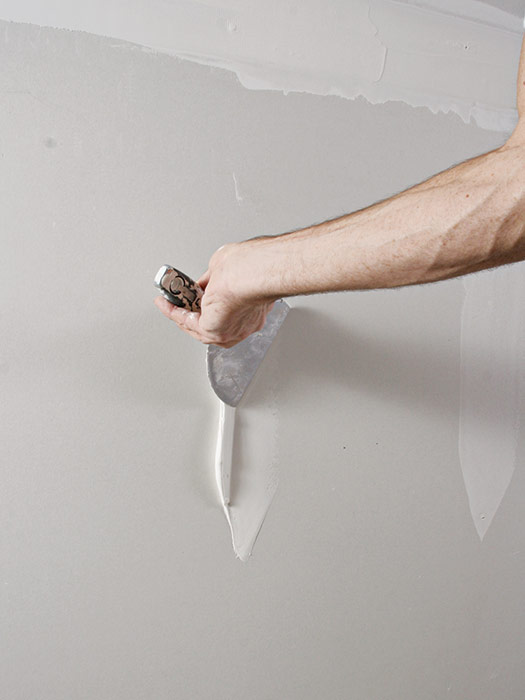
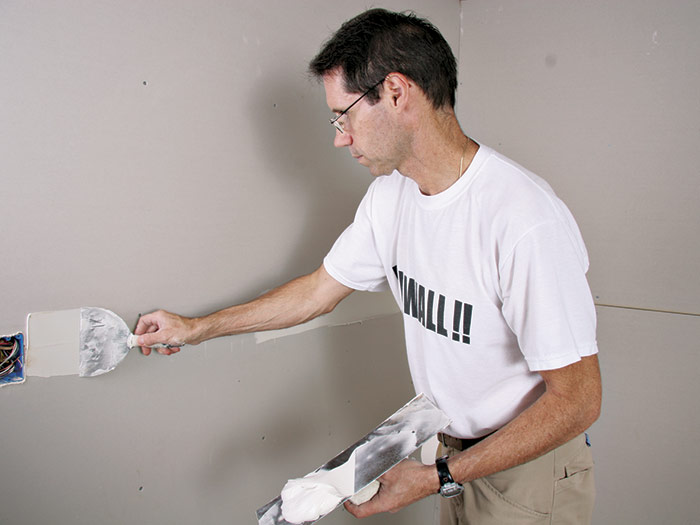
When using self-adhesive mesh tape, it’s easiest to tape all the joints in the room before applying the compound. Press the tape firmly over the joint so that it lies flat with no wrinkle, and cut it to length with a sharp taping knife or a utility knife. Using a hawk or a large (4-in. by 14-in.) beveled trowel as a palette, apply joint compound to the entire length of the joint with a 5-in. or 6-in. taping knife. A thin, even layer of 1/4-in.-thick compound is all that you need. Don’t worry about the compound being smooth at this point.
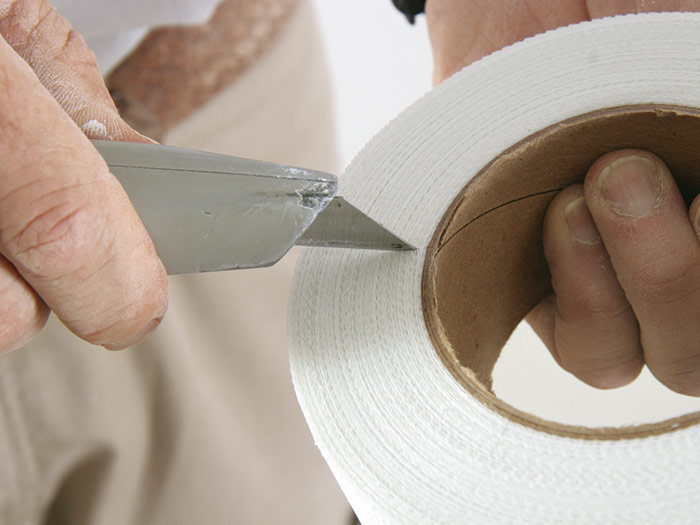
Score the roll
Score the roll: “Ringers,” strands of mesh tape that unravel when the tape is unrolled, are common. To prevent them, score the edges of the roll with a utility knife.


Mesh Tape for Tapered Seams

Though not as strong as paper tape, fiberglass-mesh tape offers plenty of strength along tapered seams. You need only a roll of tape, joint compound, a 4-in. by 14-in. beveled trowel, and a 5-in. or 6-in. taping knife.

Tape the seams
Tape the seams: Lay tape over the seam so that it is centered, smooth, and free of wrinkles.

Cut the tape
Cut the tape: There’s no need to make it difficult—mesh tape can be torn along the blade of a taping knife.

Cover it with compound
Cover it with compound: Put a small amount of compound on the taping knife and press the compound onto the center of the joint for the width of the trowel.

Smooth the compound
Smooth the compound: Use a beveled trowel to smooth the compound. Hold the trowel almost flat against the wall so that only the back edge is used to pull the compound.


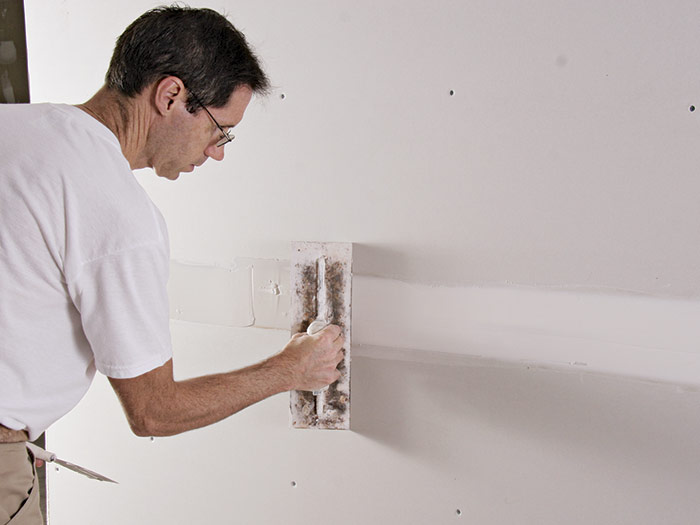
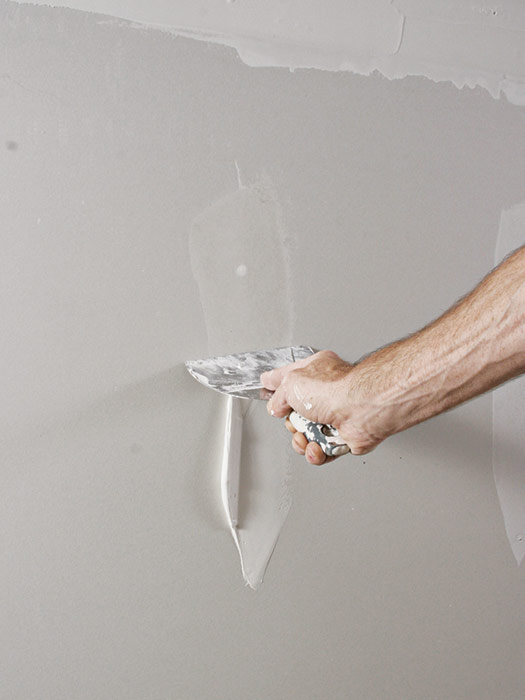
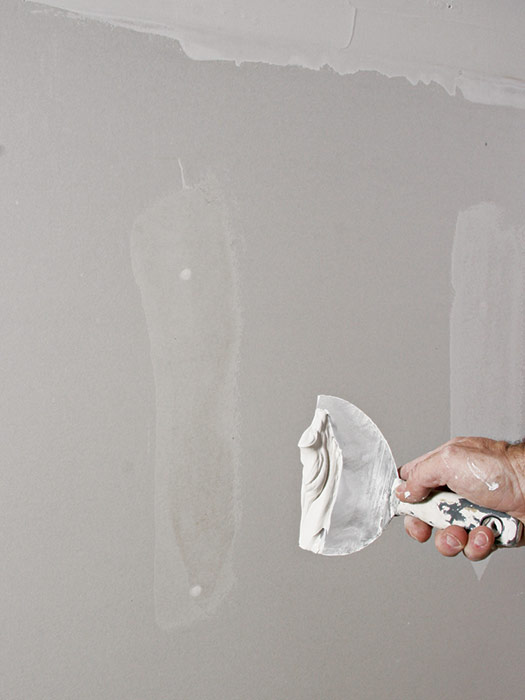
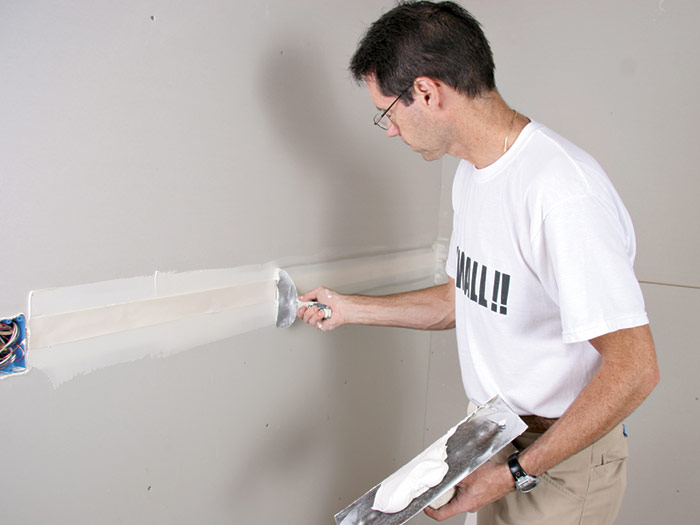
Now switch to the 4-in. by 14-in. beveled trowel to smooth the compound. With the trowel centered on the seam and held almost flat against the panels, pull the trowel along the joint, smoothing the compound with the back edge. Leave a layer of compound that just covers the tape and fills the recessed areas of the tapered seam. The edges should be fairly smooth and feathered. If a lot of compound builds up in front of the trowel and pushes out around the sides as you smooth the seam, either you have put too much joint compound on the seam or you’re taking too much off. When you’ve finished the seam, the joint compound should be about 3/16 in. thick in the center and 6 in. or less wide from one tapered edge to the other. Remember: The first coat doesn’t have to be perfect—just make sure that you don’t build up the compound too thickly or leave ridges that will make the application of the second coat more difficult.


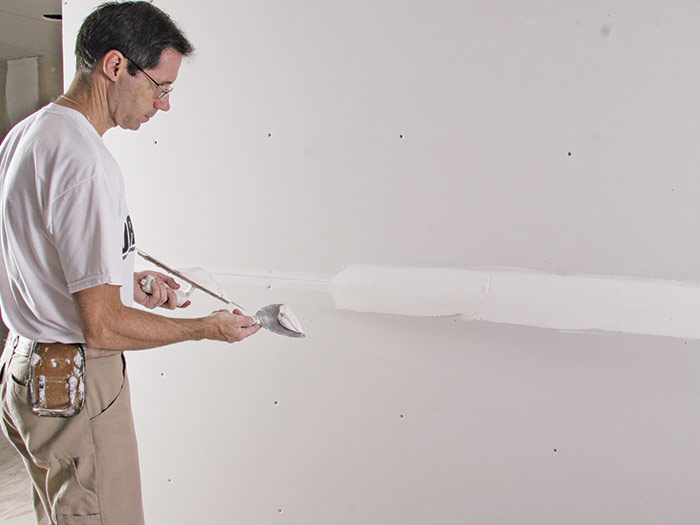
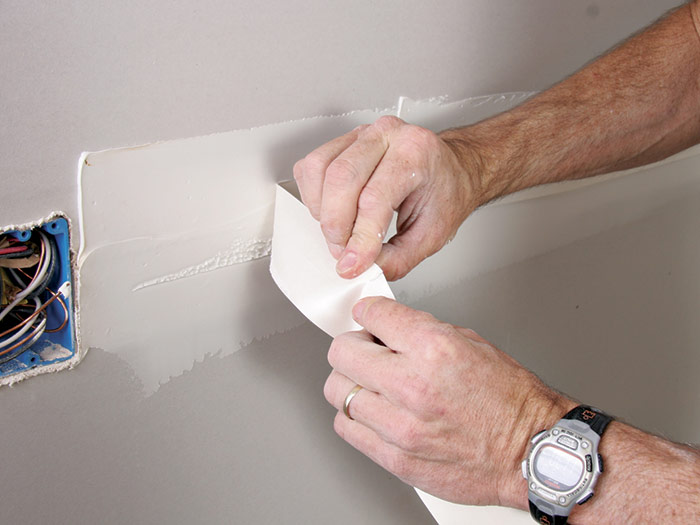
Paper-tape method Paper tape forms a strong joint on seams when it is used with any type of tape-embedding joint compound. Paper tape used in conjunction with an all-purpose joint compound is the most common way to tape seams (whether they are tapered-edge or butted).

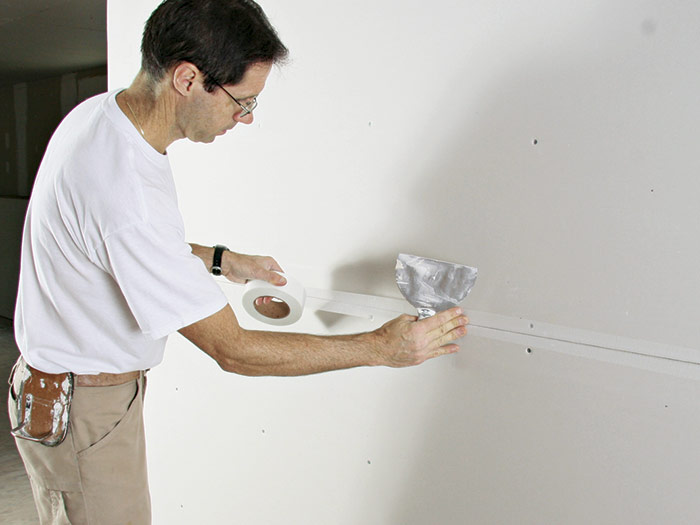
The procedure for embedding paper tape is somewhat different than for mesh tape. Because the paper tape is not self-adhesive, you first have to lay down a ground coat of compound to hold the paper in place. Use a 5-in. or 6-in. taping knife to apply a thin, fairly even layer of joint compound 1/4-in. thick or less along the center of the seam.

Next, center the paper tape on the joint and lightly press it into place. Keep the tape pulled tight and reasonably straight along the joint. Rip the tape to the desired length, making sure that the tape goes far enough into each corner so that the corner tape overlaps the joint tape.


Paper Tape on Tapered Seams

Unlike mesh tape, paper tape is held in place by a thin layer of joint compound that is applied before the tape goes on. On either tapered or butted seams, paper tape can be set in and covered with any type of tape-embedding compound.

Apply the compound first
Apply the compound first: Begin by spreading a thin layer of joint compound along the seam using a 5-in. or 6-in. taping knife.

Set the tape in place
Set the tape in place: Pull the paper tape tight along the seam and lightly press it into the compound.

Cut the tape
Cut the tape: When you reach the end of a seam, tear the paper tape by hand (or along the edge of a taping knife).

Embed the tape
Embed the tape: Use a taping knife to embed the tape tight against the seam. Make sure the tape is flat, wrinkle-free, and embedded in the recess of the tapered seam.


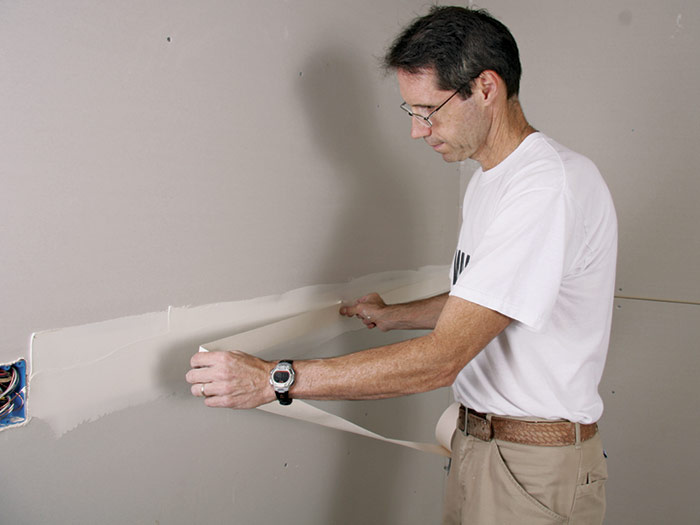
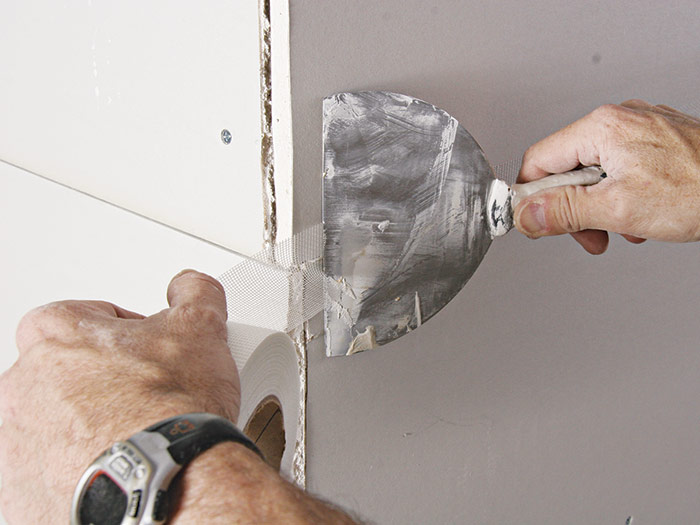
With the paper tape in position, pull the taping knife along the center of the tape. I usually start at the center of a seam and pull toward each end. (If the joint butts into an inside corner, be careful not to leave too much compound under the tape as you approach the corner to avoid raising a bump.) Keep enough pressure on the knife to properly embed the tape as you go. The pressure on the knife should push the extra compound out from the edges, leaving a layer 1/8 in. thick or less under the tape. Make sure the tape is tight against the panel at the edges. Clean excess compound from along the edges of the joint with the taping knife.

If the paper tape wrinkles or bunches up as you embed it with the taping knife, it’s probably because the initial layer of compound was too thick or was not pulled tight when set in place. If you must use two pieces of tape—on a joint over 16 ft. long, for instance—still start at the center of the tape and work both ways.

Butted seams
Butted seams: A butted seam is created when the nontapered ends of two panels are joined together. Here, the second piece is being slid into place.

Use paper tape on butted seams
Use paper tape on butted seams: Butted seams attached to wall studs or ceiling joists are weak joints subject to cracking. Using paper tape gives the seam a little extra strength.

Minimize the effect
Minimize the effect: Butted seams can be properly placed above a doorway. To minimize the bump created by taping, be sure the tape is embedded well. Also stay at least 8 in. away from the corner so the bump doesn’t affect the casing miter later.


Previous: Taping Drywall Ceilings Next: Taping Fastener Heads and Seams: Second Coat

Guide

Drywall

Chapter

Taping and Sanding

Sign up for eletters today and get the latest how-to from Fine Homebuilding, plus special offers.

Signing you up...

This site is protected by reCAPTCHA and the Google Privacy Policy and Terms of Service apply.
See all newsletters
See all newsletters

Log in or create an account to post a comment.

Sign up Log in

Become a member and get full access to FineHomebuilding.com

Drywall

Drywall

Trusted, comprehensive guidance for choosing, hanging, taping, sanding, and repairing drywall—the right way

View Project Guide

View All Project Guides »

Become a member and get unlimited site access, including the Drywall Project Guide.

Start Free Trial

Drywall Basics
  • Types and Uses of Drywall
  • Planning the Job
Tools and Materials
  • Hanging Tools
  • Taping Tools and Materials
  • Sanding and Finishing Tools and Materials
Hanging Drywall
  • Prep for Hanging
  • Measuring and Cutting Drywall
  • Guidelines for Hanging and Fastening Drywall
  • Hanging Ceilings
  • Hanging Walls
  • Hanging Airtight Drywall
  • Trim Accessories/Corner Beads
Taping and Sanding
  • Taping Basics
  • Taping Seams
  • Taping Inside and Outside Corners
  • Sanding
Special Installations
  • Tricky Transitions
  • Curved Surfaces
  • Other Special Installations
  • Decorating with Drywall
Drywall Repairs
  • Patching Holes, Cracks, and More
Plaster
  • Working with Lime Plaster
  • Plaster Repair
  • Classic Plaster Techniques

Fine Home Building

Newsletter Sign-up

  • Fine Homebuilding

    Home building tips, offers, and expert advice in your inbox.

  • Green Building Advisor

    Building science and energy efficiency advice, plus special offers, in your inbox.

  • Old House Journal

    Repair, renovation, and restoration tips, plus special offers, in your inbox.

Signing you up...

This site is protected by reCAPTCHA and the Google Privacy Policy and Terms of Service apply.
See all newsletters

Follow

  • Fine Homebuilding

    Dig into cutting-edge approaches and decades of proven solutions with total access to our experts and tradespeople.

    Start Free Trial Now
    • Facebook
    • Instagram
    • X
    • LinkedIn
  • GBA Prime

    Get instant access to the latest developments in green building, research, and reports from the field.

    Start Free Trial Now
    • Facebook
    • YouTube
  • Old House Journal

    Learn how to restore, repair, update, and decorate your home.

    Subscribe Now
    • Facebook
    • Instagram
    • X

Membership & Magazine

  • Online Archive
  • Start Free Trial
  • Magazine Subscription
  • Magazine Renewal
  • Gift a Subscription
  • Customer Support
  • Privacy Preferences
  • About
  • Contact
  • Advertise
  • Careers
  • Terms of Use
  • Site Map
  • Do not sell or share my information
  • Privacy Policy
  • Accessibility
  • California Privacy Rights

© 2025 Active Interest Media. All rights reserved.

Fine Homebuilding receives a commission for items purchased through links on this site, including Amazon Associates and other affiliate advertising programs.

  • Home Group
  • Antique Trader
  • Arts & Crafts Homes
  • Bank Note Reporter
  • Cabin Life
  • Cuisine at Home
  • Fine Gardening
  • Fine Woodworking
  • Green Building Advisor
  • Garden Gate
  • Horticulture
  • Keep Craft Alive
  • Log Home Living
  • Military Trader/Vehicles
  • Numismatic News
  • Numismaster
  • Old Cars Weekly
  • Old House Journal
  • Period Homes
  • Popular Woodworking
  • Script
  • ShopNotes
  • Sports Collectors Digest
  • Threads
  • Timber Home Living
  • Traditional Building
  • Woodsmith
  • World Coin News
  • Writer's Digest
Active Interest Media logo
X
X
This is a dialog window which overlays the main content of the page. The modal window is a 'site map' of the most critical areas of the site. Pressing the Escape (ESC) button will close the modal and bring you back to where you were on the page.

Main Menu

  • How-To
  • Design
  • Tools & Materials
  • Video
  • Blogs
  • Forum
  • Project Guides
  • Reader Projects
  • Magazine
  • Members
  • FHB House

Podcasts

  • FHB Podcast
  • ProTalk

Webinars

  • Upcoming and On-Demand

Podcasts

  • FHB Podcast
  • ProTalk

Webinars

  • Upcoming and On-Demand

Popular Topics

  • Kitchens
  • Business
  • Bedrooms
  • Roofs
  • Architecture and Design
  • Green Building
  • Decks
  • Framing
  • Safety
  • Remodeling
  • Bathrooms
  • Windows
  • Tilework
  • Ceilings
  • HVAC

Magazine

  • Current Issue
  • Past Issues
  • Magazine Index
  • Subscribe
  • Online Archive
  • Author Guidelines

All Access

  • Member Home
  • Start Free Trial
  • Gift Membership

Online Learning

  • Courses
  • Project Guides
  • Reader Projects
  • Podcast

More

  • FHB Ambassadors
  • FHB House
  • Customer Support

Account

  • Log In
  • Join

Newsletter

Get home building tips, offers, and expert advice in your inbox

Signing you up...

This site is protected by reCAPTCHA and the Google Privacy Policy and Terms of Service apply.
See all newsletters
See all newsletters

Follow

  • X
  • YouTube
  • instagram
  • facebook
  • pinterest
  • Tiktok

Join All Access

Become a member and get instant access to thousands of videos, how-tos, tool reviews, and design features.

Start Your Free Trial

Subscribe

FHB Magazine

Start your subscription today and save up to 81%

Subscribe

We hope you’ve enjoyed your free articles. To keep reading, become a member today.

Get complete site access to expert advice, how-to videos, Code Check, and more, plus the print magazine.

Start your FREE trial

Already a member? Log in

Privacy Policy Update

We use cookies, pixels, script and other tracking technologies to analyze and improve our service, to improve and personalize content, and for advertising to you. We also share information about your use of our site with third-party social media, advertising and analytics partners. You can view our Privacy Policy here and our Terms of Use here.

Cookies

Analytics

These cookies help us track site metrics to improve our sites and provide a better user experience.

Advertising/Social Media

These cookies are used to serve advertisements aligned with your interests.

Essential

These cookies are required to provide basic functions like page navigation and access to secure areas of the website.

Delete My Data

Delete all cookies and associated data