Podcast 257: Attic Foam, Watertight Decks, and Failing Expansion Joints
Kiley, Matt, and Patrick hear from listeners about attic insulation removal and FHB podcast diversity before taking questions about spray-foaming moldy sheathing, waterproofing a deck with living space below, and replacing wood expansion joints.
Follow the Fine Homebuilding Podcast on your favorite app. Subscribe now and don’t miss an episode:
 |
 |
Jon Riley of Casco Bay Insulation discussed the feasibility of DIY insulation removal. Taylor offers his tip for drilling accurate holes in concrete. George asks for more diversity on the FHB podcasts. Corey inquiries about improving the performance of his Upstate New York house. Jason wants to know the best way to make a deck with living space below watertight. Mike asks for advice on replacing his driveway’s PT expansion joints. Ryan wants to know if spray foam on the underside of his roof sheathing will hide a leak.
Listener Feedback 1:
In episode #255 Scott from Ann Arbor asked if clearing his attic of blown fiberglass, airsealing and insulating with new blown cellulose was a DIY project.
Jon Riley of Casco Bay Insulation, responds: Hi Patrick! In general I support homeowners taking on the dirty job of attic insulation removal. It will save a whole bunch of money however there are a few important details to consider before signing yourself (and your family) up for this adventure.
Most people see fiberglass batts and loose fill fiberglass as fairly innocuous, but considering the mouse leavings, roofing debris, and the formaldehyde binders, you’re removing a toxic mess. If you’re comfortable wearing a protective suit and full face respirator you’ll be fine, but a paper mask and a long sleeve T shirt probably won’t cut it. Further, always be on the lookout for asbestos and vermiculite, I’ve run into a few first gen insulation products that are very heavy, very coarse fibers… best to leave that to the professionals.
Using a professional insulation vacuum requires a ton of planning so you don’t accidentally install a thin layer of fiberglass dust throughout your home. Full containment of the room where the attic hatch is located with a zippered dust barrier is the only way to go. If you’re scooping and bagging the insulation, tie the bags in the attic and remove them all at once to minimize trips through the house. It’s also best to depressurize the space you are working in with ducted fans. A box fan in a window will help but it will not be enough to keep dust and fiberglass from migrating to other areas of the home.
Can you take the heat? An attic is a strenuous environments to work in, especially in the summer. Heat stroke is real and it can sneak up on anyone with disastrous results. Plan your day with achievable realistic goals, set up ventilation, drink lots of water, and know when to quit. The disappointment of an incomplete project is small compared your foot slipping off a joist and destroying a ceiling because you pushed it too far. Been there, done that!
Operating a gas operated insulation removal vacuum is relatively easy and relatively dangerous. The steel impeller spins at around a gazillion rpm and will shoot a knot of wood through the vac bag and a neighbors window easily. We typically set up the collection bag facing into an empty box truck. You should point it toward the woods or a windowless wall. It’s a 2 person operation, someone always needs to be with the machine monitoring the integrity of the bag and how full it is. Once full, the bags are very heavy. Even a bag of loose fill fiberglass can weigh a few hundred pounds. Have a way to get it into the truck before you turn on the machine. Getting the old insulation to the transfer station in a pick-up will take a few runs. We pay around $100/ton tipping fee at the transfer station. Don’t forget to add up the disposal time and the dump fees when considering whether to do this yourself.
That’s a lot of insulation to throw away, about $600 worth by my calculations. Can it be re-blown back into the attic once the other work is done?
Nope, no pity nope. It only takes 1 small hard piece of debris to cause damage to an insulation machine, anything removed should not be put in anyone’s hopper. Further, it’s fiberglass, it is a very poor performing product compared to cellulose, which is the perfect product for this project. I’m glad to hear it’s more affordable than fiberglass in your area, that’s rarely the case. Make sure they/you install 18″ of material so that once it settles you still have R-60. Plan on 2″ of settling in an open blow scenario like yours.
Also, plan for attic ventilation. The soffit venting and ridge vent must be done before the insulation process. There are potentially big condensation consequences if it gets put off. Gable end vents (cross flow ventilation strategy) are also a great option.
Before the attic is a moonscape of insulation REPLACE THE BATH EXHAUST FAN AND VENT IT TO THE EXTERIOR GABLE END WALL WITH SEALED RIGID METAL DUCTWORK. Once the house is tightened up you will need it. I like the Panasonic WhisperGreen Select with time delay module, wire it for full functionality. If you have a wet basement encapsulate and/or dehumidify the space pronto.
4) I’m certain the walls in this house leak like a sieve (2×4, R7, brown fibrous sheathing, tar paper), are there any practical strategies and low hanging fruit for improving air sealing at the walls? Major retrofitting of the interior walls or exterior sheathing/siding not in the cards right now.
If you see the top of an open wall bay from the attic, stick a hose down there and pack it as best you can. Once full, block it off with a piece of rigid foam sealed in place with canned foam for a belt and suspenders approach. The air leakage you are experiencing in the living space is directly driven by air leakage in the attic and the basement, creating stack effect. Sealing up these two areas will slow the air movement considerably and will improve comfort throughout the home. The exterior walls are almost always at the bottom of my list, even when they are uninsulated.
Related links:
Listener Feedback 2:
Taylor, from Austin, TX writes: With regard to making accurate holes in episode 253, I find that if I draw a large plus sign on the concrete I can adjust the location of the bit before it sinks into the wrong spot. It leaves pencil marks on the concrete afterwards but they almost always get covered up anyway.
Thanks for the great show! I have been listening for years and talking about it to anyone who will pretend to listen. My partner overheard today and said, “Oh, it’s Car Talk for houses!” Happy podcasting!
Related links:
Listener Feedback 3:
George writes: I’m loving the content! Your interviewees are very knowledgeable and very passionate about home. But! Is there a way that one of your subsequent guests could be more diverse? I am sure there are several folks with great stories to tell and knowledge to distill from different racial, gender, and sexual orientation backgrounds. I hear all over the place about how hard it is to find people to join the trades. Why not give a platform for more people that don’t fit the white-guy-doing-it-for-30-years sort of mold?
Please FHB podcast. I am sure it is difficult to find people like this but I think it would behoove us all to make the tent of homebuilding more diverse. Thanks so much!
Related links:
- Keep Craft Alive: Monica Coyne, Blacksmith
- Latinos Will Drive the Next Housing Boom (Excerpt from a 2008 interview with former HUD director Henry Cisneros)
- Keep Craft Alive: Elly Hart, Carpentry Apprentice
Rotary Hammer Feedback:
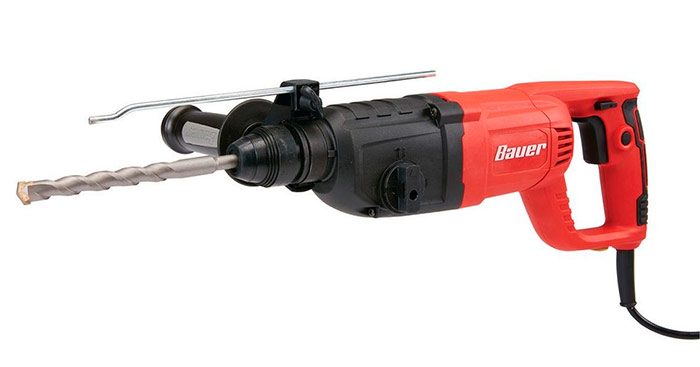
I’ve owned a few professional brands and models of rotary hammer drills over the years – burned out a couple motors and drive gears. When I researched the drive gear replacement cost on the last one I trashed and it was $212. About what I paid for the tool!
The tool died after 3pm on a Saturday and the tool shop was closed so I ran to harbor freight (open till 9) figuring I’d get a disposable tool to finish the job and give me time to research a true replacement tool. 3 years later and the harbor freight rotary hammer is still at it – and I beat the snot out of it; and so do all my friends who borrow it. Best part – I had a special 25% off coupon so the darn thing was <$70.
Related links:
Editor Updates:
Kiley: garden
Matt: New tractor
Jeff: Rotted sill
Patrick: Old tractor
 |
 |
 |
 |
Question 1: Is it a bad idea to spray foam insulation in my attic if the roof sheathing has signs of mold?
Corey Dannemora, from NY writes, Hi! I just discovered the FHB podcast (referred to me by the contractor giving me a quote on a closed-cell spray foam project, shout out to Phil in Jay, NY).
It’s serendipitous that my first episode is 247 – Insulating Rim Joists, Installing Batt Insulation, and Getting Schooled in Building Science. I’m hooked!
My house is situated within a 0.25 mile radius where convicted murderers David Sweat and Richard Matt escaped maximum security prison in Dannemora, NY in 2015.
I just moved in to the house 5/23/2020 and to no surprise, I’m discovering all sorts of long-neglected issues.
The most significant long-neglected issues deal with insulation, ventilation, moisture, and water management. In a cold humid climate, where temperatures dip well into the negative digits with a ferocious wind, and summers are hot and humid, I don’t want to get these aspects of building science wrong.
My home inspector discovered significant black mold on the attic roof sheathing. The sellers abated the mold with a product similar to “Rapid Mold Remover” to the extent that my home inspector satisfactorily signed off on the job they did.
I’m investigating closed cell spray foam to convert this hip-roof attic space into conditioned space and I’m not only concerned about the $9,000 price tag, (an estimated 1,800 sq. ft. at a depth of 5 inches ~R-35), but also the health implications of spray foam chemicals and future access to electrical wires/plumbing vents. In addition, is this even the most appropriate solution for my situation?
The contractors extol the safety and “inertness” of their products, deeming it comparable to a stabilized plastic (despite exposure to extreme summer heat). One of the contractors uses Lapolla 4G, which he asserts is “Green Guard Gold Certified for Air Quality.”
Details:
I’ve included a video link of the property for you and the FHB audience, so that your podcast team of experts might freely discuss and point things out. What should homeowners look for in an attic, knee wall, and crawl space scenarios when seeking to manage heat loss and control moisture condensation on the underside of roof sheathing in cold climates. Your team providing commentary on the actual video might be helpful for many homeowners. You mentioned in FHB Episode 247 that a video could be like visiting a property while honoring social distancing protocols. In addition, please address the notion that I hear from the old-timers: “A home needs to breathe.”
Furthermore, if money were no object, and my only concerns were health implications, Return on Investment, and R-Value – what is the absolute best way to go:
-Fiberglass with baffles?
-Cellulose with baffles?
-Closed-Cell Spray Foam?
From what you can infer from the video:
• Is the roof sheathing in good enough condition for spray foam or would I be wasting my money because I have a roof that had previous mold issues and presently has visible intermittent mold concerns? In other words, is this roof in need of serious repair and replacement where paying $9k would be a waste of money?
• What do homeowners do when they peel back the asphalt roof shingles and discover moisture damage to roof decking after a spray foam job? If I pay for spray foam should I just go over the shingles with metal roofing within the next 10 years?
• My Spray Foam Contractors both insisted on seeing the basement to observe the stack effect, rim-joist insulation (or non-existence of), ventilation potential, and overall moisture situation. The adventure to the basement revealed to me more of a headache than I had anticipated, including what appears to be an abundance of mold and water damage to my joists (why didn’t my home inspector catch the condition of the joists!?). My father thinks it’s possible that some of the joists appear this way because they were used as concrete forms. He showed me similar joists at his house that were used for this purpose. What are your thoughts? To me, they appear pitted and have visible water penetration.
I hope this video and discussion regarding insulation of attics, rim joists, and the home’s envelope and ventilation via soffits, baffles, and ridge vents can benefit the FHB community.
I’ll also note, I searched sites such as energystar.gov, nyserda, my utility company NYSEG, and federal government for grants, rebates, and incentives geared towards homeowners seeking to improve their home’s energy performance.
I found nothing, so perhaps you could offer guidance in that regard. If this project were half the cost and deemed the most appropriate solution for a hip-roof with dormers (by unbiased professionals such as yourselves not in the business of selling me closed cell spray foam, I’d do it in a heartbeat – I’ll still do it in a heartbeat if you give me the green light, but my bank account will protest).
As things are presently, winter is indeed coming, and my attic is exposed allowing the wasps, heat, and fiber-glass-infused air particles to freely enter the house, so something has to be done.
Thank you so much for your advice and expertise, I sure could use your guidance right now. Much appreciative!
Related links:
- Avoiding Spray-Foam Problems
- Home-Building Cyclopedia – Spray-Foam Insulation
- Ask the Expert: Spray foam durability
Question 2: How can I build a balcony floor over a roof?
Jason from Swift Current Saskatchewan writes, Hey FHB crew. I am a fairly new listener to the podcast about 6 months. I listen to many podcasts during the week but must say I look forward to this one the most. I love listening to the wealth of knowledge you guys have and appreciate that you are not afraid to say “i don’t know”.
I own a home building company in Swift Current Saskatchewan, we mostly focus on building custom houses from the ground up doing everything from concrete, to drywall and mudding, to trim and cabinetry.
We are currently in the middle of a complete home build and about to wrap up the framing. I have been dreading the next stage of wrb and getting the house closed in. Not only because it’s a tall 2 story, with 1′ overhangs and stucco, but because it involves water proofing a balcony over a living space.
I have done balconies before using vinyl decking products like Duradeck, where the vinyl is welded together at the seams to create a water tight finished surface, but they have very few options in colors and patterns and most of them are hard to sell. My current client has pushed hard against using this product mostly for looks, and she would really like the balcony to match the main floor deck which will be composite decking.
I have a few ideas on how to make this work but I would love to hear what you guys would have in mind.
One thought that I am currently going with is adding sloped wedges to the top of the joists and putting my 3/4 inch tongue and groove plywood on top, it will sloped off to the side of the house to a small trough and downspout. I am then thinking about waterproofing with something like an EPDM, or….. ( Ideas?). After waterproofing is installed I will then install treated 2×4 sleepers that will rest on the waterproofing to attach my composite decking to. The sleepers will have to be ripped into wedges as well to fit the slope of the water proofing.
The whole deck system will literally float with no fasteners to the house at all.
To me this seems like a pretty good idea other than I can’t get over the fact that over time the sleepers would end up wearing through the waterproofing, compromising it all. I am stuck at this part of the details and can’t get past it.
Obviously as a home builder I want to build something that will last. I never want to sell something to a customer that will give a fear of being called back in a few years to fix a leak.
I would appreciate hearing your thoughts on this one guys. Cheers!
Related links:
Question 3: How can I repair the wood expansion joint in my concrete driveway?
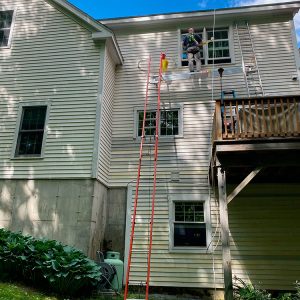
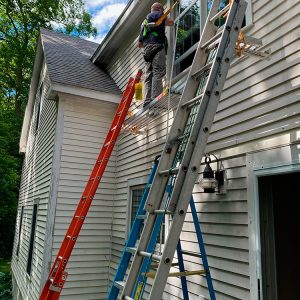
Mike from Richmond, VA writes, What up FHB guru’s! The attached photos show some deteriorated wood expansion joint that I would like to replace. Is it as simple as remove and hammer a new piece in? What would hold a new piece in place since the concrete isn’t attached to the new wood? Or would you remove and do something different? There’s also a hole in one area. What can I do/should I do with that? Note the sticker on the SUV.
Also, talk about who came up with the intro music and how it was decided to be used. I guess it’s good.
Lastly, if you have a few minutes feel free to discuss roof venting! LOL! Thanks for the great show!
 |
 |
Related links:
- Amazon.com: Concrete Expansion Joint
- Amazon.com: SlabGasket Expansion Joint Replacement – Free Sample Pack
- Control vs. Isolation Joints in a Concrete Driveway
- How to Pour a Rock-Solid, Well-Insulated Garage Slab
Question 4: Will spraying foam insulation under a roof make it harder to know if your roof ever leaks?
Ryan writes, Hello everyone. During episode 249 Matt and Rob spoke of spray foaming the underside of a roof as their choice for insulation for Josh from Tampa.
On that, I have a question and a question. I’m currently working to remodel the third floor or our house, built in about 1883. It was previously finished but has fallen into a state of disrepair. Most of the old plaster has been pulled from the lath and the entire room will be covered in 3/8″ drywall, then plastered. Right now there is not any insulation on the roof plane of the house but there is loose cellulose under the floor and behind the knee wall and extending toward the eves. As I’m sure you can imagine, it gets very, very hot up there during the day. I had been planning on having a spray foam contractor come in and spray the underside of the roof deck before the wall board was hung, but Peter Yost and Steve Baczek got me thinking about that plan and here’s where the questions come:
1) Doesn’t spraying foam of any type directly on the underside of the roof deck allow for any kind of defect in the roofing to go unnoticed- namely a water leak? Doesn’t spraying foam directly prohibit the movement of moisture because there’s no drainage plane? Or is it that the bays are sprayed and then edges of the rafters are left exposed to keep them from rotting due to trapped moisture?
2) If you were in my shoes, what would you insulate the third floor/roof deck with? Spray foam? rockwool? fiberglass? I’m afraid Patrick may keel over when he reads this, but the cost of the insulation up there isn’t as important to me as making the space as comfortable as can be, year round. In other words, the cost of the solution to make the space as comfortable as possible is of no real concern.
I’m including a couple of photos, let me know if you need any more. Thanks!
Related links:
- Should Rafters be Encapsulated by Spray-Foam?
- Insulating Unvented Roof Assemblies
- Can Spray Foam Rot Your Roof? (from greenbuildingadvisor.com)
END NOTE:
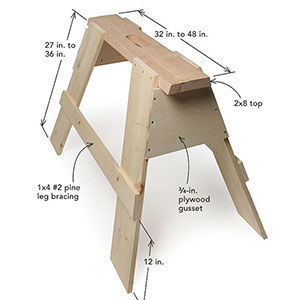
- Please tell us what kind of saw horses you like: [email protected].
 |
 |
 |
If you have any questions you would like us to dig into for a future show, shoot an email our way: [email protected].
If we use your question we’ll send you a FHB Podcast sticker!
FHB Podcast T-shirts!
Represent your favorite podcast! Available in several styles and colors. Made from 100% cotton. Find the Podcast t-shirt and more cool products in the Fine Homebuilding Store.
Fine Homebuilding podcast listeners can now get 20% off anything in the Taunton store, including the The Visual Handbook of Building and Remodeling, 4th Edition.
Use the discount code FHBPODCAST to take advantage of this special offer.
We hope you will take advantage of a great offer for our podcast listeners: A special 20% off the discounted rate to subscribe to the Fine Homebuilding print magazine. That link goes to finehomebuilding.com/podoffer.
The show is driven by our listeners, so please subscribe and rate us on iTunes or Google Play, and if you have any questions you would like us to dig into for a future show, shoot an email our way: [email protected]. Also, be sure to follow Justin Fink and Fine Homebuilding on Instagram, and “like” the magazine on Facebook. Note that you can watch the show above, or on YouTube at the Fine Homebuilding YouTube Channel.
The Fine Homebuilding Podcast embodies Fine Homebuilding magazine’s commitment to the preservation of craftsmanship and the advancement of home performance in residential construction. The show is an informal but vigorous conversation about the techniques and principles that allow listeners to master their design and building challenges.
Other related links
- Check out all the FHB podcast show notes.
- #KeepCraftAlive shirts and gear support scholarships for building trades students.




View Comments
Great comment by Mike Guertin.
Seems like there is a lot of emotion regarding power tools not from Mike but in general.
The tool reviews on You Tube and elsewhere almost never reflect real world conditions or acknowledge the fact that there are only a few companies that actually make these power tools. On the reviews you often see "face off's" where drills will turn in the opposite direction, or you drill x number of 8 in screws with little to no break in between.
I did find a design channel that did a tear down of I think the HD pro-sumer drill driver. I was impressed with how good the mid or lower range tool was.
Whether it is gardening, cooking, writing software, framing or detailing, you choose the tools that are appropriate to the application. Baczek (what are your constraints, first cost, power, convenience, battery platform, or Christine Williamson what are you risks. mfg support, availability, power, consistency (eg staplers) durability (if it breaks what will it cost to not have the tool available for that period of time
You mentioned a while ago about the marketing team of a big brand, that has the resources to fly you out for guys weekend doing cool things with many tools you would never buy, vs a smaller brand that comes with a suitcase.
The reason they market is to get you buy their tools, choose their battery platform etc. This isn't to say that the pro tools aren't good to buy, but rather those "free" trips aren't really free. None of that money goes to better tools or support. This is their version of investment, they get a higher return on their dollars flying out writers and influencers than they do producing better tools. If they were really concerned about job site problems there would be universal battery platforms. At some level that is an oversimplification, but at another level it is a turf war. If I have 20 tools with one battery type, my short list for the next tool will always be their ecosystem. They don't promote the specialty tools with the ferocity they do batteries, drivers and commodity impact drivers. Why would they? You are already sold.
I know from being involved in procurement and supply chain, that buying brands often means asking the mfg for different color packaging, though the widgets (whatever they are) are essentially coming down the same production line. With many of the same internals. Having fewer production lines is how you justify paying the premium to buy a brand.
Patrick fixes his own vehicles and I am guessing his own appliances and I am guessing is fully aware of the breadth of shared components across our durable appliances.
The attraction to TTI ( and there are others) to buying a brand is to trade off of that brand and consolidate operations (manufacturing).
I'd like to hear more about how a throw away purchase wound up being a "Pro" tool. We say in consulting don't hire the guy with the new briefcase. Do we say the same for the guy who walks in with a $1,200 Milwaukee Packout system? Plumber_igram I think shows value in having great organization, but one minute of a plumbers time is worth $2-3. It makes sense for them.
I think ALL of these tools have great compare to what we had available even a few years ago. Of course there are tradeoffs but those are decisions that applied to individual situations. Constraints, risks.
To your credit you don't seem to obsess much about this in your content.
Thank you