Wet-Crawlspace Solution
Avoid rot and mold by sealing out moisture from above and below.

I’m trying to determine a cost-effective method of insulating the floor in my 60-year-old three-season cottage in southern Maine. The cottage sits on a block foundation with a crawlspace. Due to a very high water table, the crawlspace floods and stays wet after a heavy rain. The hemlock joists do not show any signs of deterioration except in one spot. The previous owner had put fiberglass insulation under the bathroom. Over the years, it absorbed moisture and rotted two of the joists. Since the cottage is closed during the winter months, I am not trying to insulate for heating, but instead to minimize the moisture entering the living space from the crawlspace. What’s the best way to do this?
—Bob Mitchell via email
Ben Bogie, a lead carpenter with Kolbert Building in Portland, Maine, replies: It doesn’t sound like the solution you’re looking for is insulation, though you may eventually want to add insulation for comfort—when we’re done here, you’ll be able to do that without worry. The reason those joists rotted is because the insulation reduced the heat and airflow that kept the other joists dry and sound. Adding insulation of any type in this situation can prove to be a fool’s errand.
The real issue here is the bulk water as well as water vapor naturally rising from the ground below the house. The number-one priority is to do whatever site work and drainage is necessary to make rainwater flow away from the building. This can be as simple as adding gutters or as complex as an underground curtain or perimeter drain and major regrading of the site. With this only being a seasonally occupied cottage, it may not be feasible to stomach that expense.
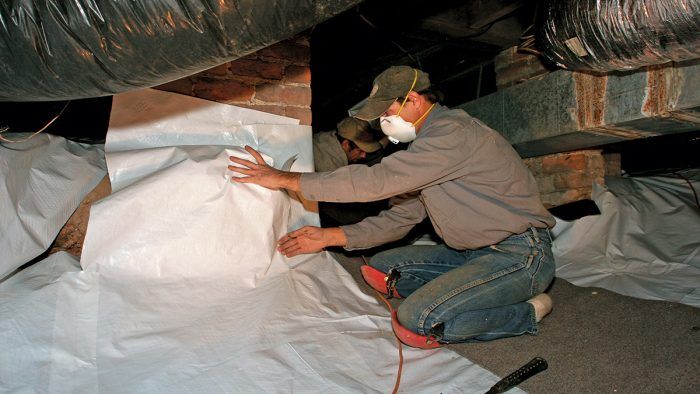
Moisture can be kept at bay by installing a continuous vapor barrier across the ground of the crawlspace and up the walls. Something as simple as 6-mil polyethylene sheeting can be laid and the joints taped, or you can step up to some of the more robust reinforced polyethylene products. I like Stego’s 15-mil sheeting, Siga’s Fentrim tape to secure the plastic (either commodity poly or Stego’s products) to masonry, and their Wigluv tape to join the poly sheeting. This is really a matter of weighing cost against durability. Basic 6-mil poly will be adequate if your ground is relatively smooth and rock-free, if you can install the plastic without punctures, and if the crawlspace will see infrequent usage that would damage it. But if your crawlspace has uneven rocky ground or you anticipate needing to access the space in the future, say to add insulation, it may be prudent to bite the bullet and upgrade.
The goal is to make a reverse swimming pool under the house so that any bulk water and water vapor is sealed out. The poly won’t necessarily keep the water out of the crawlspace, but it should keep it from becoming a problem for the framing. Don’t be concerned after installation if you see water condensed or running below the plastic. This is a sign that it is doing its job. Do be concerned if you see water on top of the plastic, as this is likely the sign of a leak.
Once the moisture issue from below is dealt with, we need to think about the potential of a moisture issue from above. During summer months or if the cottage is heated during the winter, there’s potential for moisture to push from the living space into the now-sealed crawlspace and condense. Crawlspace vents can also admit humid summer air if they aren’t permanently closed. This humidity is best dealt with by installing a dehumidifier in the crawlspace that includes a pump and a hose so that it can drain outside automatically. Check on it every now and then or install a wireless hygrometer (hygrometers measure relative humidity) such as one from SensorPush that you can read remotely to be sure the dehumidifier is working.
Now you’ve made a dry space that you can insulate however you’d like without the risk of rot or mold. Even if you do nothing further, you’ll have taken a step to greatly extend the life expectancy of your cottage by protecting it from further moisture damage.
From Fine Homebuilding #293
More about keeping foundations dry
Keep Your Basement Dry With a Curtain Drain – If your house is under assault from groundwater, make perforated pipe your first line of defense.
Keeping a Basement Dry – Waterproofing the foundation walls is only the first step; you also need a system of drains around the foundation that silt won’t render useless.
Creating a Sealed Crawlspace – It’s like a scaled down version of a basement, and should perform like one.
Insulating a Slab-On-Grade Foundation – Depending on your location, you may need rigid foam insulation under and around the edges of the slab
Fine Homebuilding Recommended Products
Fine Homebuilding receives a commission for items purchased through links on this site, including Amazon Associates and other affiliate advertising programs.

Caulking Gun

Insulation Knife

Nitrile Work Gloves


