Control-Line Layout
The verticals keep the shingle slots aligned, while the horizontals keep the courses straight.
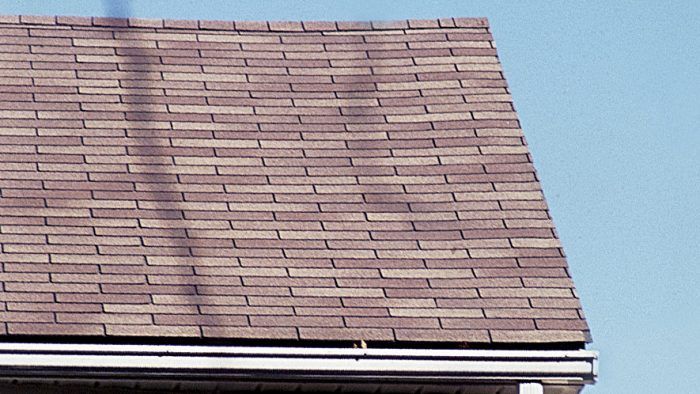
You can shingle a roof without using control lines, but chances are the vertical lines of slots and horizontal lines of butt edges will look crooked. Although this probably won’t affect the water-shedding ability of the roof, it will detract from the home’s appearance, especially on steep roofs that are a prominent part of the façade.
Vertical control lines keep slots in tab-style shingles aligned, while horizontal control lines keep the butt edges of the shingles in straight courses. Neither is very hard to lay out as long as you keep the shingle overhangs along the rakes and eaves in mind when you establish your primary reference lines. Be sure to account for the overhang when you mark for the control lines.
Before you lay out control lines, install the drip edge along the eaves, then roll out at least the first course of underlayment. Also install the drip edge along the rake. If you won’t be installing underlayment and drip edge up the entire roof before shingling, tack-nail the drip edge along the rakes edges for measurement purposes.
Vertical Control Lines
Vertical control lines are necessary when you’re installing tabbed shingles or other shingle designs with distinct patterns. Without them, the cutout slots or shingle pattern can waver. Laminated and other random-pattern shingles don’t need vertical control lines, so you can skip this step in the layout process when you use them. It will be quicker to install random-pattern shingles using the pyramid pattern without control lines.
On simple roofs, you can measure and locate vertical control lines from a gable end, provided the roof is relatively square and the rake is straight. The goal is to snap a series of parallel chalklines from eaves edge to ridge. You’ll set the ends of the shingles up to the chalklines to keep the shingle offset precisely equal and thereby keep the tab slots in line up the roof plane.
There are slightly different methods for arranging chalklines on racking- and pyramid-pattern layouts.
Vertical control lines for a racking-pattern layout
When laying out for common three-tab shingles, you’ll need two vertical control chalklines for a half-tab offset pattern and three chalklines for a one-third offset. The cutout slots on roofs shingled with a half-tab offset will repeat every other shingle course. The slots will repeat every third course when you use a one-third offset. Check the manufacturer’s instructions when you install shingles with other designs that have a different number of cutout slots or a regular pattern to follow; they may require slightly different procedures than described here.
You want to locate your control lines as close to the vertical center of the roof as possible while saving labor and materials by minimizing the shingle cuts on one side of the roof.
By establishing the chalklines toward the center of the roof, you will minimize the number of shingles that will be installed to either side of the line. This, in turn, minimizes the accumulated error that occurs because of variations in shingle lengths and how tightly you press them together when you install them. The farther a course gets from the line, the more obvious the accumulated error will become as the shingle cutouts drift out of alignment.
Shingle waste and trimming labor are the other issues to consider when choosing the control-line location. You can start your control lines at the precise center of the roof so that the distance between the last row of cutout slots and the rake edge will be equal on the left and right side of the roof, but the benefit may not be worth the cost. In reality, not too many people are going to notice the difference between one side of the roof and the other.
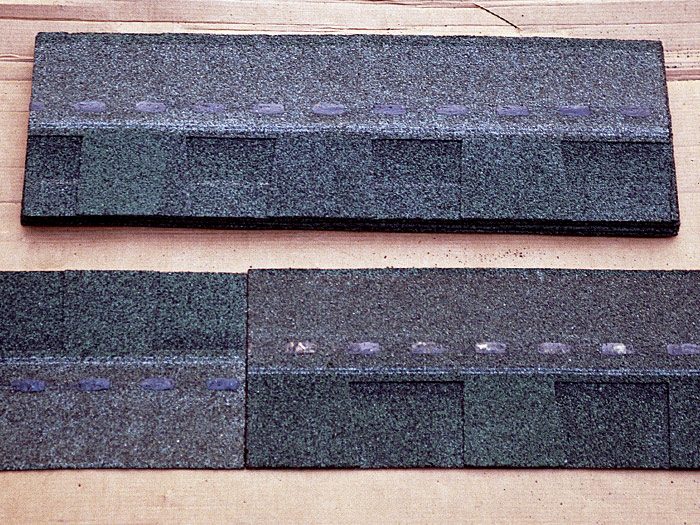
You can usually end with full-length shingles along one edge and only have to trim the shingles along the other. This saves time cutting shingles and minimizes waste, provided you don’t end up with tabs trimmed down to less than 1½ in. along one rake edge. Short tabs are unsightly and damage easily (see the photo). I’ll describe the control-line layout in optimum circumstances and look at adjustment techniques to use when the shingles or shingle tabs on one rake edge work out to be too narrow.
- Check if the rakes are parallel and if the roof is square. After the drip edges are tacked in place, measure the distance between rake edges along the ridge and along the eaves to see if they deviate from parallel and if so, by how much. To check if the roof is square, measure diagonally from the end of the ridge to the opposite eaves corner, then measure the opposite diagonal. On a large roof plane, even deviations up to 3 in. or 4 in. from square can be accommodated as long as the rake edges are close to parallel.
When the rakes are out of parallel more than 1 in., the problem will be noticeable because the distance from the trimmed edge of the shingles to the slots will change from the bottom to the top of the rake. You can vary the shingle overhang to make adjustments and conceal the error.
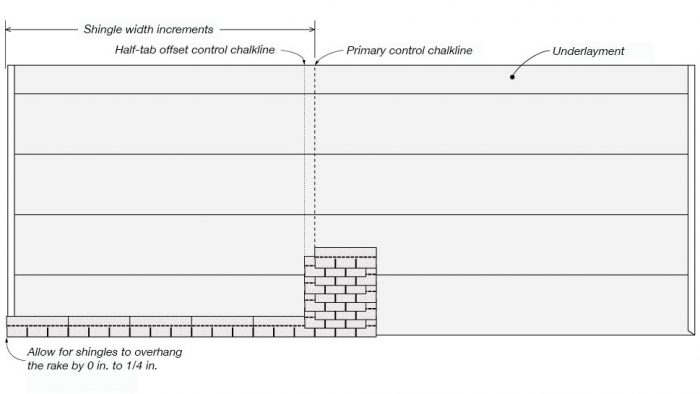
- Mark the “proposed” control line. Measure along the eaves edge from one of the rake edges to the full-shingle increment that is closest to the center of the roof and make a mark. When you measure, remember to subtract the shingle overhang of ¼ in. to ¾ in. If you are using a half-tab offset, the full-shingle increment will allow you to end every other course along one rake with a full shingle. If you are using a one-third offset, every third course on that rake will end with a full shingle (see the illustration below).
Racking-Pattern Control-Line Layout
- Check that cut tabs will be wide enough. You want to make sure that all courses end with a tab that’s at least 1½ in. wide. That’s easy to do because shingle tabs are 1 ft. wide. Measure from the proposed control-line mark to the opposite rake. If the tape reads at least 1½ in. more than a full-tab width, you’re in business. If not, you’ll need to move the control-line mark toward the rake you measured from in step 1. In this case, you’ll have to trim every shingle along both rakes. Fortunately, the odds are you won’t have to do this.
- Snap the first control line. Make a mark along the ridge that is the same distance from the rakes as the final mark you made at the eaves. If you planned to use the shingle overhang along the rake to make a minor adjustment for unparallel rakes, be sure to subtract the correct amount when measuring along the ridge. Drive a nail at the mark at the ridge to hold the end of your chalkline, and strike a chalkline down to the mark at the eaves edge. This is your primary vertical control line.
- Snap offset control lines. To establish your offset control lines, measure from the first control line back toward the rake edge you started from. By doing this, the shingles in courses lined up with the offset lines will be trimmed rather than require a narrow inset shingle tab at the end. If your offset will be a half tab, mark and snap one line a half tab from the first line. If you will be using a one-third offset, snap two offset lines—one 1/3 of a tab from the first line and one 2/3 of a tab from the first line.
Although establishing control lines in the center of the roof minimizes cutout drift, some roofers prefer to work exclusively from left to right or right to left. In this case, you can make your proposed control line just a full-shingle width from one rake (remembering to account for the rake overhang). Then measure to the opposite rake edge and make adjustments to prevent ending with a 1½-in. row. Snap the first control line and measure toward the rake for the offset lines.
Vertical control lines for a pyramid-pattern layout
Establishing vertical control lines for the pyramid pattern is typically done along one rake edge but you can start in the middle too. I’ll describe the process for starting along one rake edge and then tell you about the modifications necessary to start in the middle. The same concerns about cutout-slot drifting apply to the pyramid pattern as to the racking pattern. The farther you apply shingles from the control lines, the more likely the slots will drift.
Vertical Control Lines
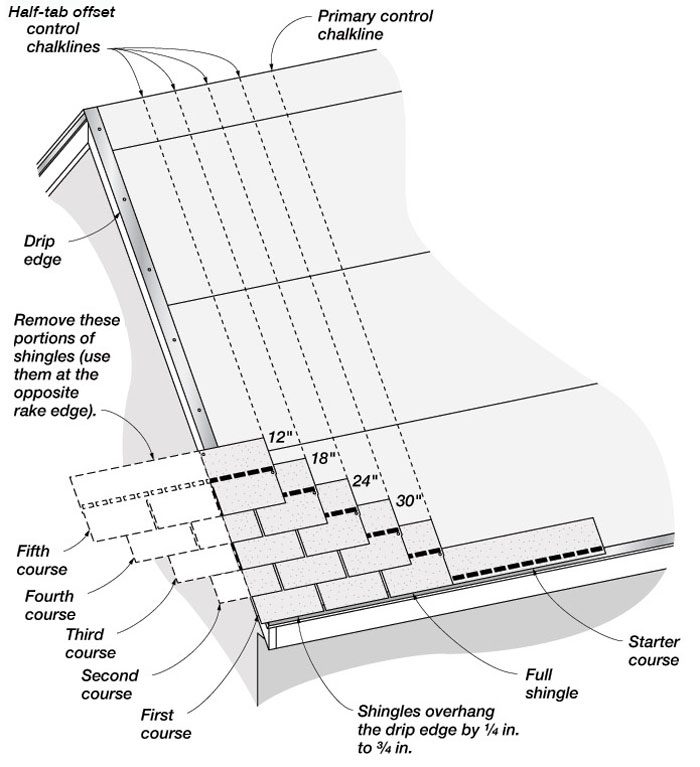
Establish the primary vertical control line
Assess whether the roof is square and the rakes are parallel, and plan the shingle overhang and adjustments if necessary. Make your initial mark along the eaves edge. To locate the mark, subtract the shingle overhang from a full shingle width and then measure in that distance from the rake edge. Measure from that point to the opposite rake edge to see how the final shingles will trim off. If it looks like the last shingle will end up with tabs less than 1½ in. wide, adjust your mark back. Mark the final point for the primary control line along the eaves edge, and duplicate the measurement along the ridge. Strike a chalkline between the marks.
Establish incremental vertical control lines
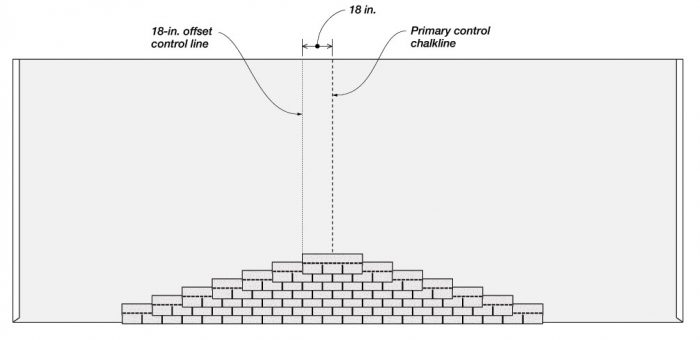
Measure back from the primary control chalkline in half-tab or one-third-tab increments.
When you start shingling the pyramid, you’ll align the factory end of each starting shingle with a control line and trim the excess off the rake-edge end. The starting shingle of each successive course will be indexed to the next control line back toward the rake. When you reach the last control line, start installing full shingles back at the bottom along the eaves edge and work diagonally up the pyramid. You’ll reach the point where you’ll once again index a series of trimmed shingles to the control lines.
Starting the pyramid pattern mid-roof
As with the racking pattern, starting the pyramid near the middle of the roof minimizes accumulated error in shingle placement and allows roofers to work both sides of the pattern at one time. Establish mid-roof vertical control lines for the pyramid in the same way as for the racking pattern except for one difference: Instead of snapping the offset control line a half tab from the primary line, locate it a half-shingle width away. This way, individual tabs will still be offset by a half tab, but you won’t have to cut shingles to create the pyramid.
Pyramid Pattern Started Mid-Roof
Horizontal Control Lines
Horizontal control lines, snapped parallel to the eaves, are used to keep courses straight. Without horizontal control lines, each shingle course is likely to drift up and down a little (see the photo). When your only horizontal reference is the course of shingles below, gauging errors accumulate with each course. You may find your shingles so far off after only five or six courses that you can’t correct all the error by snapping and following a single horizontal chalkline. It may take two or three courses to make the adjustment, and breaking your pace to snap corrective chalklines slows production. It’s usually more productive to establish horizontal lines while you’re laying out vertical control lines. This saves time in the long run and results in a superior shingle installation.
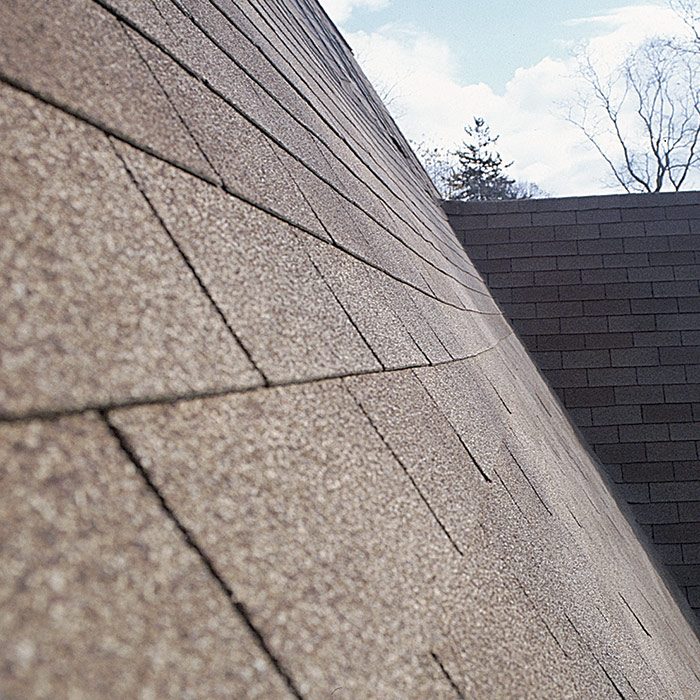
You can strike one horizontal control chalkline for each course of shingles, every other course, every third course, or any combination you feel you need. When you have a line to follow for every course, you merely need to place the top edge of each shingle at the line before you fasten it down. When there’s only a line to follow every third or fifth course, you have to judge the shingle courses between the lines using visual cues to the shingle course beneath or by using a gauge on your hatchet or on the base of a pneumatic nailer or stapler.
| WORK SMART: On long roofs, have someone press the chalkline down tight to the roof at the midpoint with a finger before you snap the line. This prevents a breeze from causing you to snap a chalkline that isn’t straight. |
Roofers usually develop a preference as to how many horizontal control lines they initially snap in chalk and how many courses of shingles they can lay straight without lines. I find it doesn’t take that much longer to snap chalklines for every course as it does for every third, so I just do it.
You don’t have to snap all the horizontal control lines up the entire roof all at once. Mark and snap the lines on the underlayment as you roll out courses and work your way up the roof. Register your tape measure to the top of the last course of shingles you installed, and continue marking exposures from there.
| THINKING AHEAD: It’s helpful to number your marks so that workers at either end of the building can register the chalkline to the same control mark before snapping the chalkline. |
Mark and snap the starter chalkline
The starter course of shingles along the eaves is the first line to establish. Trim off the exposure so the self-seal strip will be at the new bottom edge—the right spot to bond to the shingle above. This means the starter course is only about 7 in. to 9 in. high. Once the starter course is applied, it is completely covered by the first course of shingles.
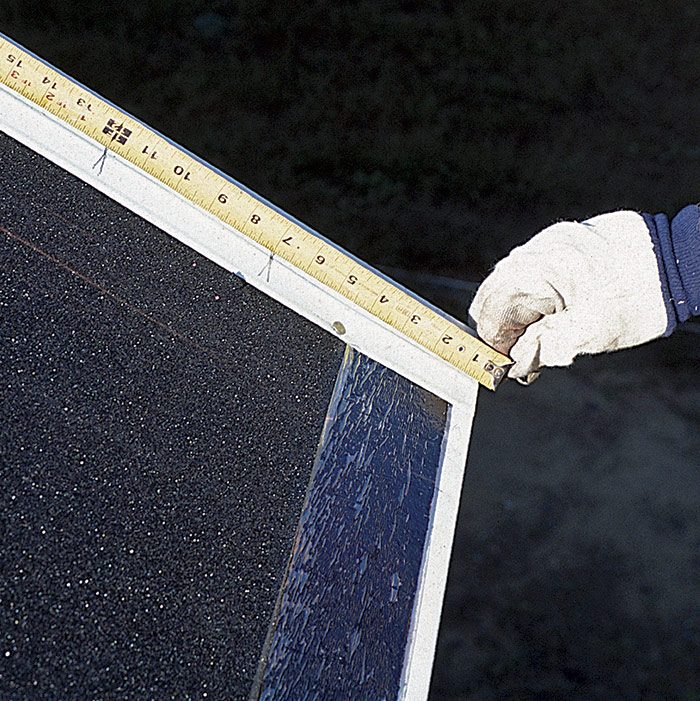
The starter and first courses can overhang the drip edge by up to 1/4 in. You can use the overhang distance to hide minor errors in the straightness of the eaves that you couldn’t take out when you installed the drip edge and first course in a straight line.
Let your tape measure overhang the drip edge by the amount you want the starter course to overhang at one end of the roof. Make two marks on the underlayment; one for the top of the starter course and the other for the first course of full shingles. (Pencil marks are hard to see on black underlayment, so try a light-colored crayon or chalk to make marks.) Do the same at the other end of the roof and snap a chalkline between the marks.
Mark and snap additional control lines
The rest of the horizontal control lines are referenced to the top of the first course. Measure, mark and snap lines at increments equal to the shingle exposure.
You can mark out for the horizontal lines in one of three ways: You can make marks along the rake edges, you can leave tape measures in place at either end of the roof, or you can use leave-in-place layout tape that gets shingled over.
Marking method. This is probably the most time-consuming method because you’re making marks on the underlayment and then revisiting them to snap the chalklines. But snapping lines as you go can be handy on hot days when the underlayment tar absorbs the chalk and makes your lines disappear if you snap them too far in advance.
Set the end of a tape measure on the first-course shingle reference line and stretch it out to the ridge along one rake edge. Make marks with a crayon or chalk at the interval you want control lines: every course, every third course, or every fifth course. When the ridge is within ½ in. of parallel to the eaves, make the marks all the way until you reach the ridge. If the ridge isn’t parallel, stop making marks about 3 ft. from the ridge. (In a moment, I’ll describe how to make adjustments for ridges that aren’t parallel.) Duplicate your layout marks at the opposite end of the roof.
Two-tape method. You can avoid the time-consuming process of making the marks to which to register the chalkline by setting up tape measures at both ends of the roof and just snapping chalklines between corresponding measurements. To hold the tape measures in place, drive nails halfway in near the rakes on the first-course shingle reference line. Hook the tapes to the nails and extend them along the rakes and over the ridge. Lock the tape measures and let their bodies rest on the opposite roof plane; gravity will keep the tapes taut. With a person at each rake edge, snap chalklines between the tapes (see the photo).
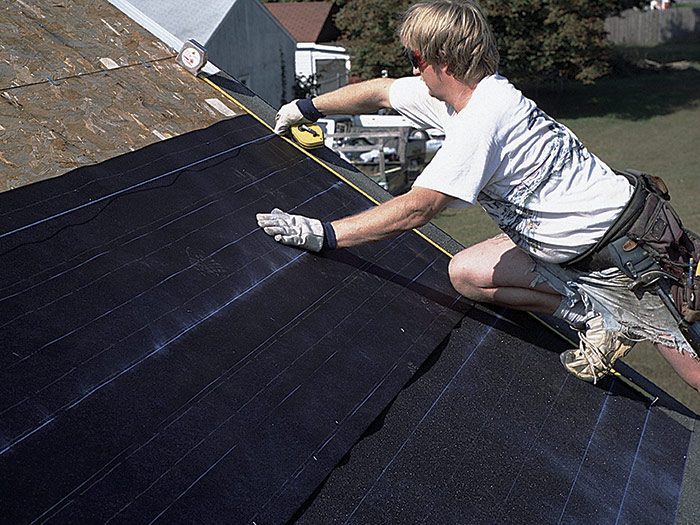
Since both tapes are hooked at the same reference line, all you have to do is call out the measurement to your partner to be sure he’s at the same point before snapping. Use the marking method for the last five to seven lines from the top of the roof to adjust an out-of-parallel ridge in ¼-in. increments).
Disposable tape method. The third way to guide the control chalklines is to use “disposable” fabric or plastic measuring tape. These tapes are marked out with simple measurement systems. Some are made specifically for roofing and just have marks in standard shingle-exposure increments. Unreel a length from the spool, and staple one end to the first-course shingle reference line. Staple the tape every foot or two along the rake until you reach the ridge. Put a tape along each rake and in the middle of roofs wider than 40 ft. or 30 ft. on windy days. Snap chalklines between registration marks on the tapes. Leaving the tapes in place, install the roof shingles over them. Remember to make adjustments to the last few control lines when the ridge is not parallel.
| WORK SMART: In cases where you’re installing a couple of shingle courses at a time, snap the control lines as you go. If you’re using the two-tape method, register it from the top of the last course of shingles installed. If you’re using disposable tape, just leave the tape rolls coiled on each section of the roof and continue unrolling and stapling them as you work your way up. |
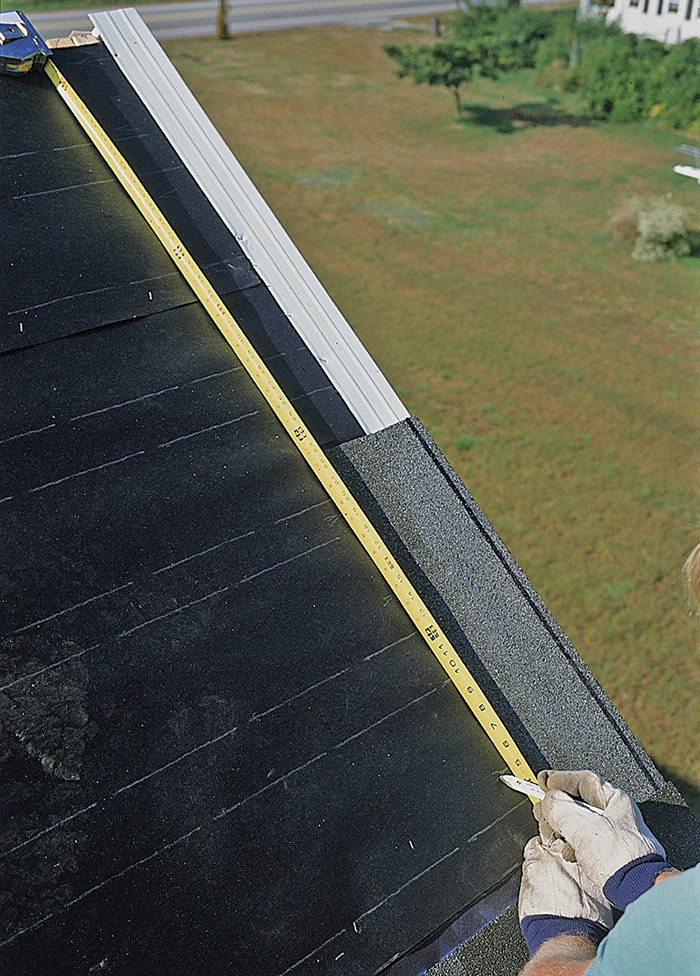
Adjusting for ridges that aren’t parallel
When the ridge is out of parallel to the eaves edge by more than ½ in., you’ll have to adjust the layout of the last few courses so that the last shingle course is parallel. If you don’t make the correction, the cap shingles will highlight the deviation. Make the adjustment by reducing the exposure measurement at the narrower end of the roof for the last few courses of shingles. Reduce each exposure measurement by ¼ in. in the series of adjustment courses until you make up the discrepancy (see the photo). It will take eight courses to make up a 2-in. parallel discrepancy but only two courses for ½ in.
Once you have a pair of marks that are parallel to the ridge, continue making equal exposure marks. Don’t make the adjustment by expanding the exposure beyond the prescribe shingle exposure at the opposite (wider) end of the roof. Doing so may leave properly placed fasteners or the self-seal strip exposed.
Fine Homebuilding Recommended Products
Fine Homebuilding receives a commission for items purchased through links on this site, including Amazon Associates and other affiliate advertising programs.
Peel & Stick Underlayment
Flashing Boot Repair
Hook Blade Roofing Knife

