Establishing Control Lines around an Obstacle
You'll need to snap extra reference lines when installing shingles around a dormer or a chimney that interrupts the roof plane.
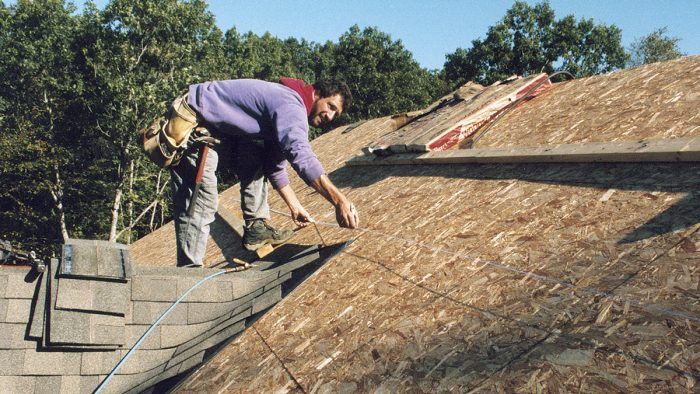
Dormers, chimneys, and other obstacles sticking out of a roof plane require additional horizontal and vertical control lines to keep butts aligned on both sides of the obstacle. Tabbed shingles also require additional vertical control lines to keep the cutouts aligned.
Horizontal Control Lines
If the obstacle obstructs the middle or upper part of the roof and not the eaves, the horizontal control lines are easy to establish. Start along the eaves edge to mark out and snap control chalklines for the top of the starter course and the first course of shingles. Measure up from the first course reference line in the standard course exposure increments for the shingles being installed.
When the obstacle interrupts the eaves, you have to establish a horizontal control line above the obstacle and measure backward to the eaves edge.
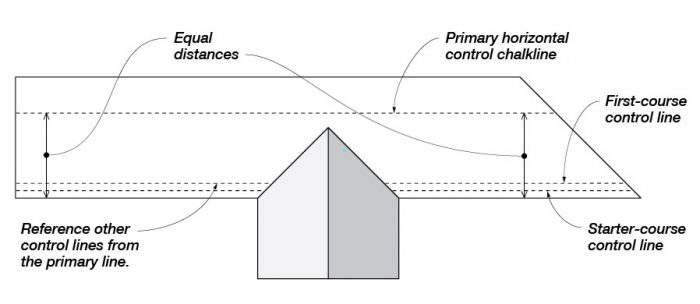
- Establish the control line above the obstacle. Position and tack nail one shingle along the drip edge letting it overhang the desired distance on the far left side of the obstruction and another shingle on the far right side. Measure up from the top of the shingles to equal points about a foot above the obstruction. Select a measurement that is equally divisible by the shingle exposure. For example if the exposure is 5 in. and the obstruction is 82 in. up the roof slope, mark the points at 95 in. to clear the obstruction. Snap a chalkline between the points and extend the line to the edges of the roof. This line will be a reference line and also a control line that a course of shingles can be aligned with. (see the illustration)
Laying Out Horizontal Control Lines around an Obstacle
- Establish starter and first-course lines. Measure back down toward the eaves edge from the control chalkline above the obstacle, then mark control lines for the top of the starter course and the first course of shingles on either side of the obstacle. You’ll need to measure down at two points at each side of the obstacle so you will have two points to snap from on both sides of the obstacle.
- Check for correct shingle overhang. Measure from the drip edge to the top of the shingle control line along the eave edge to make sure the shingles will be within an acceptable range of overhang beyond the drip edge—usually flush to 1/2 in. If it is less or more than the target range, adjust the primary control line above the obstacle to make the correction.
- Establish additional control lines. You can raise or lower one end of the line or both ends depending on how the drip edge measures up from one side of the obstacle to the other. After you adjust the primary control line, remeasure and resnap the pair of chalklines along the eaves, then check the measurements to the drip edge. When you are satisfied with the measurement range, mark and snap the rest of the control chalklines up the roof.
Establishing vertical control lines around an obstacle for 3-tab and patterned shingles
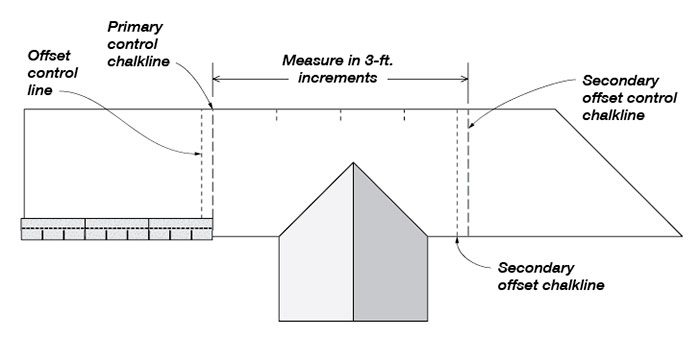
To keep the cutout slots on both sides of an obstacle aligned, you’ll need to snap two sets of vertical control lines; one set at each side. Select points and snap a primary vertical control chalkline and the offset lines on one side of the obstacle in the same fashion as described in the article Control-Line Layout. Most of your shingles will be guided by these primary lines.
Measure from your primary control line to the other side of the obstacle along the eaves edge and the ridge (or two point above or below the obstacle when it blocks the eaves edge or ridge). Make marks at increments equal to the shingle length so the ends of full shingles will land on the primary control lines as well as the secondary lines around the obstacles. Snap the secondary control chalkline and offset chalklines (see the illustration).
Laying Out Vertical Control Lines around an Obstacle
Fine Homebuilding Recommended Products
Fine Homebuilding receives a commission for items purchased through links on this site, including Amazon Associates and other affiliate advertising programs.
Peel & Stick Underlayment
Roofing Gun
Fall Protection

