FHB Logo Facebook LinkedIn Email Pinterest Twitter X Instagram Tiktok YouTube Plus Icon Close Icon Navigation Search Icon Navigation Search Icon Arrow Down Icon Video Guide Icon Article Guide Icon Modal Close Icon Guide Search Icon Skip to content
Subscribe
Log In
  • How-To
  • Design
  • Tools & Materials
  • Restoration
  • Videos
  • Blogs
  • Forum
  • Magazine
  • Members
  • FHB House
  • Podcast
Log In

Fine Homebuilding Project Guides

Roofing

Guide Home
  • Tools and Materials
  • Roof Replacement and Reroofing
  • Roof Ventilation
  • Waterproofing
  • Installing Asphalt Shingles
  • Installing Other Types of Roofs
  • Roof Maintenance and Repair

Establishing Control Lines on Roof Planes with Jogs

A roof with multiple eaves complicates the layout, requiring a number of adjustments.

By Mike Guertin
  • X
  • facebook
  • linkedin
  • pinterest
  • email
  • add to favorites Log in or Sign up to save your favorite articles

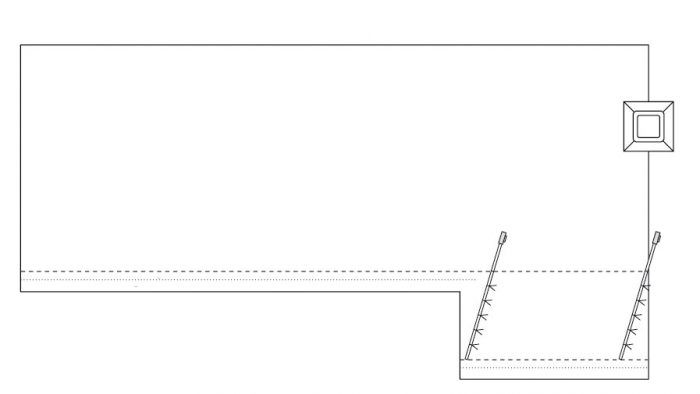
Roof planes with jogs will have more than two rake edges and will have multiple eaves edges. This occurs when a portion of a roof plane continues past the eaves of the main part of the roof as is often the case with contemporary-style homes. This complicates the layout of vertical and horizontal control lines by forcing you to consider more variables. Here’s how to lay out first the vertical control lines and then the horizontal control lines on the jog (see the illustration).

 Establishing Parallel Vertical Control Lines on Jogs in a Roof

Vertical Control Lines on Jogs in a Roof

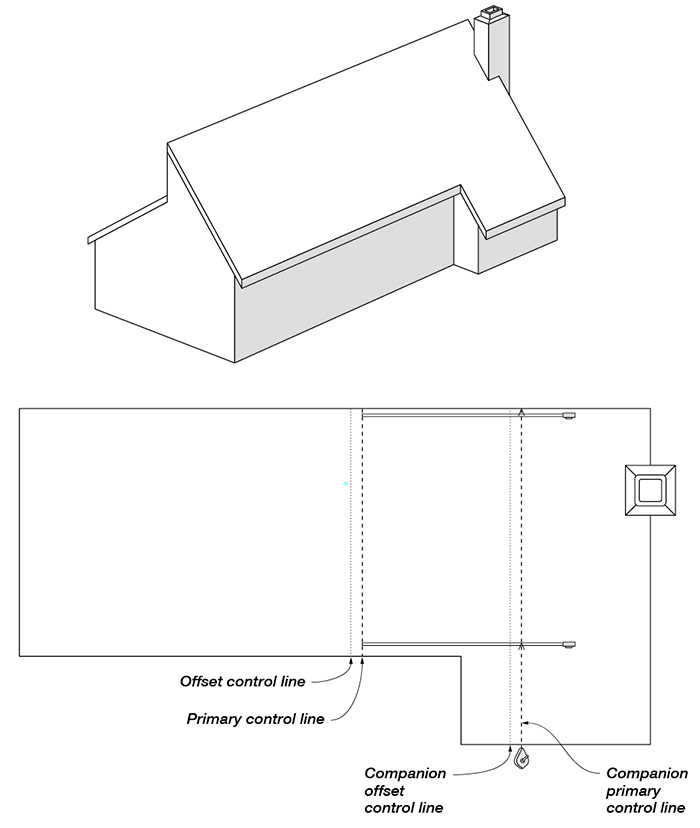
Establish Primary Vertical Control Lines

Again, the vertical control lines are needed only for three-tabbed shingles. Lay out for the primary vertical control line using the method described in the article Control-Line Layout. Measure to each of the rake edges from the control line to see that you’ll end with a shingle piece longer than 6 in. and that the last tab will be 1½ in. wide or greater. Try to shift the vertical control line so the shingles will end within the 6-in. and 1½-in. minimums. Sometimes you won’t be able to meet this standard on every rake, usually breaking the 1½-in. tab rule. When you can’t avoid tabs narrower than 1½ in., plan to seal them down with a dab of asphalt cement.

Establish Companion Vertical Control Lines on the Jog

Where a roof section jogs below or above the main part of the roof, you’ll need to snap a companion set of vertical control chalklines for the shingles to follow until you reach the main roof. The process is similar to marking a secondary vertical control line on the opposite side of an obstacle.

Starting from the primary vertical control line, measure out an equal distance along the ridge and along the eaves. Mark two points that are over the jog and are at a shingle-length increment from the primary line. Place the chalkline on the ridge point and pull it down to the eaves. Adjust the chalk string until it is exactly over the lower point and snap the line.

Establishing Horizontal Control Lines on the Jog

If a roof plane jogs down, it’s unlikely that the horizontal spacing for the main part of the roof will give you full shingles along the jog’s eaves, so you have two choices. You can continue the horizontal alignment of the main roof and trim the butts at the jog eaves, or you can reduce the exposures on the jog to result in a full-shingle first course.

Trimming the Butts

If you decide to trim the first-course butts, mark and snap horizontal control chalklines for the starter and first course of shingles along the longest eaves edge. Extend the chalklines through the jog.

On the jog, measure down from the primary horizontal first-course line in course-exposure increments to mark and snap chalklines. Stop snapping chalklines when you reach the first exposure increment within 12 in. of the eaves edge. This will be the top of the first course of shingles. Mark for the starter shingles in the normal way, allowing for drip-edge overhang. After you install the starter shingles, measure from the bottom edge of the starters to the first control line, and trim the first-course shingles to this height.

THINKING AHEAD: When trimming first-course shingles, always cut from the butt of the shingles so the self-seal strip will be in the correct location to seal the tabs of the shingle above.


Reducing Exposures on the Jog

Here’s a math-avoiding method to reduce the shingle exposures on the jog if you decide you want a full course at the jog’s eaves. Again, start by continuing the starter- and first-course horizontal lines from the main roof across to the jog (see the illustration).

 Adjusting Course Exposure (Height) on Jogs in a Roof

Adjusting Course Exposure (Height) on Jogs in a Roof

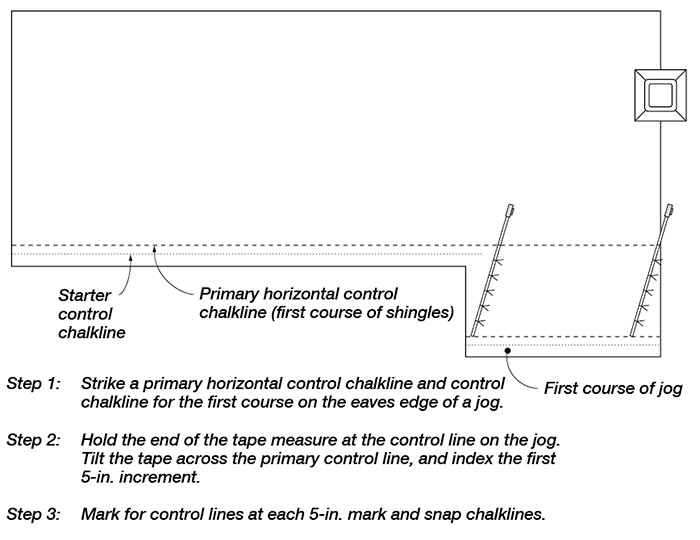
At the eaves of the jog, mark control lines for the starter and first course exactly as you would for a main roof. Before you snap lines between the marks, measure up to make sure these lines will be parallel to the lines you extended across the main roof. If they aren’t, make minor adjustments up or down until the marks are parallel and the resulting shingle overhang is ¼ in. to ¾ in. By making this adjustment, the shingle overhang won’t be equal beyond the drip edge, but the shingle courses will be parallel. Now snap the starter and first-course lines at the jog eaves.

Measure from the 12-in. line along the jog eaves up to the line extended from the 12-in. line for the main roof. Most likely the measurement won’t be divisible by 5-in. increments, so you’ll need to reduce each course by an equal amount. Here’s the math-avoiding trick: Drive a nail into the jog’s 12-in. line with the head protruding enough to hook your tape. You don’t need to measure the position of the nail—just put it near one rake. Hook the tape and pull it past the main roof’s 12-in. line, then tilt the tape until the next 5-in. increment crosses the line. Have someone mark every 5-in. increment along the tilted tape. Repeat the process near the other rake, then snap control lines between all these marks.

Fine Homebuilding Recommended Products

Fine Homebuilding receives a commission for items purchased through links on this site, including Amazon Associates and other affiliate advertising programs.

Roofing Gun

This lightweight, pneumatic roofing nailer is capable of driving ¾-in to 1¾-in coil roofing nails and has a depth adjustment wheel to dial in nailing depth on the various shingle types you're likely to encounter.
Buy at Amazon

Shingle Ripper

This tool makes tearing off shingles easier and faster, providing powerful leverage that allows you to work comfortably. Its beveled teeth and wide blade make it easy to remove nails and push shingles off the roof.
Buy at Amazon

Ladder Stand Off

Stability is key when working off a ladder or accessing the roof, and this lightweight aluminum stand-off makes any extension ladder safer and more comfortable to use.
Buy at Amazon
Previous: Establishing Control Lines around an Obstacle Next: How to Get a Good-Looking Layout with Laminated Shingles

Guide

Roofing

Chapter

Installing Asphalt Shingles

Sign up for eletters today and get the latest how-to from Fine Homebuilding, plus special offers.

Signing you up...

This site is protected by reCAPTCHA and the Google Privacy Policy and Terms of Service apply.
See all newsletters
See all newsletters

Log in or create an account to post a comment.

Sign up Log in

Become a member and get full access to FineHomebuilding.com

Roofing

Roofing

A complete resource that includes the best materials and the right techniques to build a sturdy, leak-free, attractive roof on any house

View Project Guide

View All Project Guides »

Become a member and get unlimited site access, including the Roofing Project Guide.

Start Free Trial

Tools and Materials
  • Roof Coverings
  • Roofing Materials
  • Power Tools
  • Handy Helpers
  • Staging and Ladders
  • Safety Equipment
Roof Replacement and Reroofing
  • Preparing the Old Roof
  • Sheathing
  • Installing the New Roof
Roof Ventilation
  • Venting Basics
  • Installation
Waterproofing
  • Underlayment
  • Drip Edge
  • Flashing Adjoining Walls
  • Dormer and Skylight Flashing
  • Chimney Flashing
  • Vent Flashing
  • Gutters
Installing Asphalt Shingles
  • Calculating Shingles
  • Layout
  • Installation
  • Valleys
Installing Other Types of Roofs
  • Cedar Shingles
  • Metal
  • Low-Slope Roofs
  • Slate and Tile
Roof Maintenance and Repair
  • Assessing the Problem
  • Repairing Asphalt-Shingle Roofs
  • Other Roofing Repairs

Fine Home Building

Newsletter Sign-up

  • Fine Homebuilding

    Home building tips, offers, and expert advice in your inbox.

  • Green Building Advisor

    Building science and energy efficiency advice, plus special offers, in your inbox.

  • Old House Journal

    Repair, renovation, and restoration tips, plus special offers, in your inbox.

Signing you up...

This site is protected by reCAPTCHA and the Google Privacy Policy and Terms of Service apply.
See all newsletters

Follow

  • Fine Homebuilding

    Dig into cutting-edge approaches and decades of proven solutions with total access to our experts and tradespeople.

    Start Free Trial Now
    • Facebook
    • Instagram
    • X
    • LinkedIn
  • GBA Prime

    Get instant access to the latest developments in green building, research, and reports from the field.

    Start Free Trial Now
    • Facebook
    • YouTube
  • Old House Journal

    Learn how to restore, repair, update, and decorate your home.

    Subscribe Now
    • Facebook
    • Instagram
    • X

Membership & Magazine

  • Online Archive
  • Start Free Trial
  • Magazine Subscription
  • Magazine Renewal
  • Gift a Subscription
  • Customer Support
  • Privacy Preferences
  • About
  • Contact
  • Advertise
  • Careers
  • Terms of Use
  • Site Map
  • Do not sell or share my information
  • Privacy Policy
  • Accessibility
  • California Privacy Rights

© 2025 Active Interest Media. All rights reserved.

Fine Homebuilding receives a commission for items purchased through links on this site, including Amazon Associates and other affiliate advertising programs.

  • Home Group
  • Antique Trader
  • Arts & Crafts Homes
  • Bank Note Reporter
  • Cabin Life
  • Cuisine at Home
  • Fine Gardening
  • Fine Woodworking
  • Green Building Advisor
  • Garden Gate
  • Horticulture
  • Keep Craft Alive
  • Log Home Living
  • Military Trader/Vehicles
  • Numismatic News
  • Numismaster
  • Old Cars Weekly
  • Old House Journal
  • Period Homes
  • Popular Woodworking
  • Script
  • ShopNotes
  • Sports Collectors Digest
  • Threads
  • Timber Home Living
  • Traditional Building
  • Woodsmith
  • World Coin News
  • Writer's Digest
Active Interest Media logo
X
X
This is a dialog window which overlays the main content of the page. The modal window is a 'site map' of the most critical areas of the site. Pressing the Escape (ESC) button will close the modal and bring you back to where you were on the page.

Main Menu

  • How-To
  • Design
  • Tools & Materials
  • Video
  • Blogs
  • Forum
  • Project Guides
  • Reader Projects
  • Magazine
  • Members
  • FHB House

Podcasts

  • FHB Podcast
  • ProTalk

Webinars

  • Upcoming and On-Demand

Podcasts

  • FHB Podcast
  • ProTalk

Webinars

  • Upcoming and On-Demand

Popular Topics

  • Kitchens
  • Business
  • Bedrooms
  • Roofs
  • Architecture and Design
  • Green Building
  • Decks
  • Framing
  • Safety
  • Remodeling
  • Bathrooms
  • Windows
  • Tilework
  • Ceilings
  • HVAC

Magazine

  • Current Issue
  • Past Issues
  • Magazine Index
  • Subscribe
  • Online Archive
  • Author Guidelines

All Access

  • Member Home
  • Start Free Trial
  • Gift Membership

Online Learning

  • Courses
  • Project Guides
  • Reader Projects
  • Podcast

More

  • FHB Ambassadors
  • FHB House
  • Customer Support

Account

  • Log In
  • Join

Newsletter

Get home building tips, offers, and expert advice in your inbox

Signing you up...

This site is protected by reCAPTCHA and the Google Privacy Policy and Terms of Service apply.
See all newsletters
See all newsletters

Follow

  • X
  • YouTube
  • instagram
  • facebook
  • pinterest
  • Tiktok

Join All Access

Become a member and get instant access to thousands of videos, how-tos, tool reviews, and design features.

Start Your Free Trial

Subscribe

FHB Magazine

Start your subscription today and save up to 70%

Subscribe

This is your last free article.

Don't miss another expert tip or technique from building pros. Start your free trial today.

Start your FREE trial

Already a member? Log in

We hope you’ve enjoyed your free articles. To keep reading, become a member today.

Get complete site access to expert advice, how-to videos, Code Check, and more, plus the print magazine.

Start your FREE trial

Already a member? Log in

Privacy Policy Update

We use cookies, pixels, script and other tracking technologies to analyze and improve our service, to improve and personalize content, and for advertising to you. We also share information about your use of our site with third-party social media, advertising and analytics partners. You can view our Privacy Policy here and our Terms of Use here.

Cookies

Analytics

These cookies help us track site metrics to improve our sites and provide a better user experience.

Advertising/Social Media

These cookies are used to serve advertisements aligned with your interests.

Essential

These cookies are required to provide basic functions like page navigation and access to secure areas of the website.

Delete My Data

Delete all cookies and associated data