Flashing a Deck the Hard Way
Adding flashing between the deck ledger and the house means safely removing and replacing rows of decking and siding.

The family that built our home and deck didn’t use any flashing between the deck ledger and the house. I’ve confirmed there is no major damage, but I want to add the correct flashing to make things right. How can I go about doing this?
—Aaron Grames via email
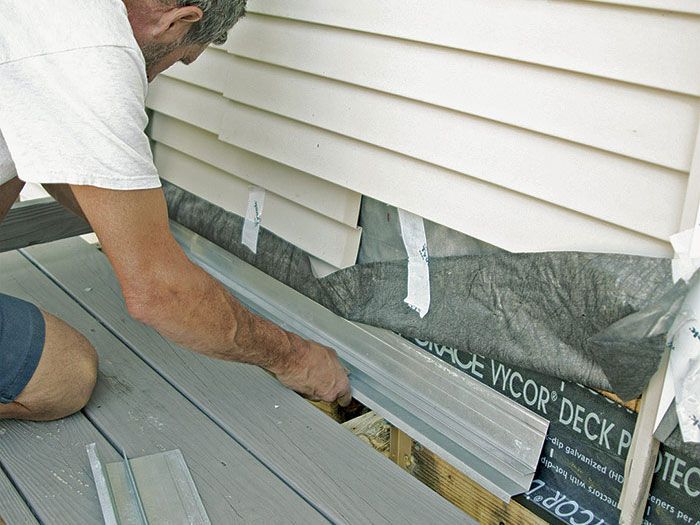
Remodeling contractor Andy Engel replies: It would have been so much easier if they’d done it right the first time! In any event, you’ll need to remove a course or two of decking at the house, and a course or two of siding above the deck. If there’s siding below the deck, you’ll need to remove a course there as well. This will allow access to slip the new deck flashing under the house’s weather-resistive barrier (WRB). You’ll have to cut the WRB just above the ledger. Fold up the WRB to expose about 1 ft. of the sheathing above. Tape the WRB to the siding above to keep it out of the way.
If you have access below the deck, the next step is to build a temporary support beam to take the load off the ledger. This is potentially dangerous, so if you aren’t completely certain how to do it safely, hire a pro. Be sure to lag-bolt framing lumber between the bases of the outer posts and the joists near this temporary beam to help prevent the deck from pulling away from the house. Block off all unnecessary access to the deck from above.
If your deck is too close to the ground to get under, you’ll have to remove several feet of decking near the house to have access to support the joists from below. You’ll probably have to block under each one with scraps of lumber.
With the safety issues in hand, back out the existing lag bolts or structural screws from about 10 ft. of ledger at a time. You might also need to pull the joist-hanger nails if they’re long enough to protrude through the ledger. If you do this, replace them with 1 1⁄2-in. structural screws as you go–both Simpson Strong-Tie and MiTek make them for joist hangers.
With a section of the ledger detached from the house, slide metal or PVC flashing behind it. The flashing needs to be on top of the WRB below the ledger, lapping it by 2 in. or so. Above the ledger, the flashing should extend at least 3 in. up behind the WRB, and more is better.
Using new lag bolts or structural screws in new holes and spaced according to the table in the DCA 6 guide or the International Residential Code, reattach that section of ledger. Move over to the next 10-ft. section, leaving the adjoining ledger loose enough to be able to lap the flashing you’re about to install 6 in. laterally over the flashing you’ve just placed, and repeat the process.
Once the flashing behind the ledger is complete and the ledger is reattached to the house, move to the top and complete the flashing. Place a drip cap made from the same material as the flashing over the ledger, notching the down-leg at each joist. Run a band of 9-in. self- adhering membrane (I like 3M’s All Weather Flashing Tape) so that it laps both the top of the drip cap and the top of the flashing. Fold the WRB back down over the new tape and flashing, and tape any side cuts you had to make in it. Reinstall the decking and siding and pop a cold one. You’ve earned it.
From Fine Homebuilding #298
Fine Homebuilding Recommended Products
Fine Homebuilding receives a commission for items purchased through links on this site, including Amazon Associates and other affiliate advertising programs.

Jigsaw

Standard Marking Chalk

4-Gallon Piston Backpack Sprayer


