Dampproofing and Waterproofing for Foundation Walls
The easiest and most economical place to waterproof a basement or crawlspace is on the outside, but there are reliable interior solutions too.
Early morning TV viewers in Portland, Maine, sooner or later will meet Tony Hafford, founder of T.C. Hafford Basement Systems. The affable pitchman stands beneath an oversized umbrella and promotes a business devoted to “all things basementy.” Hafford is one of hundreds, maybe thousands, of specialists around the country who have made careers out of rehabbing wet, moldy basements and crawlspaces. But few in the business would argue that even a successful retrofit is better than keeping water out of the basement in the first place.
“It’s always better to treat the exterior,” says Peter Barrett, product and marketing manager for Dörken Systems Inc., which makes a variety of waterproofing products. “It’s always better to try to keep the water out of the system than manage the water once it gets into the system.”
Expectations for below-ground spaces continue to rise, as building scientist John Straube points out in this webinar at Dörken’s website. Homeowners at one time expected their basements to be wet once in a while. Who cared? They were used mainly for storing coal and potatoes. That’s s no longer the case. Basements are increasingly becoming in-law suites, man caves and home theaters where finish materials rival those in above-grade parts of the house, Straube says. And for that, any amount of water is a potentially serious problem.
Products and techniques for managing water infiltration go far beyond the buckets of asphaltic goop that builders spread on below-grade portions of foundation walls. Although that’s still a common approach for dampproofing foundations, builders also will find a range of other products, from peel-and-stick waterproofing membranes to liquid-applied synthetic rubber designed to span cracks in the concrete that are bound to develop in time.
When builders combine these products with below-grade perimeter drains, and sensible site grading and gutter systems that carry rainwater away from the house, the chances of keeping a basement dry start to look very good.
Do you need dampproofing or waterproofing?
Even in parts of the country that don’t have a high water table or get much rain, dampproofing is required by the International Residential Code (section R406.1). Approved materials include bituminous coatings (asphalt that has been diluted with solvents)‚ acrylic modified cement, or surface-bonding cement. Asphaltic coatings are very common. They can be applied with a sprayer or with a brush, and in many parts of the country that’s all the foundation walls will get in the way of moisture control.
Dampproofing resists the passage of liquid water that is not under hydrostatic pressure, which is the case when the foundation is backfilled with a well-draining material and is not subjected to standing water. “In the vast majority of cases, residential cases, dampproofing is more than adequate,” says Barrett. “Most of the time, waterproofing is not needed residentially.”
Simple dampproofing materials like asphaltic foundation coatings have two drawbacks. One is that they will not span any cracks that develop in the foundation wall—and foundation cracks are viewed as all-but-inevitable. Second, while effective at blocking the migration of moisture through concrete, they are not capable of blocking the passage of water that is under hydrostatic pressure.
Asphaltic coatings may be solvent- or water-based. The liquid is the carrier, says Russ Snow, sales manager and product group manager for W.R. Meadows, but the products are essentially the same once the liquid has evaporated and the coating has cured. Why one over the other? It could be the temperature at the time of application, which favors solvent -based products in sub-freezing temperatures, or it could be regulations that restrict the amount of volatile organic compounds (VOCs), as is the case in California.
One of the reasons that builders may stick with simple dampproofing is cost, says Steve Geiger, product group manager for W.R. Meadows. Waterproofing sheet membrane the company sells costs roughly $1 a square foot ($180 for a roll that yields about 175 square feet of usable membrane) while a water-based dampproofing costs $300 for a 55-gallon drum, or about 22 cents a square foot. If the builder is treating 1,000 square feet of foundation wall, the cost would be $1,000 vs. $220 (without factoring in labor). On low risk sites where free-draining backfill and perimeter drains are provided, especially where basement use is limited, dampproofing may make sense to a developer looking for any way to cut costs.
Dimple mat and drain board
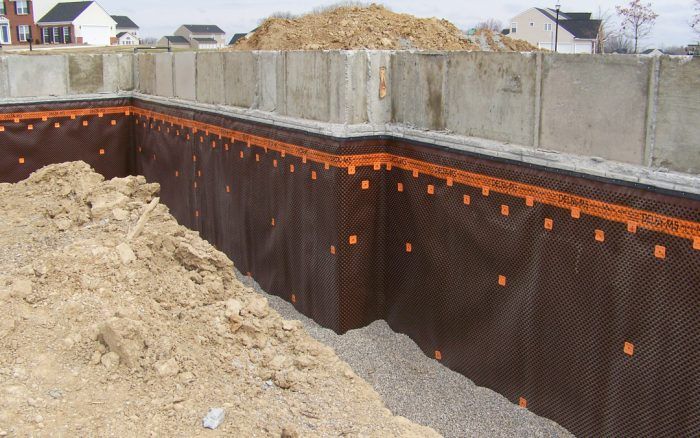
Dimple mat, or dimple board, is a product that seems to fall somewhere in between simple asphaltic dampproofing and a full-on waterproofing membrane. Dörken’s version is called Delta MS. It is a high-density polyethylene sheet combining recycled and virgin materials whose surface is studded with 5/16-inch-tall dimples. The sheet is installed so the dimples face the foundation wall, creating an air space between the membrane and the foundation. Water that makes its way past the face of the sheet should make run down to perimeter drains at the base of the wall without hydrostatic pressure that would cause problems. It’s also used on the inside of foundations in basement retrofits.
Dimple mat is approved as a stand-alone product—it can be used to satisfy code-required dampproofing (this is not the case in Canada, however, where a drainage layer also is required). Despite the fact that dimple mat is impervious to water, it’s still not considered a waterproofing layer because it is not sealed at the bottom of the wall, says Barrett. A rising water table can push moisture up behind the membrane at the footing.
Drainage board, such as Dörken’s Delta-Drain, is similar to dimple mat except that the dimples face outward and are covered with a layer of geotextile material. The geotextile keeps sediments out, and the textured surface of the membrane creates an air gap to relieve hydrostatic pressure. Drainage board can be used to protect a dampproofing or waterproofing layer but it’s not designed as a stand-alone product, Barrett says. It’s often used as part of a waterproofing assembly.
Waterproofing required under some conditions
Builders will have to move up to a true waterproofing material when site conditions include a high water table, or when taking extra precautions against water intrusion. A variety of sheet- and liquid-applied membranes can be used, all designed to resist the hydrostatic pressure of ground water. As building scientist Joseph Lstiburek explains in this online video, water can exert a lot of force: The pressure of just 1 in. of standing water is equal to 250 pascals, the same as a 70-mph wind. So on a site where the foundation may be sitting in a foot or two of water, even seasonally, there’s a lot of force to create leaks.
The code permits a variety of waterproofing materials (even rolled roofing), but the most common for residential work are probably liquid-applied and peel-and-stick sheet membranes. Liquid-applied varieties can be sprayed, rolled or troweled onto the surface, typically to a thickness of 60 mils wet (curing to 40 mils). Styrene-butadiene rubber compounds cure to a flexible, rubbery consistency. According to the Concrete Network, liquid-applied membranes go on quickly, and are relatively low in cost. Although liquid-applied membranes are seamless, their potential weakness is inconsistent application resulting in uneven thickness on the concrete.
“With the spray, quality control is always with the guys doing the spraying,” Barrett said. “Whatever thickness you get is whatever the guy puts on.”
Snow, on the other hand, prefers fluid-applied membranes because there are no seams or joints to detail. The performance of liquid-applied and sheet membranes is the same, he says, and costs are similar. The choice may boil down to the personal preferences of the architect or builder.
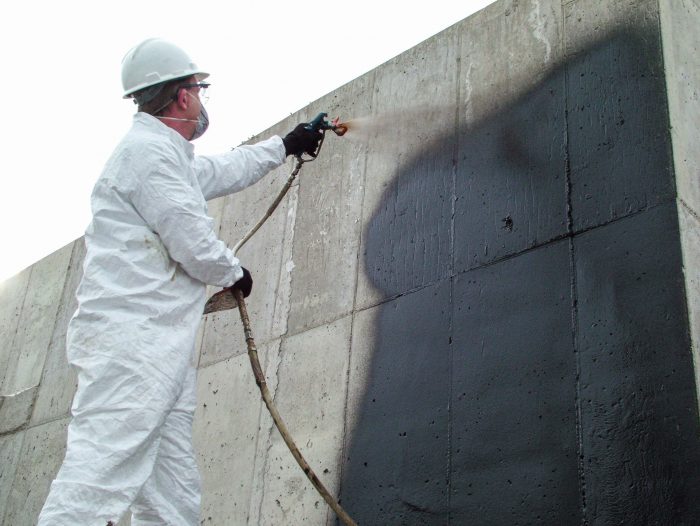
Liquid-applied waterproofing membranes may come in several grades, with a manufacturer’s better-quality products guaranteed for greater amounts of hydrostatic head. Tremco, for example, offers two versions of its flagship Tuff-N-Dry membrane, a polymer-fortified asphalt. The H8 version will handle 8 feet of head while the XTS, used in both residential and light commercial work, will resist 12 ft. of hydrostatic head, according to the company. These coatings are typically combined with a fiberglass board insulation that both insulates the wall and protects the waterproofing.
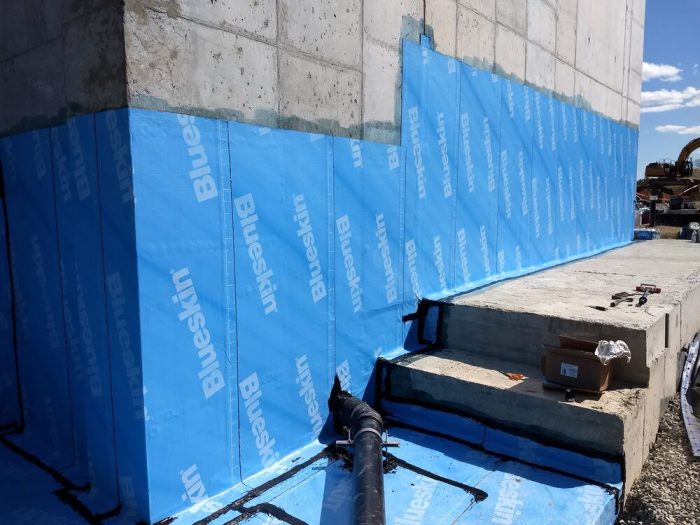
Peel-and-stick membranes are sold by a number of companies under a variety of trade names—Blueskin WP 200 from Henry, for example or Mel-Rol from W.R. Meadows. Some but not all sheet membranes are applied over a primer, and manufacturers offer versions that can be applied in temperatures as low as 0°F.
There’s one thing to keep in mind when using a waterproofing membrane on the foundation walls, Straube says. Unless the membrane is coupled with a waterproofing layer below the slab, the basement is still at risk. With enough of a hydrostatic head, water will be forced up through the slab even if the walls are watertight.
A good-better-best approach
Straube suggests a three-tiered approach to protecting the foundation, with the choice hinging on site conditions and budget. The “entry level of good performance,” as Straube puts it, would consist of a drainage membrane like dimple map plus a perimeter drain at the base of the wall. The membrane would provide a vapor barrier and a capillary break. A little bit of water might get through at a puncture or nail hole, but a little water shouldn’t be a problem.
A second level of performance would include a dampproofing layer (sprayed on asphaltic emulsion, for example), plus a drainage membrane like dimple mat, and drainage at the base of the wall. The top edge of the membrane should be sealed to the foundation. This assembly, what he calls the “biggest bang for the buck,” should be able to cope with relatively wet conditions and work on all but the most challenging sites. If water gets through the dimple sheet, the dampproofing will prevent it from being absorbed by the concrete. (This assembly looks a lot like an above-grade rainscreen wall, with the dimple mat taking the place of exterior cladding, and the dampproofing filling the role of a water-resistive barrier.)
For really wet sites, with lots of water expected in the soil, or in situations where the living space inside the basement is especially vulnerable to moisture, Straube recommends another step up. The layers would consist of a dampproofing layer, a dimple sheet to provide an air gap, and then a drainage sheet with a geotextile layer that sheds water down to the bottom of the wall where it is picked up by the perimeter drain.
In all cases, installing a perimeter drain below the level of the basement floor is essential.
Combining multiple layers for added protection
Combining different moisture control layers is popular with a number of builders. One of them, Texas-based Matt Risinger, starts with a liquid-applied or peel-and-stick membrane that is applied directly to the foundation wall (he fills any large voids with mortar first). After spraying on a 60-mil layer of styrene-butadiene rubber, Risinger explains in this article in the Journal of Light Construction, he adds a heavy bead of sealant at the cold joint between the wall and the footing. Imperfections in the sprayed coat are repaired or filled with the sealant (Risinger recommends Poly Wall 2200). Alternately, he’ll use a peel-and-stick membrane 40 mils thick over a primer. Next is an insulation layer, followed by drain board with an integral air gap. The drain board protects the waterproofing layer while relieving hydrostatic pressure. Perimeter drains of 4-inch Schedule 40 PVC covered with coarse gravel or septic rock in filter fabric completes the installation.
Maine builder Ben Bogie uses a peel-and-stick waterproofing membrane or a fluid-applied waterproofing product, also in combination with dimple mat and perimeter drains.
Hammer & Hand, the design/build company in the Pacific Northwest, recommends in its Best Practices manual a liquid-applied elastomeric membrane directly over the concrete, followed by drainage mat with integrated filter fabric. The manual also recommends an expanding waterstop made of bentonite over a capillary break between the footing and the foundation wall.
Other materials for waterproofing
Peel-and-stick and liquid-applied membranes are common on residential sites, but manufacturers offer several other options. They include flexible cementitious coatings—such as W.R. Meadows’ two-part Cem-Kote Flex ST—and panels made with a layer of sodium bentonite (a variety of clay) that expands to form a watertight barrier when it gets wet. Tremco’s HDPE/Bentonite is typical of these products. It combines bentonite and a high-density polyethylene sheet that is installed on the outside of the foundation before backfilling. Moisture in the soil cause the bentonite to expand, sealing out ground water.
Bentonite panels are still common on commercial waterproofing jobs, says Geiger, and remain popular with some architects and builders. But, he adds, just as water makes the bentonite swell, a lack of water makes the panels shrink. In soils that go through repetitive wetting and drying cycles, the panels eventually show signs of wear and become less effective than if they had stayed wet all the time.
An option used less frequently is a thermofusible membrane. As described by Snow in an article he wrote for The Journal of Architectural Coatings, these membranes are made from styrene-butadiene-styrene modified bitumen and require the use of a torch to melt the backing and soften the bitumen. The heat fuses layers together and overcomes some of the shortcomings of self-adhering membranes by providing complete coverage of joints and other details. Snow adds: “These systems, however, require application by skilled installers and can be quite dangerous.”
Although a number of other materials also would satisfy IRC requirements for waterproofing, the availability of so many spray-on and peel-and-stick membranes probably makes many of them seem either obsolete or less reliable.
Retrofits can get complicated
Stopping water leaks in an existing foundation is more complicated. This can be handled from the outside (positive side repairs) or from the inside (negative side repairs). But before doing any work on the foundation itself, it might pay to inspect the grade around the house and the condition (or existence) of gutters and downspouts to make sure that runoff does not pool around the foundation but is directed safely away from the house. Some wet basement issues can be solved with these steps alone.
When the basement is used only for storage or mechanicals, a little water once in a while may not be a big deal. But when the basement is being turned into living space, solving moisture issues becomes very important. Repairs from the outside involve digging a trench on the outside of the foundation, adding perimeter drains if they do not already exist, and adding dimple mat or another type of membrane to the outside of the foundation wall. Flower beds, overhanging decks, nearby neighbors and a variety of other site conditions may make this difficult, and it will be expensive.
Spot repairs aimed at fixing a limited number of cracks in a concrete foundation can be handled in a less obtrusive way than digging up the entire foundation perimeter. As explained by Matt Stock, president and owner of U.S. Waterproofing, a Chicago-area company, it’s possible to dig outside the foundation to expose a crack with a shovel or post-hole digger, then treat the area with bentonite. In other cases, more extensive repairs may be needed. As Stock points out, the solution has to take site conditions into account. “No one size fits all,” he said in a telephone call.
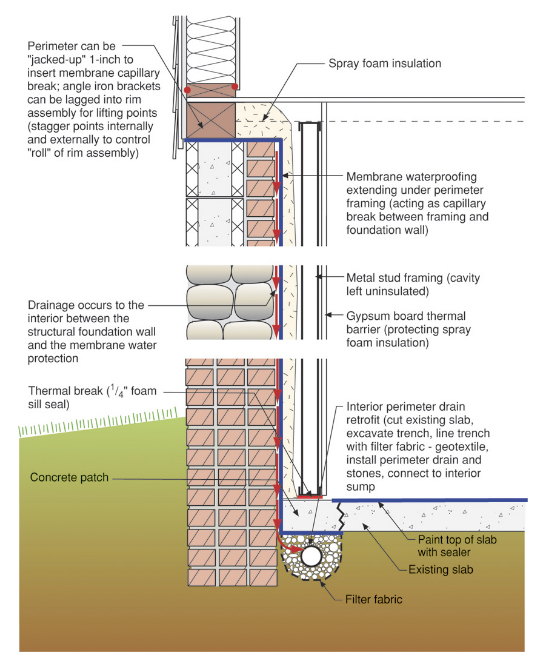
Contractors like U.S. Waterproofing have a variety of options for tackling repairs from the inside. As this Building Science Corporation paper explains, the concrete slab can be cut back along the edge, a trench dug to accommodate drain pipe and crushed rock, and an interior sump pump installed to get the water out of the basement. An interior drainage layer—such as dimple mat or sheet waterproofing membrane—can be added. For uneven rubble foundations, a layer of spray foam insulation can be applied over the waterproofing membrane, as the illustration below shows.
One potential risk from this approach is that unless you’re careful cutting back the slab and opening the floor creates a pathway for radon, a naturally occurring radioactive gas, to enter the house. “Personally, I think it’s a terrible idea,” says Barrett, who adds that radon is the second leading cause of lung cancer in the U.S. after smoking. “If you have to do it make it as airtight as possible.”
The Building Science report addresses the issue this way: “Where an interior drainage layer is used, it must be gas tight (meets the requirements for air barrier materials/assemblies) and vapor tight (Class I vapor control layer) relative to the interior.”
Hammer & Hand uses essentially the same procedure. One difference is that 16-inch sections of the slab are left intact every 15 to 20 feet to keep the foundation wall stable, as the illustration below shows. The sump basin is always capped with a lid that is vapor and air tight.
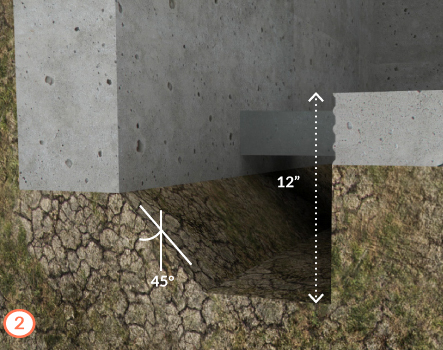
When cracks in a concrete foundation are not structural, they can be repaired by injecting them with epoxy or urethane from the inside. The sealant is pushed through the entire depth of the crack to plug leaks effectively, Stock said. In a technique called curtain wall injection, a series of holes is drilled all the way through a foundation and a sealant is pumped into the soil surrounding the wall or slab to create a waterproof barrier. But this approach would be more common with a brick foundation than it would with a monolithic concrete foundation.
Coatings applied from the inside
Another way of tackling leaky basement walls is by using a waterproofing coating on the interior. In one of what he calls his Wingnut Real-World Tests, GBA technical director and building consultant Peter Yost experimented with several waterproofing compounds: UGL Drylok Extreme, Koster NB1 Grey, and Xypex Concentrate. Do these interior moisture control systems really work? That’s what Peter set out to learn.
To do so, Peter built hollow columns of 8-by-8-inch masonry block and waterproofed the outside according to directions provided by the manufacturer. Then he filled the hollow cores of the columns with water to see whether the coatings worked. Two of the products—Koster NB1 Grey and Xypex Concentrate—are so called crystalline coatings, which are designed to seep into the concrete and form a crystalline matrix when they cure. The UGL Drylok Extreme is not.
Here’s how they did.
-
- UGL Drylok Extreme is guaranteed to resist 15 feet of head and last for as long as 15 years. However, a double coat of this paint-like material was not enough to prevent some water from seeping out at the bottom of the column. When Peter tried plugging an active leak with Drylok Fast Plug hydraulic cement, the column continued leaking, including right at the plug.
- Xypex balked at Peter’s test method, arguing that CMU blocks differ too much in composition to allow a reliable seal. There is not enough calcium hydroxide in the CMUs to permit the growth of crystals, so they suggested Peter allow an additional two weeks for the material to cure before he went ahead with his water test. Two weeks later, the column was showing a very slow seepage of water near the bottom of the column. After Peter wetted the block with water and rubbed in Xypex Patch-n-Plug, the leaks disappeared.
- Koster USA expressed the same reservations about the test methods. The company suggested that Peter substitute SB Bonding Emulsion for some of the water in the NB 1 Grey mix and apply a primer (Polysill TG500) to the block before coating the CMU. Even after taking these steps, Peter found a bit of seepage at certain spots on the lower part of the column. After waiting two weeks and retesting, Peter found no water leaks at all on the column.
What are we to make of these “wingnut” results? First, let’s keep in mind that Peter would be the last person to claim lab-like precision with his testing. That said, UGL Drylok is apparently not able to resist hydrostatic pressure, at least with that amount of head in the CMU column he built. With some coaxing, the two crystalline coatings did keep water out. Whether they are as reliable as waterproofing on the foundation exterior is another question.
Tremco also offers a negative side spot treatment for cracks. The company’s EasyDri is a single-component polyurethane that’s used to treat a crack, not the entire wall, says brand sement menager Amanda Helber. It can be applied to a wet wall. But experts caution against coating an entire wall with a urethane or epoxy sealer that is not vapor permeable. Hydrostatic pressure can push the coating off the wall.
The inherent difficulties of fixing water leaks on an existing foundation are a good reason to consider doing more than simple dampproofing when you have the choice. A few thousand bucks up front on a site where conditions are questionable seems like good insurance. That’s the thinking behind Risinger’s approach, and Stock’s experience on the retrofit side would seem to back him up.
“Once bit, twice shy,” Stock said in a call. “Generally, the people you find putting money into new construction waterproofing, whether it’s residential or commercial, are those who have either been bit before because they’ve owned another home and it leaked, or they have a very conservative architect or builder who’s going to tell the homeowner the truth.”
Originally published on GreenBuildingAdvisor.com.


