Managing Water When Insulating Old Walls
Water is the enemy, so keep it away and ensure the house's drying potential.

Synopsis: All siding leaks, which means careful thought must be put into managing moisture intrusions when adding insulation to an old house. Rather than increasing R-value, remodeler Andy Angel is always focused on insulating without adding moisture problems. He notes the importance of addressing older doors and windows and air-sealing, and then describes an assembly that leaves an air gap between the back of the old siding and the new insulation, similar to a rainscreen detail on the exterior, that allows for any moisture to dry.
One summer about 40 years ago, at a time when I was deciding between going to college and working while doing neither, my father hooked me up with a job insulating the walls of a shoddy summer home that was being lived in year-round. My dad knew everyone in the lakeside community where he lived, and one of his drinking buddies, whose business name ended with the word “Enterprises,” sold cellulose insulation and owned a blower. Another of his buddies owned the aforementioned summer house. And I wanted work. It was meant to be.
So, on a hot and humid New Jersey−summer day, I found myself drilling 3-in. holes in the siding of that rattletrap house, stuffing in a hose, and blowing cellulose while one of my similarly underemployed friends fed shredded newspaper into the hopper.
As my sweat mixed with cellulose dust, encasing me in a papier-mâché carapace, I had little understanding of what I was doing. I had no idea, for instance, if there was blocking that would keep the cellulose from fully insulating the bays, or how important it was that the insulation be blown densely enough to avoid settling, which would render it less effective.
But that was the least of it. I never thought about water. Not once did it cross my mind that the siding on almost every house leaks, never mind the siding on a post−World War II vacation house in a community my hopper-feeding friend’s father referred to as “the poor man’s Lake Tahoe.”
What happens to newspaper when it gets wet? It stays wet. While cellulose itself is usually treated with borates that retard fire, mold, and decay, the siding and framing of that house certainly didn’t have that protection. I’m sure I created a hell of a mess for someone down the road to clean up.
It’s all about water
Don’t get me wrong—cellulose has advantages over most other insulations, not the least of which is that it sequesters carbon. From a thermal perspective alone, almost any insulation added where there was none before is a benefit. But any insulation installed improperly can create moisture problems, particularly in old buildings.
For the last two years, I haven’t worked on a house newer than the first Roosevelt administration. More than a few of them might have hosted George Washington. Every time I or the crew I am working with open up an exterior wall, we insulate it. And my first thought is never maximizing the R-value of the wall or ceiling. It is always how to insulate without creating moisture problems.
How moisture gets in
All siding leaks. Old houses survived only because the walls weren’t air-sealed or insulated, and the leaking heat and chronic airflow dried the assembly before the moisture could peel the paint off the siding or rot the framing. Doing the right thing by insulating and air-sealing has the potential to destroy the building. That’s why builders of modern, high-performance homes spend so much time and effort detailing water-resistive barriers (WRBs) with flashing tapes.
Moisture from wet foundations can be transported by the stack effect up through walls. Warm air escaping through the upper level of a house during the winter creates suction that draws cold air in through small and large openings in the lower levels. Basements and crawlspaces that are wet during the spring and summer dry out in the winter because of this air movement. Moisture from this air moving through walls can condense on the back of cold siding or sheathing. Once the moisture has given up enough heat to change phase from vapor to liquid, it takes the same energy input to make it evaporate.
Sources of moisture also include cooking, showering, and occupant respiration. Historically, interior moisture sources have been given much more attention than is deserved, resulting in solutions such as plastic vapor retarders. In many cases, such vapor retarders do more damage than good by trapping moisture in the walls.
Before insulating
Installing new windows and doors is arguably the most important moisture-control action that can be taken on an old house. If I have the opportunity to replace them, I’ll take it, carefully flashing the new windows and doors to direct water outward to the face of the siding. That said, replacing old windows and doors is rarely a winning financial choice in terms of payback on investment. The next-best choice for controlling moisture is replacing the exterior trim while leaving the jambs, sill, and sashes in place, and focusing on doing a great job flashing the new trim.
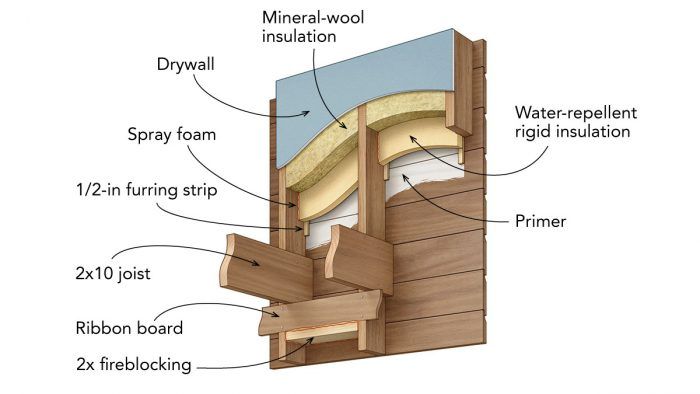
The next most important thing to do is air-seal. While the assembly is open, I block off open stud bays in both exterior and interior walls. This is an opportunity to install fire-blocking at the same time, so I like to use 2x material or 3/4-in. plywood to close vertical bays. Many old houses are balloon-framed, and the joists rest on ribbons let into the studs. The floors and walls are directly connected, allowing air and fire to flow freely. I also block these bays. Small holes and imperfect joints in my blocking get air-sealed with spray foam.
Regarding the interior vapor retarder: You need to be in a very cold climate such as northern New England before a plastic vapor retarder is required by code. In most cases, two coats of latex paint on the walls is all you need.
Allow for drying
It’s a practical impossibility to keep water out entirely, but if you do a good job in the three areas I mention above, there shouldn’t be much getting in. Still, water is a relentless enemy, and I like to allow for drying, if only to keep the paint on the siding. For that purpose, a coat of primer rolled or sprayed on the back of the siding when the wall is open is a good idea.
Installing a rainscreen—a system of materials that creates an air gap behind the siding to encourage drying—is becoming standard practice in new construction. For the same reason, I like to keep new insulation from directly contacting the back of old siding. (That’s a downside of blowing new cellulose into an old wall—leaving a gap between the two materials isn’t possible.) If the insulation is spray foam, I’ll staple house-wrap to the sides of the studs in the bays to maintain separation.
Because of its environmental penalties, spray foam isn’t usually on the table. A better approach is to tack some 1/2-in. vertical furring strips to the back of the siding, right next to the studs. Then, pressure-fit a water-repellent rigid insulation product from a manufacturer like Gutex or Steico between the studs and seal any gaps with spray foam. The entire cavity can be packed with rigid insulation, or you can do an inch or two of that followed by batt insulation such as mineral wool—depending on your climate and insulation-thickness requirements for the assembly.
Old houses take thought. There are no universal solutions, and that’s what makes working on them so much fun.
Andy Engel is a remodeler and former FHB editor.
Drawing: Christopher Mills
From Fine Homebuilding #299
RELATED LINKS
Fine Homebuilding Recommended Products
Fine Homebuilding receives a commission for items purchased through links on this site, including Amazon Associates and other affiliate advertising programs.

Foam Gun

Loctite Foamboard Adhesive

Caulking Gun


