FHB Logo Facebook LinkedIn Email Pinterest Twitter X Instagram Tiktok YouTube Plus Icon Close Icon Navigation Search Icon Navigation Search Icon Arrow Down Icon Video Guide Icon Article Guide Icon Modal Close Icon Guide Search Icon Skip to content
Subscribe
Log In
  • How-To
  • Design
  • Tools & Materials
  • Restoration
  • Videos
  • Blogs
  • Forum
  • Magazine
  • Members
  • FHB House
  • Podcast
Log In

Fine Homebuilding Project Guides

Tiling

Guide Home
  • Selecting Tile
  • Tools & Techniques
  • Installation Materials
  • Preparation
  • Tiling Floors
  • Tiling Walls & Backsplashes
  • Tiling Showers
  • Grouting, Sealing & Caulking
  • Maintenance & Repair
How-To

How To Install Wood-Look Tile Flooring

Follow these guidelines when setting wood-patterned ceramic plank tiles to create a solid floor that looks great.

By Robin Nicholas, Michael Schweit
  • X
  • facebook
  • linkedin
  • pinterest
  • email
  • add to favorites Log in or Sign up to save your favorite articles

In many homes, wood-look tiles have replaced wood flooring. That’s because they are much more durable, won’t scratch, and require less maintenance than wood, especially over time. Because of their growing popularity, the choices are almost infinite in color, texture, patterns, and size.

The customary size range is 4 in. to 9 in. in width and from 2 ft. to 5 ft. in length. Use a narrower grout line because less grout means less to maintain and it gives a cleaner look. As with all large-format tiles, you’ll need to be mindful of the manufacturer’s 33% overlap cautions to avoid lippage and have a trouble-free installation.

Installing plank flooring

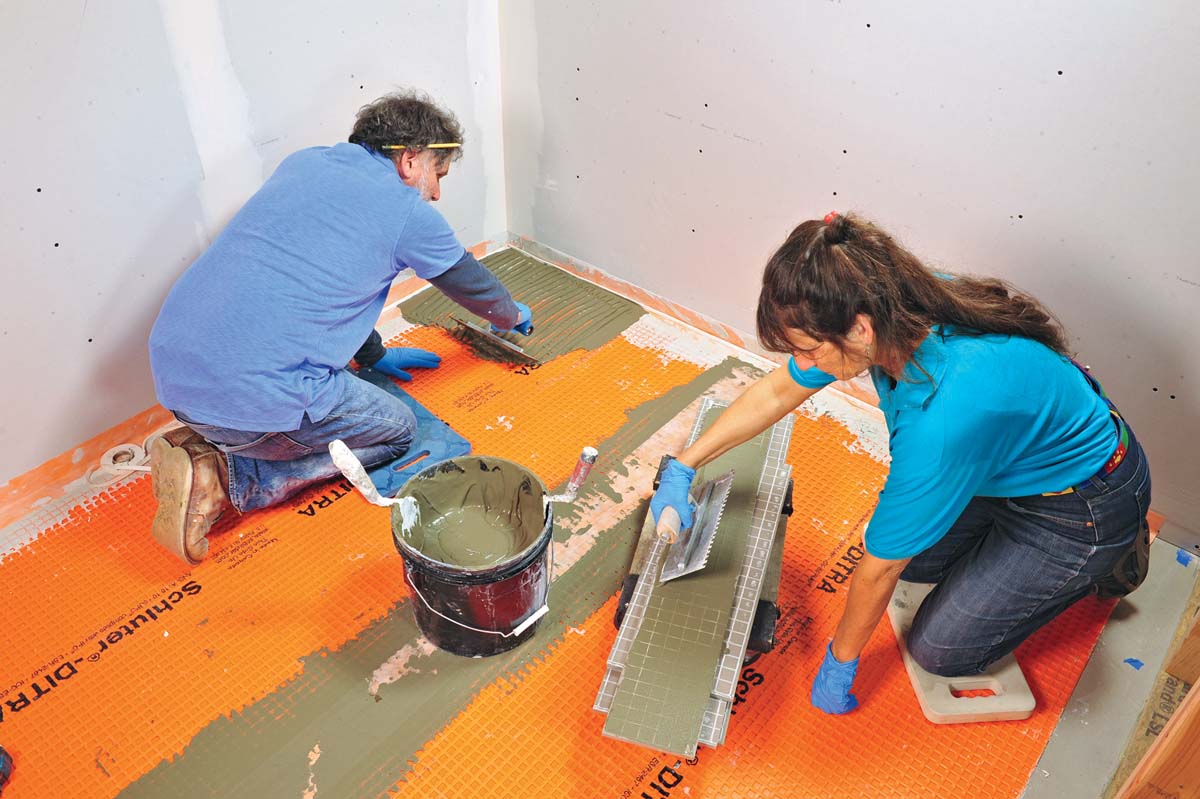
Level the floor so that the planks will lay as flat as possible. For any installation, you should also install an antifracture or uncoupling membrane to ensure that your tiles will not crack.

After you’ve planned your layout according to the width of the tile (from front to back of the room), you’re ready to start. The length of the room will not matter as the lengths of the tile ends will be randomized.

Adjusting the Layout to Avoid Small Cuts

Adjusting the Layout to Avoid Small Cuts


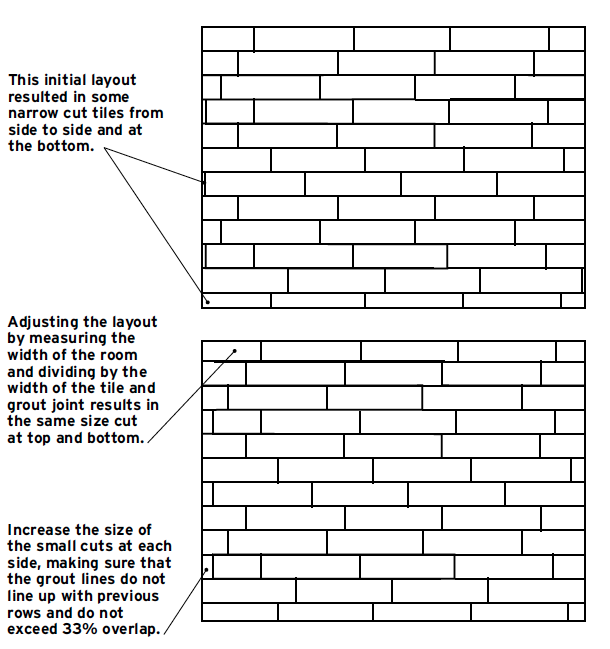
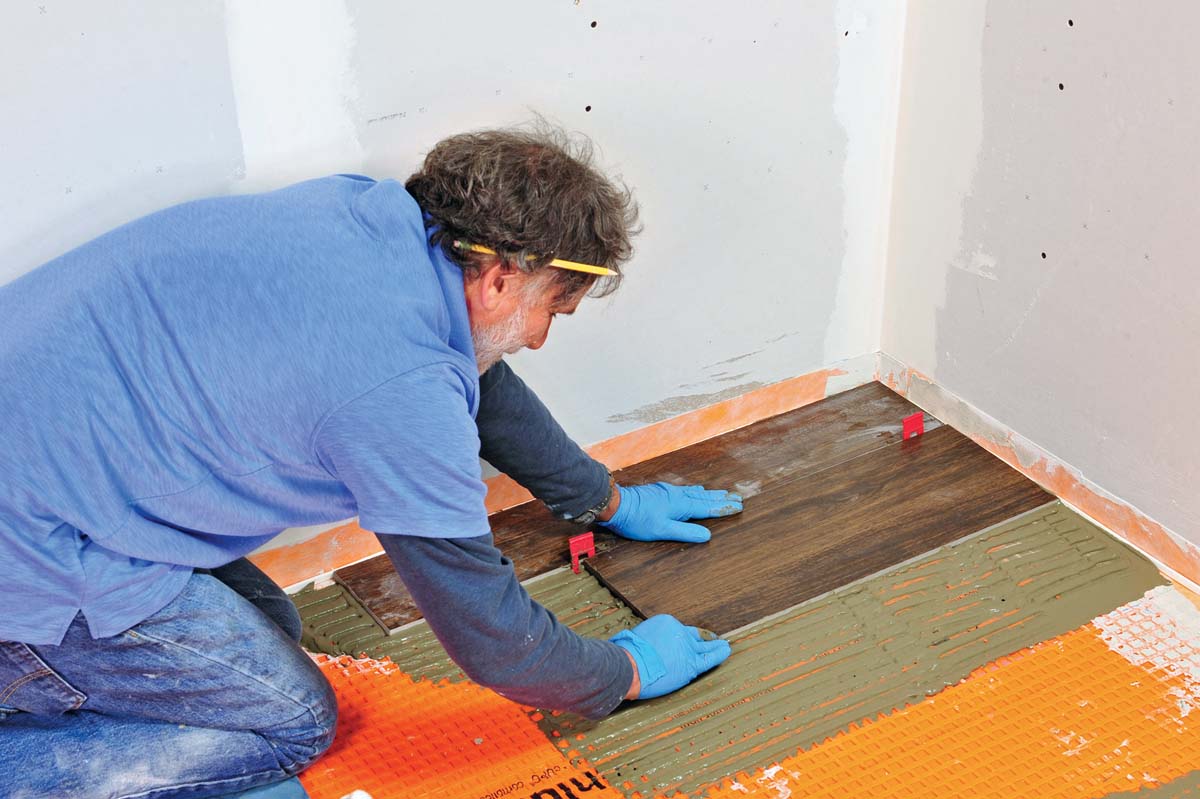
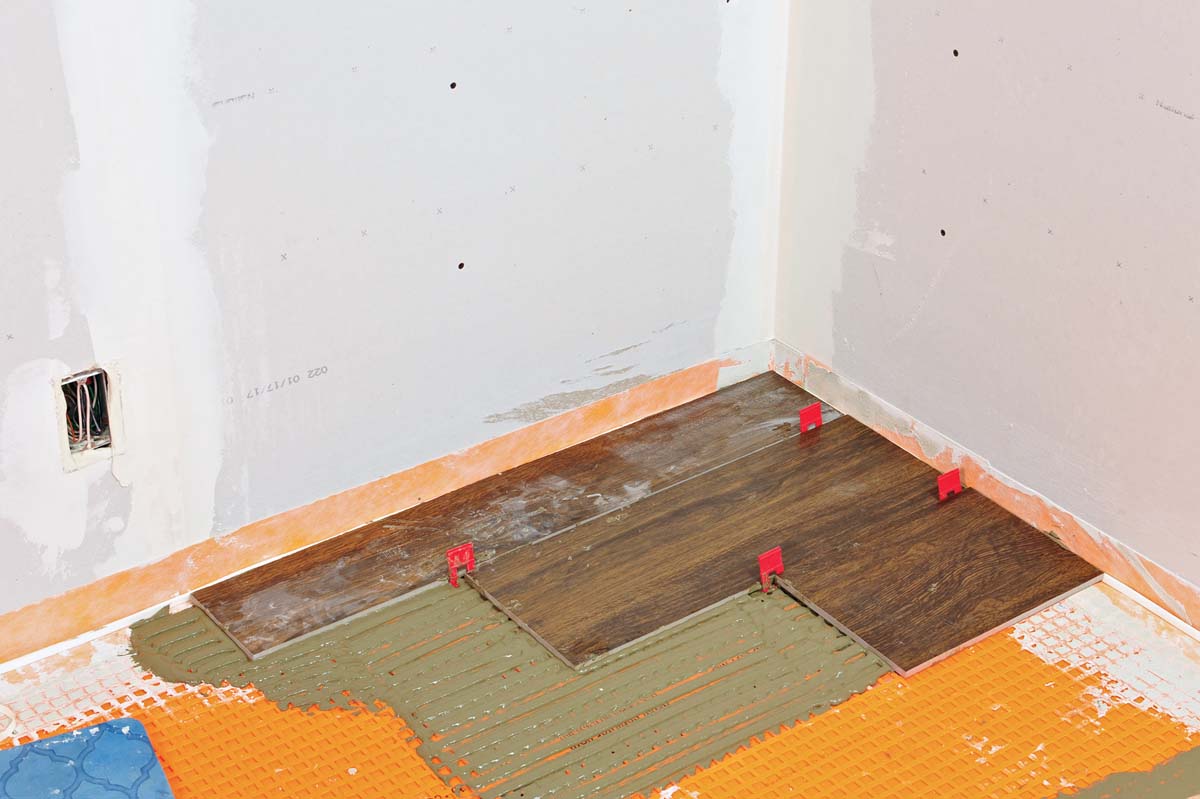
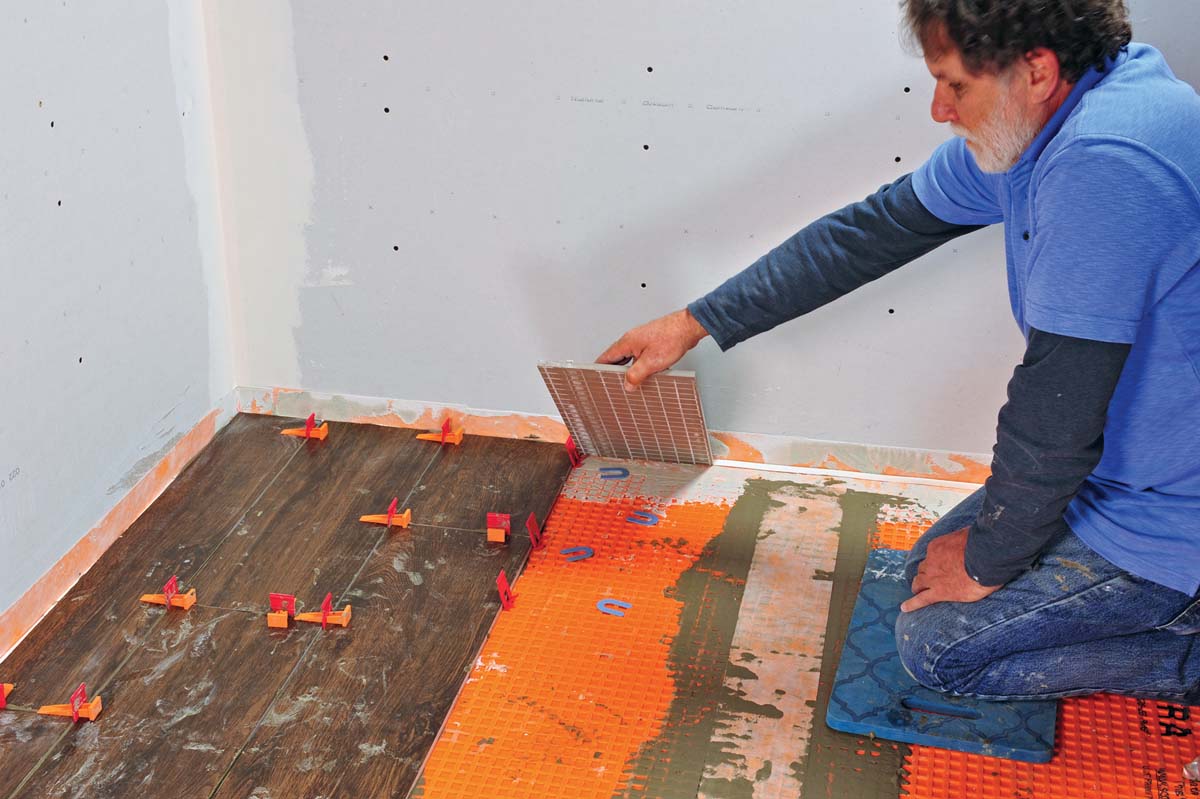
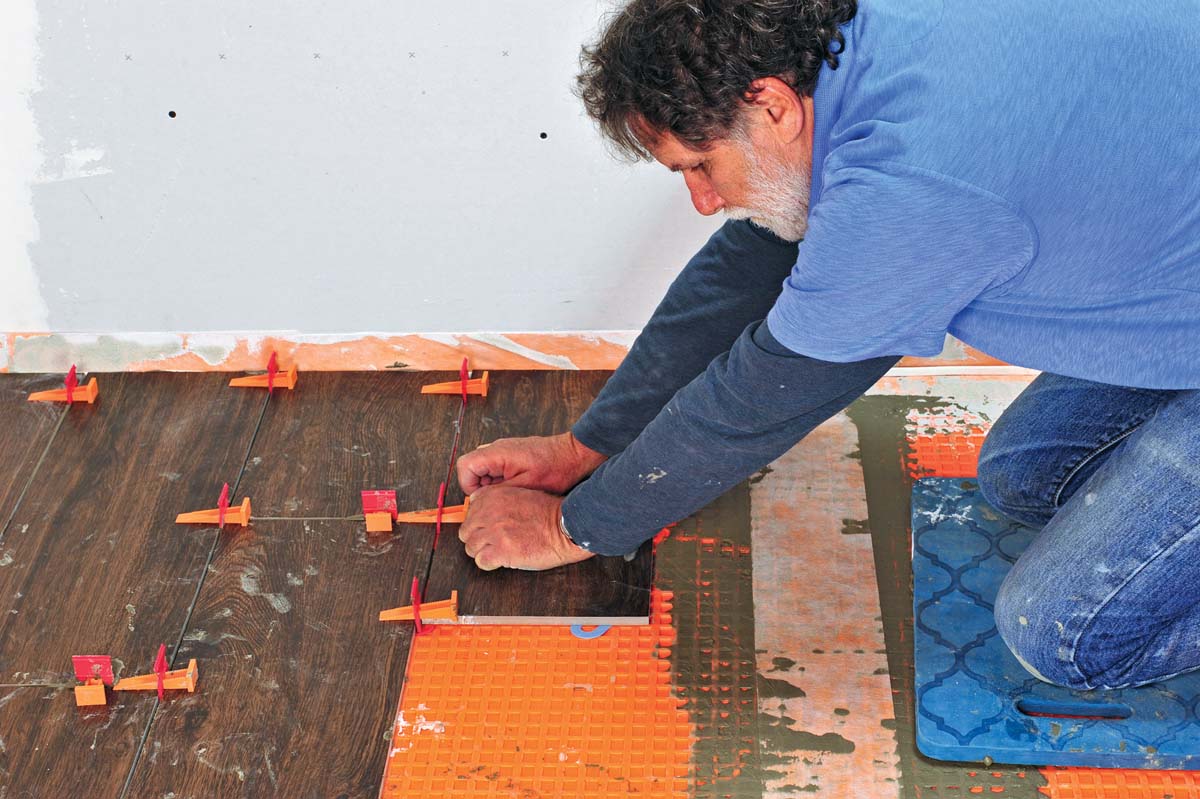
Snap a chalkline lengthwise but no farther than 2 ft. from your starting edge or as far as you can comfortably reach. Spread thinset beyond the length of the tile and up to the chalkline. Back-butter the first tile and place it onto the bed of thinset 1. Place leveling clips at the corners and edges of the tile before you lay your next tile. Cut, back-butter, and set a tile for the second row that will allow for no more than one-third overlap of the previous tile 2. Save the rest of that cut tile and use it for the other side or another row. Cut, back-butter, and place your third row tile, and if you can use a previously cut tile, do so, being mindful of the one-third overlap of each tile 3. Be sure to tighten the leveling clips. Seat all tiles by tapping lightly with your mallet 4.

Before moving on to the next section, place a couple of wedges or spacers against the wall to prevent the tiles from sliding out of adjustment. Tap across the front edge of the tiles to ensure that the tiles are tight up against the spacers and make sure you can see your chalkline. Spread the next section and continue to place tiles until you reach the end of this section. Snap another chalkline three to four lines down based on your reachable depth and continue until you reach the end of that row. At each new section, be sure that you are measuring your cuts to overlap no more than one-third of the tile in the previous row.

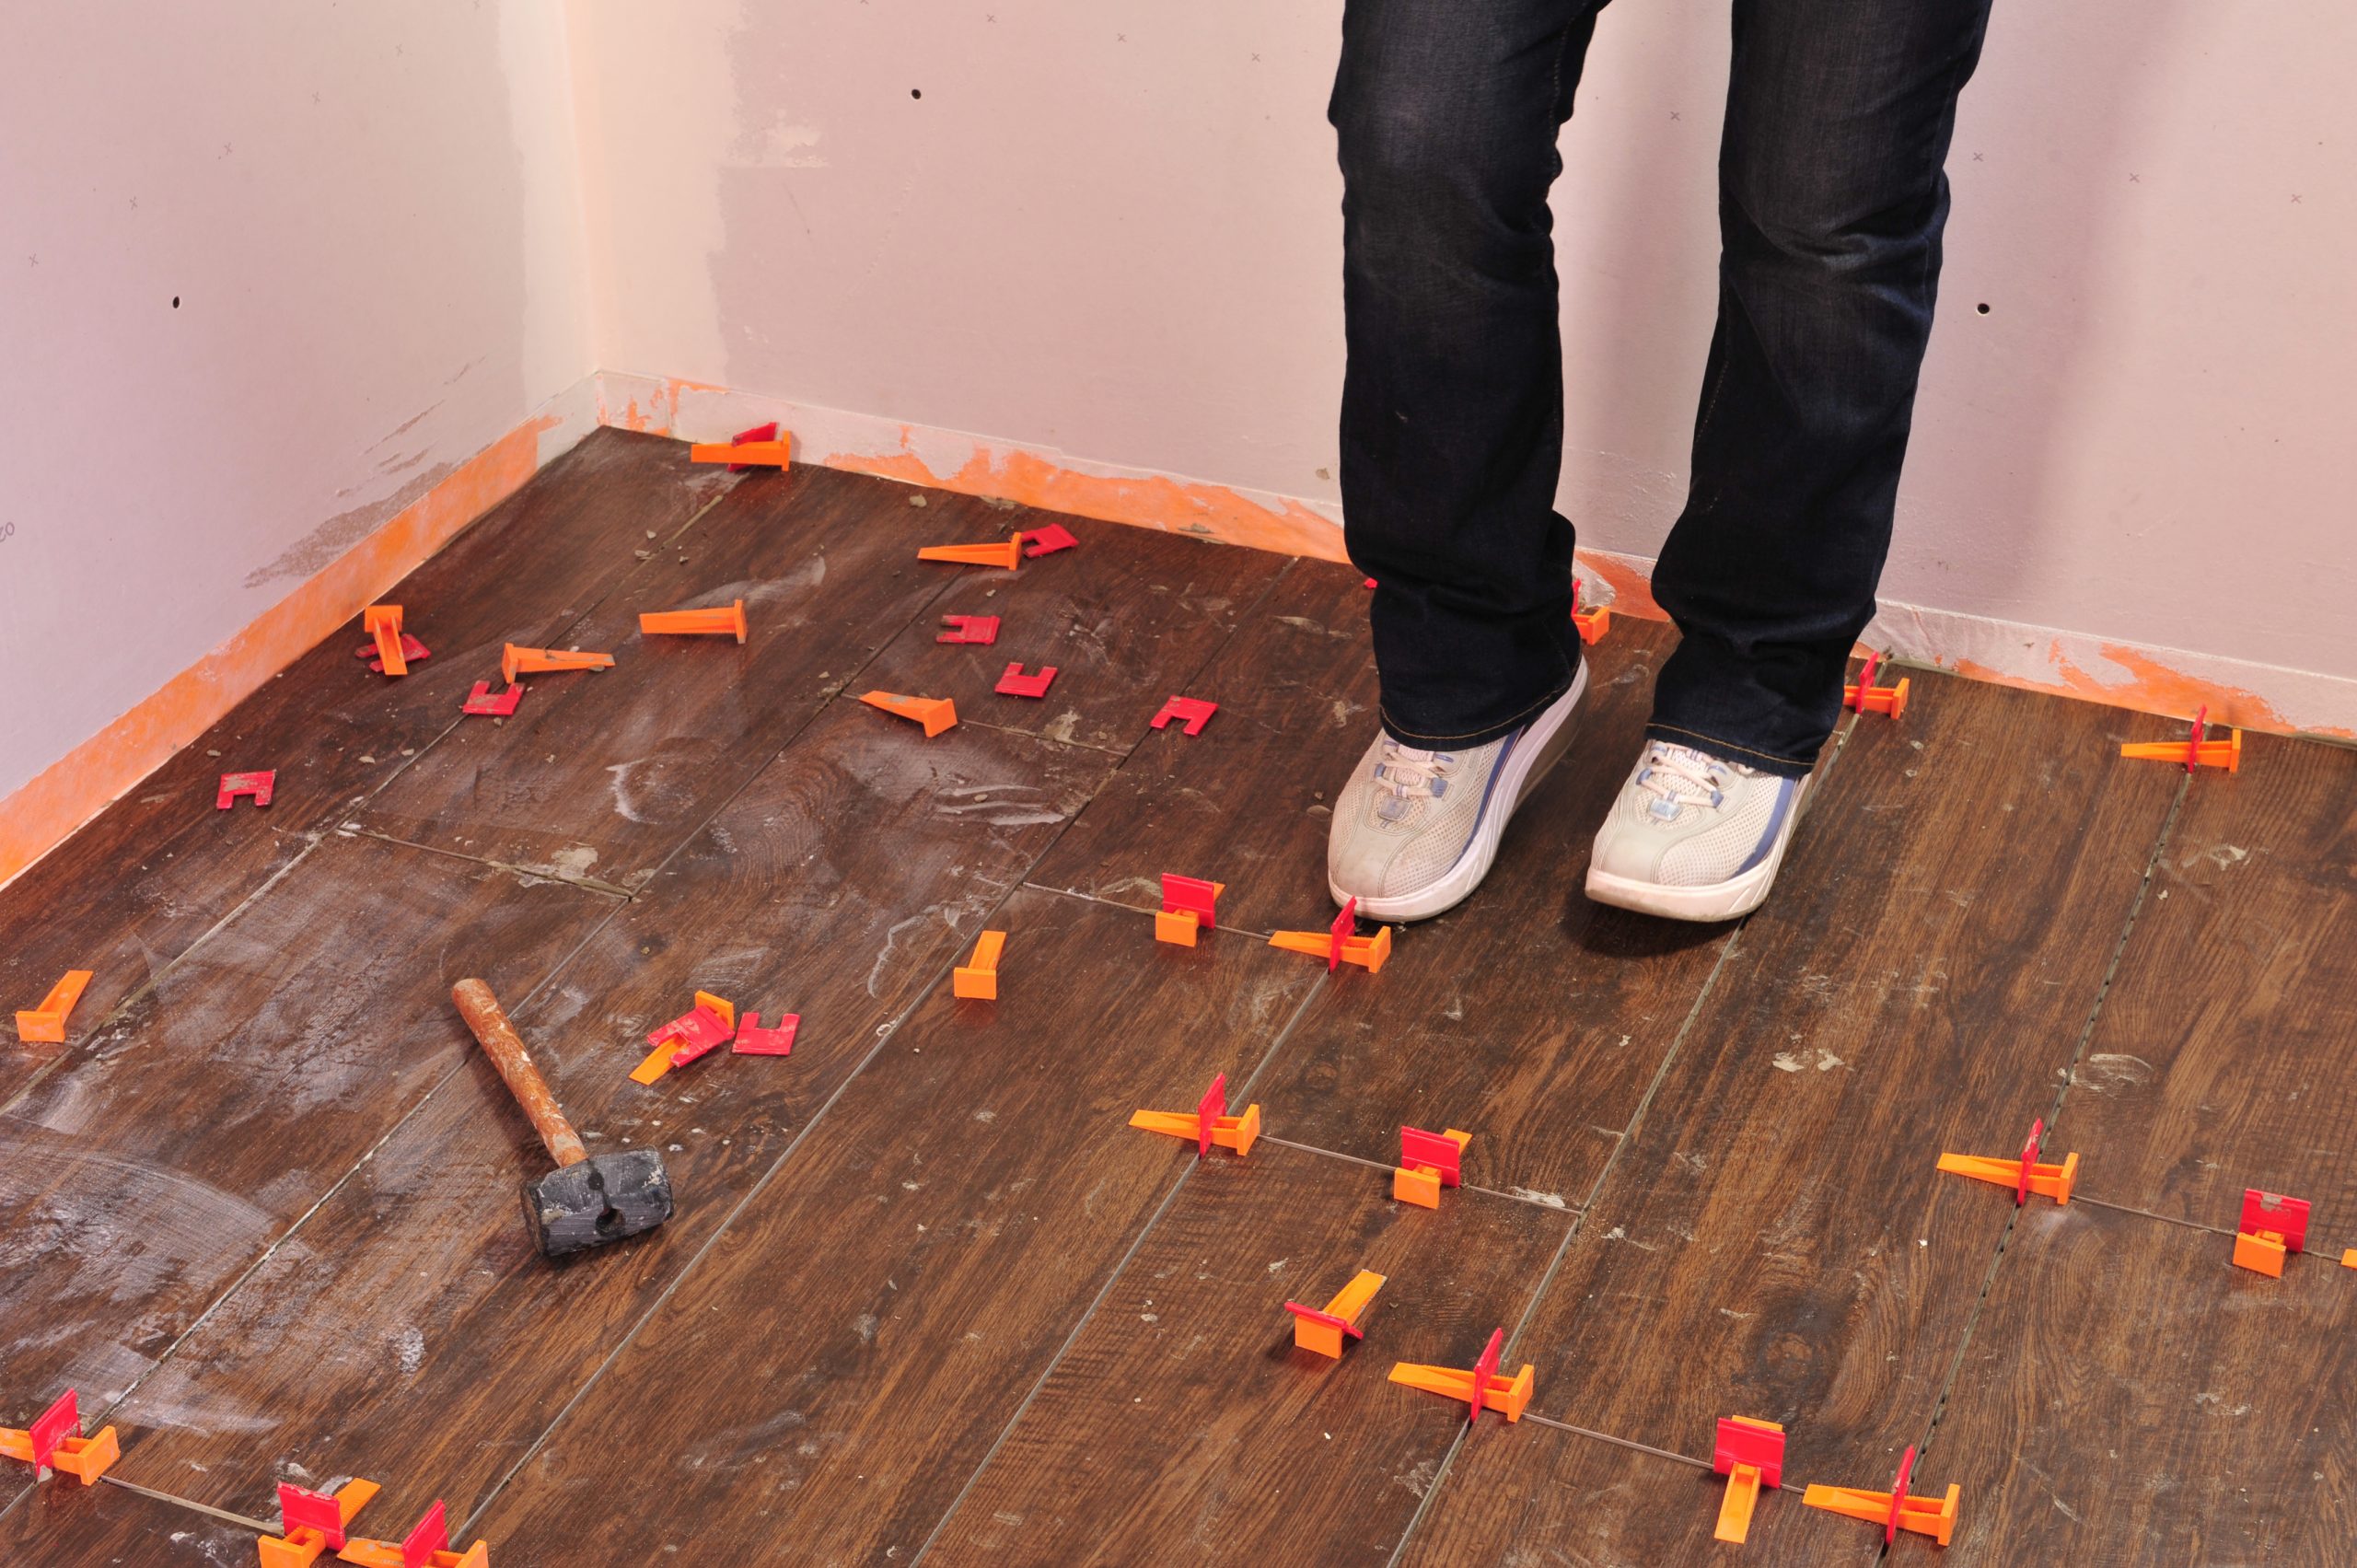
At the day’s end, if it’s a small room, you won’t be able to finish the area that you are tiling because it becomes very awkward to reach and set these large tiles. You’ll need to finish laying the floor the next day when you can kneel on the previously set tiles. Either way, small or large area, finish the areas you have tiled by inserting leveling clips, tile scraps, and spacers (to mimic the height of the thinset) 5, 6. In this way, you’ll keep the tile height of your last section ready for the tiles you’ll set the following day. Failure to do this may allow the edge of this last row of tiles to dip slightly and cause lippage between those two rows. The next day, begin by removing the leveling clips 7 and then clean this area thoroughly before setting the next section.

Comb the thinset on the underlayment in one direction. Back-butter each tile before setting it in the thinset.
1.  Comb the thinset on the underlayment in one direction. Back-butter each tile before setting it in the thinset.
Lay the first tile, add leveling spacers, and then place the next tile.
2.  Lay the first tile, add leveling spacers, and then place the next tile.
Cut your third row tile, being careful not to exceed 33% overlap. Add spacers and set the tile.
3.  Cut your third row tile, being careful not to exceed 33% overlap. Add spacers and set the tile.
Use a mallet to beat the tile in place.
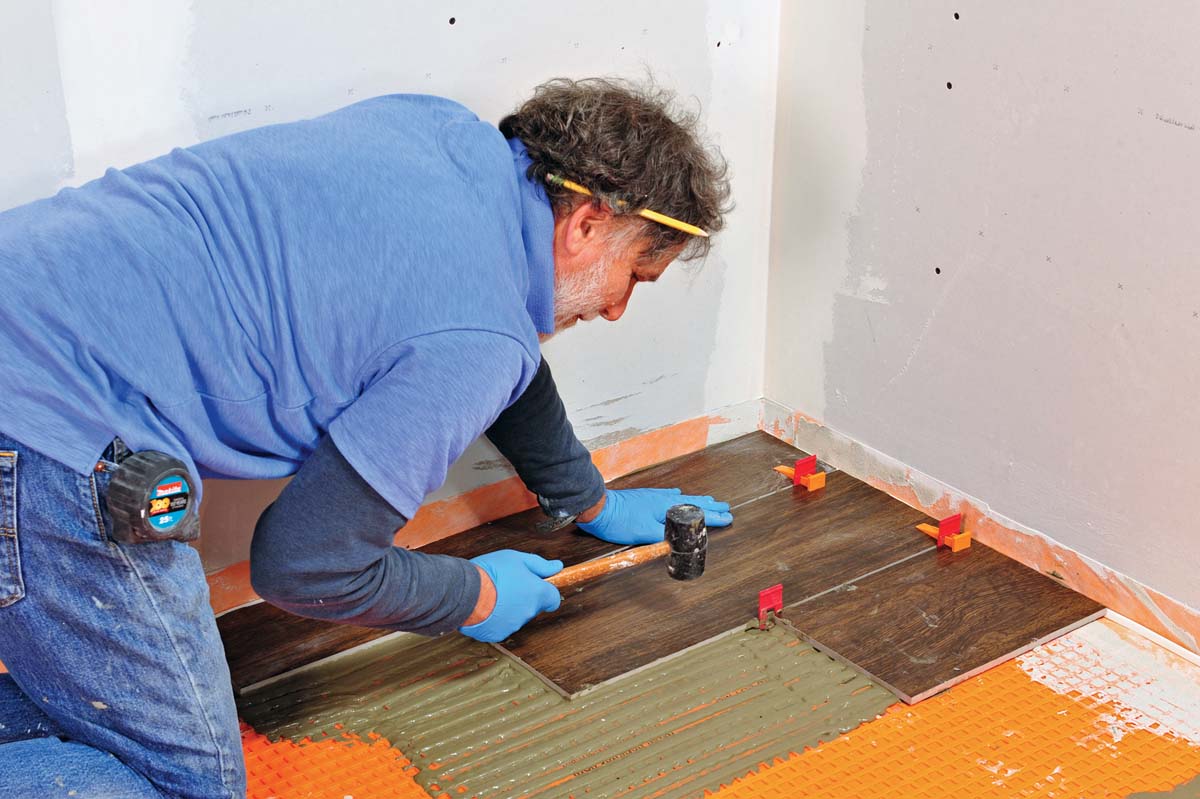
4.  Use a mallet to beat the tile in place.
If you’re finished for the day, place levelers at the last row, and other spacers underneath scrap tile as if it was set.
5.  If you’re finished for the day, place levelers at the last row, and other spacers underneath scrap tile as if it was set.
Push the wedges in tight. This process will help you avoid dips in the floor when you return to lay the rest of the tile.
6.  Push the wedges in tight. This process will help you avoid dips in the floor when you return to lay the rest of the tile.
The next day, kick out the spacers in the direction of the grout joint. Or knock them out with a mallet.
7.  The next day, kick out the spacers in the direction of the grout joint. Or knock them out with a mallet.

Tiling Complete, 2nd EditionExcerpted from Tiling Complete, 2nd Edition by Robin Nicholas and Michael Schweit.

Available in the Taunton Store and at Amazon.com.

Previous: Large-Format Tiles

Guide

Tiling

Chapter

Tiling Floors

Sign up for eletters today and get the latest how-to from Fine Homebuilding, plus special offers.

Signing you up...

This site is protected by reCAPTCHA and the Google Privacy Policy and Terms of Service apply.
See all newsletters
See all newsletters

Log in or create an account to post a comment.

Sign up Log in

Become a member and get full access to FineHomebuilding.com

Tiling

Tiling

Trusted, comprehensive guidance from the pros for a great-looking tile job in any room of the house

View Project Guide

View All Project Guides »

Become a member and get unlimited site access, including the Tiling Project Guide.

Start Free Trial

Selecting Tile
  • The Basics
  • Tile Options
Tools & Techniques
  • Job-Preparation Tools
  • Cutting Tiles
  • Setting & Grouting Tools
Installation Materials
  • Membranes & Substrates
  • Adhesives & Mortars
  • Grout
  • Sealers & Caulk
  • Spacers, Hardware & Trim
Preparation
  • The Prep Job
  • Repairs & Surface Prep
  • Installing Backerboard
Tiling Floors
  • Layout & Installation
  • Setting Specialty Tiles
Tiling Walls & Backsplashes
  • Preparation
  • Backsplashes
  • Walls
Tiling Showers
  • Tile Shower Basics
  • Waterproofing
  • Shower Pans
  • Shower Drains
  • Shower Niches
  • Video Series: Tile a Shower
  • Video Series: Tile a Barrier-Free Bathroom
Grouting, Sealing & Caulking
  • Grouting
  • Caulking
  • Sealing
Maintenance & Repair
  • Maintenance
  • Tile Repair
  • Grout Repair

Fine Home Building

Newsletter Sign-up

  • Fine Homebuilding

    Home building tips, offers, and expert advice in your inbox.

  • Green Building Advisor

    Building science and energy efficiency advice, plus special offers, in your inbox.

  • Old House Journal

    Repair, renovation, and restoration tips, plus special offers, in your inbox.

Signing you up...

This site is protected by reCAPTCHA and the Google Privacy Policy and Terms of Service apply.
See all newsletters

Follow

  • Fine Homebuilding

    Dig into cutting-edge approaches and decades of proven solutions with total access to our experts and tradespeople.

    Start Free Trial Now
    • Facebook
    • Instagram
    • X
    • LinkedIn
  • GBA Prime

    Get instant access to the latest developments in green building, research, and reports from the field.

    Start Free Trial Now
    • Facebook
    • YouTube
  • Old House Journal

    Learn how to restore, repair, update, and decorate your home.

    Subscribe Now
    • Facebook
    • Instagram
    • X

Membership & Magazine

  • Online Archive
  • Start Free Trial
  • Magazine Subscription
  • Magazine Renewal
  • Gift a Subscription
  • Customer Support
  • Privacy Preferences
  • About
  • Contact
  • Advertise
  • Careers
  • Terms of Use
  • Site Map
  • Do not sell or share my information
  • Privacy Policy
  • Accessibility
  • California Privacy Rights

© 2025 Active Interest Media. All rights reserved.

Fine Homebuilding receives a commission for items purchased through links on this site, including Amazon Associates and other affiliate advertising programs.

  • Home Group
  • Antique Trader
  • Arts & Crafts Homes
  • Bank Note Reporter
  • Cabin Life
  • Cuisine at Home
  • Fine Gardening
  • Fine Woodworking
  • Green Building Advisor
  • Garden Gate
  • Horticulture
  • Keep Craft Alive
  • Log Home Living
  • Military Trader/Vehicles
  • Numismatic News
  • Numismaster
  • Old Cars Weekly
  • Old House Journal
  • Period Homes
  • Popular Woodworking
  • Script
  • ShopNotes
  • Sports Collectors Digest
  • Threads
  • Timber Home Living
  • Traditional Building
  • Woodsmith
  • World Coin News
  • Writer's Digest
Active Interest Media logo
X
X
This is a dialog window which overlays the main content of the page. The modal window is a 'site map' of the most critical areas of the site. Pressing the Escape (ESC) button will close the modal and bring you back to where you were on the page.

Main Menu

  • How-To
  • Design
  • Tools & Materials
  • Video
  • Blogs
  • Forum
  • Project Guides
  • Reader Projects
  • Magazine
  • Members
  • FHB House

Podcasts

  • FHB Podcast
  • ProTalk

Webinars

  • Upcoming and On-Demand

Podcasts

  • FHB Podcast
  • ProTalk

Webinars

  • Upcoming and On-Demand

Popular Topics

  • Kitchens
  • Business
  • Bedrooms
  • Roofs
  • Architecture and Design
  • Green Building
  • Decks
  • Framing
  • Safety
  • Remodeling
  • Bathrooms
  • Windows
  • Tilework
  • Ceilings
  • HVAC

Magazine

  • Current Issue
  • Past Issues
  • Magazine Index
  • Subscribe
  • Online Archive
  • Author Guidelines

All Access

  • Member Home
  • Start Free Trial
  • Gift Membership

Online Learning

  • Courses
  • Project Guides
  • Reader Projects
  • Podcast

More

  • FHB Ambassadors
  • FHB House
  • Customer Support

Account

  • Log In
  • Join

Newsletter

Get home building tips, offers, and expert advice in your inbox

Signing you up...

This site is protected by reCAPTCHA and the Google Privacy Policy and Terms of Service apply.
See all newsletters
See all newsletters

Follow

  • X
  • YouTube
  • instagram
  • facebook
  • pinterest
  • Tiktok

Join All Access

Become a member and get instant access to thousands of videos, how-tos, tool reviews, and design features.

Start Your Free Trial

Subscribe

FHB Magazine

Start your subscription today and save up to 70%

Subscribe

This is your last free article.

Don't miss another expert tip or technique from building pros. Start your free trial today.

Start your FREE trial

Already a member? Log in

We hope you’ve enjoyed your free articles. To keep reading, become a member today.

Get complete site access to expert advice, how-to videos, Code Check, and more, plus the print magazine.

Start your FREE trial

Already a member? Log in

Privacy Policy Update

We use cookies, pixels, script and other tracking technologies to analyze and improve our service, to improve and personalize content, and for advertising to you. We also share information about your use of our site with third-party social media, advertising and analytics partners. You can view our Privacy Policy here and our Terms of Use here.

Cookies

Analytics

These cookies help us track site metrics to improve our sites and provide a better user experience.

Advertising/Social Media

These cookies are used to serve advertisements aligned with your interests.

Essential

These cookies are required to provide basic functions like page navigation and access to secure areas of the website.

Delete My Data

Delete all cookies and associated data