FHB Logo Facebook LinkedIn Email Pinterest Twitter X Instagram Tiktok YouTube Plus Icon Close Icon Navigation Search Icon Navigation Search Icon Arrow Down Icon Video Guide Icon Article Guide Icon Modal Close Icon Guide Search Icon Skip to content
Subscribe
Log In
  • How-To
  • Design
  • Tools & Materials
  • Restoration
  • Videos
  • Blogs
  • Forum
  • Magazine
  • Members
  • FHB House
  • Podcast
Log In

Fine Homebuilding Project Guides

Plumbing

Guide Home
  • Plumbing Basics
  • Bathrooms
  • Kitchens
  • Roughing In
  • Water Heaters, Washers, and More
  • Maintenance and Repair
How-To

Installing a Drop-In Sink

Careful measuring and cutting of the hole in your countertop are the keys to success when adding a new sink.

By Steve Cory
  • X
  • facebook
  • linkedin
  • pinterest
  • email
  • add to favorites Log in or Sign up to save your favorite articles
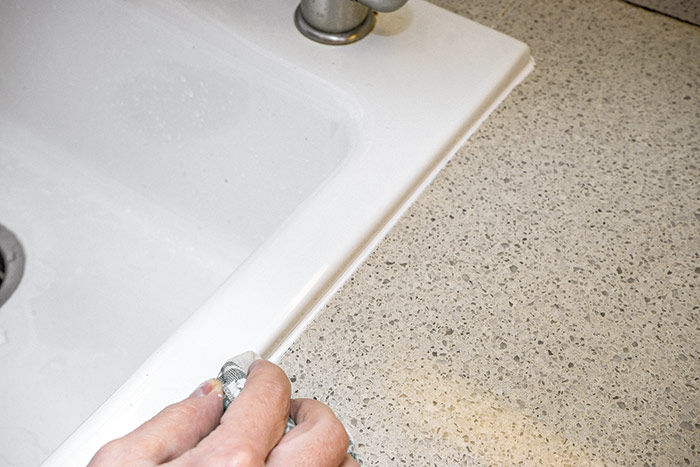
A RIM WITH NO GAPS. A carefully installed sink’s rim will rest firmly and evenly on top of the countertop, with no gaps.

If you are replacing an existing sink, remove it: Unplug the garbage disposal, disconnect the dishwasher hose, and unscrew one or more nuts on the trap. If it is stainless steel, remove the clips (see Step 11); if it is cast iron, cut through the bead of caulk around the rim. Then lift it out carefully, watching for any connections you missed. If you plan on keeping the countertop, choose a sink that fits into the existing hole.

If you are installing a new countertop (as shown in this sequence), position the sink above a “sink base” cabinet, which allows room for the sink. Measure to be sure the sink will fit, preferably with several inches to spare. There should be a drain line and supply stop valves nearby in the wall.

MARK FOR THE OPENING
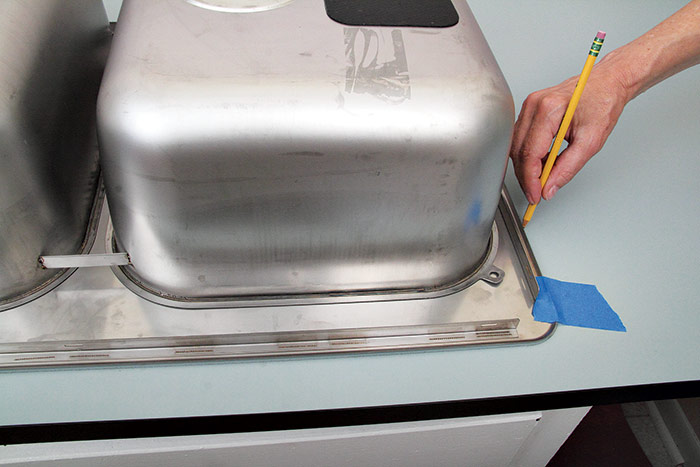
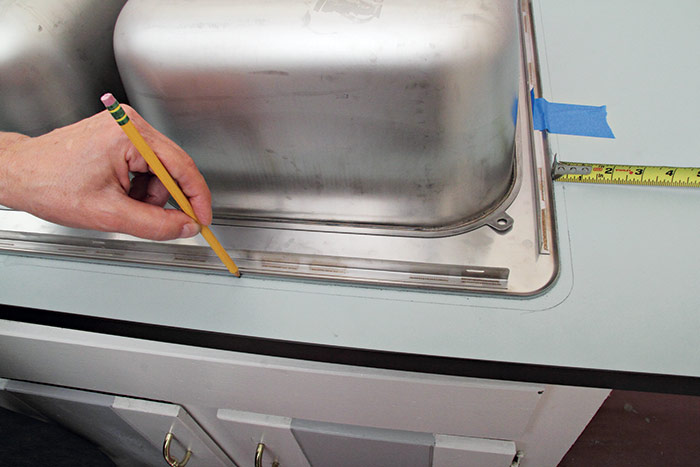
1. MARK FOR THE OPENING. Measure carefully and position the sink, upside down, where it will go. Usually, the front lip is 1½ in. to 3 in. from the front edge and centered over the base cabinet below. Apply a few pieces of tape to keep the sink from moving and scribe a pencil line around the lip. This is not the cutline!
mark the actual cutline
Next, mark the actual cutline, which is 3⁄8 in. to 1 in. inside the outer line (above). The easiest way to do this is to offset the sink the appropriate distance and use the edge of it as a template, as shown; you will need to shift its position to scribe the other two sides.


FOUR STARTER HOLES
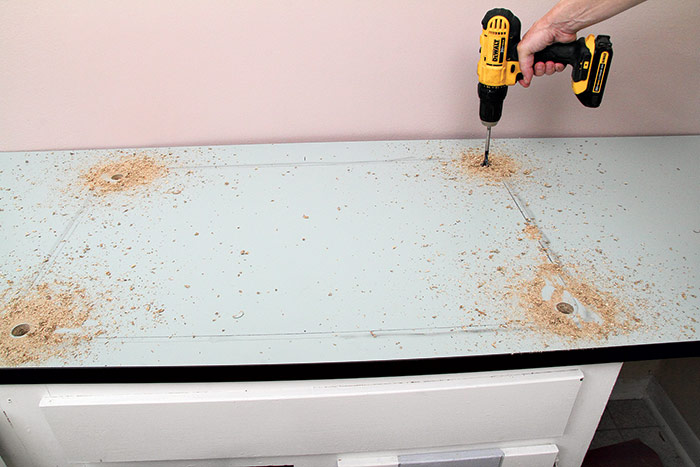
2. FOUR STARTER HOLES. Erase or at least blur the outside line to be sure you don’t follow it. At each corner of the inside line, bore a starter hole, about ½ in. or ¾ in. wide.


TIP: To make absolutely sure a laminate countertop will not chip, some remodelers turn the countertop upside down and cut with a circular saw. Of course, this complicates things.


CUT THE HOLE
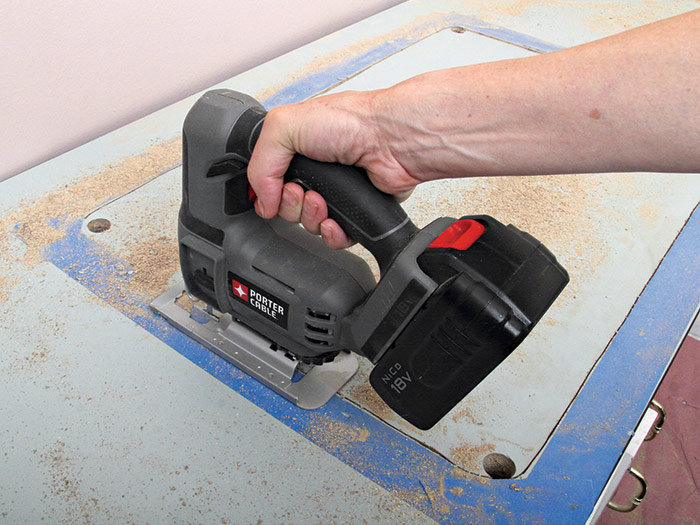
3. CUT THE HOLE. Make a simple 2×4 support to keep the cutout from falling when you finish the cut (top). (If it does fall, it can seriously chip the laminate.)
make the cut
Equip your jigsaw with a fine-cutting blade and place tape all around the cut hole. Press down firmly as you make the cut; watch to be sure you are not producing large chips that go outside the outer line. If you are, switch to a finer cutting blade.


Cutting a Solid Countertop

If you have granite, quartz, or solid-surface, you can cut it using a grinder equipped with a diamond blade. Cut slowly and stop periodically to check that you are not overheating the blade. If the blade gets very hot, gently spritz it with water, taking care that the water does not splash up onto the grinder itself.


wrap in plumbers putty
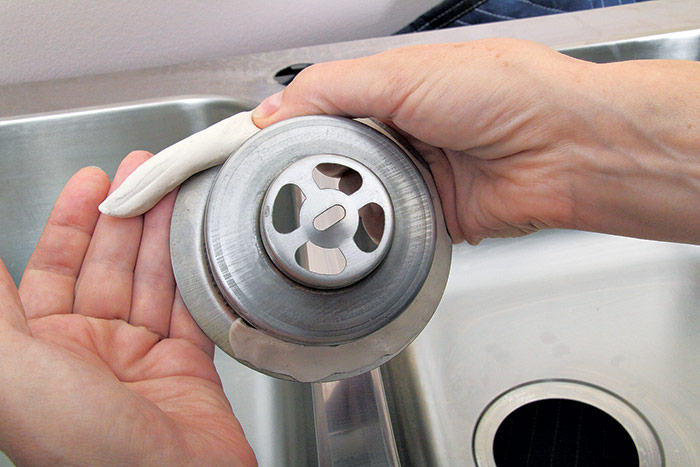
4. INSERT THE BASKET STRAINER. In our example, one of the holes has a simple basket strainer, whereas the other has a mounting bracket for the garbage disposal. To install a basket strainer, roll out a rope of plumber’s putty and wrap it around the bottom of the strainer’s flange.
press the strainer into place
With the sink right side up, press the strainer into place; some putty should squeeze out. Do the same for the mounting bracket in the other hole.


TIP: It will save trouble if you install as many parts as possible—the strainers, the disposal, the faucet, and the trap—with the sink upside down and resting on the counter or a pair of sawhorses. Use a drop cloth to protect the counter from scratches.


TIGHTEN THE STRAINER NUT
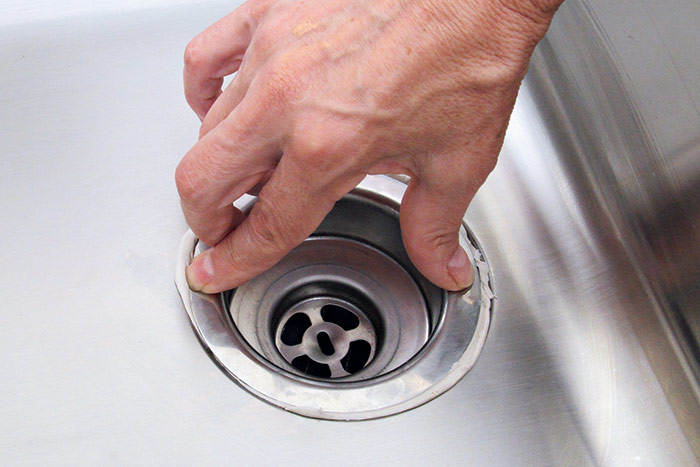
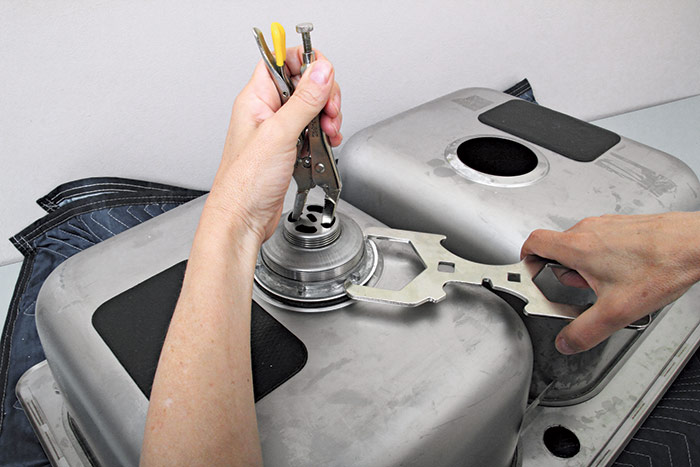
5. TIGHTEN THE STRAINER NUT. Turn the sink upside down. Gently (so as not to move the flange while you work) slip on the rubber washer, then the cardboard washer. Screw on the mounting nut. Hold the strainer in place with a pair of locking longnose pliers and tighten the nut with a spud wrench. Check the other side to see that the flange is centered in the hole.


MOUNT THE DISPOSAL BRACKET
6. MOUNT THE DISPOSAL BRACKET. At the hole for the garbage disposal, slip on the cardboard gasket, the backup ring, the ring with the three screws, and the mounting ring. (This will be easier than doing it upside down inside a cabinet, but it is still a bit tricky to get the ring on.) Again, check the inside of the bowl to see that the flange is centered on the hole before the final tightening.


If There Is No Disposal

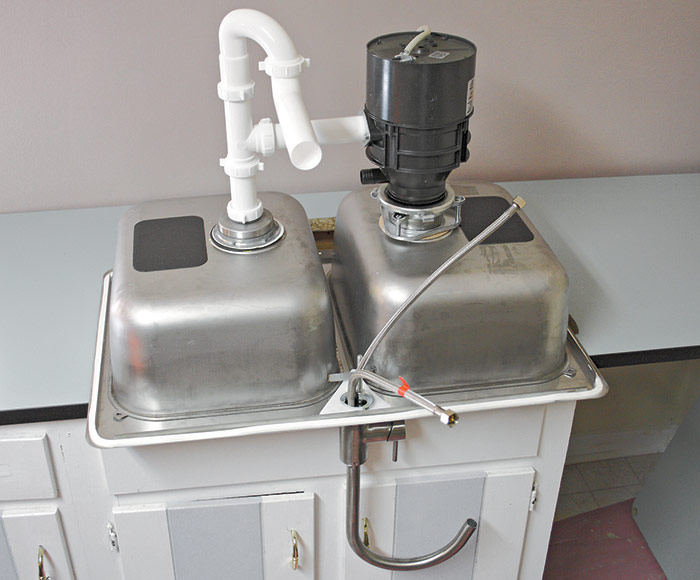
If you have no garbage disposal, here is a very simple trap configuration for a double-bowl sink, where both bowls share a single trap. However, codes in some areas require that each bowl have its own trap.

simple trap configuration for a double-bowl sink


INSTALL THE FAUCET
7. INSTALL THE FAUCET.  Installing the faucet should be simple with the sink upside down. Follow the instructions provided by the manufacturer, as faucet mounting procedures can vary.


Boring-a-Mounting-Hole
Boring a Mounting Hole

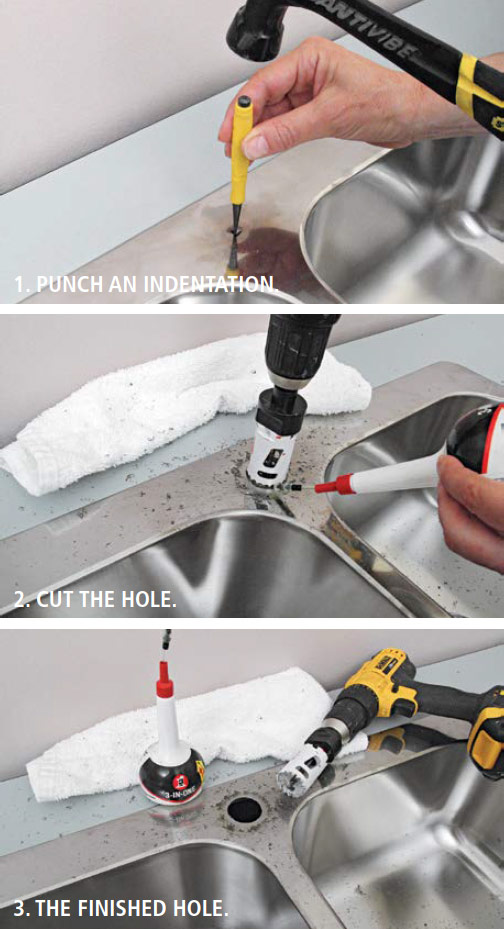
Most sinks come with holes predrilled for faucets and accessories, but if you need to cut a hole in your stainless-steel sink, it is usually not difficult. In most cases, a bi-metal hole saw, as shown, will do the trick. (If your sink is very thick and hard, you may need a titanium step drill bit.) The hole size is usually 1-3⁄8 in. Determine the center of the hole, and tap with a hammer and nail set to create an indentation so the pilot bit will not wander. Then drill the hole, squirting oil on the bit regularly. Take your time; it may take 5 or 10 minutes to make the hole. If the bit heats up and starts to smoke, stop and let it cool off. If the finished hole is rough around the edges, deburr it with a file or sandpaper before installing your new faucet.


START ASSEMBLING THE TRAP.
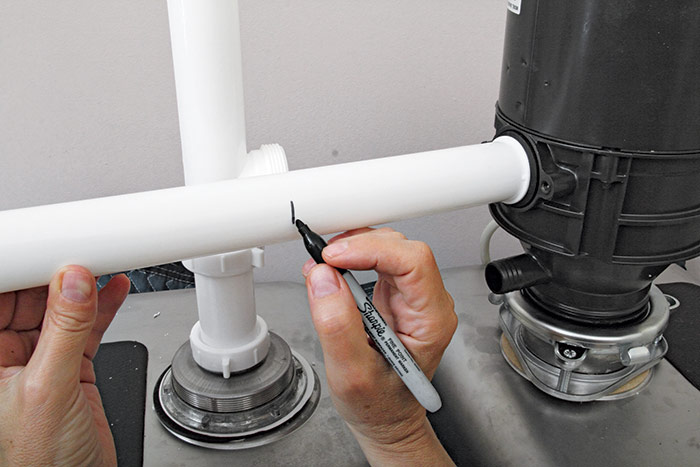
8. START ASSEMBLING THE TRAP. Install the garbage disposal. In this setup, the trap’s tailpiece goes down from the basket strainer and has a T fitting for fastening to the disposal. Cut the tailpiece so the T is directly opposite the disposal’s outlet, and install the T. Measure another tailpiece for cutting, and cut with a hacksaw or a miter saw.
attach with the diamond-shaped large washer
At the disposal’s outlet, insert the rubber washer and attach with the diamond-shaped large washer and two nuts.


COMPLETE THE TRAP
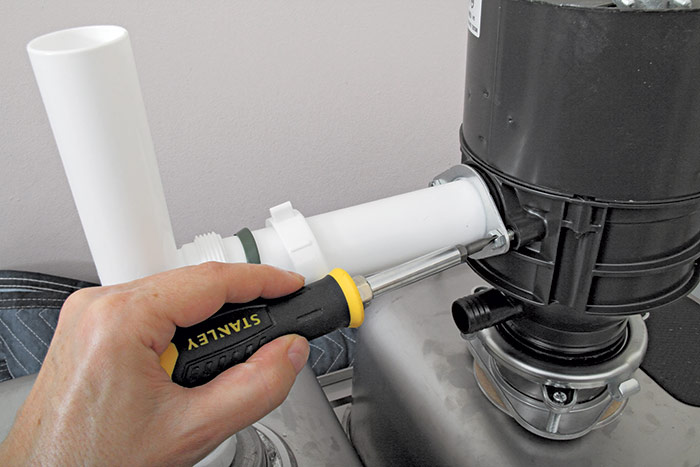
9. COMPLETE THE TRAP. Measure the height of the trap adapter in the wall and assemble a trap that will reach into it. Here, the disposal and the other bowl share a single trap; some codes may require separate traps for each.


SEAL THE RIM
10. SEAL THE RIM. Seal the underside of the rim so water cannot seep underneath. This can be done with silicone caulk, but some sinks come with foam strips, which are less messy and make a surer seal. Pull off the paper backing as you press the strip into place.


STAINLESS-STEEL CLIPS
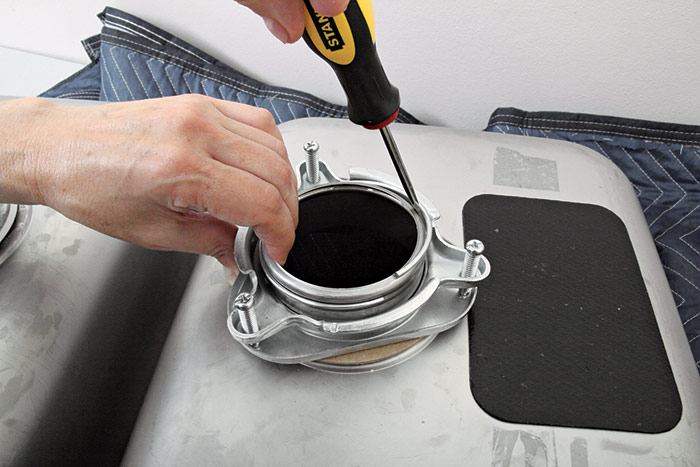
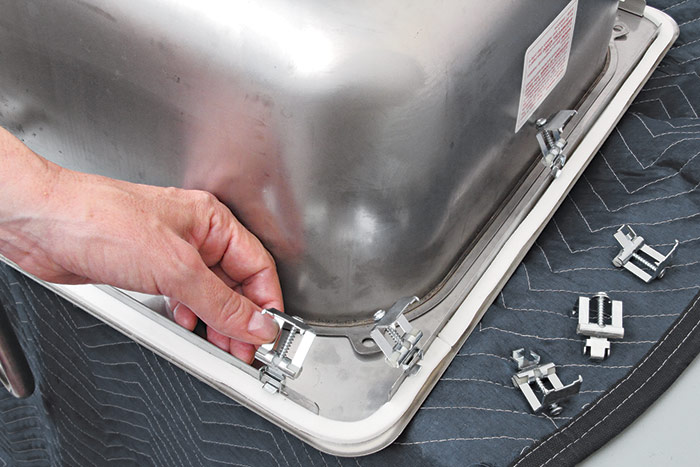
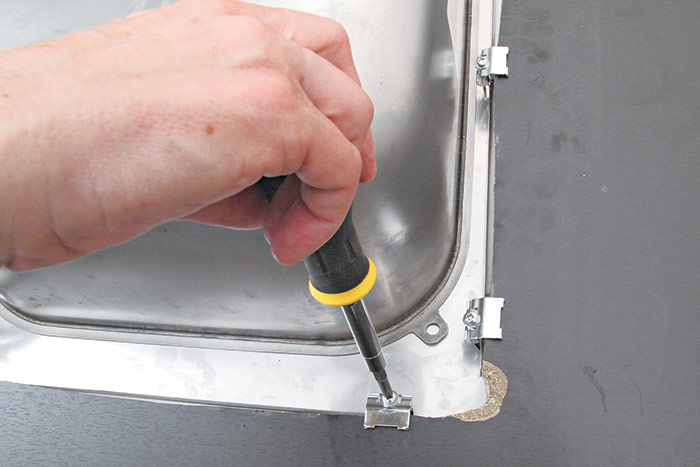
11. STAINLESS-STEEL CLIPS. The sink should come with mounting clips. Slip them into the flange around the bowl and slide them so they are evenly spaced (top). Turn the clips so they do not get in the way, and carefully set the sink in place.
turn the clips and tighten
From underneath, turn the clips and tighten them with a screwdriver (above) to firmly fasten the sink to the countertop.


Setting a Cast-Iron Sink

Cast-iron sinks are heavy, so they need no mounting clips. Just set the sink in place, make sure there are no gaps, and apply a bead of silicone or “tile and kitchen” caulk around the rim.

apply a bead of silicone


Excerpted from Plumbing (The Taunton Press, 2016) by Steve Cory.

Previous: Better Undersink Plumbing Next: Installing a Farmhouse Sink

Guide

Plumbing

Chapter

Kitchens

Sign up for eletters today and get the latest how-to from Fine Homebuilding, plus special offers.

Signing you up...

This site is protected by reCAPTCHA and the Google Privacy Policy and Terms of Service apply.
See all newsletters
See all newsletters

Log in or create an account to post a comment.

Sign up Log in

Become a member and get full access to FineHomebuilding.com

Plumbing

Plumbing

Trusted, comprehensive guidance from the pros for tackling any plumbing project

View Project Guide

View All Project Guides »

Become a member and get unlimited site access, including the Plumbing Project Guide.

Start Free Trial

Plumbing Basics
  • Plumbing Systems
  • Materials
  • Plumbing Tools
Bathrooms
  • Sinks
  • Showers & Tubs
  • Toilets
Kitchens
  • Kitchen Sinks
  • Water Filtration
  • Appliances
Roughing In
  • Layout
  • Installation
  • Copper Pipe
  • PEX Tubing
  • PVC Drainpipe
Water Heaters, Washers, and More
  • Water Heaters
  • Whole-House Filters
  • Sump Pumps
  • Washers
  • Sprinkler Systems
Maintenance and Repair
  • Sinks
  • Toilets
  • Showers & Tubs
  • Systems

Fine Home Building

Newsletter Sign-up

  • Fine Homebuilding

    Home building tips, offers, and expert advice in your inbox.

  • Green Building Advisor

    Building science and energy efficiency advice, plus special offers, in your inbox.

  • Old House Journal

    Repair, renovation, and restoration tips, plus special offers, in your inbox.

Signing you up...

This site is protected by reCAPTCHA and the Google Privacy Policy and Terms of Service apply.
See all newsletters

Follow

  • Fine Homebuilding

    Dig into cutting-edge approaches and decades of proven solutions with total access to our experts and tradespeople.

    Start Free Trial Now
    • Facebook
    • Instagram
    • X
    • LinkedIn
  • GBA Prime

    Get instant access to the latest developments in green building, research, and reports from the field.

    Start Free Trial Now
    • Facebook
    • YouTube
  • Old House Journal

    Learn how to restore, repair, update, and decorate your home.

    Subscribe Now
    • Facebook
    • Instagram
    • X

Membership & Magazine

  • Online Archive
  • Start Free Trial
  • Magazine Subscription
  • Magazine Renewal
  • Gift a Subscription
  • Customer Support
  • Privacy Preferences
  • About
  • Contact
  • Advertise
  • Careers
  • Terms of Use
  • Site Map
  • Do not sell or share my information
  • Privacy Policy
  • Accessibility
  • California Privacy Rights

© 2025 Active Interest Media. All rights reserved.

Fine Homebuilding receives a commission for items purchased through links on this site, including Amazon Associates and other affiliate advertising programs.

  • Home Group
  • Antique Trader
  • Arts & Crafts Homes
  • Bank Note Reporter
  • Cabin Life
  • Cuisine at Home
  • Fine Gardening
  • Fine Woodworking
  • Green Building Advisor
  • Garden Gate
  • Horticulture
  • Keep Craft Alive
  • Log Home Living
  • Military Trader/Vehicles
  • Numismatic News
  • Numismaster
  • Old Cars Weekly
  • Old House Journal
  • Period Homes
  • Popular Woodworking
  • Script
  • ShopNotes
  • Sports Collectors Digest
  • Threads
  • Timber Home Living
  • Traditional Building
  • Woodsmith
  • World Coin News
  • Writer's Digest
Active Interest Media logo
X
X
This is a dialog window which overlays the main content of the page. The modal window is a 'site map' of the most critical areas of the site. Pressing the Escape (ESC) button will close the modal and bring you back to where you were on the page.

Main Menu

  • How-To
  • Design
  • Tools & Materials
  • Video
  • Blogs
  • Forum
  • Project Guides
  • Reader Projects
  • Magazine
  • Members
  • FHB House

Podcasts

  • FHB Podcast
  • ProTalk

Webinars

  • Upcoming and On-Demand

Podcasts

  • FHB Podcast
  • ProTalk

Webinars

  • Upcoming and On-Demand

Popular Topics

  • Kitchens
  • Business
  • Bedrooms
  • Roofs
  • Architecture and Design
  • Green Building
  • Decks
  • Framing
  • Safety
  • Remodeling
  • Bathrooms
  • Windows
  • Tilework
  • Ceilings
  • HVAC

Magazine

  • Current Issue
  • Past Issues
  • Magazine Index
  • Subscribe
  • Online Archive
  • Author Guidelines

All Access

  • Member Home
  • Start Free Trial
  • Gift Membership

Online Learning

  • Courses
  • Project Guides
  • Reader Projects
  • Podcast

More

  • FHB Ambassadors
  • FHB House
  • Customer Support

Account

  • Log In
  • Join

Newsletter

Get home building tips, offers, and expert advice in your inbox

Signing you up...

This site is protected by reCAPTCHA and the Google Privacy Policy and Terms of Service apply.
See all newsletters
See all newsletters

Follow

  • X
  • YouTube
  • instagram
  • facebook
  • pinterest
  • Tiktok

Join All Access

Become a member and get instant access to thousands of videos, how-tos, tool reviews, and design features.

Start Your Free Trial

Subscribe

FHB Magazine

Start your subscription today and save up to 70%

Subscribe

You have 1 free article remaining.

Get complete site access, including thousands of videos, how-to tips, tool reviews, and design features.

Start your FREE trial

Already a member? Log in

We hope you’ve enjoyed your free articles. To keep reading, become a member today.

Get complete site access to expert advice, how-to videos, Code Check, and more, plus the print magazine.

Start your FREE trial

Already a member? Log in

Privacy Policy Update

We use cookies, pixels, script and other tracking technologies to analyze and improve our service, to improve and personalize content, and for advertising to you. We also share information about your use of our site with third-party social media, advertising and analytics partners. You can view our Privacy Policy here and our Terms of Use here.

Cookies

Analytics

These cookies help us track site metrics to improve our sites and provide a better user experience.

Advertising/Social Media

These cookies are used to serve advertisements aligned with your interests.

Essential

These cookies are required to provide basic functions like page navigation and access to secure areas of the website.

Delete My Data

Delete all cookies and associated data