On-Site Carpentry With a Circular Saw
Cutting in place saves time and trouble.
Synopsis: Readers of Tips and Techniques will recognize the format of this article originally featured in Fine Homebuilding issue #3. It offers a number of well-illustrated tips for using a circular saw on the job to save time, and is written by a West Coast carpenter who favors a worm-drive saw.
The portable electric circular saw isn’t just a labor-saving device. It’s a tool that can do things which would be impossible with a handsaw. The circular saw is hazardous, and its electric cord tethers you to an outlet, so you’ve got to organize your work differently than you would if you were using a handsaw. But if you can develop the right habits, tricks and sequences for moving materials, nailing and cutting, you can work safely and also save time and energy.
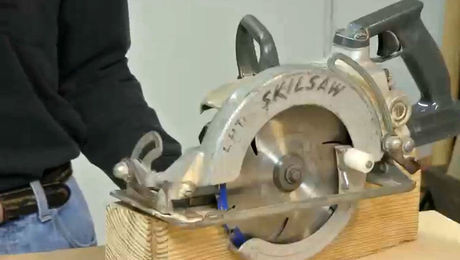
I think worm-drive saws are best. They are better balanced, harder to stall and, most important, the blade is on the left, so a right-handed person can see the cut in progress. If I were left-handed, I would investigate sidewinder models with the blade on the other side.
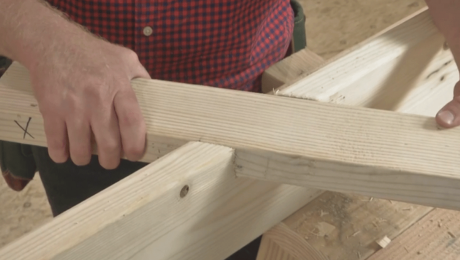
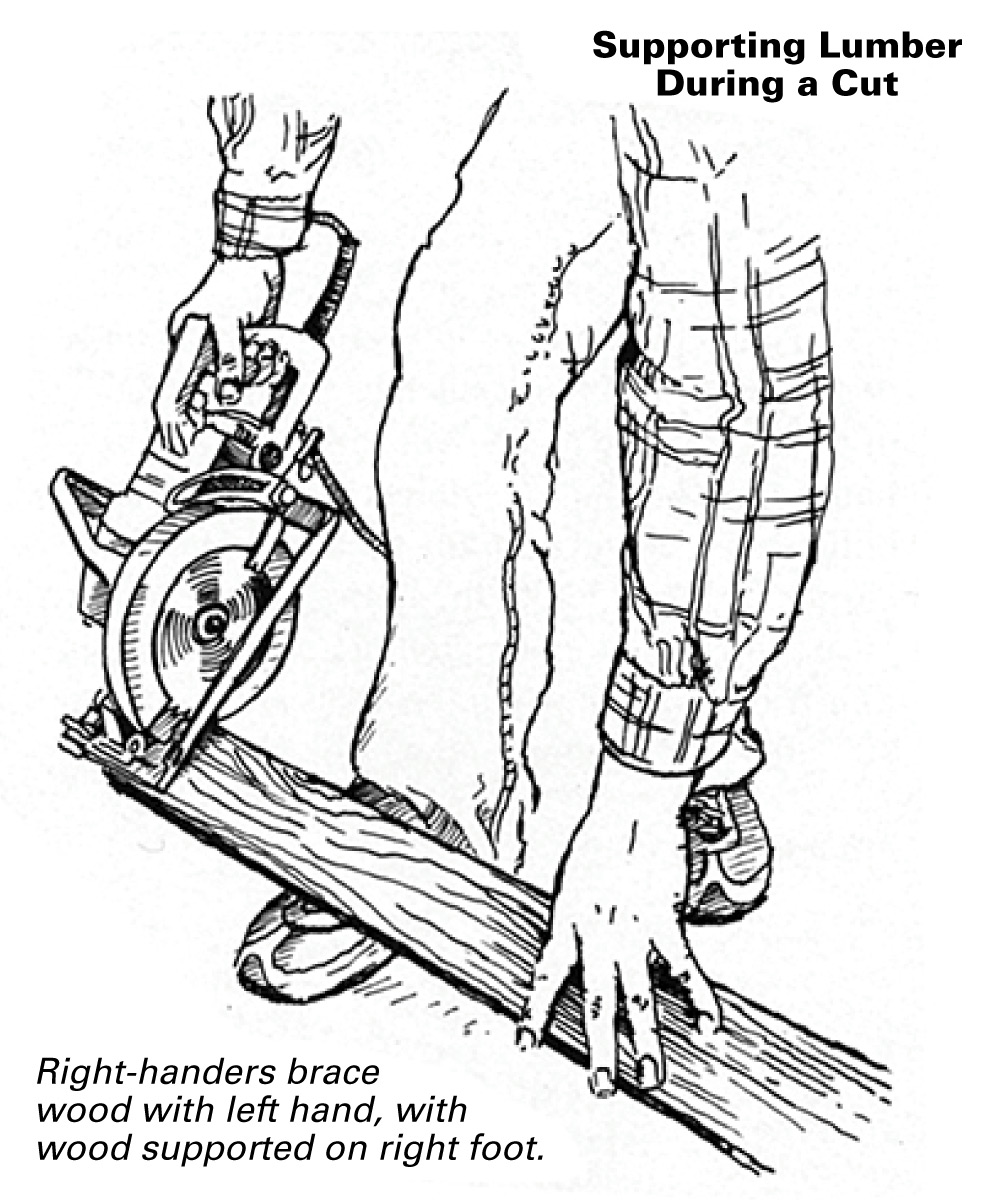
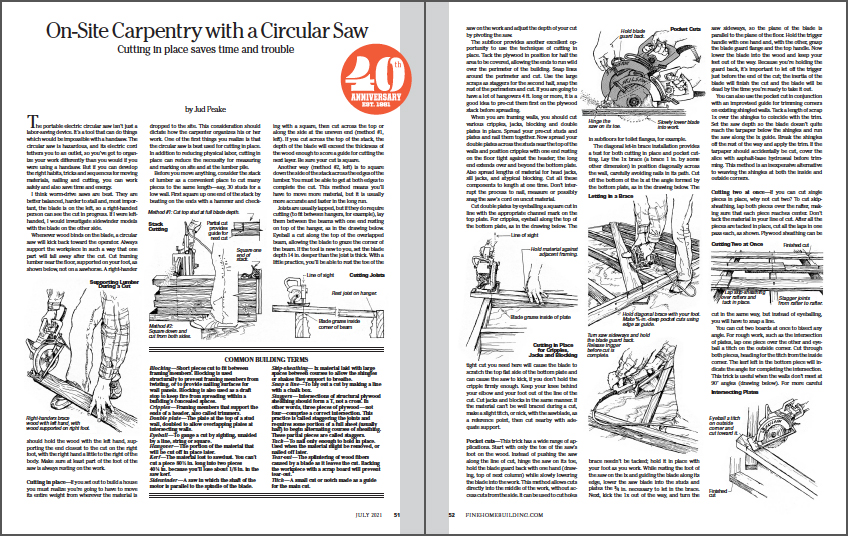
Whenever wood binds on the blade, a circular saw will kick back toward the operator. Always support the workpiece in such a way that one part will fall away after the cut. Cut framing lumber near the floor, supported on your foot, as shown below, not on a sawhorse. A right-hander should hold the wood with the left hand, supporting the end closest to the cut on the right foot, with the right hand a little to the right of the body. Make sure at least part of the foot of the saw is always resting on the work.
Cutting in place
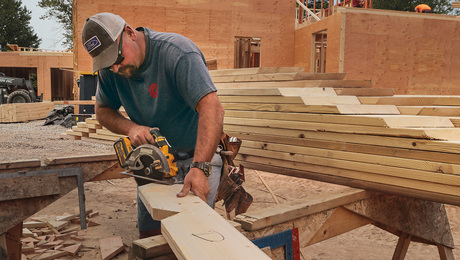
If you set out to build a house you must realize you’re going to have to move its entire weight from wherever the material is dropped to the site. This consideration should dictate how the carpenter organizes his or her work. One of the first things you realize is that the circular saw is best used for cutting in place. In addition to reducing physical labor, cutting in place can reduce the necessity for measuring and marking on site and at the lumber pile.
Before you move anything, consider the stack of lumber as a convenient place to cut many pieces to the same length—say, 30 studs for a low wall. First square up one end of the stack by beating on the ends with a hammer and checking with a square, then cut across the top or along the side at the uneven end (method #1, left). If you cut across the top of the stack, the depth of the blade will exceed the thickness of the wood enough to score a guide for cutting the next layer. Be sure your cut is square.
Another way (method #2, left) is to square down the side of the stack across the edges of the lumber. You must be able to get at both edges to complete the cut. This method means you’ll have to move more material, but it is usually more accurate and faster in the long run.
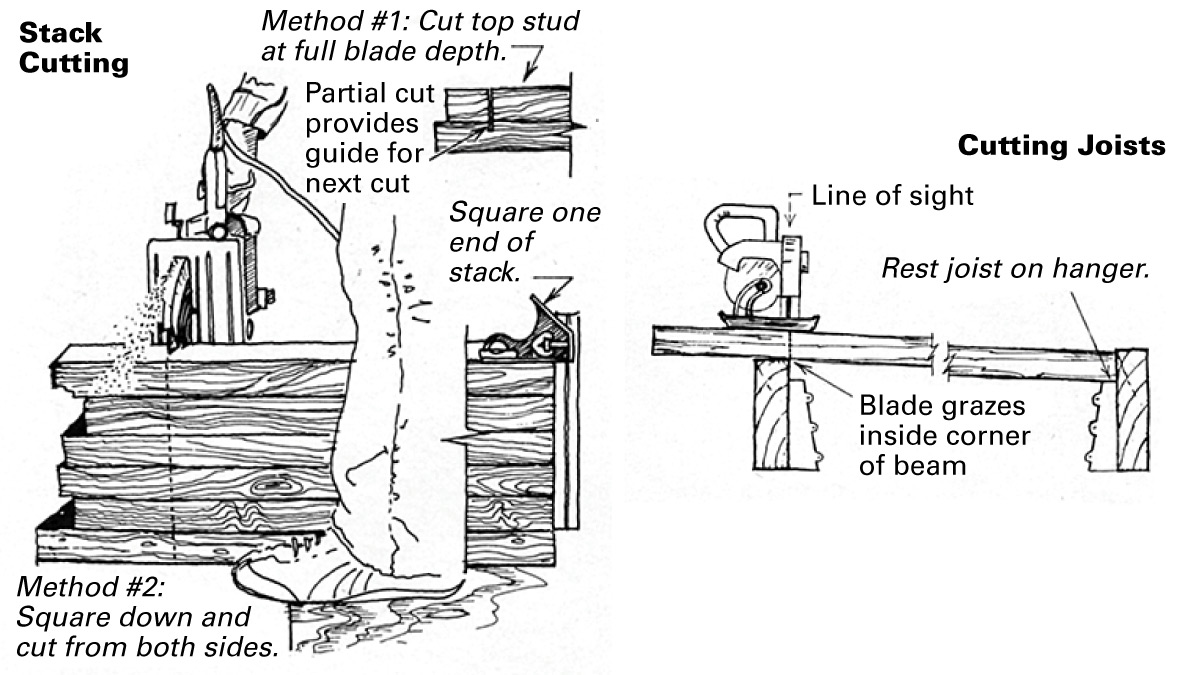
Joists are usually lapped, but if they do require cutting (to fit between hangers, for example), lay them between the beams with one end resting on top of the hanger, as in the drawing below. Eyeball a cut along the top of the overlapped beam, allowing the blade to graze the corner of the beam. If the tool is new to you, set the blade depth 14 in. deeper than the joist is thick. With a little practice, you’ll be able to rest the toe of the saw on the work and adjust the depth of your cut by pivoting the saw.
The subfloor provides another excellent opportunity to use the technique of cutting in place. Tack the plywood in position for half the area to be covered, allowing the ends to run wild over the perimeter of the building. Snap lines around the perimeter and cut. Use the large scraps as staggers for the second half, snap the rest of the perimeters and cut. If you are going to have a lot of hangovers 4 ft. long or more, it is a good idea to pre-cut them first on the plywood stack before spreading.
Common Building Terms |
| Blocking—Short pieces cut to fit between framing members. Blocking is used structurally to prevent framing members from twisting, or to provide nailing surfaces for wall panels. Blocking is also used as a draft stop to keep fire from spreading within a building’s concealed spaces.
Cripples—Framing members that support the ends of a header, also called trimmers. Double plate—The plate at the top of a stud wall, doubled to allow overlapping plates at intersecting walls. Eyeball—To gauge a cut by sighting, unaided by a line, string or square. Hangover—The portion of the material that will be cut off in place later. Kerf—The material lost to sawdust. You can’t cut a piece 80-1/2 in. long into two pieces 40-1/4 in. because you’ll lose about 1/8 in. in the saw kerf. Sidewinder—A saw in which the shaft of the motor is parallel to the spindle of the blade. |
Skip-sheathing— lx material laid with large spaces between courses to allow the shingles or shakes they support to breathe.
Snap a line—To lay out a cut by making a line with a chalk box. Staggers—Intersections of structural plywood sheathing should form a T, not a cross. In other words, three pieces of plywood—not four—comprise a correct intersection. This practice is called staggering the joints and requires some portion of a full sheet (usually half) to begin alternating courses of sheathing. These partial pieces are called staggers. Tack—To nail only enough to hold in place. Used when the material might be removed, or nailed off later. Tear-out—The splintering of wood fibers caused by a blade as it leaves the cut. Backing the workpiece with a scrap board will prevent tear-out. Titch—A small cut or notch made as a guide for the main cut. |
When you are framing walls, you should cut various cripples, jacks, blocking and double plates in place. Spread your pre-cut studs and plates and nail them together. Now spread your double plates across the studs near the top of the walls and position cripples with one end resting on the floor tight against the header; the long end extends over and beyond the bottom plate. Also spread lengths of material for head jacks, sill jacks, and atypical blocking. Cut all these components to length at one time. Don’t interrupt the process to nail, measure or possibly snag the saw’s cord on uncut material.
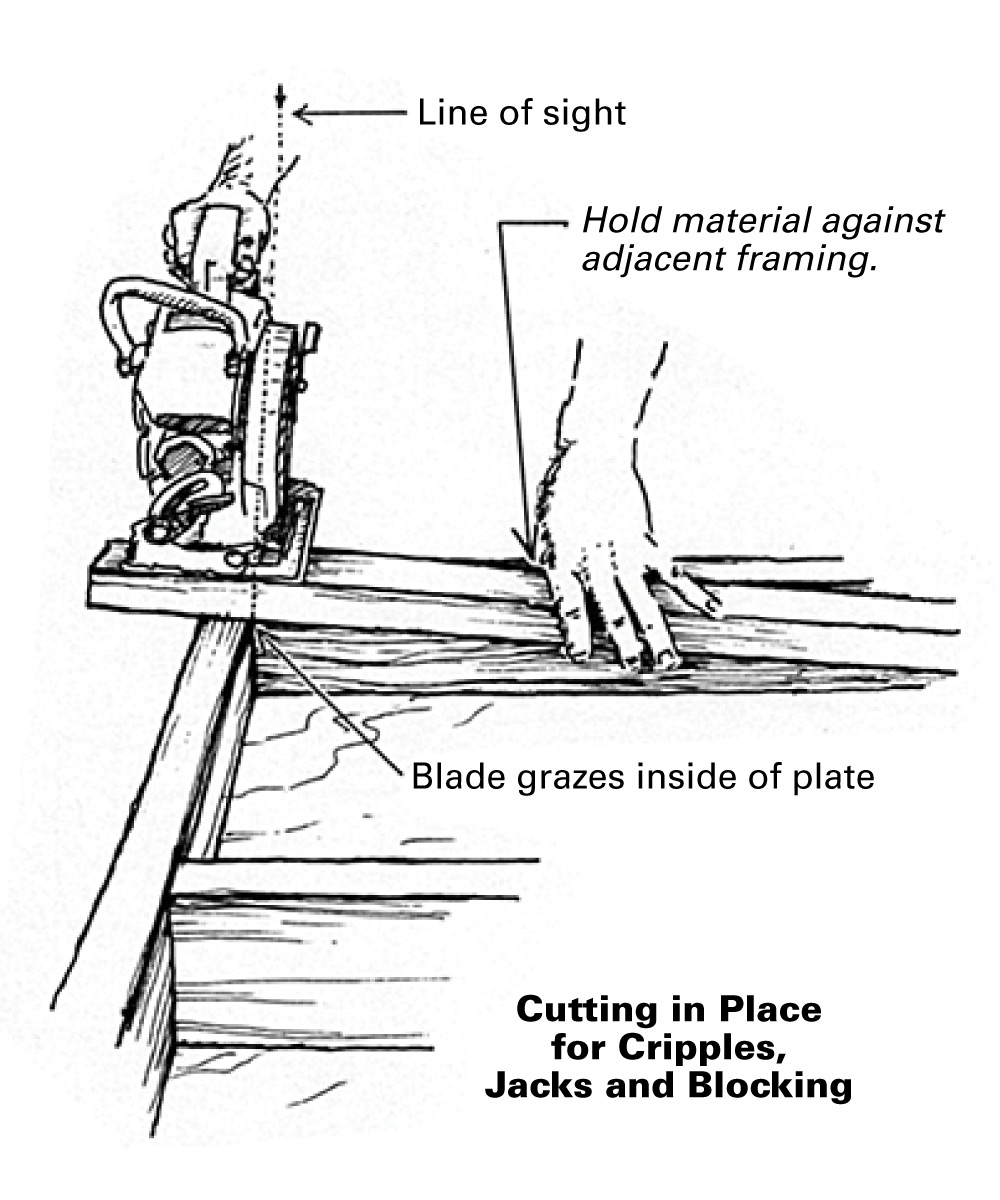
Cut double plates by eyeballing a square cut in line with the appropriate channel mark on the top plate. For cripples, eyeball along the top of the bottom plate, as in the drawing below. The tight cut you need here will cause the blade to scratch the top flat side of the bottom plate and can cause the saw to kick, if you don’t hold the cripple firmly enough. Keep your knee behind your elbow and your foot out of the line of the cut. Cut jacks and blocks in the same manner. If the material can’t be well braced during a cut, make a slight titch, or nick, with the sawblade, as a reference point, then cut nearby with adequate support.
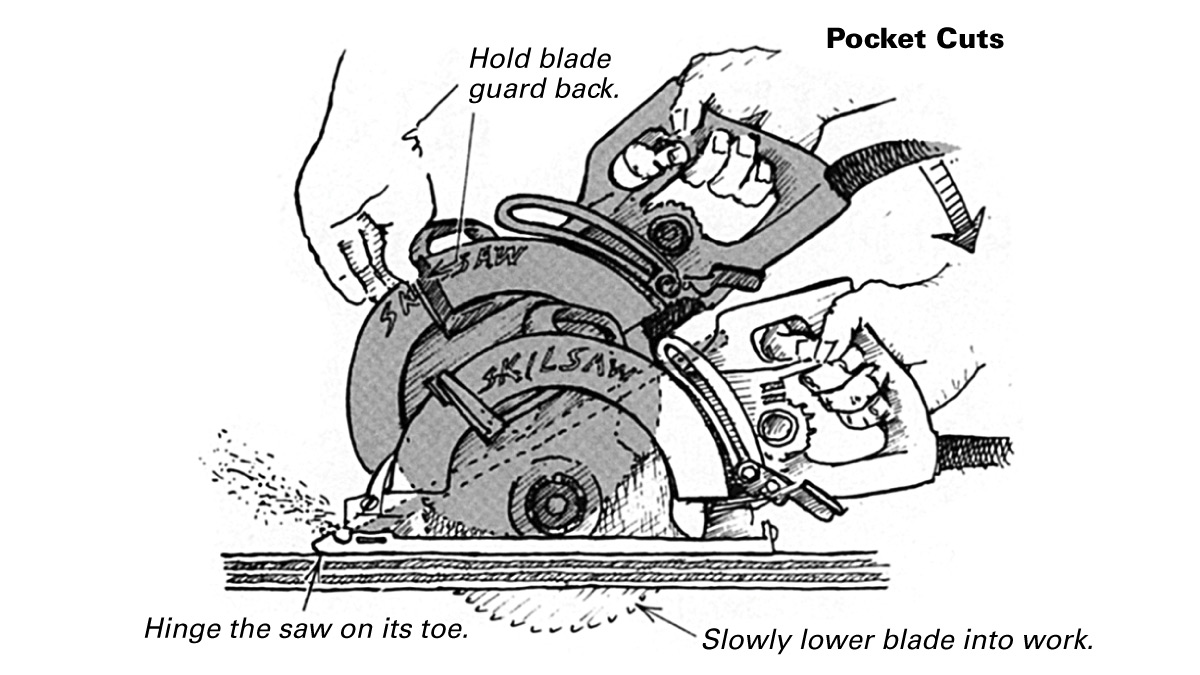
Pocket cuts
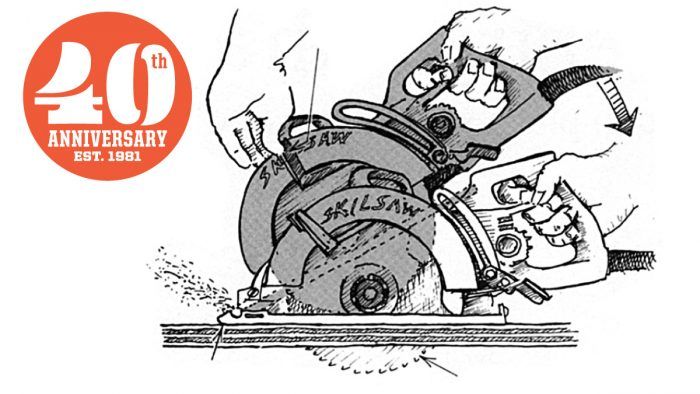
This trick has a wide range of applications. Start with only the toe of the saw’s foot on the wood. Instead of pushing the saw along the line of cut, hinge the saw on its toe, hold the blade guard back with one hand (drawing, top of next column) while slowly lowering the blade into the work. This method allows cuts directly into the middle of the work, without access cuts from the side. It can be used to cut holes in subfloors for toilet flanges, for example.
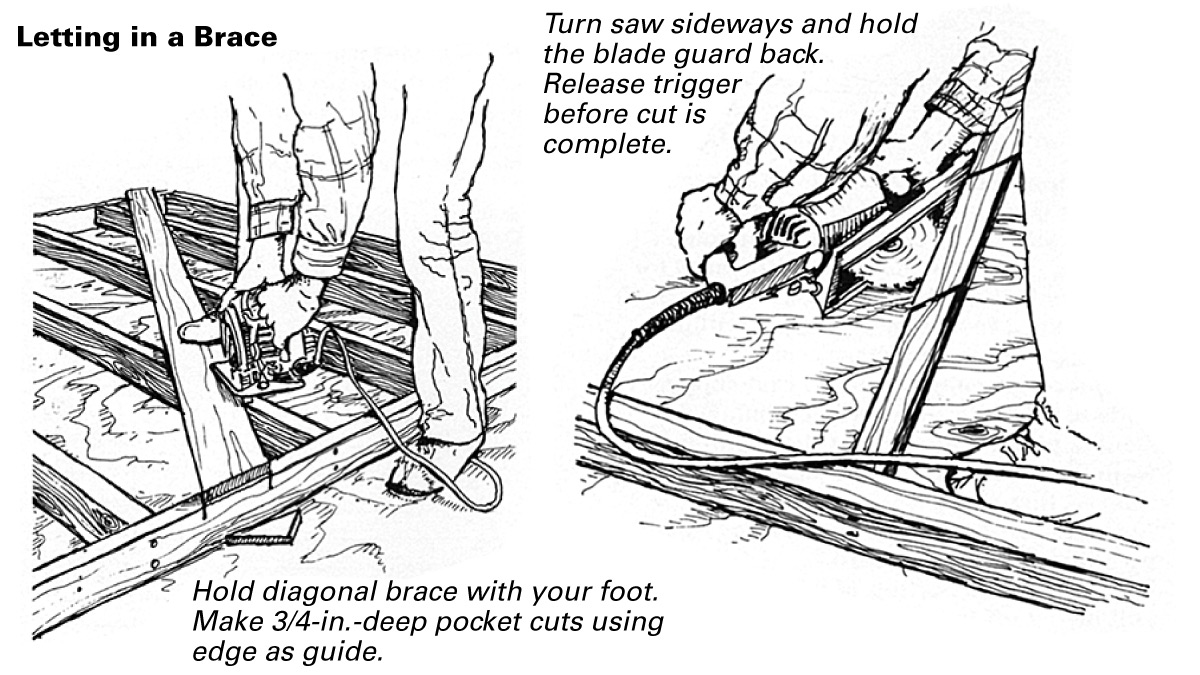
The diagonal let-in brace installation provides a test for both cutting in place and pocket cutting. Lay the 1x brace (a brace 1 in. by some other dimension) in position diagonally across the wall, carefully avoiding nails in its path. Cut off the bottom of the lx at the angle formed by the bottom plate, as in the drawing below. The brace needn’t be tacked; hold it in place with your foot as you work. While resting the foot of the saw on the lx and guiding the blade along its edge, lower the saw blade into the studs and plates the 3/4 in. necessary to let in the brace. Next, kick the 1x out of the way, and turn the saw sideways, so the plane of the blade is parallel to the plane of the floor. Hold the trigger handle with one hand and, with the other, grasp the blade guard flange and the top handle. Now lower the blade into the wood and keep your feet out of the way. Because you’re holding the guard back, it’s important to let off the trigger just before the end of the cut; the inertia of the blade will finish the cut and the blade will be dead by the time you’re ready to take it out.
You can also use the pocket cut in conjunction with an improvised guide for trimming corners on existing shingled walls. Tack a length of scrap 1x over the shingles to coincide with the trim. Set the saw depth so the blade doesn’t quite reach the tarpaper below the shingles and run the saw along the lx guide. Break the shingles off the rest of the way and apply the trim. If the tarpaper should accidentally be cut, cover the slice with asphalt-base hydroseal before trimming. This method is an inexpensive alternative to weaving the shingles at both the inside and outside corners.
Cutting two at once
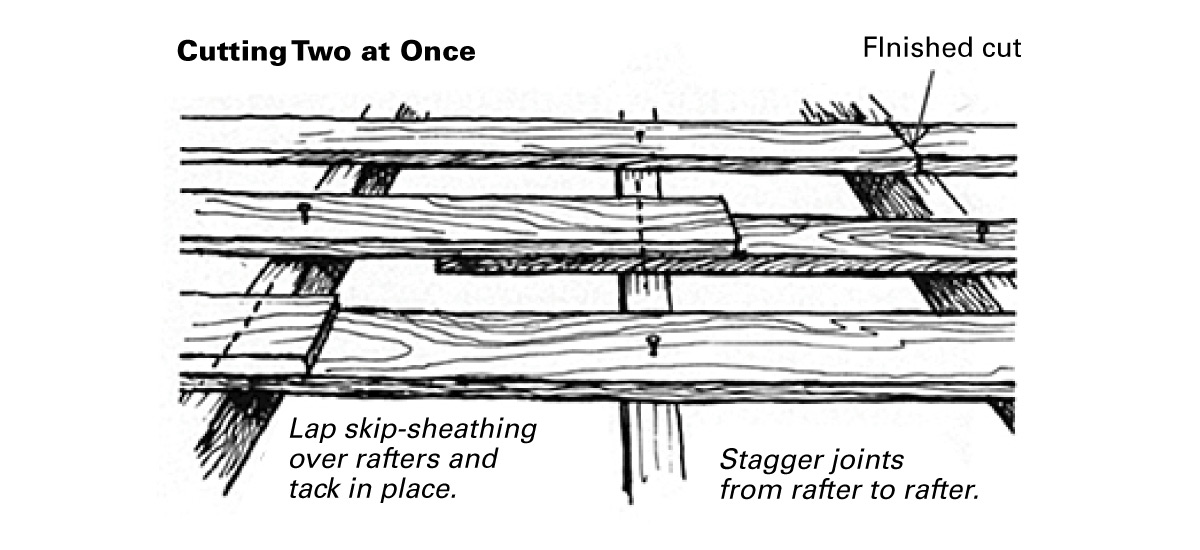
If you can cut single pieces in place, why not cut two? To cut skip-sheathing, lap both pieces over the rafter, making sure that each piece reaches center. Don’t tack the material in your line of cut. After all the pieces are tacked in place, cut all the laps in one pass each, as shown. Plywood sheathing can be cut in the same way, but instead of eyeballing, you will have to snap a line.
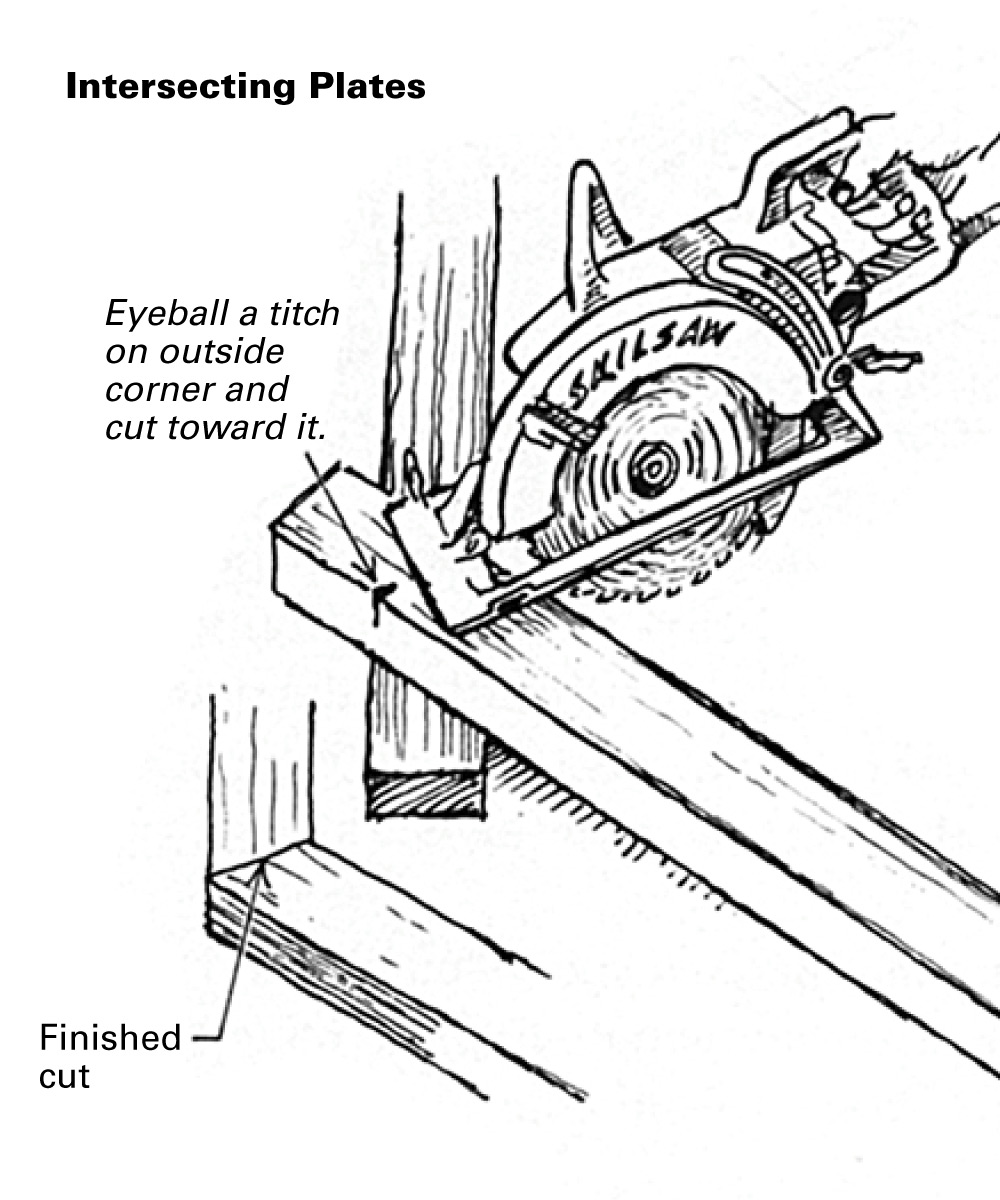
You can cut two boards at once to bisect any angle. For rough work, such as the intersection of plates, lap one piece over the other and eyeball a titch on the outside corner. Cut through both pieces, heading for the titch from the inside corner. The kerf left in the bottom piece will indicate the angle for completing the intersection. This trick is useful when the walls don’t meet at 90° angles (drawing below). For more careful work, you can square up on both of these corners and draw a connecting line. In this case, you will need to move the material together after the cut to make up for the saw kerf.
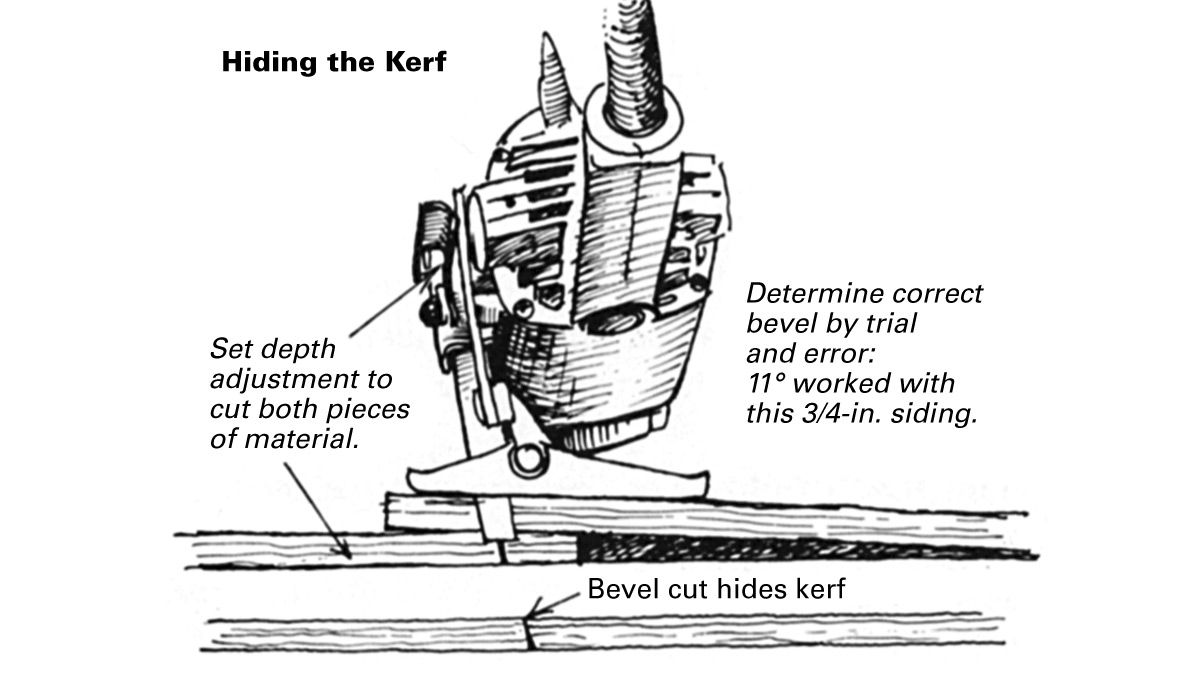
If, for some reason, you are unable to move the material ends together, you can always find a bevel at which to set the saw to hide the kerf. As you can see in the drawing, it is impractical to try to predict the exact angle. Trial and error works best. The beveled lap cut can sometimes be used when doing exterior trim or siding. Start from the bottom and cut laps in place as you go. Don’t wait until it’s all up to cut.
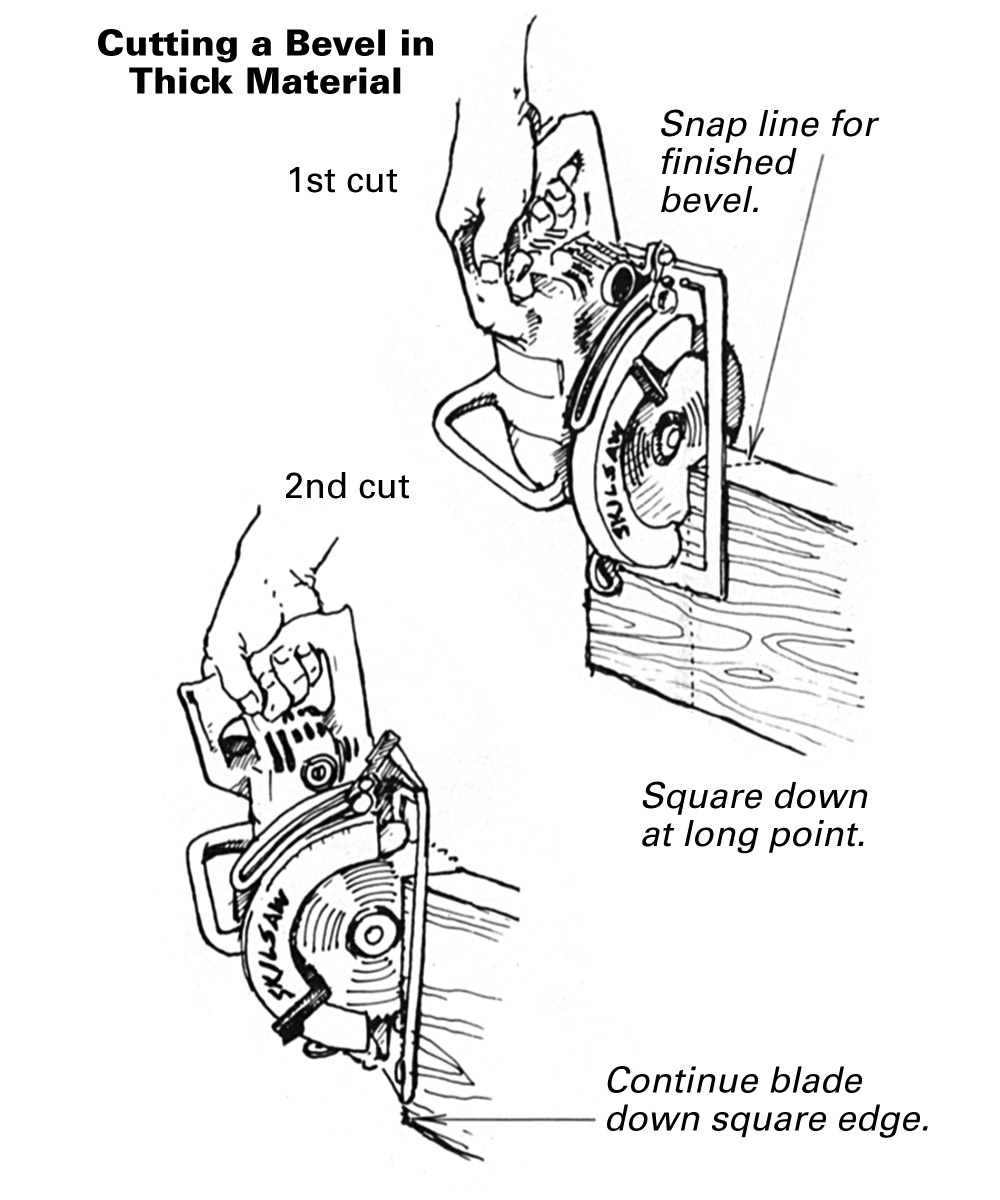
Cutting a bevel in thicker material can be difficult. The 45° bevel is easy to visualize; it bisects a right angle. But with a circular saw it can be hard to execute. Let’s take an example from rough work. You’ve cantilevered some joists for a bay window that require 45° cuts, and snapped your lines. Square down the face of the joist, set the bevel on your saw, and cut. You find out soon you can’t cut one side of the bay window from above; you usually can’t reach it from below, either. Instead, square down from the long point and make a square cut, as in the drawing below; then cut into the top edge of the joist along the snap-line mark until the blade has reached its full depth. Continue the cut by leading the front of the blade down the square end edge of the joist. I have found this method to be consistently more accurate than relying on the saw’s beveling capabilities.
Trim work
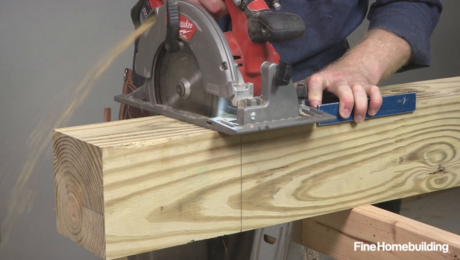
It can be hard to use the circular saw here, but often it’s the only power saw on hand. In this case, the best place to cut is on sawhorses. Cut from the backside of the material, so the tear-out is hidden. For outside miters you just have to cut carefully. Tilt the square up toward the saw, so that, instead of running over it, the saw runs against the edge of the square, which acts as a guide. If the material is wide and tends to get forced onto the untoothed portion of the blade where it binds, make relief cuts on the waste side. Don’t try to make a pocket cut on a beveled miter.
For inside corners on trim of rectangular cross section, I think the butt joint is best. It’s easiest, and, if the material cups or shrinks, it’s much more difficult to see any gap in the joint. If a miter joint is used, any gap will be obvious to people as they walk by.
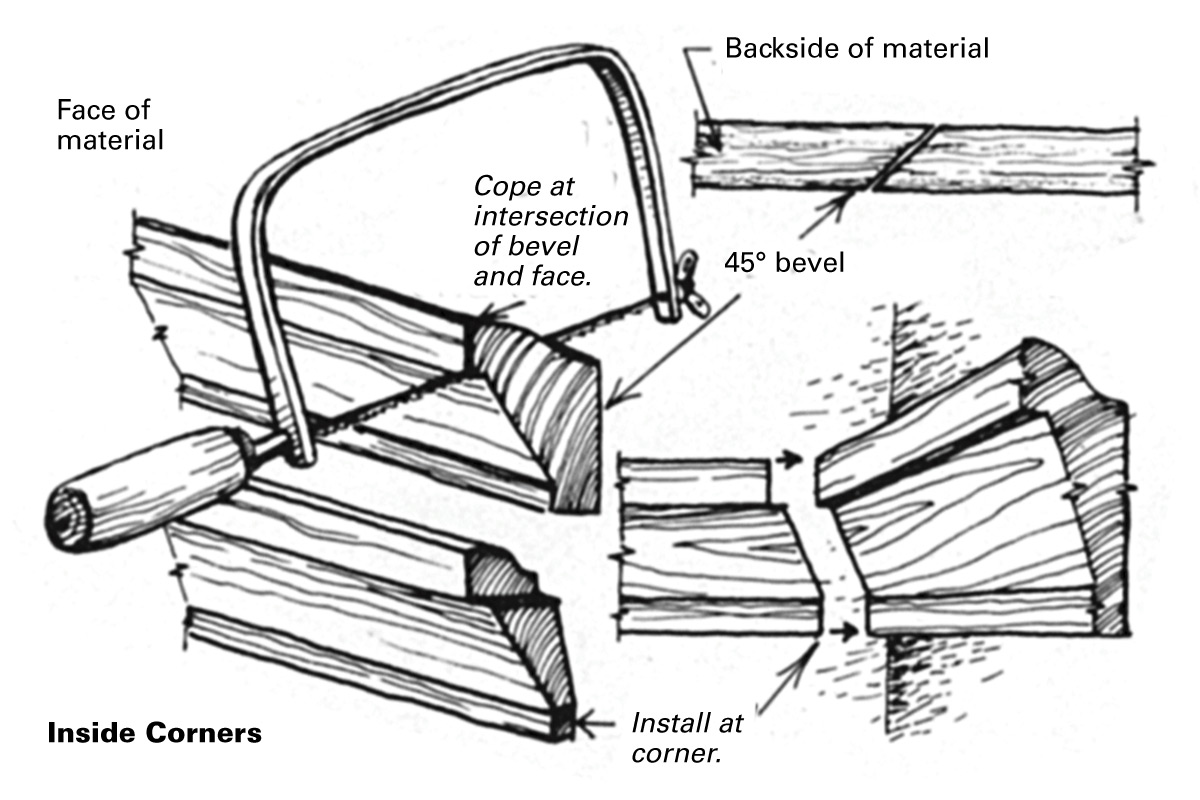
Sometimes you can get stuck cutting molded material for interior trim without a miter box; either you don’t have one on hand or your material won’t fit in the one you do have. You can make perfectly acceptable inside corners by first making a 45° bevel with a circular saw and then back-cutting the joint with a coping saw. A backcut joint is cut at slightly less than 90° to allow the trim’s visible edge complete contact with the adjacent trim. This is useful when joining trim with complex contours (drawing below). To install picture molding, for example, butt the material between the walls on one end of the room. Measure and cut the material for the adjoining side just as if you were going to miter the inside corner. Make this cut from the backside of the material with a circular saw and follow the line formed by the intersection of the face of the material and the end-grain bevel made by your circular saw cut with a coping saw. Make the piece 1/16 in. long, and the back-cut trim will dig into the adjoining piece and hide any errors.
Dimensions and notching
If you want to crosscut or rip something at 1-1/2 in. or 3-1/2 in., you don’t have to measure and mark. The circular saw has these dimensions built in. From one side of the foot to the far side of the blade is about 3-1/2 in.; from the other side of the foot to the near side of the blade is about 1-1/2 in. Eyeball the appropriate side of the foot along the edge of the material to get your cut. If you have some odd-sized rip to make that is not greater than 3-1/2 in., and a rip fence isn’t handy, make a mark on the toe of the foot at the correct distance from the blade and lead this mark down the edge of the material to be cut.
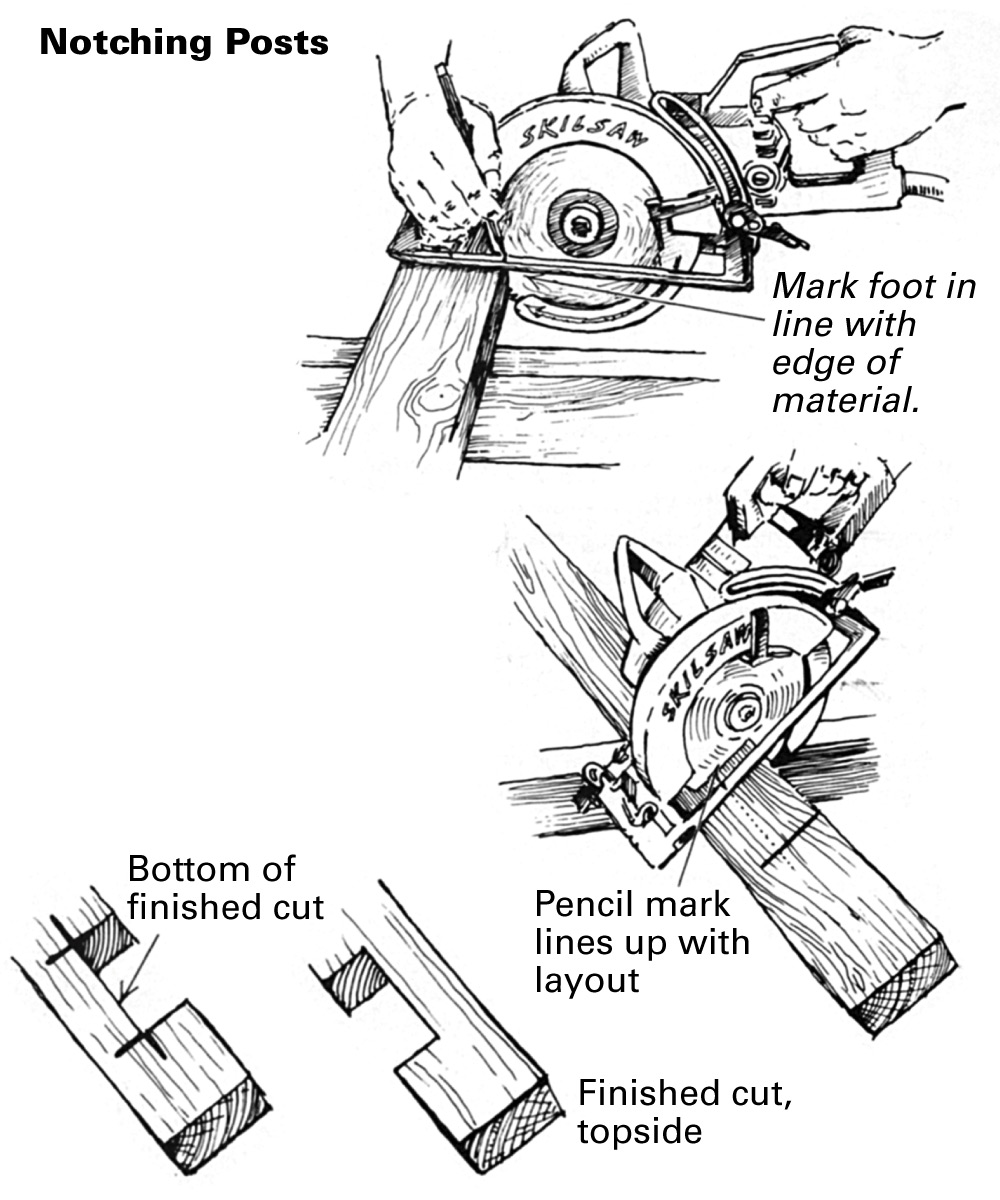
Notches around posts for exterior decking can be accomplished quickly by cutting from the backside. Start a saw cut into a scrap of the same material and stop just as the blade touches the lower corner, as in the drawing. Make a pencil mark on the foot of the saw in line with the square edge of the wood (this mark won’t be accurate if you change the depth adjustment of the saw or work with varying thicknesses of material). Lay out the notch on the backside of the work and cut past the intersecting lines until the pencil mark lines up with the layout; this hides tear-out and saves handsawing.
If you use the circular saw enough, someday it’s going to kick back on you. That’s why it’s important to make your safety precautions habitual. Support the wood well, stand to the side of the line of cut, release the trigger before the end of the cut, and back up your elbow with your knee when possible. Eyeball your cuts square—the more you do it the better you’ll get. Cut in place whenever practical and work your material—moving and nailing into a pattern with your cutting to save unnecessary movement. Don’t use your tape measure unless you have to.
At time of writing, Jud Peake was a contractor in Oakland, Calif. This article originally appeared in Issue #3 in June of 1981.
From Fine Homebuilding #300
To read the entire article, please click the View PDF button below.
RELATED LINK:
Fine Homebuilding Recommended Products
Fine Homebuilding receives a commission for items purchased through links on this site, including Amazon Associates and other affiliate advertising programs.

Makita Top-Handle Jigsaw (4350FCt)

DEWALT 2 1⁄4-hp Router Combo Kit (DW618PK)

Reliable Crimp Connectors