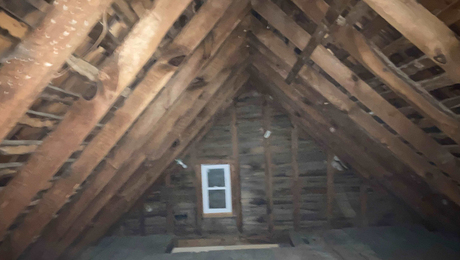
These Old Rafters Need a Lift
The rafters in this 1950s house are sagging. What's the best way to reinforce them?
An FHB reader named nomorecoffee (let’s call him Coffee) is trying to solve a problem common to many older houses: the original rafters are undersized, and sagging or showing cracks.
“I may need to sister some of the rafters in my house,” Coffee writes in a post in FHB’s Discussion Forum. “They’re Douglas fir 2×6 from the ’50s, actual size 5 1/4 in. to 5 3/8 in.”
Coffee would like to reinforce them with full-length sisters that run from the top plate of the wall all the way to the ridge. He’s picked up some 16-ft. 2×6 spruce that are slightly longer than he’ll need, but he’s not sure the material is the right choice.
“These things flex up and down noticeably when I hold them upright (narrow side down),” Coffee writes. “Are these good enough to reinforce the old rafters if they’re not even strong enough to fully support their own weight? Do I need to find some southern pine or use laminated veneer lumber (LVL)?”
Coffee’s predicament is the topic for this FHB Spotlight.
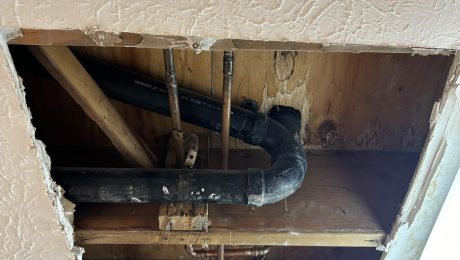
Assessing the condition of the originals
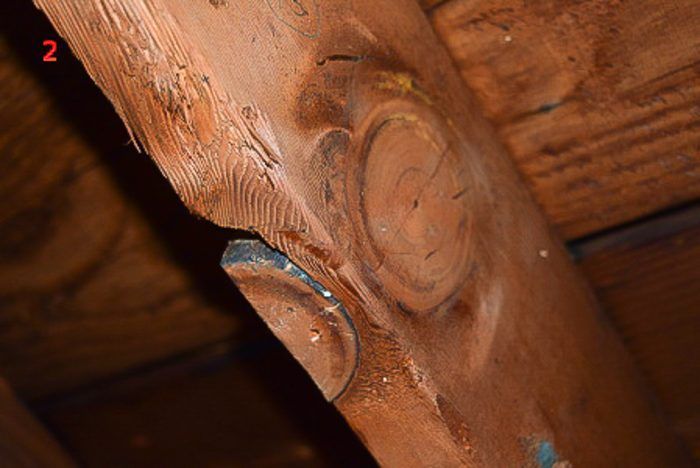
Vishnej suggests that Coffee look carefully at the birdsmouth cuts where the bottom of the rafter meets the top plate of the wall. It’s a natural weak point in the rafter. “You may be able to sister damage farther up the rafter,” he says, “but it will be tricky to address damage to that junction without de-skinning the roof.”
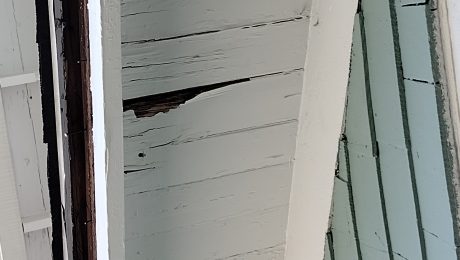
Jlyda says that checks, or cracks, in rafters may result from drying and shrinking, and may not affect their structural integrity. A big knot in the middle of a rafter, however, could make it weaker than checking. “If the cracks are perpendicular to the grain it is a bigger issue and structural integrity is compromised,” Jlyda adds.
Are you sure sistering is the right solution?
On the question of what material to use, Tfarwell points out that spruce is strong but naturally springy. His choice would be Douglas fir.
But others question Coffee’s basic plan of attack. In sistering a rafter, he would cut a second rafter to match the original and nail or screw it to the first, thereby doubling the thickness of the original and increasing its strength. Firedudec56, however, suggests that adding a 2×4 to the bottom edge of each rafter to create an I-beam might be easier. And Jlyda thinks that installing purlins would take less time and require less material than sistering.
“I think I need to sister the rafters because they are cracked to varying degrees,” Coffee replies. “I don’t think the roof is going to fall down and it’s not sagging noticeably but I want to install insulation and that will add weight by itself and through snow load. I’m thinking sistering because that seems the closest to just replacing the broken components without major structural changes.”
He could add 2x4s to the bottom of the rafters, although he’s concerned about thermal bridging through the roof framing. And because the attic is a finished space, adding purlins and supports below them is not a workable plan.
The plywood solution
Coolwillie takes note of Coffee’s description of the old rafters—in particular, his use of the phrase “cracking to various degrees” and “not sagging noticeably.”
“Two of your comments lead me to suggest you hire a carpenter experienced in structural repair to take a look at the cracks and check for sagging,” Coolwillie says. “One possible solution would be 3/4-in. CDX plywood ripped to full depth of existing rafters and glued and bolted both sides with the joints in the plywood sheets offset.”
This plan also sounds good to firedudec56.
“I’m thinking more and more that sandwiching the rafters with 3/4-in. plywood and adding a 2x across the bottom edge gives you the best, easiest solution,” he writes. “Adding plywood sort of eliminates the potential for cracking as the plywood is a laminated product and has no lines to crack along.”
There is also the notion that a sistered rafter would not have to extend the full length of the original. UncleMike42 says this: “I really would not worry about sistering the entire rafter. Cut the rafter to extend as far as you can past the nasty parts and glue and screw or nail together,” UncleMike42 says. “Use a couple of C-clamps till they bond if you like. Use some good poly construction adhesive.”
That’s a problem, replies Coolwillie. That plan would not meet code where he lives.
Dct1967 echoes those concerns, warning Coffee that from an engineering point of view there’s good reason why the sister should run the entire length of the damaged original. “I can’t tell you the number of times I get called in to assess a prior repair,” Coolwillie says, “and tell the owner to re-do it properly.”
This is harder than it sounds
Despite the suggested alternatives, Coffee decides to go with his original idea. Sistering it is. But what looked mildly challenging in theory is proving to be something else in practice.
“I’m trying my hand at adding a full-length sister to a rafter and I didn’t expect it to be easy but it is a colossal pain,” Coffee writes in a progress report. He’s cutting all the protruding nails in the rafter bay flush so they don’t interfere with the new rafter, and errors in measuring are forcing him to swing a 14-ft. 2×6 around for trimming in a confined space.
Andy Engel had suggested that if Coffee went the sistering route that he put the upper edge of the sister in first. “Then,” he says, “when you’re beating them into place, the only friction points are at the ends. Don’t ask me how I know this.”
Now, Coffee is discovering that Engel was right. “I thought I could turn it upright while it’s oriented diagonally in the bay,” he says, “but that hasn’t worked out so far. Pounding it upright is going to be pretty intense.”
Firedudec56 makes several suggestions that might make the job to a little easier:
- Make a pattern for the 2x material out of 1x furring and a short piece of 2x stock for the ends of the rafters.
- Use a piece of 2x material as a pounding block, and use a 2-lb. sledge to pound the sisters into place rather than a framing hammer. The block will prevent dings in the new framing.
- Use short pipe clamps to squeeze the sister into place, and attach it with construction adhesive and structural screws.
Given the difficulty of getting the new rafter into place, Coffee wonders whether it would be a code violation to cut it 1/4 in. short and then add shims between the end of the rafter and the ridge.
“If you cut it a little short, why not just drop the rafter down onto the plate?” Engel replies. “It doesn’t matter if it’s contacting the sheathing.”
For the rafters that are bowed (rather than sagging), Coffee asks whether the sister should be set in straight, or curved to match the contour of the original.
Firedudec56 says that the two rafters, old and new, should be connected where possible and any open spaces between them can be filled with 1/4-in. plywood or cedar shingles that are glued and screwed in place. “Everything you’re doing should be strengthening the roof support system so I don’t think you need to try to match the existing,” he says. “To some extent you’re reframing the roof.”
Our expert’s view
Builder Ben Bogie added these thoughts:
First, a disclaimer: I am not a structural engineer. What I am is a carpenter with more than 20 years of experience in cobbling together functional repairs on old structures. Here’s how I’d approach your situation.
We want to make this easy, right? Not because we don’t like to work hard, but as a general principle I don’t like fixes, especially ones adjacent to an existing roof, that require smashing or clipping nails. This is just inviting issues down the road. Reinforcing the damaged areas with plywood gussets has some merit, but without having a holistic view of the structure its hard to say that will be sufficient. So let’s approach this as a full sistering of the rafters.
Your gut instinct may be to cut the new rafters to exactly the same dimensions as the existing rafters, but that’s a false start. It’s nearly impossible to install the like-sized pieces without a sledge hammer, if that works at all, and without thoroughly damaging the new and existing materials. So make them shorter! This can be a combined reduction in both length and height. The shorter length is easy to understand. What I mean by height may not be. I’m not suggesting you rip 1/2 in. off each rafter. Instead, shorten the “stand” of the rafter by lessening its height above the plate at the seat cut (birdsmouth) by about 1/2 in. This means that if there’s any crown in the new rafter or sag in the existing we can account for it by having the top of the new rafter sit lower.
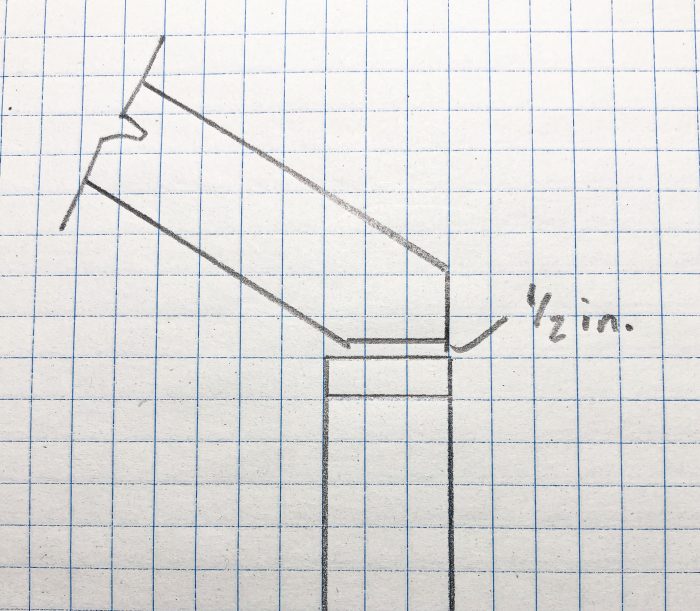
Now, back to the shortening of length. Ideally what we want in a rafter is for the seat cut’s heel to be fully supported on the wall plate and the plumb cut tight against the ridge. This allows the rafter to transfer its forces into the rest of the structure without failing. There’s really no great way to get the rafter in without shortening it and how do we deal with that? If you take the line length of the bottom side of the existing rafter, mark it on a new piece and then remove 1 to 1- 1/4 in. at the ridge plumb cut you’ll have a sister that should be relatively simple to get into location and then you can slide the rafter out towards the soffit until you have a 1 1/2-in. space between the new plumb cut and the ridge. This space can be filled with a piece of solid lumber. Now we have a new rafter that has full contact on the plate and full contact at the ridge. There will likely be a bit of back and forth on the first one or two to figure out how much you have to lower the height above plate versus the overall reduction in length.
So we’ve got full bearing members, now what do we do? Glue and screw! Or glue and nail, whichever you prefer. The goal here is to marry the pieces together so they act as one unit, not as separate pieces. A high-quality polyurethane construction adhesive can be gunned onto the existing rafter (if you put it on the new one you’re sure to stick your hand in it while positioning); something along the lines of two or three 3/8-in. beads should be sufficient. If there’s substantial cupping you may need more to get good coverage. Then fasten every 8in. to 12 in. with two fasteners. If there is major twisting or cupping, some hand screw clamps can help bring everything together tight enough for the fasteners to hold while the adhesive sets.
Scott Gibson is a contributing writer. Ben Bogie is project manager at BPC Green Builders in Wilton, Conn. Reader comments may have been edited for spelling or clarity. For a look at the full conversation, use the link at the top of the column.
Fine Homebuilding Recommended Products
Fine Homebuilding receives a commission for items purchased through links on this site, including Amazon Associates and other affiliate advertising programs.

Tajima Chalk Rite Chalk Line

Sledge Hammer
Stabila Extendable Plate to Plate Level