FHB Logo Facebook LinkedIn Email Pinterest Twitter X Instagram Tiktok YouTube Plus Icon Close Icon Navigation Search Icon Navigation Search Icon Arrow Down Icon Video Guide Icon Article Guide Icon Modal Close Icon Guide Search Icon Skip to content
Subscribe
Log In
  • How-To
  • Design
  • Tools & Materials
  • Restoration
  • Videos
  • Blogs
  • Forum
  • Magazine
  • Members
  • FHB House
  • Podcast
Log In

Fine Homebuilding Project Guides

Siding & Exterior Trim

Guide Home
  • Choosing Siding
  • Installing Siding
  • Choosing Exterior Trim
  • Installing Exterior Trim
  • Repairing Siding & Trim
How-To

Install Vinyl Siding Panels

Follow along with Larry Haun and a Habitat for Humanity crew as they install vinyl siding on a house.

By Larry Haun
  • X
  • facebook
  • linkedin
  • pinterest
  • email
  • add to favorites Log in or Sign up to save your favorite articles
The work goes quickly. With a Habitat-size crew, this siding job moves along at a good pace. Short offcuts from one side of the house can often be used elsewhere to minimize waste.

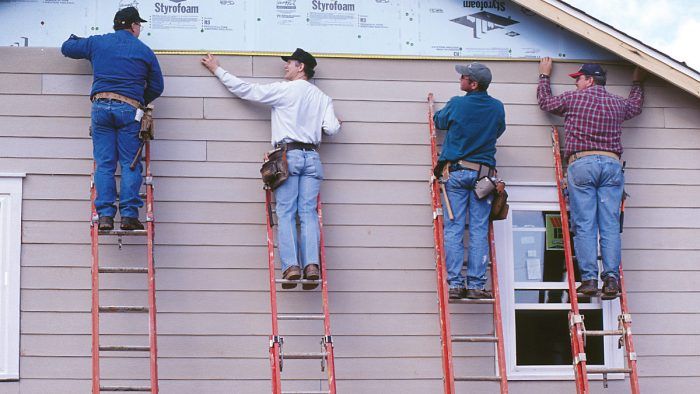
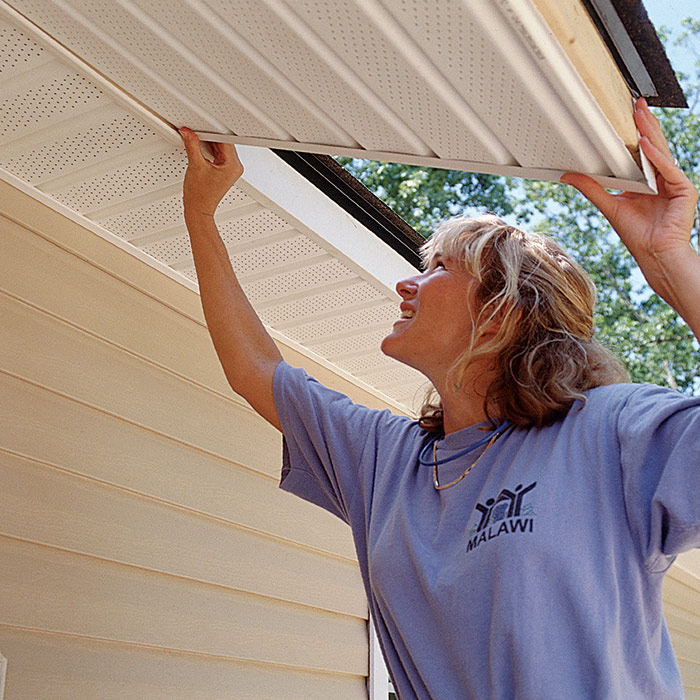
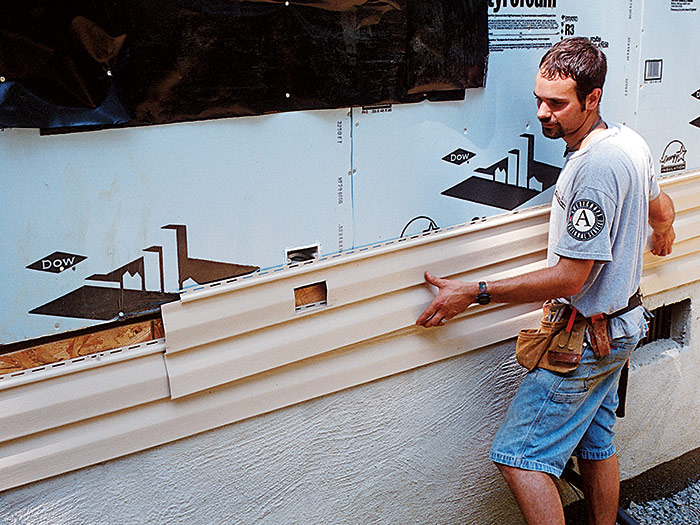
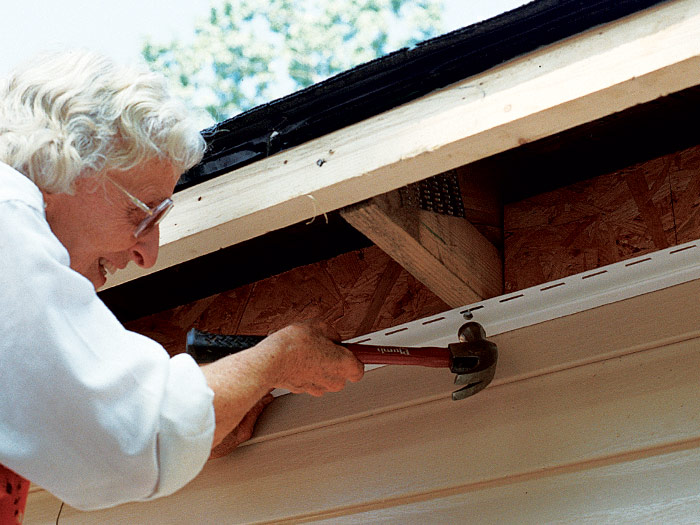
Once you’ve installed the vinyl starter strips and trim, siding panel installation can go quickly, especially when you have a good-size crew, as we did on this job. The first panel course is always the bottom-most course. Start against the corner on one side of the house (preferably the back corner). Pull up the first panel, snap it into the starter strip, and slide the end of the panel under the corner trim’s top edge. Keep the panel seated in the starter strip as you drive nails into each stud. The nail heads should be 1⁄16 in. proud of the flange. Don’t drive nails at the edge of a slot or through the vinyl itself. If the prepunched slot is not centered over a stud, lengthen the slot with a utility knife or a slot-punch tool.

Once the panel is nailed in position, check whether you can slide it back and forth manually. If the panel won’t slide, find out where it’s getting hung up and fix the problem. After you’ve checked that the panel is free to move, you can, if you like, nail it fast near the middle. Some builders prefer this technique, which encourages the panel to expand and contract equally in both directions.

The clearance between the end of a panel and the inside edges of the trim pieces depends on the temperature. If it’s over 90°F when you install the siding, leave the panel end about 1⁄4  in. away from the trim piece’s inside edge. If it’s less than 30°F, leave a good 1⁄2 in. of clearance at each end so there’s room for heat-induced expansion. For temperatures between these two extremes, gauge accordingly.
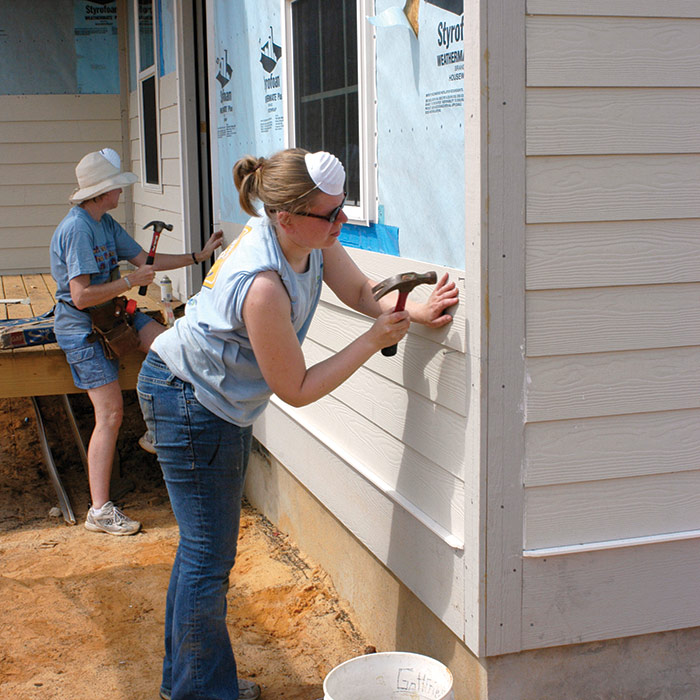
 

The Habitat For Humanity Crew at Work

Some volunteers prefer contrast between the white corner trim and the brown siding, whereas others aren’t sure whether it looks attractive.
We install siding panels from the bottom up.
Each new course of panels snaps onto the one below.
You can’t drive the nails hard against the vinyl because it needs to move.
With snips and utility knives, we measure, trim, and cut to fit around windows, doors, outlets, and vents.
The vinyl soffit panels are filled with small holes so that air can pass into the attic space.
They finish off the eaves nicely.

contrast between the white corner trim and the brown siding
install siding panels from the bottom up
Each new course of panels snaps onto the one below
can’t drive the nails hard against the vinyl
cut to fit around outlets and vents
vinyl soffit panels


Cutting and Lapping Panels

When you come to an opening or reach the end of a wall, cut a panel to fit. Remember always to leave room for expansion. Cut panels to length with a tablesaw, as described earlier using a circular saw with the blade in backward. You can also crosscut with a radial-arm saw, a sliding compound-miter saw, a utility knife, a hacksaw, or even tinsnips. Plan each siding cut so that the cut ends are hidden in the corner posts, in the J-channel trim, or by the factory edge of an overlapping panel. Panels that join within a course should overlap by at least 1 in.

TIP: Turn the blade backward! For smoother, shatter-free cuts in vinyl siding, use a fine-tooth paneling blade in a circular saw and turn the blade so that the teeth face backward. The same backward rule applies if you’re using a chopsaw or radial-arm saw to cut vinyl siding.


You’ll notice that the nailing flange on a siding panel is cut back about 1 in. from the end of the panel. When two panels join each other in the same course, their nailing flanges should never butt together on the wall. When necessary, cut back the nailing flanges so that those in the same course are separated by at least 1 in.

It’s best to lap the panels between—not on—the studs. Try not to install pieces shorter than 3 ft. long, especially in high-wind areas. And don’t let the overlaps where siding panels meet stack over one another in subsequent courses. Rather, randomly separate these overlaps by two or three studs, so that you don’t create a staircase pattern. The pattern created by the installed vinyl panels should be pleasing to the eye.

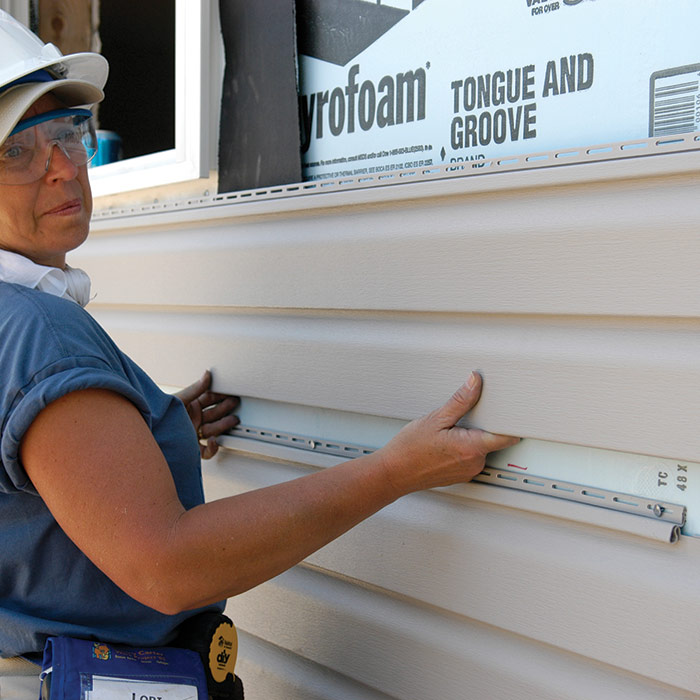
Pull each panel up snugly against the locking hem of the previous panel, but don’t stretch it. Panels that were stretched tightly when they were installed (especially in warm weather) can tear when cold weather causes them to contract. Before moving on to the next row, make sure each panel is free to move back and forth horizontally.

As you proceed upward, measure down from the underside of the trusses to each row to ensure that the siding is remaining level around the building. Vinyl siding can stretch upward and easily become out of level. Some builders snap level chalklines every 2 ft. or so around the building to serve as reference points while they install rows of siding.

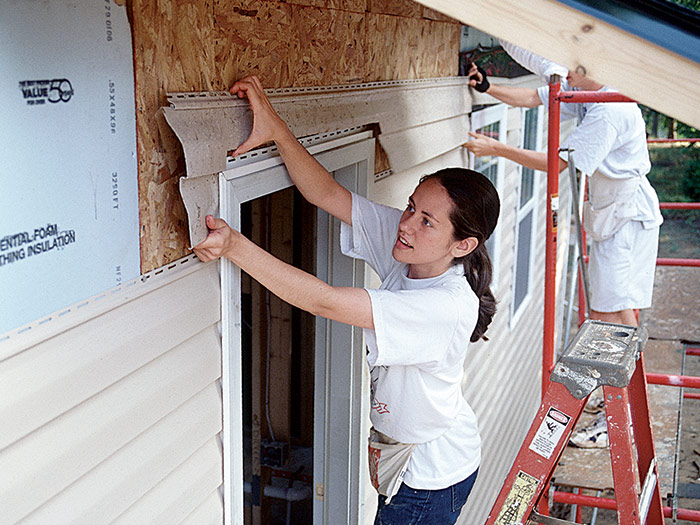
Installing Panels Around Windows, Doors, Outlets, and Vents

Strips of undersill trim must be installed beneath windowsills. This special trim covers the horizontal edge of a siding panel and locks the panel in place. Cut each trim piece to fit between the two side J-channels, then nail it flush against the underside of the window. If the panel beneath a window needs to be notched more than 1 in. to fit, you must fur out or shim the undersill trim. The deeper the notch in the siding, the thicker the shim you’ll need. By furring out the undersill trim, you can prevent the surface of the siding from bowing in beneath the window. Try not to have any joints between panels located beneath or above windows.

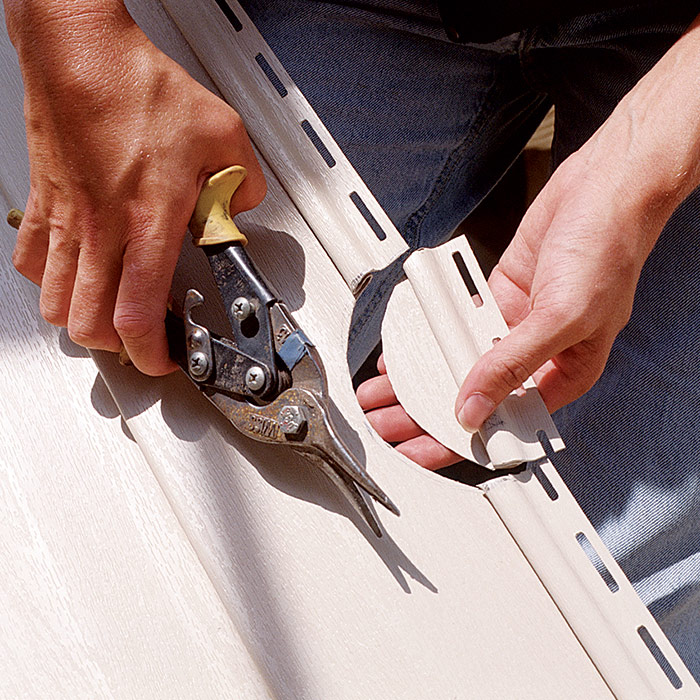
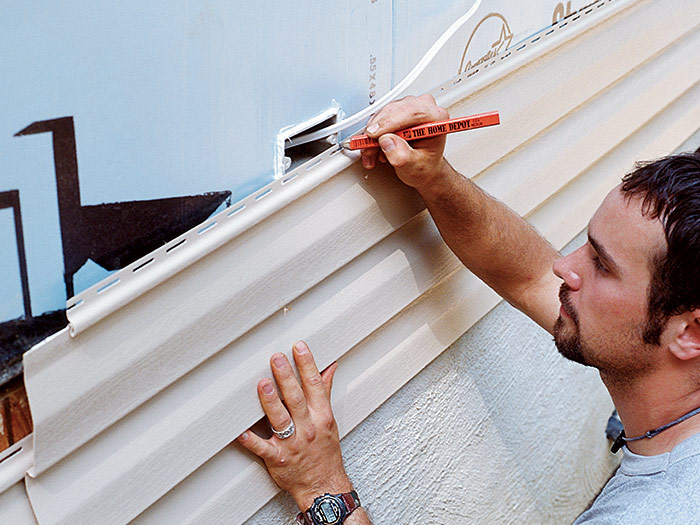
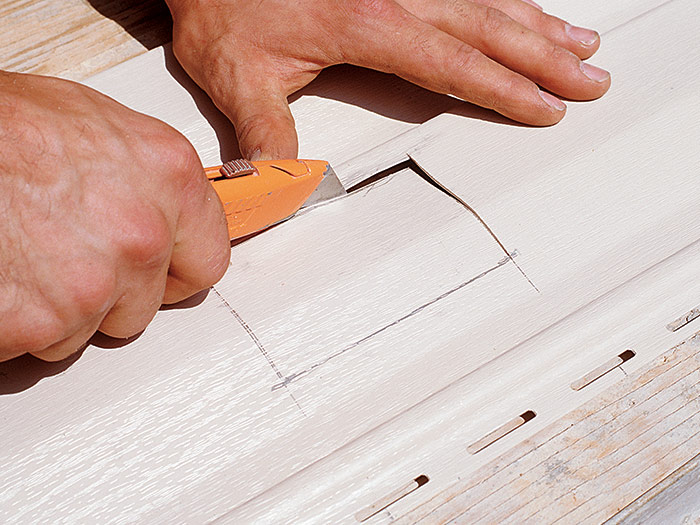
To determine a notch’s location horizontally in the panel beneath a window, measure from the last piece of siding to the opening and mark it on the panel (don’t forget to add 1 in. for the overlap). For an accurate height measurement vertically, lock a scrap of siding into the nail flange of the piece below, then slide the scrap against the window edge. Mark where the scrap hits the bottom of the window and transfer the mark to the panel you’re cutting. Finally, measure the length of the opening and transfer it to the siding, leaving 1⁄4 in. on each side for expansion. These notched cuts can be made with a utility knife, a hacksaw, or tinsnips. Use a snap-lock punch to create crimps, or tabs, 1⁄4 in. down from the top edge of the notched siding and make crimps every 6 in. across the length of the window. The crimps must face out to lock into the undersill trim.

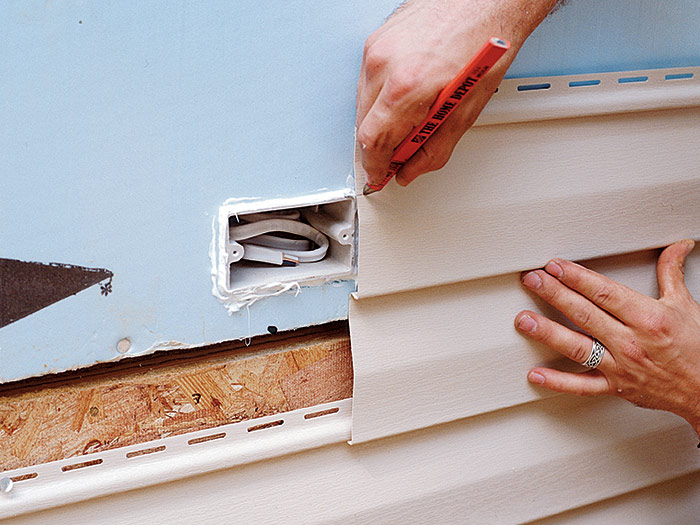
The panels that fit over the tops of windows and doors are marked and notched in the same way as those on the bottom. The horizontal part of the siding slips down into the J-channel. To make cutouts where the siding fits over a dryer vent, an electrical outlet box, or another protrusion, use the techniques discussed here.

Cutouts are challenging
Cutouts are challenging. This siding panel was notched to fit over a door and a window. It’s important to measure carefully so that the cutout edges fit properly in the J-channel around the doors and windows.


Making an Outlet-Box Cutout

Precise cutouts are sometimes required for certain situations, such as fitting siding panels over vents or electrical outlet boxes. Careful layout is the key here.

Mark where the sides of the box hit the panel
1) Place the siding panel directly below where it will be installed. Mark where the sides of the box hit the panel.

Mark where the top and bottom of the box hit the panel
2) Reposition the panel to one side of the box, clipping it into the panel just below the box. Mark where the top and bottom of the box hit the panel.

cut the opening with a sharp utility knife
3) Outline the cutout where the horizontal and vertical lines intersect, then cut the opening with a sharp utility knife.

The panel is now ready to install.
4) The panel is now ready to install.


Installing the Top Piece of Eave-Wall Siding

The last piece of siding at the top of an eave wall can be fastened in different ways. If the eaves will be left open, use strips of undersill trim and cut and fasten the final panel in the same way as the one under the window. If the eaves will be closed with soffit material (as was done on this house), then the uppermost siding panel can simply be nailed in place above the level of the soffit. The J-channel trim for the soffit, and then the soffit itself, will cover the top siding panel.

Siding Gable-End Walls

Begin by nailing 2×2 blocking between the lookouts and along the barge rafter. This allows J-channel to be nailed up the rake, where it can receive the angled ends of the siding panels. Some builders prefer to hold the J-channel 1⁄2 in. down so the soffit pieces can simply lie on top of it.

To ensure accurate angled cuts where the siding panels meet the rake, make a pattern from a short scrap of vinyl siding, with the angle cut to match the roof’s pitch. If you really want to save time, however, set up a circular saw guide at the proper angle on the worktable.

As you cut and fit these pieces on the gable end, be sure to leave a 1⁄4-in. space between the siding and the inside of the J-channel. If there are gable-end vents, cut and fit pieces around the vents, just as you did for those around the windows and doors. The last small piece at the peak can be cut and secured to the wall with a small screw or nail.

Install J-channel for the soffit
Install J-channel for the soffit. The top course of vinyl siding on eave walls extends behind the J-channel that holds the soffit panels. Install the J-channel by nailing it to the bottom chords of the roof trusses.

How To Build A House book

Excerpted from Habitat for Humanity: How to Build a House, by Larry Haun

Available at Amazon.com and in the Taunton Store.


Previous: Installing J-Channel for Vinyl Siding around Windows Next: Fastening Vinyl over Foam

Guide

Siding & Exterior Trim

Chapter

Installing Siding

Sign up for eletters today and get the latest how-to from Fine Homebuilding, plus special offers.

Signing you up...

This site is protected by reCAPTCHA and the Google Privacy Policy and Terms of Service apply.
See all newsletters
See all newsletters

Log in or create an account to post a comment.

Sign up Log in

Become a member and get full access to FineHomebuilding.com

Siding & Exterior Trim

Siding & Exterior Trim

Trusted, comprehensive guidance from the pros for choosing, installing, and repairing siding and exterior trim

View Project Guide

View All Project Guides »

Become a member and get unlimited site access, including the Siding & Exterior Trim Project Guide.

Start Free Trial

Choosing Siding
  • Materials
  • Design Options
Installing Siding
  • Siding Basics
  • Lap Siding
  • Shingle Siding
  • Board & Batten
  • Fiber Cement and Composite Siding
  • Vinyl Siding
  • Masonry Claddings
Choosing Exterior Trim
  • Trim Materials
  • Trim Design
Installing Exterior Trim
  • Trim Basics
  • Roof Eaves Trim
  • Corner Boards
  • Corbels & Brackets
  • Window & Door Trim
Repairing Siding & Trim
  • Trim Repairs
  • Siding Repairs

Fine Home Building

Newsletter Sign-up

  • Fine Homebuilding

    Home building tips, offers, and expert advice in your inbox.

  • Green Building Advisor

    Building science and energy efficiency advice, plus special offers, in your inbox.

  • Old House Journal

    Repair, renovation, and restoration tips, plus special offers, in your inbox.

Signing you up...

This site is protected by reCAPTCHA and the Google Privacy Policy and Terms of Service apply.
See all newsletters

Follow

  • Fine Homebuilding

    Dig into cutting-edge approaches and decades of proven solutions with total access to our experts and tradespeople.

    Start Free Trial Now
    • Facebook
    • Instagram
    • X
    • LinkedIn
  • GBA Prime

    Get instant access to the latest developments in green building, research, and reports from the field.

    Start Free Trial Now
    • Facebook
    • YouTube
  • Old House Journal

    Learn how to restore, repair, update, and decorate your home.

    Subscribe Now
    • Facebook
    • Instagram
    • X

Membership & Magazine

  • Online Archive
  • Start Free Trial
  • Magazine Subscription
  • Magazine Renewal
  • Gift a Subscription
  • Customer Support
  • Privacy Preferences
  • About
  • Contact
  • Advertise
  • Careers
  • Terms of Use
  • Site Map
  • Do not sell or share my information
  • Privacy Policy
  • Accessibility
  • California Privacy Rights

© 2025 Active Interest Media. All rights reserved.

Fine Homebuilding receives a commission for items purchased through links on this site, including Amazon Associates and other affiliate advertising programs.

  • Home Group
  • Antique Trader
  • Arts & Crafts Homes
  • Bank Note Reporter
  • Cabin Life
  • Cuisine at Home
  • Fine Gardening
  • Fine Woodworking
  • Green Building Advisor
  • Garden Gate
  • Horticulture
  • Keep Craft Alive
  • Log Home Living
  • Military Trader/Vehicles
  • Numismatic News
  • Numismaster
  • Old Cars Weekly
  • Old House Journal
  • Period Homes
  • Popular Woodworking
  • Script
  • ShopNotes
  • Sports Collectors Digest
  • Threads
  • Timber Home Living
  • Traditional Building
  • Woodsmith
  • World Coin News
  • Writer's Digest
Active Interest Media logo
X
X
This is a dialog window which overlays the main content of the page. The modal window is a 'site map' of the most critical areas of the site. Pressing the Escape (ESC) button will close the modal and bring you back to where you were on the page.

Main Menu

  • How-To
  • Design
  • Tools & Materials
  • Video
  • Blogs
  • Forum
  • Project Guides
  • Reader Projects
  • Magazine
  • Members
  • FHB House

Podcasts

  • FHB Podcast
  • ProTalk

Webinars

  • Upcoming and On-Demand

Podcasts

  • FHB Podcast
  • ProTalk

Webinars

  • Upcoming and On-Demand

Popular Topics

  • Kitchens
  • Business
  • Bedrooms
  • Roofs
  • Architecture and Design
  • Green Building
  • Decks
  • Framing
  • Safety
  • Remodeling
  • Bathrooms
  • Windows
  • Tilework
  • Ceilings
  • HVAC

Magazine

  • Current Issue
  • Past Issues
  • Magazine Index
  • Subscribe
  • Online Archive
  • Author Guidelines

All Access

  • Member Home
  • Start Free Trial
  • Gift Membership

Online Learning

  • Courses
  • Project Guides
  • Reader Projects
  • Podcast

More

  • FHB Ambassadors
  • FHB House
  • Customer Support

Account

  • Log In
  • Join

Newsletter

Get home building tips, offers, and expert advice in your inbox

Signing you up...

This site is protected by reCAPTCHA and the Google Privacy Policy and Terms of Service apply.
See all newsletters
See all newsletters

Follow

  • X
  • YouTube
  • instagram
  • facebook
  • pinterest
  • Tiktok

Join All Access

Become a member and get instant access to thousands of videos, how-tos, tool reviews, and design features.

Start Your Free Trial

Subscribe

FHB Magazine

Start your subscription today and save up to 81%

Subscribe

We hope you’ve enjoyed your free articles. To keep reading, become a member today.

Get complete site access to expert advice, how-to videos, Code Check, and more, plus the print magazine.

Start your FREE trial

Already a member? Log in

Privacy Policy Update

We use cookies, pixels, script and other tracking technologies to analyze and improve our service, to improve and personalize content, and for advertising to you. We also share information about your use of our site with third-party social media, advertising and analytics partners. You can view our Privacy Policy here and our Terms of Use here.

Cookies

Analytics

These cookies help us track site metrics to improve our sites and provide a better user experience.

Advertising/Social Media

These cookies are used to serve advertisements aligned with your interests.

Essential

These cookies are required to provide basic functions like page navigation and access to secure areas of the website.

Delete My Data

Delete all cookies and associated data