FHB Logo Facebook LinkedIn Email Pinterest Twitter X Instagram Tiktok YouTube Plus Icon Close Icon Navigation Search Icon Navigation Search Icon Arrow Down Icon Video Guide Icon Article Guide Icon Modal Close Icon Guide Search Icon Skip to content
Subscribe
Log In
  • How-To
  • Design
  • Tools & Materials
  • Restoration
  • Videos
  • Blogs
  • Forum
  • Magazine
  • Members
  • FHB House
  • Podcast
Log In

Fine Homebuilding Project Guides

Siding & Exterior Trim

Guide Home
  • Choosing Siding
  • Installing Siding
  • Choosing Exterior Trim
  • Installing Exterior Trim
  • Repairing Siding & Trim
How-To

Tips for Laying Out and Installing Vinyl Siding

Learn how to install the outside corners, nail the J-channel, set the starter strips, and install the siding panels.

By Andy Engel
  • X
  • facebook
  • linkedin
  • pinterest
  • email
  • add to favorites Log in or Sign up to save your favorite articles

Once you’ve installed the fascia and soffits, you can begin the process of installing vinyl siding panels. But before covering the walls with siding, you first have to nail on the corner pieces, install J-channel, and set the starter strips.

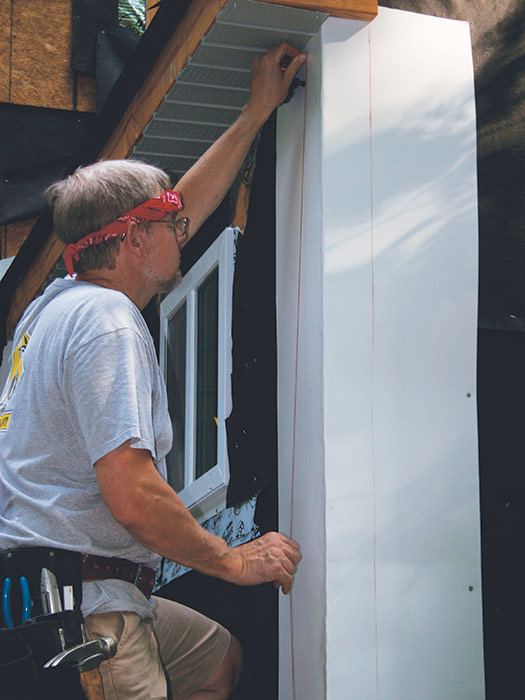
Installing Outside Corners

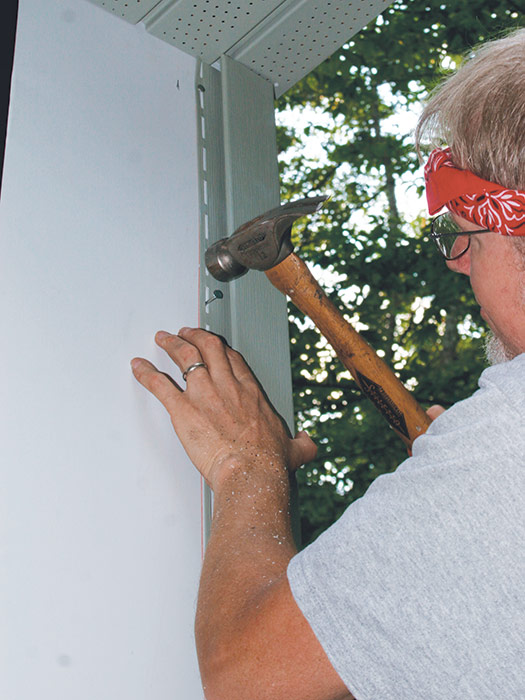
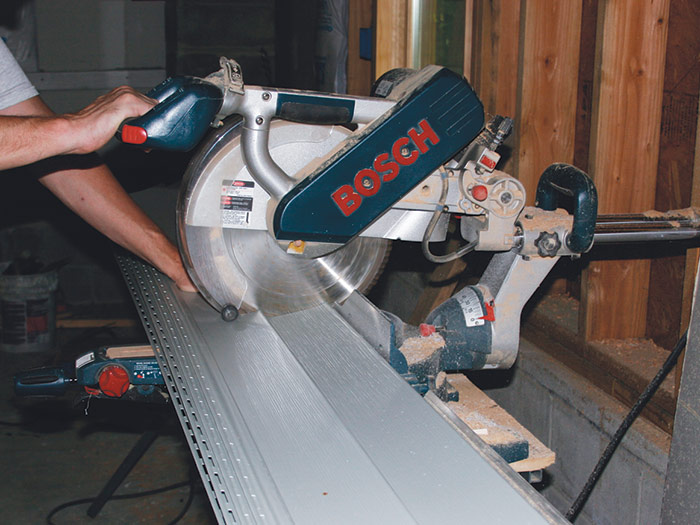
Vinyl-siding installations start at the corners. On each wall, top and bottom, mark the width of the corner piece. Then snap vertical chalklines between these marks. 1 On a miter saw, cut the corners about 1⁄2 in. longer than the wall height.

Nail the corner piece to the line with roofing nails, butted tightly to the soffit. Keeping the joint between the corner and the soffit tight will force any expansion to take place at the bottom. Set the nails in the top of the corner piece at the top of their slots. 2 Loosely nail the rest of the corner about every 12 in., in the center of the slots.

mark the edges of the vinyl cornerpieces
1) Snap chalklines on the outside corners to mark the edges of the vinyl corner pieces.

Butt the corner to the soffit
2) Butt the corner to the soffit. Set the uppermost nails at the tops of their slots and succeeding nails in the middle of the slots.

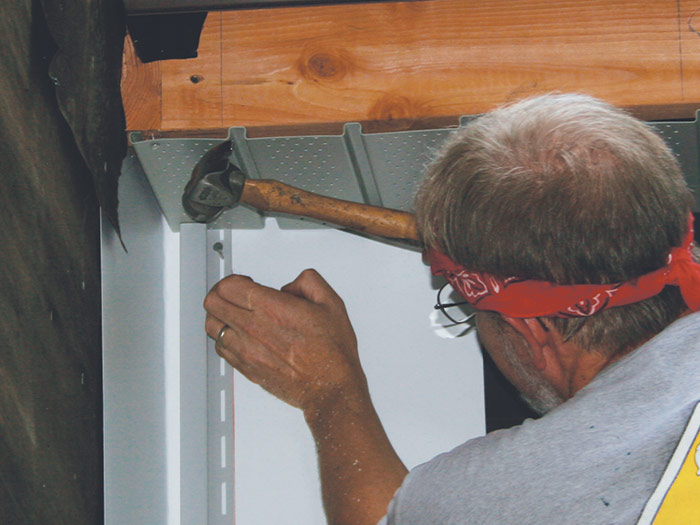
Installing J-channel

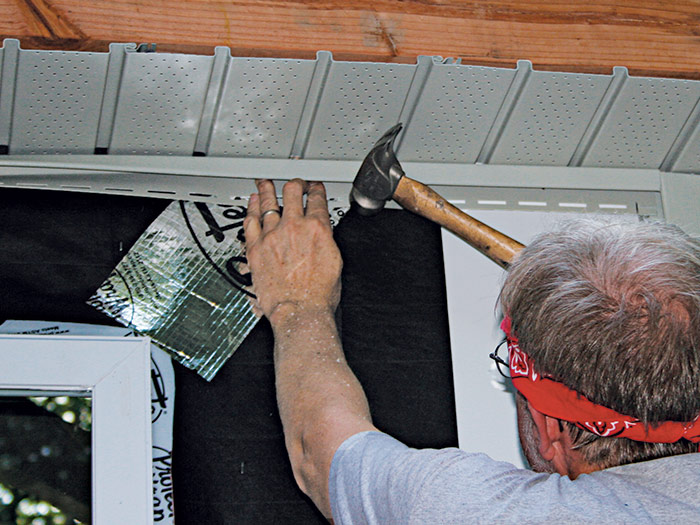
Inside corners get backed up with rigid flashing, then trimmed with J-channel, or “J,” that receives the cut ends of vinyl panels. A common practice is to nail a piece of J to each side of the corner, but that uses twice as much as you need. Even then, you’ll use a lot of the stuff. Simply nail a piece of J to one wall, spaced 3⁄4 in. away from the intersecting wall. 1 The siding on one side slips into the recess of the J-channel, the siding on the other side slips behind it.

Next, fit J from corner to corner, just below the soffit. 2 Space nails in J about 12 in. apart, and again, nail loosely. The recess in the J will capture the top of the vinyl siding, as well as hide the cut ends of the soffit panels. If more than one piece of J is needed to span the length, lap the pieces by 3⁄4 in.

install J-channels before installing vinyl siding panels
1) One piece of J-channel nailed 3⁄4 in. away from the intersecting wall creates channels to hide the ends of siding on both walls.

Nail J-channel directly below the soffit
2) Nail J-channel directly below the soffit to receive the uppermost piece of siding.


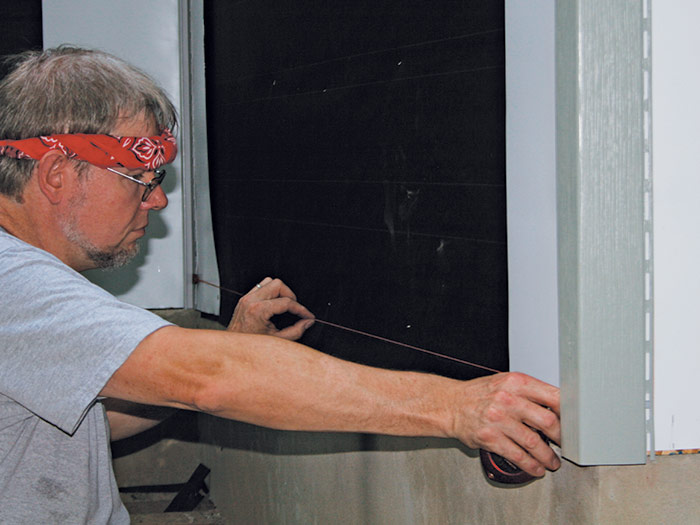
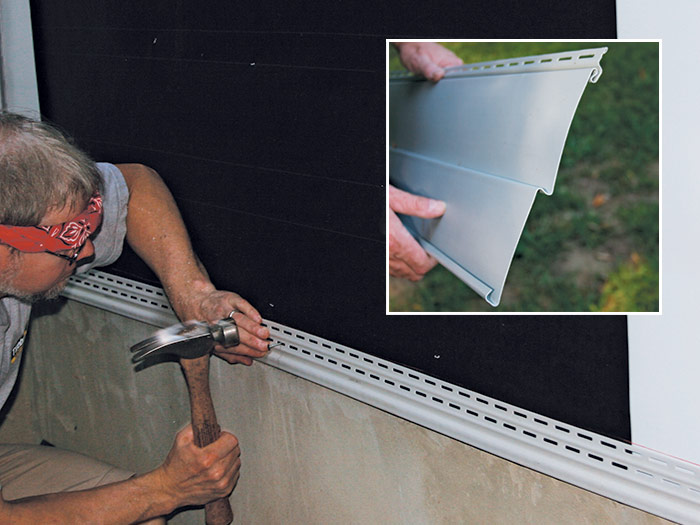
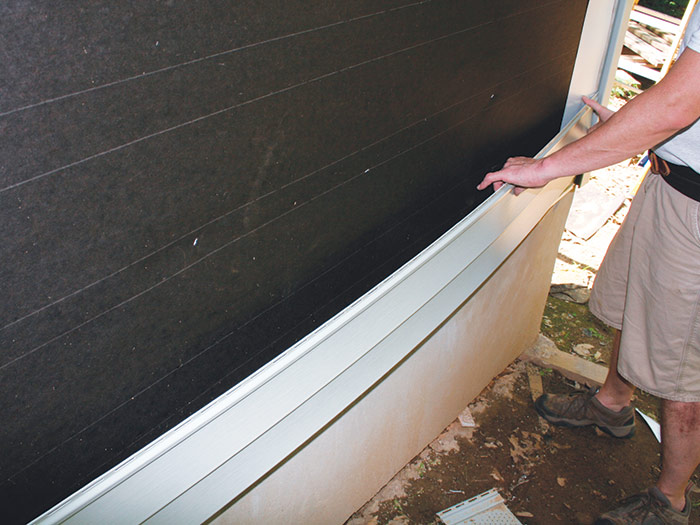
Setting the Siding Starter Strip

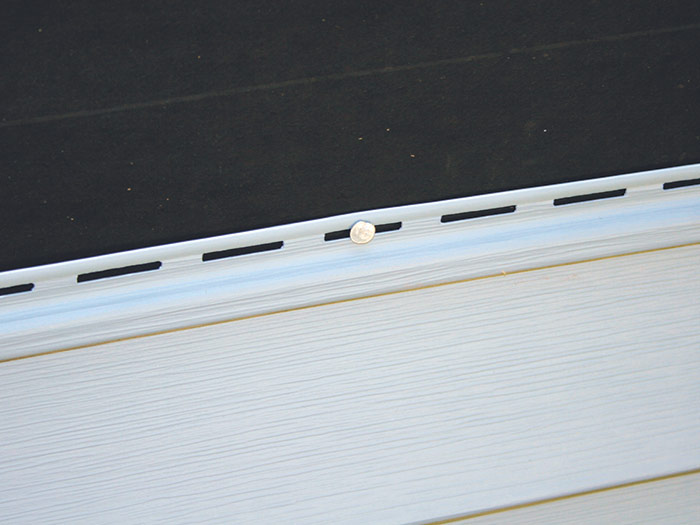
The last piece I run before installing vinyl siding panels is the starter strip. Measure the width of the starter strip, mark both ends of the wall at this measurement, and snap a chalkline to locate its top. This way, when the siding clicks in, it will align with the bottom of the corners. 1 Nail the starter strip in place with 1-1/4-in. roofing nails about every foot. The bottom edge of vinyl siding, the buttlock, is hook-shaped, and engages in the starter strip. 2

Install starter strip
1) Install starter strip so siding snapped into it will align with the bottom of the corners.

Secure the starter strip every foot
2) Secure the starter strip every foot. The bottom of the panel engages the starter strip or the top of the course below.


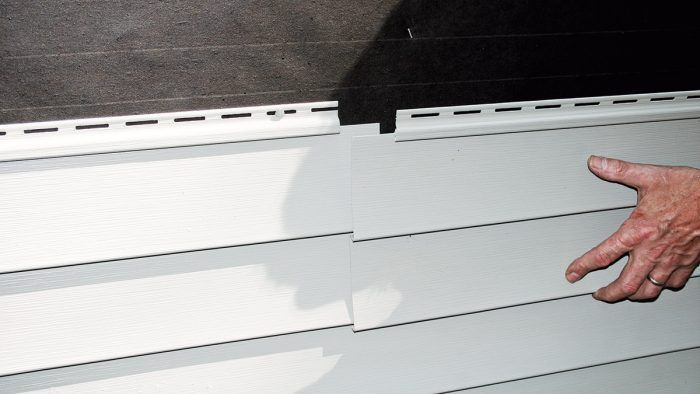
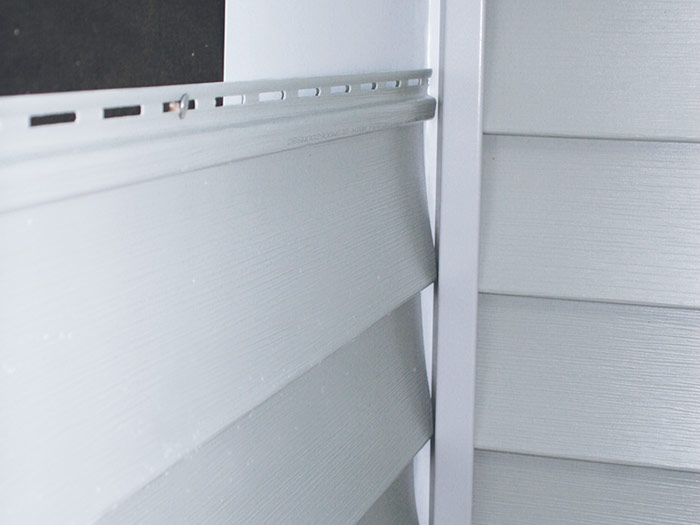
Starting the Vinyl Siding

Cut the first piece of siding to length (remembering to leave it a little short for expansion) with a miter saw. It’s much faster if you can stack up a bunch of pieces of siding of the same length and gang-cut them. 3

Holding the first panel above the starter strip, slip it into the J-channel at the corner. Push the siding’s bottom edge over the starter strip, then snap the hook on the siding into the starter strip. You’ll feel it engage. 4

gang-cut several pieces at once
3) Measure the length of the panels and, to speed installation, gang-cut several pieces at once.

Bend vinyl siding panel to fit between J channels
4) Bend panel to fit, slide it down over the top of the course below, engage the locking edges, and pull up to lock the courses together.

Before you nail them, the first panel and all succeeding panels are held in place by their engagement along the bottom edge. As you install each panel, make sure it’s engaged along its entire length, then nail it with 1-1/2-in. roofing nails about every 16 in. in the center of the slots. Don’t worry about hitting studs, and never set the nails fully—leave them a little loose so the siding can move. 5 At inside corners, just slide the siding from the intersecting wall behind the J you installed for the original wall. 6

Never drive nails tight when installing vinyl siding
5) Never drive nails tight in vinyl siding. The siding should hang from the nails and be free to expand or contract side to side.

slip each siding panel behind the J-channel
6) At inside corners, slip each siding panel behind the J-channel you previously installed.

Lap abutting panels
7) Lap abutting panels. To hide the joint, make the panel closest to the usual view point the upper lap.

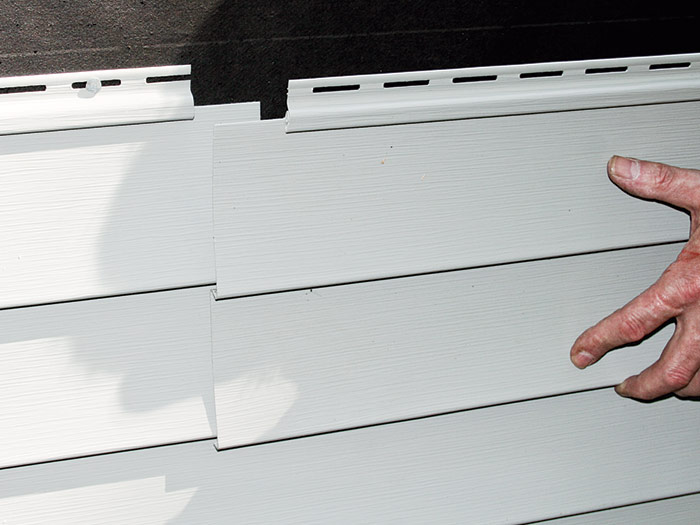
Lap abutting panels by about 1 in. 7 Pay attention to the direction of the lap, as well. At obvious viewing points, such as the front door, lap the near piece over the far piece to hide the seams. Laps should not align vertically—separate them by at least 3 courses.


Carpentry CompleteExcerpted from Carpentry Complete: Expert Advice from Start to Finish, by Andy Engel

Available at Amazon.com.

Previous: Vinyl Siding Done Right Next: Install the Starter Strips and the Trim for Vinyl Siding

Guide

Siding & Exterior Trim

Chapter

Installing Siding

Sign up for eletters today and get the latest how-to from Fine Homebuilding, plus special offers.

Signing you up...

This site is protected by reCAPTCHA and the Google Privacy Policy and Terms of Service apply.
See all newsletters
See all newsletters

Log in or create an account to post a comment.

Sign up Log in

Become a member and get full access to FineHomebuilding.com

Siding & Exterior Trim

Siding & Exterior Trim

Trusted, comprehensive guidance from the pros for choosing, installing, and repairing siding and exterior trim

View Project Guide

View All Project Guides »

Become a member and get unlimited site access, including the Siding & Exterior Trim Project Guide.

Start Free Trial

Choosing Siding
  • Materials
  • Design Options
Installing Siding
  • Siding Basics
  • Lap Siding
  • Shingle Siding
  • Board & Batten
  • Fiber Cement and Composite Siding
  • Vinyl Siding
  • Masonry Claddings
Choosing Exterior Trim
  • Trim Materials
  • Trim Design
Installing Exterior Trim
  • Trim Basics
  • Roof Eaves Trim
  • Corner Boards
  • Corbels & Brackets
  • Window & Door Trim
Repairing Siding & Trim
  • Trim Repairs
  • Siding Repairs

Fine Home Building

Newsletter Sign-up

  • Fine Homebuilding

    Home building tips, offers, and expert advice in your inbox.

  • Green Building Advisor

    Building science and energy efficiency advice, plus special offers, in your inbox.

  • Old House Journal

    Repair, renovation, and restoration tips, plus special offers, in your inbox.

Signing you up...

This site is protected by reCAPTCHA and the Google Privacy Policy and Terms of Service apply.
See all newsletters

Follow

  • Fine Homebuilding

    Dig into cutting-edge approaches and decades of proven solutions with total access to our experts and tradespeople.

    Start Free Trial Now
    • Facebook
    • Instagram
    • X
    • LinkedIn
  • GBA Prime

    Get instant access to the latest developments in green building, research, and reports from the field.

    Start Free Trial Now
    • Facebook
    • YouTube
  • Old House Journal

    Learn how to restore, repair, update, and decorate your home.

    Subscribe Now
    • Facebook
    • Instagram
    • X

Membership & Magazine

  • Online Archive
  • Start Free Trial
  • Magazine Subscription
  • Magazine Renewal
  • Gift a Subscription
  • Customer Support
  • Privacy Preferences
  • About
  • Contact
  • Advertise
  • Careers
  • Terms of Use
  • Site Map
  • Do not sell or share my information
  • Privacy Policy
  • Accessibility
  • California Privacy Rights

© 2025 Active Interest Media. All rights reserved.

Fine Homebuilding receives a commission for items purchased through links on this site, including Amazon Associates and other affiliate advertising programs.

  • Home Group
  • Antique Trader
  • Arts & Crafts Homes
  • Bank Note Reporter
  • Cabin Life
  • Cuisine at Home
  • Fine Gardening
  • Fine Woodworking
  • Green Building Advisor
  • Garden Gate
  • Horticulture
  • Keep Craft Alive
  • Log Home Living
  • Military Trader/Vehicles
  • Numismatic News
  • Numismaster
  • Old Cars Weekly
  • Old House Journal
  • Period Homes
  • Popular Woodworking
  • Script
  • ShopNotes
  • Sports Collectors Digest
  • Threads
  • Timber Home Living
  • Traditional Building
  • Woodsmith
  • World Coin News
  • Writer's Digest
Active Interest Media logo
X
X
This is a dialog window which overlays the main content of the page. The modal window is a 'site map' of the most critical areas of the site. Pressing the Escape (ESC) button will close the modal and bring you back to where you were on the page.

Main Menu

  • How-To
  • Design
  • Tools & Materials
  • Video
  • Blogs
  • Forum
  • Project Guides
  • Reader Projects
  • Magazine
  • Members
  • FHB House

Podcasts

  • FHB Podcast
  • ProTalk

Webinars

  • Upcoming and On-Demand

Podcasts

  • FHB Podcast
  • ProTalk

Webinars

  • Upcoming and On-Demand

Popular Topics

  • Kitchens
  • Business
  • Bedrooms
  • Roofs
  • Architecture and Design
  • Green Building
  • Decks
  • Framing
  • Safety
  • Remodeling
  • Bathrooms
  • Windows
  • Tilework
  • Ceilings
  • HVAC

Magazine

  • Current Issue
  • Past Issues
  • Magazine Index
  • Subscribe
  • Online Archive
  • Author Guidelines

All Access

  • Member Home
  • Start Free Trial
  • Gift Membership

Online Learning

  • Courses
  • Project Guides
  • Reader Projects
  • Podcast

More

  • FHB Ambassadors
  • FHB House
  • Customer Support

Account

  • Log In
  • Join

Newsletter

Get home building tips, offers, and expert advice in your inbox

Signing you up...

This site is protected by reCAPTCHA and the Google Privacy Policy and Terms of Service apply.
See all newsletters
See all newsletters

Follow

  • X
  • YouTube
  • instagram
  • facebook
  • pinterest
  • Tiktok

Join All Access

Become a member and get instant access to thousands of videos, how-tos, tool reviews, and design features.

Start Your Free Trial

Subscribe

FHB Magazine

Start your subscription today and save up to 70%

Subscribe

This is your last free article.

Don't miss another expert tip or technique from building pros. Start your free trial today.

Start your FREE trial

Already a member? Log in

We hope you’ve enjoyed your free articles. To keep reading, become a member today.

Get complete site access to expert advice, how-to videos, Code Check, and more, plus the print magazine.

Start your FREE trial

Already a member? Log in

Privacy Policy Update

We use cookies, pixels, script and other tracking technologies to analyze and improve our service, to improve and personalize content, and for advertising to you. We also share information about your use of our site with third-party social media, advertising and analytics partners. You can view our Privacy Policy here and our Terms of Use here.

Cookies

Analytics

These cookies help us track site metrics to improve our sites and provide a better user experience.

Advertising/Social Media

These cookies are used to serve advertisements aligned with your interests.

Essential

These cookies are required to provide basic functions like page navigation and access to secure areas of the website.

Delete My Data

Delete all cookies and associated data