FHB Logo Facebook LinkedIn Email Pinterest Twitter X Instagram Tiktok YouTube Plus Icon Close Icon Navigation Search Icon Navigation Search Icon Arrow Down Icon Video Guide Icon Article Guide Icon Modal Close Icon Guide Search Icon Skip to content
Subscribe
Log In
  • How-To
  • Design
  • Tools & Materials
  • Restoration
  • Videos
  • Blogs
  • Forum
  • Magazine
  • Members
  • FHB House
  • Podcast
Log In

Fine Homebuilding Project Guides

Siding & Exterior Trim

Guide Home
  • Choosing Siding
  • Installing Siding
  • Choosing Exterior Trim
  • Installing Exterior Trim
  • Repairing Siding & Trim
How-To

Better Window, Door, and Trim Cap Flashing

Don't let your guard down just because these flashings are on vertical surfaces—learn to install drip caps to reliably block water from leaking into your walls.

By Mike Guertin
  • X
  • facebook
  • linkedin
  • pinterest
  • email
  • add to favorites Log in or Sign up to save your favorite articles
A stock cap flashing over window trim without an end dam ruptured the housewrap and dumped water into the wall causing extensive decay in the sheathing and studs

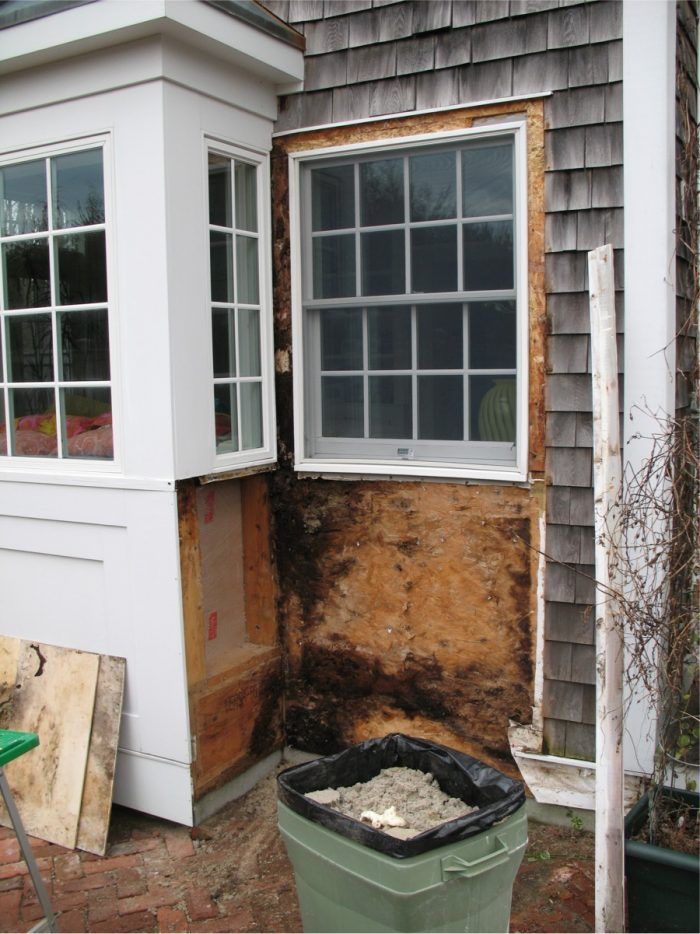
Do you ever give cap flashing (aka “drip cap”) over windows, doors, skirtboards, and deck ledgers a second thought? I thought I did a good job installing flashing on the walls of the homes I built and remodeled until discovering a problem on my own house. After just 10 years, a tiny hole in the housewrap at the end of a window cap flashing resulted in saturated insulation and rotted sheathing and studs. It was a wake-up call that I’d better take the details of good cap-flashing design and installation more seriously.

What was wrong with my cap flashing? Several things. I used the 3/4-in. aluminum cap flashing stocked at my local lumberyard. The wall leg was only 1-1/4 in. tall, so the overlap of the housewrap and siding was too short—less than an inch if you were to hold the siding off the cap by 3/8 in. The cap-leg-to-wall-leg angle was bent at 90°, so water didn’t drain off the front edge quickly and puddled. The drip leg along the front was only 1/4 in. tall, which leaves it prone to wind-driven rain getting under it, and it didn’t kick the water away from the trim below. It was thin—only 0.011 in. thick, about half the thickness required of other flashings in the building code. And my installation practices were poor: I placed the cedar shingles tight to the top of the cap flashing (I should have left a gap). And to make matters worse, there is a small roof over a bump-out just above the window without a kickout flashing. So water draining off the roof flooded onto the cap flashing.

What does the building code say about wall flashing?

The International Residential Code (IRC) is often referred to as a “minimum code,” and for that reason it may be disregarded as a serious basis for flashing, but it gives us a starting point. The IRC’s section on flashing (R703.4) says: “Approved corrosion-resistant flashing shall be applied shingle-fashion in a manner to prevent entry of water into the wall cavity or penetration of water to the building structural framing components.” It goes on to list the locations where flashing is required: exterior porches, decks and stairs attached to a wall or floor; above trim; at wall and roof intersections; under and at ends of masonry, wood or metal copings, and sills; at intersection of chimneys or other masonry; at window and door openings. It goes on to note: “The flashing shall extend to the surface of the exterior wall finish.”

The code section is written in performance language. It doesn’t get into the specifics of how to design and install flashing, but focuses on what our flashing must do: “…prevent entry of water into the wall cavity.” The cap flashing I installed over the window trim didn’t prevent water entry, so it didn’t comply with the code.

IRC chapter 7 doesn’t specify the minimum thickness of wall flashing, but the International Building Code does—0.019 in. or 26-ga. metal. The IRC does require 0.019-in. metal flashing for roof-to-wall flashing in chapter 9, so with these two indicators I’d say 0.019 in. / 26 ga. is a minimum thickness for wall flashings too. Unfortunately, many of the stock cap flashings found at lumberyards are 0.011 in.—just slightly over half the minimum thickness. Aluminum coil stock is 0.019 in. thick, readily available in a number of color coatings and easy to work with, so that’s my usual go-to material unless the job calls for copper, lead, or stainless-steel flashing due to design or proximity to saltwater.

Uncoated aluminum drip cap flashing over trim. It's inadequate due to short wall leg, flat cap leg and short drip leg. And the cap flashing is only half the thickness required by building code.
Stock drip cap has a short wall leg so siding doesn’t overlap enough; the cap leg is flat so water doesn’t drain off quickly; and the drip leg is short and prone to wind-driven rain leaking beneath.

Cap-flashing design

I haven found a stock cap flashing design that I like. Stock cap flashing usually has a short wall leg, a flat cap leg, and a narrow drip leg aside from being made of metal too thin to meet building code requirements. So to get a good cap flashing I recommend bending your own.

That means you’ll need a sheet-metal brake—or a friend who owns one. You can often rent a brake for a reasonable price. A metal brake is a must-have tool for any pro who installs siding and roofing. Cap flashings are an easy design to bend—they’re just a simple “Z” shape. The key features are the wall-leg height, cap angle, drip-leg height and bottom-edge kick, and end profile.

Custom bent drip cap flashing over trim.
A better drip-cap flashing is made of metal at least 0.019 in. (26 ga.) thick and has a tall wall leg, a sloping cap leg, and wide drip leg with a hem and kick bend along the botton so it stays tight against the trim and resists wind-driven rain.

The wall leg has to be tall enough for the water-resistive barrier (WRB) and the siding to lap over the top with several inches of coverage. How tall you make it depends on the wind exposure of the house. A strong wind-driven rain can drive water vertically several inches even beneath tight overlapping siding. I recommend a minimum of 3 in. tall in low-exposure areas and 5 in. or taller in high-exposure areas. This leaves enough wall-leg height so the siding can be spaced 1/4 in. to 1/2 in. above the cap leg. For deck-ledger cap flashing I recommend a 5-in.- to 8-in.-tall wall leg. A tall wall leg is necessary to account for the decking thickness and the minimum required space between the top of the decking and the siding. Some sidings like fiber cement and red cedar lap require a minimum of 2 in. of space from the top of the decking to the siding.

The cap leg should be sloped outward 10° to 15° to drain water rapidly off of the top of the flashing. The slope makes it less likely water will run horizontally and off the end of the flashing—the problem that lead to the leak on my house. Commercially available flashing is usually bent at 90°. If you use one you can open up the angle by pressing the flashing gently between two boards.

I like the drip leg that wraps over the face of the trim to be at least 3/4 in. tall with hem along the bottom edge and an additional kick bend 1/4 in. up from the bottom to kick water away from the trim and resist water being drawn on top of the trim by capillary action. The hem and kick bend stiffen the drip leg so it will stay straight and not warp when the flashing expands in hot weather. I make the drip leg bend 90° to 95° to the cap so the drip leg will press tight to the trim and resist wind-driven rain blowing between the cap flashing and the trim.

Three ways to finish the ends of your flashing

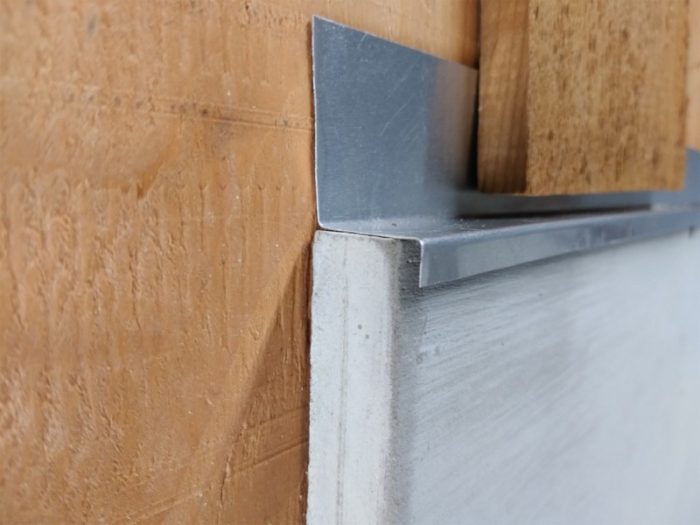
The most common end detail is none at all—the flashing is cut flush with the end of the trim like in the photo above. This leaves a small open triangle area between the flashing and the top of the trim due to the slope of the cap. Water can enter at the end so I don’t recommend leaving it open.


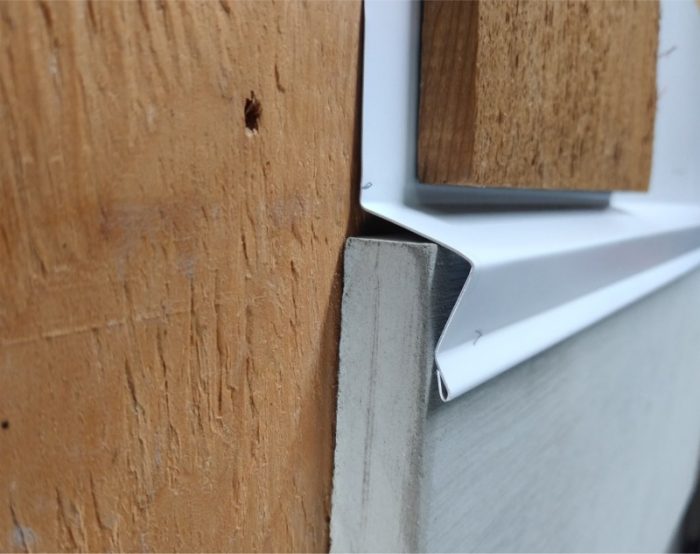
The gap can be closed by bending an end leg down in much the same way as the face of the flashing is treated.

Custom aluminum drip cap with a downturned closure at the end of the trim.
A turn-down closure is the simplest way to treat the ends of a drip cap.

The end leg will block water from blowing in between the flashing and the end of the trim. The weak point here is any water that drains off the end of the flashing is directed into the joint between the siding and end of the trim; but if the cap leg of the flashing is sloped outward there’s probably little water reaching the end to begin with.

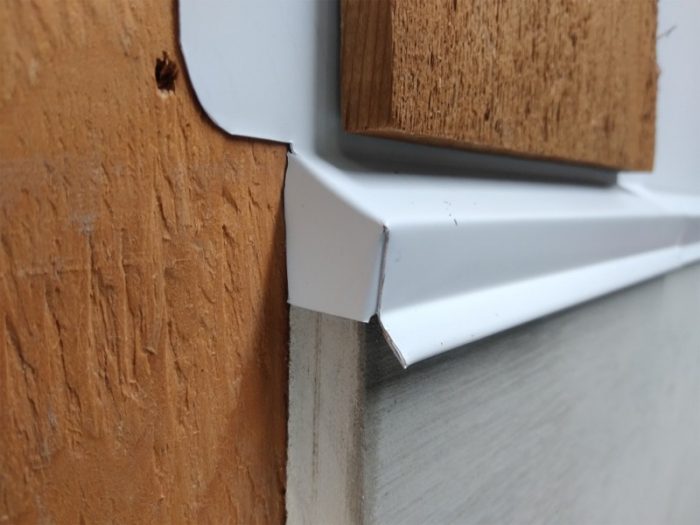
Another way to detail end of a cap flashing is with an end dam.

End dam at the end of drip cap applied over trim
An upturned end dam at the end of the drip-cap flashing directs water off the face of the flashing.

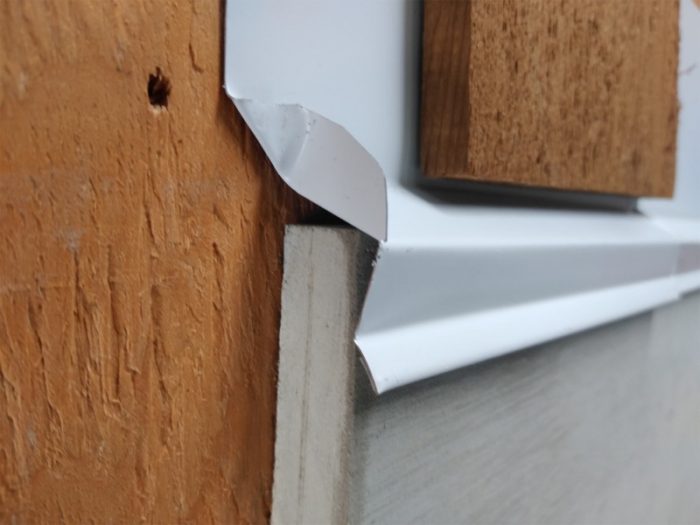
An end dam is an upturned fold that blocks water from running off the end of the flashing and directs it off the face. It also guides siding installers to leave a gap between the siding course and the top of the flashing. It takes a little more folding to bend a 3/8-in.- to 1/2-in.-tall upturned leg to block water rolling off the end of the flashing. On the downside, the end-dam profile leaves the same open triangle gap between the cap-leg slope and the top of the trim.

Drip cap with end dam and end closure.
A modified end dam on a drip cap has an extra tab leg on the end dam that covers down over the end of the trim board.

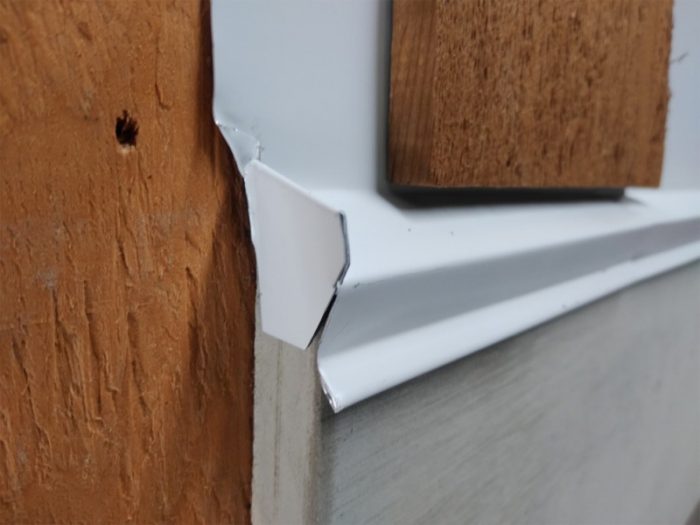
A modification to the end dam closes the gap. Just leave an extended end-dam leg and fold it down to cover the end of the trim. It takes some practice to bend and trim an end dam with a closure, so try it out with small pieces of metal before cutting a full cap flashing.


RELATED ARTICLES

  • Adding Head Flashing
  • Making Head Flashing
  • Drip Cap Design and Installation
  • Soldering Copper Cap Flashing
  • Using a Sheet-Metal Brake
Previous: How To Trim a New Exterior Door Next: How to Bend Custom Cap Flashing

Guide

Siding & Exterior Trim

Chapter

Installing Exterior Trim

Sign up for eletters today and get the latest how-to from Fine Homebuilding, plus special offers.

Signing you up...

This site is protected by reCAPTCHA and the Google Privacy Policy and Terms of Service apply.
See all newsletters
See all newsletters

Log in or create an account to post a comment.

Sign up Log in

Become a member and get full access to FineHomebuilding.com

Siding & Exterior Trim

Siding & Exterior Trim

Trusted, comprehensive guidance from the pros for choosing, installing, and repairing siding and exterior trim

View Project Guide

View All Project Guides »

Become a member and get unlimited site access, including the Siding & Exterior Trim Project Guide.

Start Free Trial

Choosing Siding
  • Materials
  • Design Options
Installing Siding
  • Siding Basics
  • Lap Siding
  • Shingle Siding
  • Board & Batten
  • Fiber Cement and Composite Siding
  • Vinyl Siding
  • Masonry Claddings
Choosing Exterior Trim
  • Trim Materials
  • Trim Design
Installing Exterior Trim
  • Trim Basics
  • Roof Eaves Trim
  • Corner Boards
  • Corbels & Brackets
  • Window & Door Trim
Repairing Siding & Trim
  • Trim Repairs
  • Siding Repairs

Fine Home Building

Newsletter Sign-up

  • Fine Homebuilding

    Home building tips, offers, and expert advice in your inbox.

  • Green Building Advisor

    Building science and energy efficiency advice, plus special offers, in your inbox.

  • Old House Journal

    Repair, renovation, and restoration tips, plus special offers, in your inbox.

Signing you up...

This site is protected by reCAPTCHA and the Google Privacy Policy and Terms of Service apply.
See all newsletters

Follow

  • Fine Homebuilding

    Dig into cutting-edge approaches and decades of proven solutions with total access to our experts and tradespeople.

    Start Free Trial Now
    • Facebook
    • Instagram
    • X
    • LinkedIn
  • GBA Prime

    Get instant access to the latest developments in green building, research, and reports from the field.

    Start Free Trial Now
    • Facebook
    • YouTube
  • Old House Journal

    Learn how to restore, repair, update, and decorate your home.

    Subscribe Now
    • Facebook
    • Instagram
    • X

Membership & Magazine

  • Online Archive
  • Start Free Trial
  • Magazine Subscription
  • Magazine Renewal
  • Gift a Subscription
  • Customer Support
  • Privacy Preferences
  • About
  • Contact
  • Advertise
  • Careers
  • Terms of Use
  • Site Map
  • Do not sell or share my information
  • Privacy Policy
  • Accessibility
  • California Privacy Rights

© 2025 Active Interest Media. All rights reserved.

Fine Homebuilding receives a commission for items purchased through links on this site, including Amazon Associates and other affiliate advertising programs.

  • Home Group
  • Antique Trader
  • Arts & Crafts Homes
  • Bank Note Reporter
  • Cabin Life
  • Cuisine at Home
  • Fine Gardening
  • Fine Woodworking
  • Green Building Advisor
  • Garden Gate
  • Horticulture
  • Keep Craft Alive
  • Log Home Living
  • Military Trader/Vehicles
  • Numismatic News
  • Numismaster
  • Old Cars Weekly
  • Old House Journal
  • Period Homes
  • Popular Woodworking
  • Script
  • ShopNotes
  • Sports Collectors Digest
  • Threads
  • Timber Home Living
  • Traditional Building
  • Woodsmith
  • World Coin News
  • Writer's Digest
Active Interest Media logo
X
X
This is a dialog window which overlays the main content of the page. The modal window is a 'site map' of the most critical areas of the site. Pressing the Escape (ESC) button will close the modal and bring you back to where you were on the page.

Main Menu

  • How-To
  • Design
  • Tools & Materials
  • Video
  • Blogs
  • Forum
  • Project Guides
  • Reader Projects
  • Magazine
  • Members
  • FHB House

Podcasts

  • FHB Podcast
  • ProTalk

Webinars

  • Upcoming and On-Demand

Podcasts

  • FHB Podcast
  • ProTalk

Webinars

  • Upcoming and On-Demand

Popular Topics

  • Kitchens
  • Business
  • Bedrooms
  • Roofs
  • Architecture and Design
  • Green Building
  • Decks
  • Framing
  • Safety
  • Remodeling
  • Bathrooms
  • Windows
  • Tilework
  • Ceilings
  • HVAC

Magazine

  • Current Issue
  • Past Issues
  • Magazine Index
  • Subscribe
  • Online Archive
  • Author Guidelines

All Access

  • Member Home
  • Start Free Trial
  • Gift Membership

Online Learning

  • Courses
  • Project Guides
  • Reader Projects
  • Podcast

More

  • FHB Ambassadors
  • FHB House
  • Customer Support

Account

  • Log In
  • Join

Newsletter

Get home building tips, offers, and expert advice in your inbox

Signing you up...

This site is protected by reCAPTCHA and the Google Privacy Policy and Terms of Service apply.
See all newsletters
See all newsletters

Follow

  • X
  • YouTube
  • instagram
  • facebook
  • pinterest
  • Tiktok

Join All Access

Become a member and get instant access to thousands of videos, how-tos, tool reviews, and design features.

Start Your Free Trial

Subscribe

FHB Magazine

Start your subscription today and save up to 81%

Subscribe

We hope you’ve enjoyed your free articles. To keep reading, become a member today.

Get complete site access to expert advice, how-to videos, Code Check, and more, plus the print magazine.

Start your FREE trial

Already a member? Log in

Privacy Policy Update

We use cookies, pixels, script and other tracking technologies to analyze and improve our service, to improve and personalize content, and for advertising to you. We also share information about your use of our site with third-party social media, advertising and analytics partners. You can view our Privacy Policy here and our Terms of Use here.

Cookies

Analytics

These cookies help us track site metrics to improve our sites and provide a better user experience.

Advertising/Social Media

These cookies are used to serve advertisements aligned with your interests.

Essential

These cookies are required to provide basic functions like page navigation and access to secure areas of the website.

Delete My Data

Delete all cookies and associated data