Podcast 402: Plugging an Unused Chimney, Heating Cables for Ice Dams, and Air-Sealing a Minnesota Mansion
Rob, Patrick, and Kiley hear from listeners about TikTok, LED lights, and Houston geography before taking questions about sealing a leaky chimney, improving the efficiency of a big old house, and fixing a hole where the rain gets in.
Follow the Fine Homebuilding Podcast on your favorite app. Subscribe now and don’t miss an episode:
 |
 |
Help us make better episodes and enter for a chance to win an FHB Podcast T-shirt:
www.finehomebuilding.com/podcastsurvey
Larry likes the FHB Tik Tok video he saw. Owen wishes the FHB website specified the age of content and asks about plugging an unused chimney. Adam shares an idea for whole-house comfort and sets us straight on Houston’s climate and geography. Suzanne has a few thoughts on LED lighting. Jon needs help with his clients’ ice dams. Brennan asks about energy updates for his old mansion. Sam wants to seal a hole in his brick house.
Editor Updates:
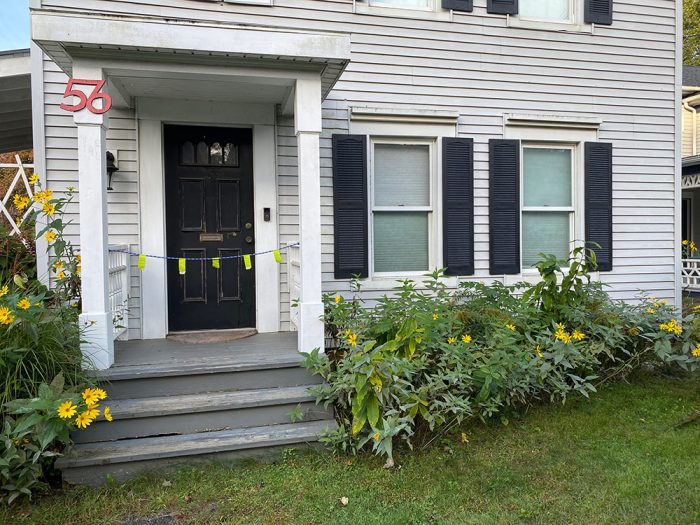
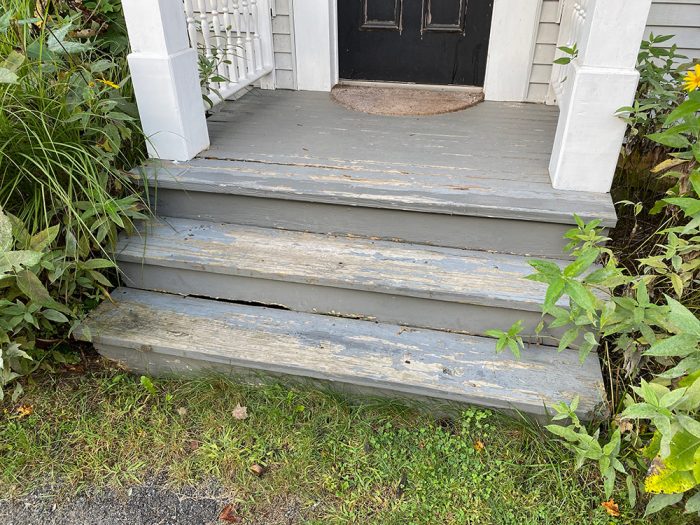
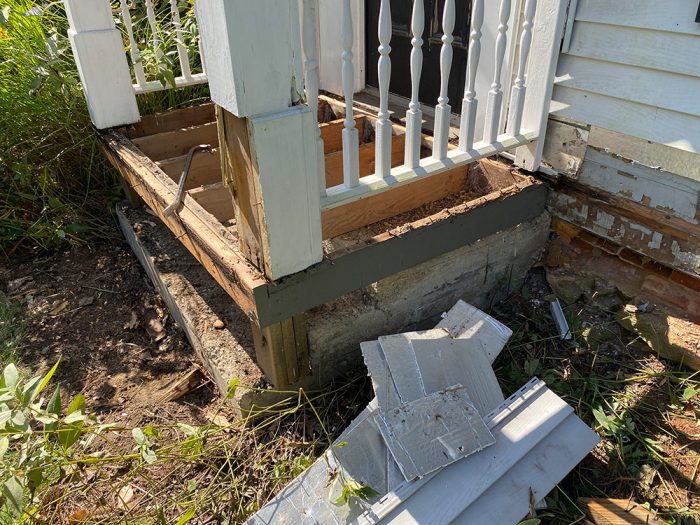
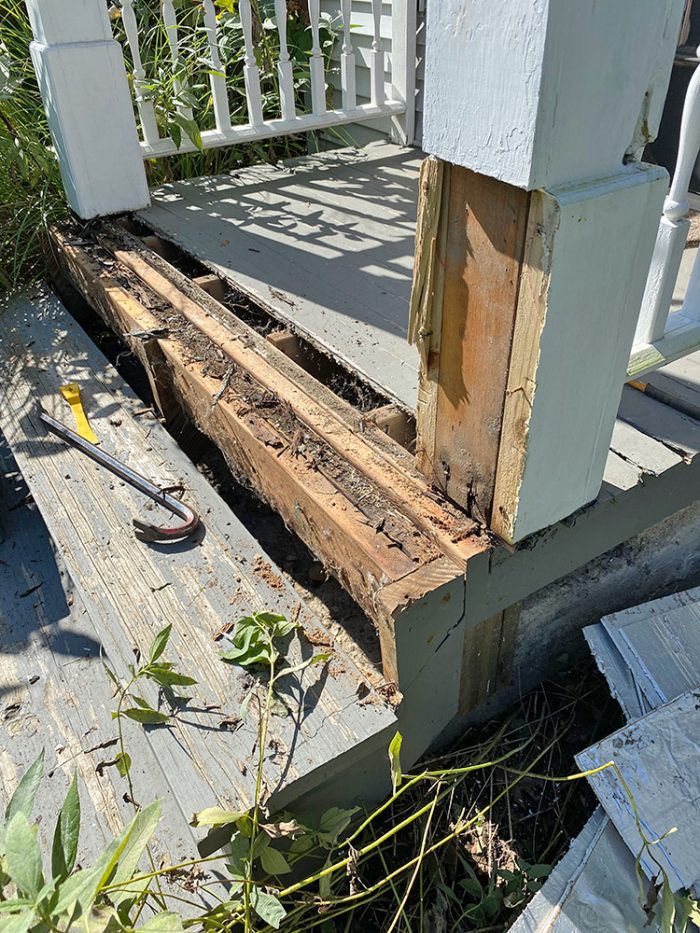
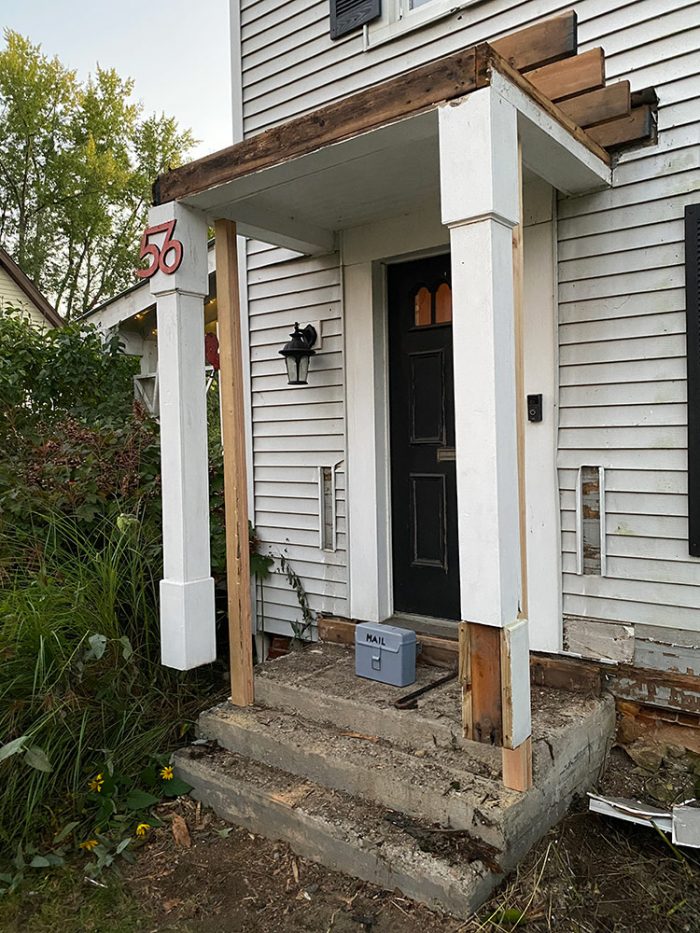
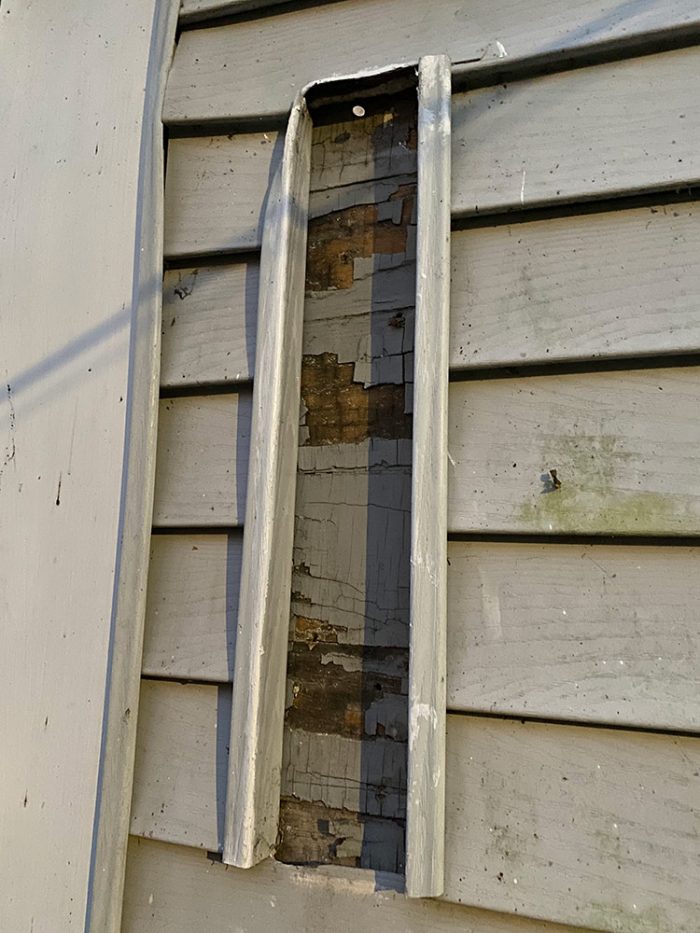
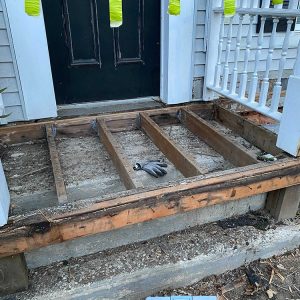
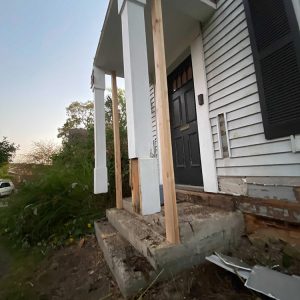
- Rob’s front porch
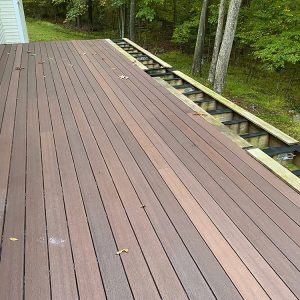
- Jeff’s deck
- Kiley’s basement air-sealing
 |
 |
 |
 |
 |
 |
 |
 |
 |
Listener Feedback 1:
Larry from Evanston, IL writes: Hey podcast gurus, Guess what showed up on my TikTok FYP page? FHB!!! I’m surprised it hasn’t been mentioned on the podcast. Not a lot of content yet, but I’ve enjoyed what’s there, especially Patrick’s demo of his top-rated sawhorse.
One minor nit to pick, though. Search results on the website no longer indicate the date of the article. When searching for a tool review, for example, it would be very helpful to know if the review is within the last couple of years, or ten-plus years old. In the latter case, the tool might not even be available anymore, or there may be a newer/better model, so why waste time reading the review? Even the articles themselves no longer indicate the date they were published, only sometimes the issue #. Obviously, this was a deliberate choice, but I’d be interested in the rationale. Love the podcast!
Related Links:
Listener Feedback 2:
Adam writes: FHB team I thought you might get a lively discussion about this ad.
Related Links:
- What’s the Difference: Whole-House Fans vs. Powered Ventilators
- Podcast Episode 145: Do Whole-House Fans Really Work?
Listener Feedback 3:
Suzanne from Chattanooga, Tennessee writes: OMG, listening to podcast 396 prompted me to put down my knitting and email you all. The question Brian posed about can lights led to such a broad discussion about lighting choices and preferences. The market surrounding LED lighting has and is changing so rapidly. There are WAY too many choices to navigate especially if you are a person of taste and highly influenced by the poor choices that others make. One advantage of LEDs is their longevity. I would submit that that is also a disadvantage because your neighbors that have white light LEDs in their porch fixtures and corner lights will never change them, thus eliminating the possibility they could dumbly choose attractive, lower lumen, soft white bulbs.
I recently had my kitchen can lights replaced with LED, soft white, low-profile fixtures. At the same time, I had the electrician install a dimmer. I can adjust the lighting to an acceptable level and I like them well enough. The main reason I did this was because the trim rings on my can fixtures would not snug up to the ceiling any more. Long story short, my husband likes the new lights and increases the dimming level to maximum, which I hate. We battle with it. However, after doing various Google searches, I found a device that I believe will allow me to limit the brightness of the dimmer via an app and Bluetooth capability. I’m sure there are more sophisticated ways to do this but ours is not a “smart home” so I just wanted this one situation to be controlled. The switch I got is a Leviton Dimmer/Timer with Bluetooth.
Also, just for the record, I agree with Kiley about overhead lighting, except in the kitchen. And, don’t get me started on the awful new LED street lights that are replacing the nice orange sodium street lights in our lovely neighborhood. It looks like a used car lot at night! I have read that they can be dimmed but I can’t figure out how to get up there! Thanks, and keep up the good work!
Related Links:
Listener Feedback 4:
Adam formerly from Houston currently from Chittenango writes: Hello FHB Podcast crew!Listening to episode #394 where you talked about Bee’s new home build in Houston as well John’s question about hurricane country in Florida emphasized again just how northern focused the podcast panel is. To start with, Houston is Gulf Coast hurricane country the same as Mississippi and Louisiana. They have similar wind speed requirements when building. To make it worse, Houston is also flatter than a pancake. So, when building in Houston or the surrounding area, you need to assume that your house will flood unless you elevate it. 15 years ago some areas of Houston were considered more desirable than others because “they didn’t flood. “The Memorial Day Storm of 2015 and others put an end to that. In a 9-hour period a single storm dropped 162 billion gallons of water on Houston. That is 1 foot of water in some areas. When that much water drops on a flat plane it floods everything as there is nowhere for it to go. During these types of storms, it is unfortunately common for a house “that has never flooded” to end up with waist deep water inside if it is on a slab foundation.
So, any building on a slab in Houston should be designed not just to withstand the extreme humidity but also to either be elevated above ground level (such as post and beam foundation) or designed to survive soaking and drying. This is one reason that ground floors in the Houston area are frequently wall to wall tile. Since Bee’s house is brick, we know that it probably is on a slab with a brick ledge, so if you have a water-tight layer protecting the inside of the house, you have to ensure that the flood waters won’t cause the walls to cave in due to the pressure, or that the water can rush in some other way fast enough to equalize the pressure before the walls collapse.
Additionally, Houston is on expansive clay soil so any foundation at all should have bell bottom piers 12-15 feet deep to prevent the foundation from breaking over time. The clay soil moves so much that during droughts the soil shrinking breaks public water mains.
Related Links:
Question 1: Is there a way to install a removable air seal or plug in the aluminum chimney insert of my fireplace?
Owen writes: Hi guys, Really enjoy the show! Sometimes the headline for the show has a topic that is interesting to me but I don’t have time to listen to all of it in one sitting. Would it be possible to add chapters to the video with each chapter title referencing the question? Or timestamps in the notes? This would really help people who are stumbling upon an archived episode as well jump to the topic of interest to them.
I also have one question. I have a natural gas fireplace insert installed in a former wood burning chimney (house built in 1968, Ottawa, Ontario, Canada). This fireplace was one of the main sources of air infiltration during a recent blower door test. We have had the gas turned off since we bought the house and don’t plan on using it except in some kind of electrical-grid down situation mid-winter. Is there a way to install a removable air-seal or plug in the aluminum chimney insert? Either accessible from the gas fireplace insert or worst case the chimney top?
I realize this comes with risk of accidental CO poisoning should someone turn it on so we’d install a lock out on the gas valve. My guess is there is also a big unsealed gap between the original chimney and the insert liner one as well, are there some high temp sealants that can be used here? Thank you!
Related Link:
Question 2: Do you have any recommendations for deicers or suggestion on how to deal with the ice damming problem of a recently reroofed addition?
Jon writes: Good day FHB podcast crew. Firstly, I really enjoy listening to your podcast and listen to it pretty well every day. I’m also an FHB subscriber and love the content. I’ve only been a subscriber for a short time but have already learned so much as a young builder so thank you for the work you guy and gals do!
I have an ice damming problem at a client’s addition that was added on to the house around 15 years ago. They just got the addition reroofed with shingles two years ago and the ice-damming problems started the winter after. They never had any issues before. I suggested roof vents but she didn’t want that—she wants to use a deicer cable to run along the eave and through the eavestrough and down the gutter. I also suggested cutting a couple holes in the attic space from the main house to the attic space in the addition so at least it could vent out through those holes and up through the vents in the main roof. By doing this I could also see if there is enough insulation in the addition as well. Unfortunately, it’s a vaulted ceiling so even if it wasn’t insulated enough, I’m not even sure if I could fit in there to insulate the addition ceiling to the proper r value. Also, would you have any stand out brands of deicers out there or are they all similar. If you have a better solution to this problem that would be just fantastic!! Thanks for the work you do!
Related Links:
Question 3: What’s the best way to insulate and air seal my 1880’s home in Minnesota?
Brennan in Rochester, MN writes: Hey FHB crew, I discovered your podcast about a year ago, fortuitously a few months before I bought an 1880’s house that was added onto in 1920 and again in 2012. We live in Rochester, MN. It’s cold here… I have come to really enjoy the questions on the old houses because I feel like I can relate to each and every one!
Our house was designed and built to look like a southern plantation by a well-known local architect to help a vascular surgeon from Kentucky feel more “at home” when he moved up to Rochester, MN to marry one of the Mayo Brothers daughters (founders of The Mayo Clinic).
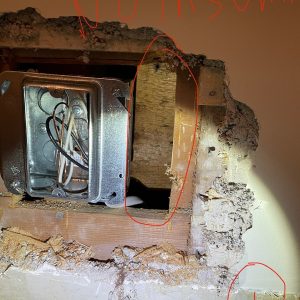
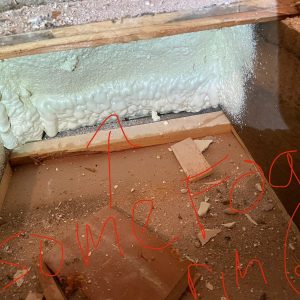
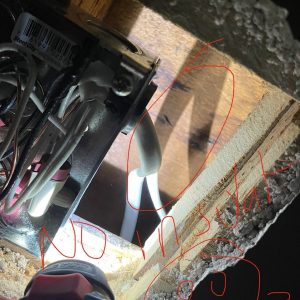
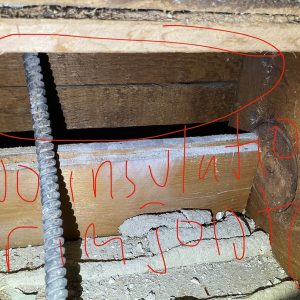
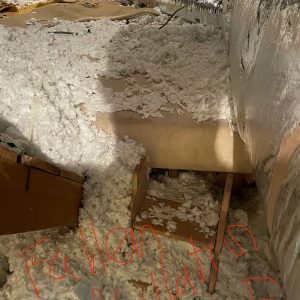
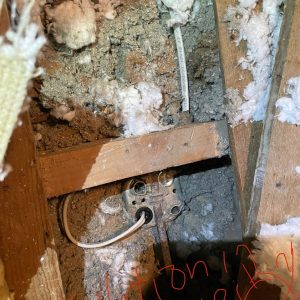
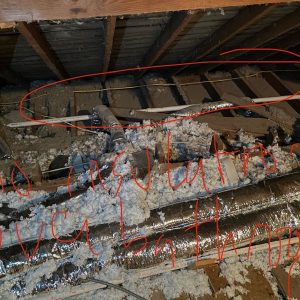
When adding a few outlets, we discovered that several of our exterior walls have no insulation. (Photos 1/3) Outside is a steel siding, and it’s unclear to me what’s between the siding and the sheathing from an air- or moisture-barrier standpoint. Based on what I can tell the sheathing is Shiplap 1×12 or so. Appears to be original to the 1920 remodel but hard to know for sure. I don’t believe there is any exterior insulation. Our exterior walls are 2×4 framed. Looking into the floors, the rim joists (I think that’s the correct term) are not insulated except a few places where the first-floor ceiling was replaced, so there is spray foam in a few areas. (Photos 2/4)
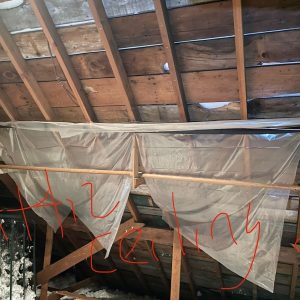
To cap things off, after we closed on the house, I discovered an attic we didn’t know we had over our bedroom with a 10’ tray ceiling. The rafters are 2×4, with loose 1x wood over the top and some form of membrane then shingles. (Photo 8) Previously they had stapled poly to the rafters and filled with cellulose for insulation, however it has now since all fallen down. (Photo 5) We discovered minimal insulation over the tray ceiling over our bedroom which is 2×6 covered in 1x lumber. (Photo 6) Over the new bathroom remodel drywall ceiling, they have NO insulation. (Photo 7) I can also see daylight where the roof meets the wall—not sure if that should be sealed or not?
I also found a chase for pipes and wires that runs from attic to basement, I can’t imagine that’s a good idea. We have radiators for heat, and a secondary forced air system that supplements the radiant. Also have high velocity AC in the summer. We never felt like our house actually got cold with AC running about 24/7 all summer, but it wasn’t horrible (our bill for electric was though). Most of our time since we closed on the house, has been spent in the new half of the house with radiant in-floor heat so it was comfortable even in February, so I’m unsure how “comfortable” the side of the house with insulation is in the winter?
Now after a million things here are my questions:
1- I feel like air-sealing is probably the top priority. I’m unsure what’s my actual process for that. Do I just go around with some cans of spray foam and seal around any penetrations starting in the attic?
2- I have concerns (not sure if legitimate) that insulating the walls may reduce the drying potential of the cavities. There is no rot in them as far as I can see anywhere so it’s either that there is no water getting in or it’s drying quickly. Is it risky to insulate without knowing how tight the outside of the house is? It’s a 3 story with only about a 14” or so overhang. We do have gutters.
3- What’s the best way to insulate the rim joists? While I have the subfloor off seems like my only opportunity to do this before we lay new hardwood. Do I buy one of those froth packs and get after it? Hire it out? Stuff rockwool in there? Stuff it with one of the 10,000 walnuts that the squirrels have brought into our house over the last century?
4- What the best way to insulate our tray ceiling? I was thinking about rock wool in that it won’t rot and environmental impact. Do i need to put any form of barrier over this? We have a plaster ceiling and theoretically and penetrations should be sealed up before i put insulation down.
 |
 |
 |
 |
 |
 |
 |
 |
5- does the same insulation for #4 apply over the drywall over the bathroom that has no insulation?
I’m worried about hiring an insulating contractor and having them just want to spray foam everything without considering whether that’s the correct thing to do?
Do I get a full energy audit first and then tackle things in line of importance? Is there even a point to a blower door test when I’m sure our house is leaky as a sieve? Academically it would be fun to see how much it could improve… how do I find a good energy audit company?
I have a million other questions but I think these ones seem most pressing while I have heard you guys talk about the importance of air sealing, I guess I’m not sure how to actually do it.
Thanks for entertainment and information. I hope you can help get me on the right path…
Related Links:
Question 4: What’s causing the moisture damage in the drywall by my refrigerant line and how do I fix it?
Sam in San Marcos, TX writes: Hello Fine Homebuilding Podcast! My wife and I recently bought our first home and I’ve been renovating it myself. While working on one room, I recently opened up a problem spot in the wall to see what was going on and need some advice. For context later, I live in San Marcos, TX which is climate zone 2.
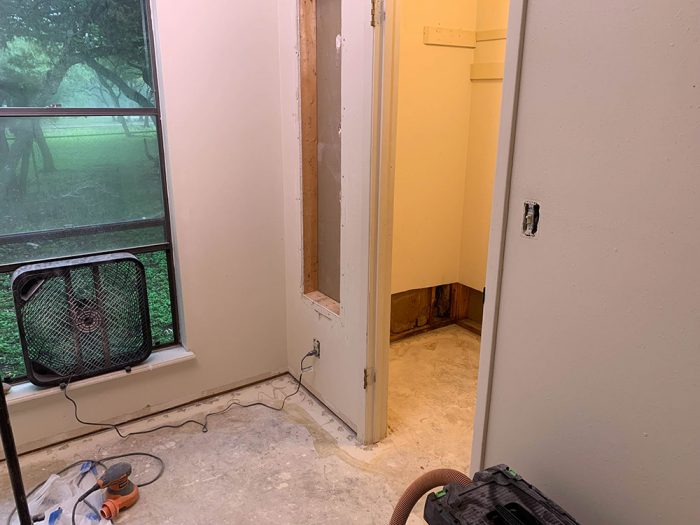
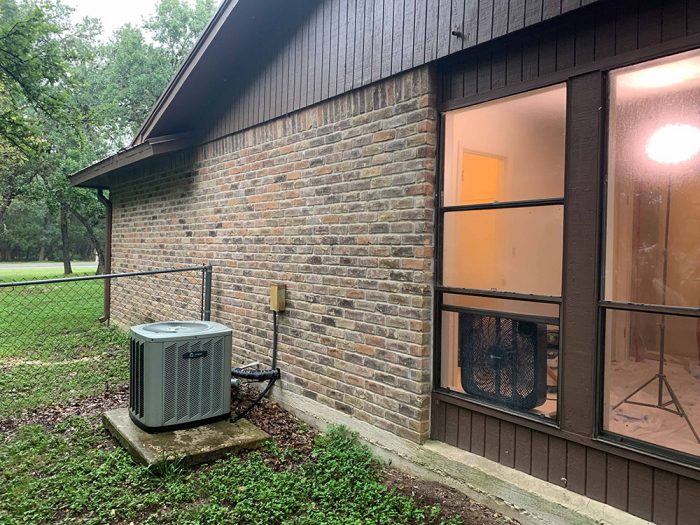
There was a section of the wall where the drywall appeared to have water damage at the bottom of the wall. This is an exterior facing wall. Before purchase, our home inspector thought this wasn’t an actively wet area and thought it was just an area where there had previously been water damage from a clogged condensate drain line. This was because we could tell the A/C used to sit in the attic above this area but had since been moved to a closet nearby.
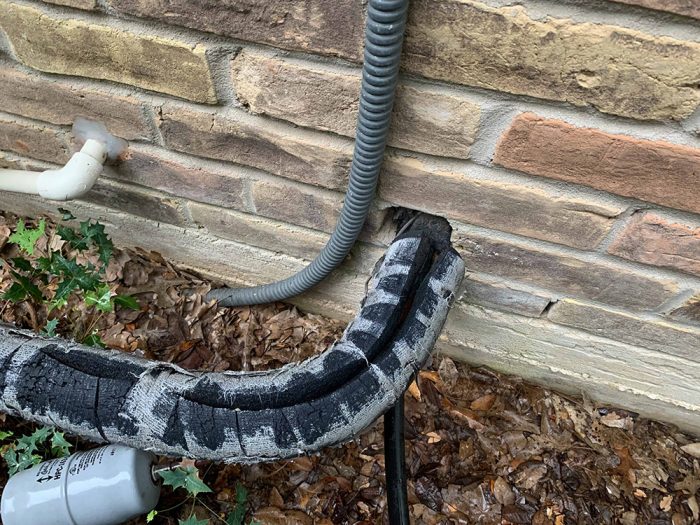
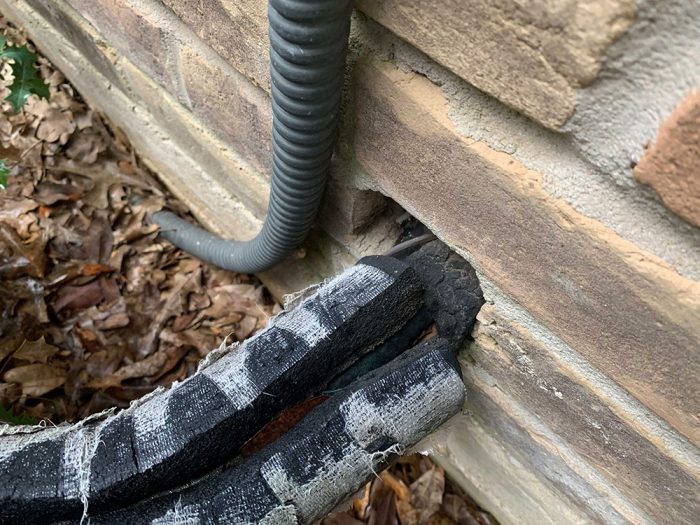
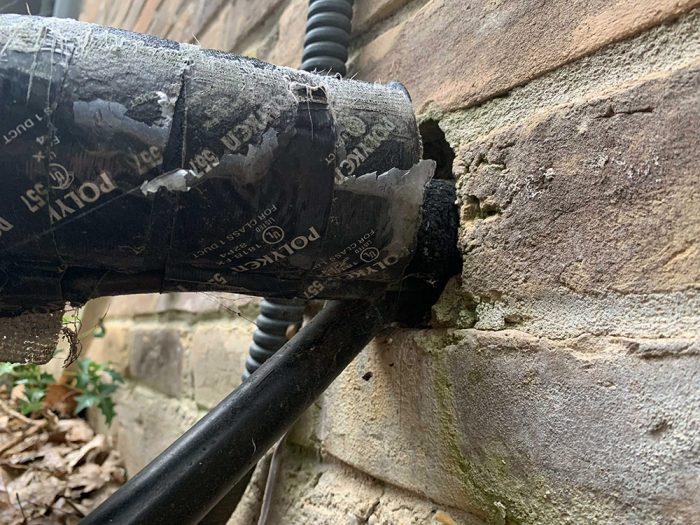
So, I cut out the drywall around this area, expecting to just need to patch in some new drywall. Instead, I found that it was still wet in the wall and that the problem was still active. Inside the wall at this spot is where the refrigerant line for the A/C enters and exits the house. I immediately noticed that this exterior penetration was not sealed well, and I could see daylight coming through. See the included photos.
 |
 |
 |
 |
 |
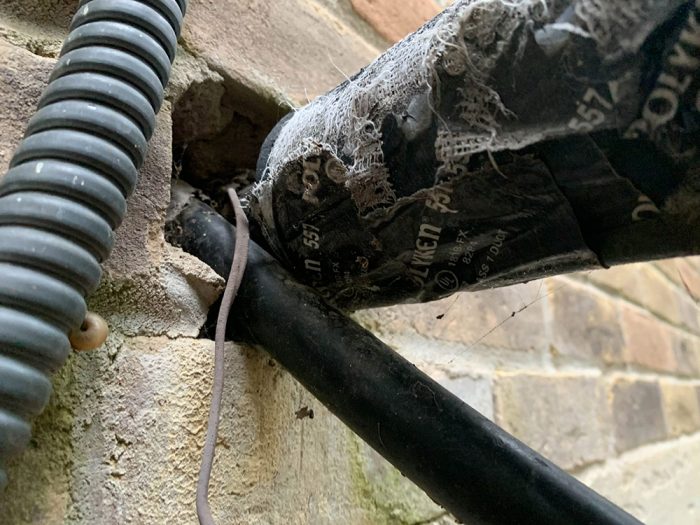 |
My leading theory is that warm moist exterior air is entering through this hole and condensing on the back of the cool drywall during the hot or warm weather (which is most of the year in Texas). If this is the case, then I should be able to fix the problem by sealing the penetration, replacing the insulation that I pulled out around the area, and patching up the drywall. Does this make sense? And what would be the best way to seal the penetration (exterior siding is brick veneer)?
My initial theory was that maybe the refrigerant line wasn’t insulated well and that was the cause of the condensation. After inspecting the pipe insulation around the open part of the wall, it seemed to be well intact. Replacing this insulation would of course be much harder as I’d probably need to open up more of the wall to access it all, so I’m hoping this isn’t the cause. Thoughts here? Also, probably relevant to mention that the framing around this area is definitely water-stained, but it doesn’t seem to be rotted.
Thanks in advance for any advice!
Related Link:
 End Note: Jim Collins, our landscape architect friend, sent this:

From Popular Science January 1963:
Disposing of used engine oil can be a problem. Solution: Dig a hole in the ground with a posthole digger and fill it with fine gravel. Then pour in the oil. It will be gone before your next oil change. Cover the spot with soil.
Check out our latest Project Guide: Siding & Exterior Trim!
Check out our new 2021 FHB Houses:
Visit the Taunton Store • Magazine Index • Online Archive • Our First Issues • All Access
Help us make better episodes and enter for a chance to win an FHB Podcast T-shirt: www.finehomebuilding.com/podcastsurvey

If you have any questions you would like us to dig into for a future show, shoot an email our way: [email protected].
If we use your question we’ll send you a FHB Podcast sticker!
FHB Podcast T-shirts!
Represent your favorite podcast! Available in several styles and colors. Made from 100% cotton. Find the Podcast t-shirt and more cool products in the Fine Homebuilding Store.
This episode of the Fine Homebuilding podcast is brought to you by Loctite’s TITE FOAM.
The best contractors take weatherization seriously. When they need to seal a gap that’s too small for insulation but big enough to create a draft, they reach for Loctite TITE FOAM. With products for everything from small cracks to the biggest gaps, there’s a TITE FOAM product for every job, including a low- pressure expansion product designed to seal the rough opening around windows and doors. The high-density foam forms a tenacious bond to most common building materials, stays flexible to prevent cracking when materials move, and keeps air, moisture, and pests out of the house. Contractors who care about energy efficiency, comfort, and durability choose TITE FOAM. Visit Loctiteproducts.com for more information
Fine Homebuilding podcast listeners can now get 20% off anything in the Taunton store, including Insulate & Weatherize.
Use the discount code FHBPODCAST to take advantage of this special offer.
We hope you will take advantage of a great offer for our podcast listeners: A special 20% off the discounted rate to subscribe to the Fine Homebuilding print magazine. That link goes to finehomebuilding.com/podoffer.
The show is driven by our listeners, so please subscribe and rate us on iTunes or Google Play, and if you have any questions you would like us to dig into for a future show, shoot an email our way: [email protected]. Also, be sure to follow Fine Homebuilding on Instagram, and “like” us on Facebook. Note that you can watch the show above, or on YouTube at the Fine Homebuilding YouTube Channel.
The Fine Homebuilding Podcast embodies Fine Homebuilding magazine’s commitment to the preservation of craftsmanship and the advancement of home performance in residential construction. The show is an informal but vigorous conversation about the techniques and principles that allow listeners to master their design and building challenges.
Other related links
-
- All FHB podcast show notes: FineHomebuilding.com/podcast.
- #KeepCraftAlive T-shirts and hats support scholarships for building trades students. So order some gear at KeepCraftAlive.org.
- The direct link to the online store is here.
